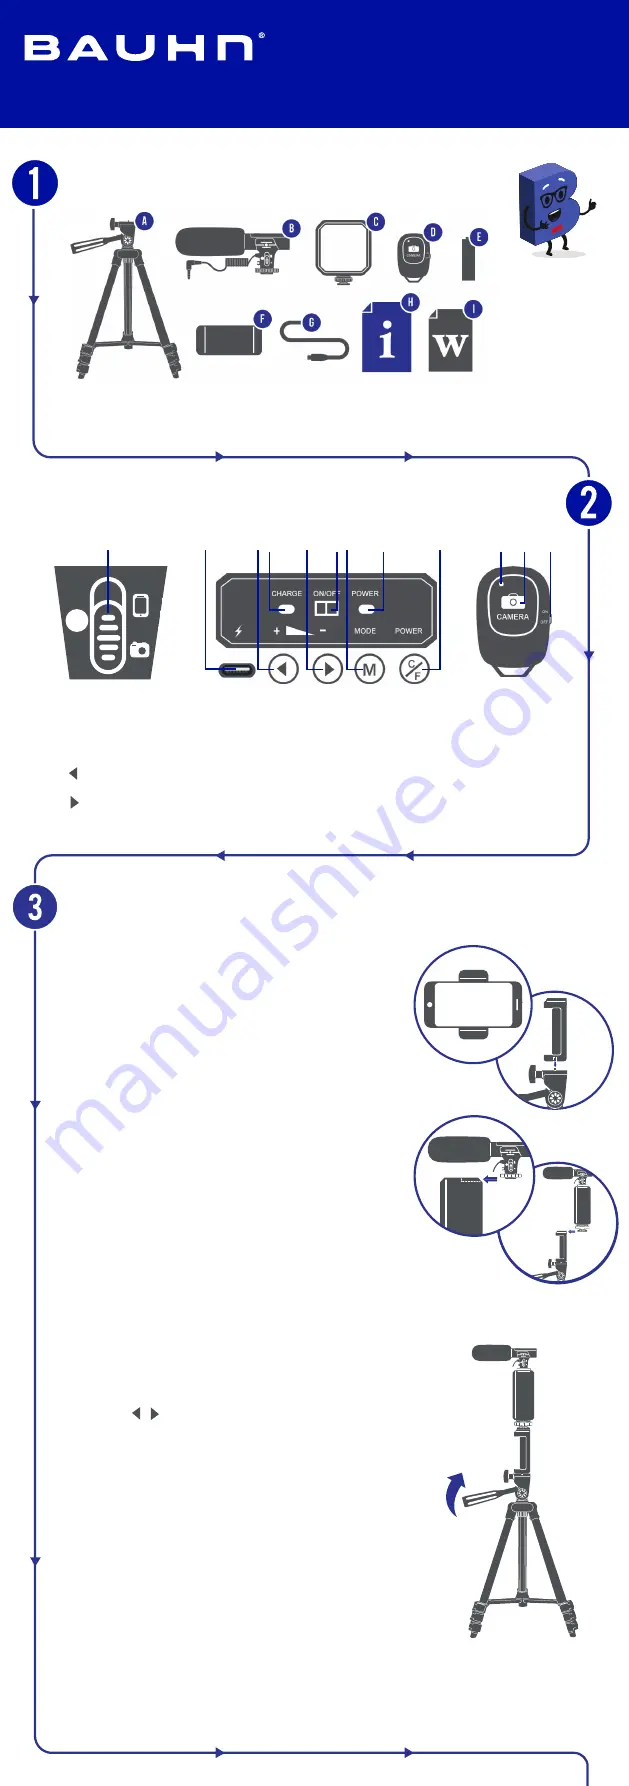
Control and Buttons
Have you got everything?
A. Switch between phone/camera mode
B. USB-C charging port
C. Button: increase brightness
D. Charging LED Indicator
E. Button: decrease brightness
F. On/Off Switch: slide to switch the LED
video light unit on/off
Condenser
Microphone
LED Video Light
Bluetooth
®
Remote
A. Foldable Tripod
B. Condenser Microphone
C. LED Video Light
D. Bluetooth
®
Remote
E. AAA Activ Energy Battery
F. Phone Holder
G. USB-C Charging Cable
H. User Guide
I. Warranty Certificate
User Guide
Model: APVK-1222
Portable Phone Vlogging Kit
A
B
C D
E
F G
H
I
J K
L
G. Mode Button: change brightness setting
H. Power LED Indicator
I. Power Button: press to turn the light on/off
J. LED Light Indicator
K. Capture Button
L. On/Off Switch: slide to turn the remote on/off
Operation
Setting Up
• Set up the tripod to the desired height using the
adjustment locks.
• Screw the phone holder onto the tripod as illustrated,
ensuring it is securely screwed in.
• Extend the phone holder and slide your phone in. The
phone holder will automatically lock and hold you phone
in place.
• Slide the condenser microphone into the LED video light
to securely lock it in place.
• Once the condenser microphone and LED video light are
connected, slide it onto the phone holder as illustrated,
ensuring it is securely locked in.
• Use the handle on the tripod to adjust the angle of your
photo/video.
Using The Condenser Microphone
• Connect the condenser microphones 3.5mm audio cable
to your phones earphone port.
• Slide to switch up for phone mode. Slide the switch down
for camera mode (you camera must support the 3.5mm
MIC input.
• Note: you will need to buy a lighting to 3.5mm adaptor for
iOS smart phones that do not have an earphone port.
Using The LED Video Light
• Slide the On/Off switch to On to turn the LED video light
unit on. The power LED indicator will light up blue.
• Press the Power button to turn the light on/off. The power
LED indicator will turn off once the video light is on. Press
again to turn off the light and the power LED indicator will
light up blue again.
• Use the / buttons to adjust the brightness level.
• Press the Mode button to change brightness settings.
• Slide the On/Off switch to Off to turn the LED video light
unit off. The power LED indicator will also turn off.
Using The Remote
• Slide the On/Off switch to turn the remote on until the LED
indicator starts flashing.
• Turn on your phones Bluetooth
®
and select “SelfieCom” from
the list of found devices. Once connected, the LED indicator
will stop flashing. (The remote will automatically turn off after 5
minutes if not paired).
• Press the capture button to remotely take a picture.
• Slide the On/Off switch again to turn the remote off.
Charging
• LED Video Light:
Connect the supplied USB-C charging cable to
the USB-C port on the LED video light. The charging LED indicator
will light up red. Once fully charged, the charging LED indicator will
light up green.
• Remote:
Connect the supplied USB-C charging cable to the USB-C
port on the remote. The charging LED indicator will light up red.
Once fully charged, the charging LED indicator will turn off.


