Bartscher FW500US, Manual
The Bartscher FW500US is a versatile catering appliance that requires proper understanding to unleash its full potential. Unlock the secrets of this dynamic food warmer with our user-friendly manual, available for free download at manualshive.com. Master your FW500US and elevate your culinary game effortlessly.
Share
Download


Reviews:
No comments
Related manuals for FW500US

3613DB
Brand: HIKOKI Pages: 20

RDP-AG67
Brand: Raider Pages: 77

WX803
Brand: Worx Pages: 132

AD 48
Brand: Adler Europe Pages: 48

Vulcan Concept VZS125D
Brand: PROFIX Pages: 60
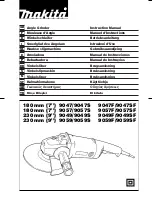
9047
Brand: Makita Pages: 52

600656
Brand: Electrolux Pages: 12

G 10SR3
Brand: Hitachi Koki Pages: 92

VZS125F
Brand: Vulcan Concept Pages: 60

SDG10P Series
Brand: Sioux Tools Pages: 27

98107
Brand: Chicago Electric Pages: 20

AG 100-7
Brand: Hilti Pages: 17

DS-150 KS
Brand: DWT Pages: 64

DAG 230-D
Brand: Hilti Pages: 20

DSAN4-T
Brand: Jet Pages: 9

7015-11 series
Brand: ARO Pages: 7

86738
Brand: Parkside Pages: 46

331789 1907
Brand: Parkside Pages: 96


