background image


Installation and operation 

14 / 32   


190080 

EN 


Power supply connection 

•  Verify if technical data of the appliance (see rating plate) correspond with the 

local electric power grid specification. 

•  Connect the appliance to a single, properly grounded mains socket with 

protective contact. Do not connect the appliance to a multi-socket. 

•  The power cord should be laid in a way preventing anyone from threading on it 

or tripping against it. 


•  Do not use the appliance with an external timer or remote control. 


5.2


Operation 


Important indications 

•  Fill the water tank solely with fresh potable water. 
•  Never fill the water tank with warm/hot water, milk nor any other liquid. 
•  Never fill the coffee container (ground coffee container) any instant coffee, 

cocoa nor any other powder mixtures. The appliance might get damaged. 

•  Never fill the coffee container with specially prepared coffee beans (e.g. coated 

with cocoa or sugar), as this might cause damage to the appliance. 

•  The coffee container may be filled only with roasted coffee beans. Rice, soy 

beans, cocoa beans, nuts, sugar, spices, etc., are prohibited. 

•  Always store coffee beans in dry, shaded place. Humid beans may damage the 

grinder. 

•  Do not keep coffee beans in the coffee container if the appliance is not to be 

used for a longer period of time. Coffee beans may attract humidity and clog the 
grinder. 


Appliance Start-up 

1.  Plug the appliance into a suitable single socket. 

2.   Press the ON/OFF switch at the left side of the control panel to activate the 

appliance. 

With first use, the coffee machine starts with heating-up and cleaning. This helps 
the appliance to achieve better working conditions. This process cannot be omitted. 


NOTE! Risk of scalding! 

During the cleaning process, hot water flows from the coffee outlet onto 
the drip tray. 

Avoid contact with the outflowing hot water. 

Summary of Contents for Easy Black 250

Page 1: ...Easy Black 250 190080...

Page 2: ...scher GmbH Franz Kleine Str 28 D 33154 Salzkotten Germany Phone 49 5258 971 0 Fax 49 5258 971 120 Technical Support Hotline 49 5258 971 197 www bartscher com Version 1 0 Date of preparation 2021 03 18...

Page 3: ...on of Conformity 7 3 Transport Packaging and Storage 8 3 1 Delivery Check 8 3 2 Packaging 8 3 3 Storage 8 4 Technical Data 9 4 1 Technical Specifications 9 4 2 List of Components of the Appliance 11 4...

Page 4: ...included in this manual is a prerequisite for safe and proper handling of the appliance Additionally accident prevention occupational health and safety and legal regulations in force in the area the...

Page 5: ...nt Too high a mains voltage or incorrect installation may cause electric shock The appliance may be connected only if data on the rating plate correspond with the mains voltage To avoid short circuit...

Page 6: ...hazard clean the appliance regularly Do not cover the appliance with e g aluminium foil or cloths Use the appliance only with materials designated to this end and with correct temperature settings Mat...

Page 7: ...children with limited physical sensory or mental capabilities nor by persons with limited experience and or limited knowledge Children should be supervised to ensure that they are not playing with or...

Page 8: ...dered to be an unintended use The following is an intended use Preparation of various types of coffee beverages for example coffee cappuccino espresso etc 1 4 Unintended Use An unintended use may lead...

Page 9: ...troduced by the user usage of unapproved spare parts We reserve the right to introduce technical modifications to the product intended for improvement of the appliance and its performance 2 2 Copyrigh...

Page 10: ...used to store the appliance when relocating or when shipping the appliance to our service point in the case of any damages The packaging and its elements are made of recyclable materials Particularly...

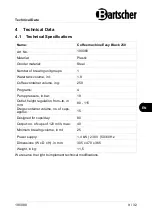
Page 11: ...in l 1 8 Coffee container volume in g 250 Programs 4 Pump pressure in bar 19 Outlet height regulation from to in mm 80 115 Dregs container volume no of cups approx 15 Designed for cups day 80 Output n...

Page 12: ...sages error messages Automatic switch off Grinder conical burr grinder Pressure system piston pressure Indicator light ON OFF Descaling signal Fill level indicator Detachable water tank ON OFF switch...

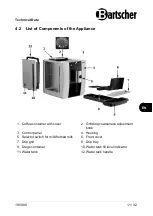
Page 13: ...iance 1 Coffee container with cover 2 Grinding coarseness adjustment knob 3 Control panel 4 Housing 5 Selector switch for milk frothed milk 6 Front cover 7 Drip grid 8 Drip tray 9 Dregs container 10 W...

Page 14: ...rrow button 6 Double cup button left arrow button 7 CAPPUCCINO button 8 COFFEE button 9 ESPRESSO button 10 ON OFF button 4 3 Functions of the Appliance The appliance is designed for preparing various...

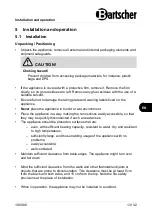
Page 15: ...ment Place the appliance in a way making the connections easily accessible so that they may be quickly disconnected if such a need arises The appliance should be placed on surfaces that are even with...

Page 16: ...ver fill the coffee container with specially prepared coffee beans e g coated with cocoa or sugar as this might cause damage to the appliance The coffee container may be filled only with roasted coffe...

Page 17: ...the cleaning process hot water flows from the coffee outlet onto the drip tray Avoid contact with the outflowing hot water Language Setting 1 If needed set the language 2 Press the selection button to...

Page 18: ...pletely set the grinding coarseness to 4 or 5 4 If the ground coffee is dark we recommend the highest coarseness grinding setting 5 If the ground coffee is light we recommend the finest grinding setti...

Page 19: ...button as soon as the display shows the Ready message 3 Press the coffee strength button until the display shows the Caff latte message 4 Press the selection button The coffee preparation is commenced...

Page 20: ...ve the cup when the display shows the Enjoy message Cappuccino Preparation 1 Before starting to prepare coffee set the selector knob to Frothed milk The Ready message will be shown on the display 2 Pr...

Page 21: ...presso 3 Select the beverage strength The appliance is factory set to strong Using the Milk Frother The appliance may be used for preparing frothed milk or hot milk 1 Connect firmly the milk hose with...

Page 22: ...ee strength button when the Use powder is shown on the display to confirm the selection 5 Open the grinder cover 6 Add ground coffee 7 Select the beverage e g Espresso Americano etc 6 Cleaning and Des...

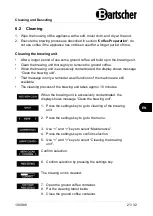
Page 23: ...ws message Clean the brewing unit That message is only a reminder as all functions of the machine are still available The cleaning process of the brewing unit takes approx 10 minutes When the brewing...

Page 24: ...ainer is full the display will show the Empty tray message When the dregs container is reinstalled the Ready message will be shown on the display Cleaning the Milk System 1 Clean the milk system after...

Page 25: ...y each time it is filled with water 3 Then fill the water tank with fresh potable water and reinstall it in the appliance 4 The water tank should always be removed very carefully never let it fall Sho...

Page 26: ...ions concerning safety found on the package of the agent WARNING If accidentally the descaling agent comes into contact with eyes or skin rinse them immediately with fresh water 3 Always execute the d...

Page 27: ...water tank 11 Place a sufficiently large container under the coffee outlet 12 When the first cleaning phase is finished remove the water tank again 13 Empty it and fill with fresh water 14 Re insert t...

Page 28: ...e elapsed since last used The brewing unit is too cold Prepare subsequent cups The coffee flows from the coffee outlet in drops The coffee was ground too finely or the ground coffee is too fine Select...

Page 29: ...re still dregs of coffee in the coffee machine Clean the appliance The Fill with coffee beans message is shown on the display although the coffee container is full In the coffee container there is too...

Page 30: ...and reinstall it in the appliance Fill the water tank The water tank is empty and the beverage preparation functions are not operating Fill the tank with fresh potable water Fill with coffee beans Th...

Page 31: ...liance from the power supply and wait for it to cool down Next restart the appliance Temperature is too low The ambient temperature in installation location is too low Keep the ambient temperature of...

Page 32: ...ppliances must be disposed of and recycled in a correct and environmentally friendly manner You must not dispose of electric appliances with household waste Disconnect the appliance from the power sup...

Reviews: