29
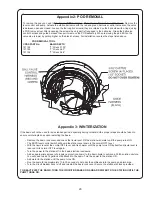
Appendix 2: POD REMOVAL
To remove the pod you need to
Shut power OFF to station
,
Close the isolation valve at the street
. Remove the
level control and pump. Actuate the station ball valve with the red and green ball valve control harness so the valve
is between open and closed. Loosen the four captive screws (they are retained on the back side with o-rings) using
a POD removal tool. After loosening the screws the only part left engaged is the ball valve. Grasp the ball valve
control harness and guide harness then pull to remove the POD assembly. When removing the pod tilt it so the
valve side is lower by pulling higher on the black harness. For installation, reverse the steps listed above.
POD REMOVAL TOOL
CP&S PART No.
BASIN DEPTH
121152
“T” Wrench 100”
121153
“T” Wrench 60”
121154
“T” Wrench 48”
Appendix 3: WINTERIZATION
If the basin will not be used for an extended period, especially during colder months, proper steps should be taken to
ensure uninterrupted use upon restarting the basin.
• Remove the basin rock cover and check the liquid level. Fill the station with water until the pump turns ON.
• The ESPS level control switch will pump the station level down to the normal OFF level.
• With the liquid level at the normal OFF level, add fresh water until the pump turns ON by itself and liquid level is
reduced to its normal OFF level again.
• Turn the power to the station off in the basin electrical enclosure.
• Add an appropriate amount of propylene glycol (non-toxic) to the basin liquid to achieve a 50/50 solution mixture.
You will need to add 15 gallons of antifreeze to the basin. Turn the power to the station ON.
• Add water to the station until the pump turns ON.
• Run the pump for approximately 10 to 30 seconds to help mix the antifreeze into the pump and discharge.
• Turn the circuit breaker back to off and reinstall the basin rock cover. Secure the station with locks provided.
TO REACTIVATE THE BASIN, TURN THE CIRCUIT BREAKER ON AND ADD WATER TO THE STATION UNTIL THE
PUMP TURNS ON.

