background image

6. Important information

Possible cleaning solutions

70 percent isopropyl alcohol

1.6 percent aqueous ammonia

Cidex® (2.4 percent glutaraldehyde solution)

Sodium hypochlorite (bleach) 10 percent

“Green soap” (USP)

0.5 percent Chiorhexidine in 70 percent isopropyl alcohol.

Like Cleansafe® optical cleaning liquid

6.6

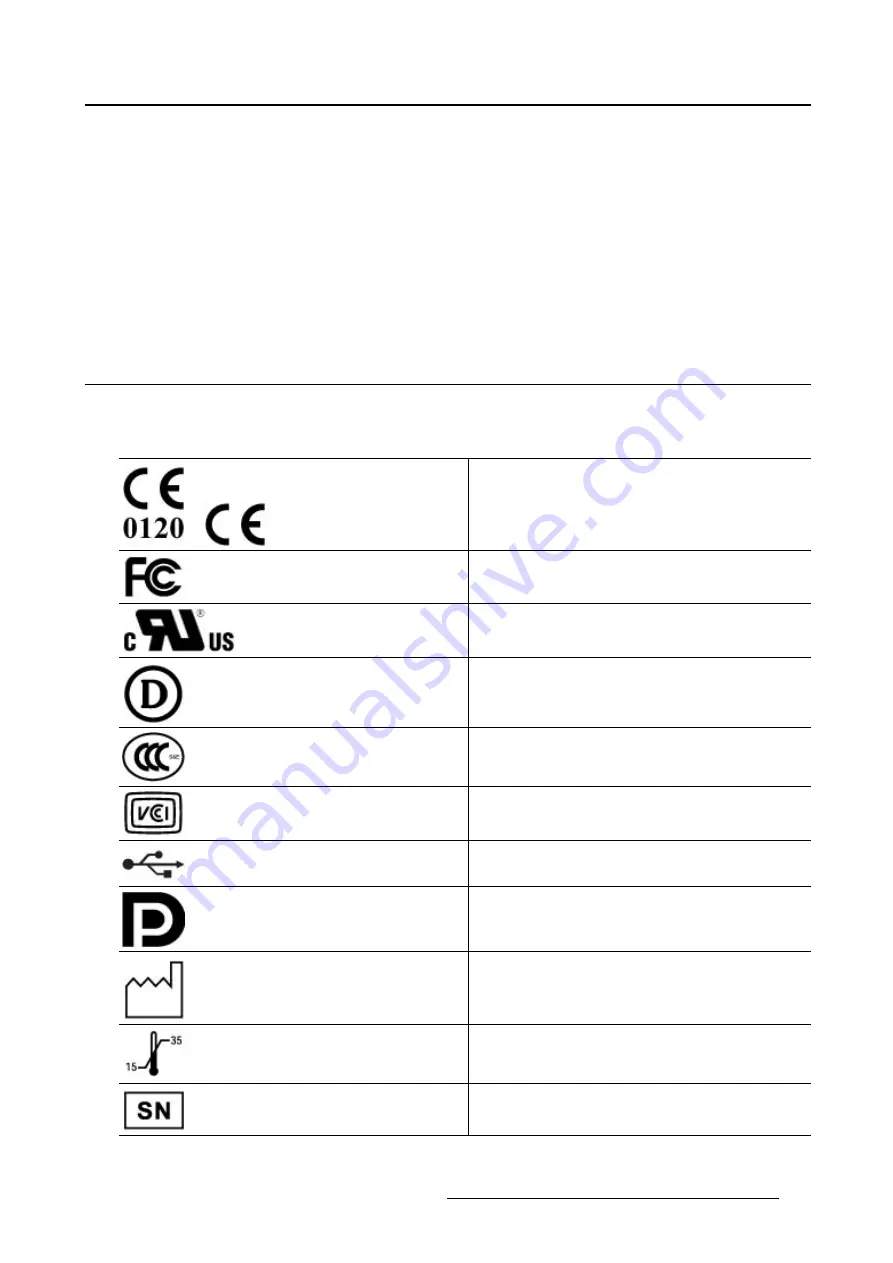
Explanation of symbols

Overview

On the equipment or power supply, you may

fi

nd the following symbols (nonrestrictive list):

or

Indicates compliance to the essential requirements
of the Directive 93/42/EEC

Indicates compliance with Part 15 of the FCC rules
(Class A or Class B)

Indicates the equipment is approved according to
the UL Recognition regulations

Indicates the equipment is approved according to
the UL Demko regulations

Indicates the equipment is approved according
to the CCC regulations

Indicates the equipment is approved according
to the VCCI regulations

Indicates the USB connectors on the equipment

Indicates the DisplayPort connectors on the
equipment

Indicates the manufacturing date

Indicates the temperature limitations for the
equipment to operate within specs

Indicates the equipment serial no.

(451920610993)K5903021 MDSC-2226 01/03/2013

55

Summary of Contents for MDSC-2226

Page 1: ...User Guide MDSC 2226...

Page 2: ......

Page 3: ...MDSC 2226 User Guide 451920610993 K5903021 02 01 03 2013...

Page 4: ...Barco nv President Kennedypark 35 8500 Kortrijk Belgium Phone 32 56 23 32 11 Fax 32 56 26 22 62 Support www barco com esupport Visit us at the web www barco com Printed in Belgium...

Page 5: ...put connection 16 3 3 1 MDSC 2226 LED version 16 3 3 2 MDSC 2226 DDI version 17 3 3 3 MDSC 2226 MNA version 17 3 4 Video output connection 18 3 4 1 MDSC 2226 LED version 18 3 4 2 MDSC 2226 DDI version...

Page 6: ...42 5 4 1 Information 42 5 4 2 Language 42 5 4 3 Failover mode 43 5 4 4 Extended keyboard 43 5 4 5 OSD setting 43 5 4 5 1 OSD Horizontal Position 43 5 4 5 2 OSD Vertical Position 44 5 4 5 3 OSD Time o...

Page 7: ...g lifetime and low power consumption Ease of installation The MDSC 2226 comes with a smart cable management system that hides the cables for a clutter free set up Its lightweight design allows easy mo...

Page 8: ...DVI cable AC power cords external power supply 4 screws and Allen key Keep your original packaging It is designed for this display and is the ideal protection during transport 1 4 About this user guid...

Page 9: ...cated on the front of the display By default only the stand by key is visible When you touch any of the keys shortly the front illumination of all other keys is switched on for a few seconds When you...

Page 10: ...ector compartment cover 5 Connector compartment cover fixation screw 2 3 Connector view 2 3 1 MDSC 2226 LED version Overview 1 2 3 4 7 11 12 13 15 8 6 5 9 10 14 16 Image 2 3 1 RS232 2 Input power conn...

Page 11: ...14 15 16 18 11 9 8 7 6 1 12 13 17 19 Image 2 4 1 DVI 2 2 RS232 3 Input power connector 4 DVI out 5 DVI 1 digital analog HDMI video support with HDCP 6 SDI 2 out 7 SDI 2 8 SDI 1 out 9 SDI 1 10 Display...

Page 12: ...ormal operation Off System not powered Orange blinking Error 5 Micro USB interface 6 USB 2 0 type A interface 7 RS232 8 Input power connector 9 DVI out 10 DVI 1 digital analog HDMI video support with...

Page 13: ...ive Earth function A Protective Earth connection is provided via a dedicated pin see image 3 10 2 4 2 DVI 1 connector Overview Image 2 7 Pin Function 1 D2_Rx T M D S 2 D2_Rx T M D S 3 GND data 2 shiel...

Page 14: ...lectable on either pin 14 or 16 via the OSD menu 2 4 3 DVI 2 connector Overview Image 2 8 Pin Function 1 D2_Rx T M D S 2 D2_Rx T M D S 3 GND data 2 shield 4 Not connected 5 Not connected 6 SCL for DDC...

Page 15: ...hield 4 Not connected 5 Not connected 6 SCL for DDC 7 SDA for DDC 8 Not connected 9 D1_Rx T M D S 10 D1_Rx T M D S 11 GND data 1 shield 12 Not connected 13 Not connected 14 5V output 15 GND cable sens...

Page 16: ...t connected 9 Not connected 2 4 6 USB connector Overview Image 2 11 Pin Function 1 5 VDC 2 Data 3 Data 4 GND 2 4 7 Mini USB connector Overview 1 2 3 4 5 Image 2 12 Pin Function 1 5 VDC 2 Data 3 Data X...

Page 17: ...D 9 ML_Lane 2 n 10 ML_Lane 3 p 11 GND 12 ML_Lane 3 n 13 CONFIG1 14 CONFIG2 15 AUX CH p 16 GND 17 AUX CH n 18 Hot Plug 19 Return 20 DP_PWR 3 3 VDC 2 4 9 S Video and S Video out connector Overview Image...

Page 18: ...2 Parts controls and connectors 14 451920610993 K5903021 MDSC 2226 01 03 2013...

Page 19: ...n arm with suitable safety factor IEC60601 1 To mount the display to an arm stand 1 Attach the arm stand firmly to the panel using the included 4 hexagonal screws M4 x 25 mm and the dented washers Use...

Page 20: ...e info Futhermore if more than one video source is connected the Picture in Picture PiP and Side by Side SbS functionality becomes available allowing you to view two different video inputs at once Ple...

Page 21: ...o inputs using the ap propriate video cable s 6 7 8 9 10 3 1 4 5 11 2 Image 3 4 DVI 1 or VGA 6 DVI 2 1 DisplayPort 7 SDI 1 3 SDI 2 2 R G B S 8 9 10 4 R G B SOG 8 9 10 Y Pb Pr 9 10 8 CVBS 5 S Video 11...

Page 22: ...video output connections Beside the video input connections the MDSC 2226 also has video output capabilities allowing you to loop through certain video inputs connected with the MDSC 2226 to another d...

Page 23: ...26 DDI version To connect the video outputs 1 Connect one or more of the available video sink s to the corresponding video outputs using the appro priate video cable s 5 2 3 4 1 Image 3 7 SDI 1 2 SDI...

Page 24: ...er the IP network in raw uncompressed format inside the operating room and even between surgical suites To connect your MDSC 2226 to Barco s Nexxis OR system connect the 10Gb Ethernet interface to you...

Page 25: ...ection is provided via a dedicated pin see image 3 10 Image 3 9 Protective earth pin 1 Earth the MDSC 2226 by connecting the protective earth pin to a grounded outlet by means of an AWG18 max 6ft 1 8m...

Page 26: ...on clip from the connector compartment cover and route all cables through it while reinstalling the cover 8b Image 3 12 WARNING When the display is assembled in the medical system take care of the an...

Page 27: ...e external power supply 2 While your display is off press and hold the stand by key for approximately 3 seconds To minimize the power consumption also the external power supply has to be switched off...

Page 28: ...4 4 OSD menu navigation OSD menu structure explained Below is on example of how the OSD menu structure looks like Picture Brightness 50 Contrast 50 Saturation 30 Profile Factory Color temperature 650...

Page 29: ...ons is to present a selection of commonly used functions immediately avail able without the need to navigate through the OSD Menu The different available shortkey functions are Main source selection M...

Page 30: ...y Side Primary and Secondary input of equal height Only a subset of multi image configuration settings is available via this shortkey func tion More multi image configuration settings can be selected...

Page 31: ...option a second press selects the lower option The different available extended keyboard functions are Main source selection Second source selection Multi image configuration Color temperature selecti...

Page 32: ...Pr S Video CVBS DVI SDI Nexxis 2nd Source E X I T Image 4 6 Note Available main source options dependent on display model 4 6 2 Second source selection To quickly select the second source 1 While no O...

Page 33: ...u 2 Toggle the available transfer function settings by pressing the key corresponding to the desired option The current selection is marked in red 3 Press the stand by key to confirm your choice and e...

Page 34: ...and exit the common functions quick selection menu Common Functions ITU 709 6500 K DICOM Native Aspect Zoom 10 E X I T Image 4 11 4 7 Keyboard locking unlocking To lock unlock the keyboard The keyboar...

Page 35: ...4 Daily operation Keyboard lock Sequence 5 6 6 3 Image 4 12 451920610993 K5903021 MDSC 2226 01 03 2013 31...

Page 36: ...4 Daily operation 32 451920610993 K5903021 MDSC 2226 01 03 2013...

Page 37: ...3 profile The Factory and X Ray profiles can be temporary modified but the factory default can t be overwritten and can always be recalled through the recall profile menu item The available profiles...

Page 38: ...t the saturation level 1 Bring up the OSD main menu 2 Navigate to the Picture menu 3 Enter the Saturation submenu The command bar Saturation is highlighted 4 Set the saturation level as desired and co...

Page 39: ...yed allowing you to manually adjust the gain and offset of red green and blue 5 1 6 Gamma About gamma presets The available gamma presets for your display are CRT Gamma 2 2 Native no correction curve...

Page 40: ...st picture quality Surgical low latency Surgical 1 low latency optimized for fast moving images To select a Smart Video preset 1 Bring up the OSD main menu 2 Navigate to the Picture advanced menu 3 En...

Page 41: ...described above isn t satisfactory the Phase can be man ually adjusted by following this procedure To manually adjust the phase 1 Bring up the OSD main menu 2 Navigate to the Picture advanced menu 3...

Page 42: ...ailable main sources dependent on display model The main source can also be selected through a shortkey function or via the extended keyboard functionality To select the main source 1 Bring up the OSD...

Page 43: ...or 1 Bring up the OSD main menu 2 Navigate to the Display Format menu 3 Enter the Zoom submenu 4 Select one of the available zoom factors and confirm 5 3 4 Image Size About image size The available im...

Page 44: ...Both images scaled to fill half of the screen with image crop if necessary The 2nd picture mode multi image configuration can also be selected via the extended keyboard functionality To select the 2nd...

Page 45: ...ce submenu 4 Select one of the available 2nd picture sources and confirm 5 3 7 2nd Picture Position About 2nd picture positions The available 2nd picture positions for your display are Top Right Top L...

Page 46: ...rd identification Option SDI SDI module identification Serial Number ANxxxxxxxxxxxx To access information 1 Bring up the OSD main menu 2 Navigate to the Configuration menu 3 Enter the Information subm...

Page 47: ...the user is presented with a list of new selections displayed on screen the new choices can be selected by using each of the key just below the OSD text If two options are available for one key the f...

Page 48: ...0 Sec 60 Sec Disabled 5 minutes To adjust the OSD time out 1 Bring up the OSD main menu 2 Navigate to the Configuration menu 3 Enter the OSD setting submenu 4 Select OSD Time out 5 Select one of the a...

Page 49: ...ave a profile 1 Bring up the OSD main menu 2 Navigate to the Configuration menu 3 Enter the Save Profile submenu 4 Select one of the available profiles to save and confirm 5 5 System menu Overview Pow...

Page 50: ...isplay version DVI 1 DVI 2 Nexxis This feature is subject to restrictions in case of Multi image PiP SbS To select the DVI output 1 Bring up the OSD main menu 2 Navigate to the System menu 3 Enter the...

Page 51: ...main menu 2 Navigate to the System menu 3 Enter the Keyboard Backlight submenu 4 Select one of the available options and confirm 5 5 6 Power Saving About power saving When the active input s is are m...

Page 52: ...5 Advanced operation 48 451920610993 K5903021 MDSC 2226 01 03 2013...

Page 53: ...he equipment may not be used with life support equipment Mission critical applications We strongly recommend there is a replacement display immediately available in mission critical applica tions Powe...

Page 54: ...o not cover or block the ventilation openings in equipment Heed the necessary free space around the equipment to allow enough air flow for cooling of the equip ment Installation Place the equipment on...

Page 55: ...IEC EN 60601 1 2 2007 EN 55011 CISPR11 MDSC 2226 MNA Class A MDSC 2226 LED and MDSC 2226 DDI Class B National Scandinavian Deviations for Cl 1 7 2 Finland Laite on liitett v suojamaadoitus koskettimi...

Page 56: ...o s product may contain The RoHS of Chinese Mainland is included in the MCV standard of the Ministry of Information Industry of China in the section Limit Requirements of toxic substances in Electroni...

Page 57: ...al hazard and returns Overview The structure and the specifications of this device as well as the materials used for manufacturing makes it easy to wipe and clean and therefore suitable to be used for...

Page 58: ...nterference by one or more of the following measures Reorient or relocate the receiving antenna Increase the separation between the equipment and receiver Connect the equipment into an outlet on a cir...

Page 59: ...the Directive 93 42 EEC Indicates compliance with Part 15 of the FCC rules Class A or Class B Indicates the equipment is approved according to the UL Recognition regulations Indicates the equipment i...

Page 60: ...rco software product in any form is authorized The specifications of Barco products are subject to change without notice Trademarks All trademarks and registered trademarks are property of their respe...

Page 61: ...upply and accessories Net weight power supply 1 5 kg Net weight packaged w o stand 13 0 kg Power supply DC output cable length 2 5 m Mounting standard VESA 100 mm Screen protection Protective non refl...

Page 62: ...ing humidity 10 90 non condensing Storage humidity 10 90 non condensing Operating altitude 3000 m max Storage altitude 12000 m max Dimensions 642 mm 25 28 86 mm 3 39 421 mm 16 57 100 mm 3 94 100 mm 3...

Page 63: ...oblem has arisen 1 2 The customer support person shall diagnose the problem experienced by the Customer and shall advise the Customer on how to proceed Customer support may ask to return the faulty eq...

Page 64: ...s instructions or in absence thereof at least with intervals and in a manner consistent with generally accepted practice for this type of products B The warranty described herein shall not include the...

Page 65: ...temperature that is lower than the total allowable difference as mentioned in the product specifications iv difference in color temperature as a result of not using all displays of a multi head config...

Page 66: ...ons shall constitute Customer s sole and exclusive remedy and Barco s sole and exclusive liability for Barco s breach of the Warranties hereunder BARCO NV HC SHALL NOT UNDER ANY CIRCUMSTANCES BE LIABL...

Page 67: ...is program is free software you can redistribute it and or modify it under the terms of the GNU General Public License http www gnu org licenses as published by the Free Software Foundation This progr...

Page 68: ......

Page 69: ......

Page 70: ......

Page 71: ......

Page 72: ...FIMI S r l Via S Banfi 1 21047 Saronno Italy www barco com K5903021 02 451920610993 March 2013...

Reviews: