background image

7. Advanced

7.9.9.4.1

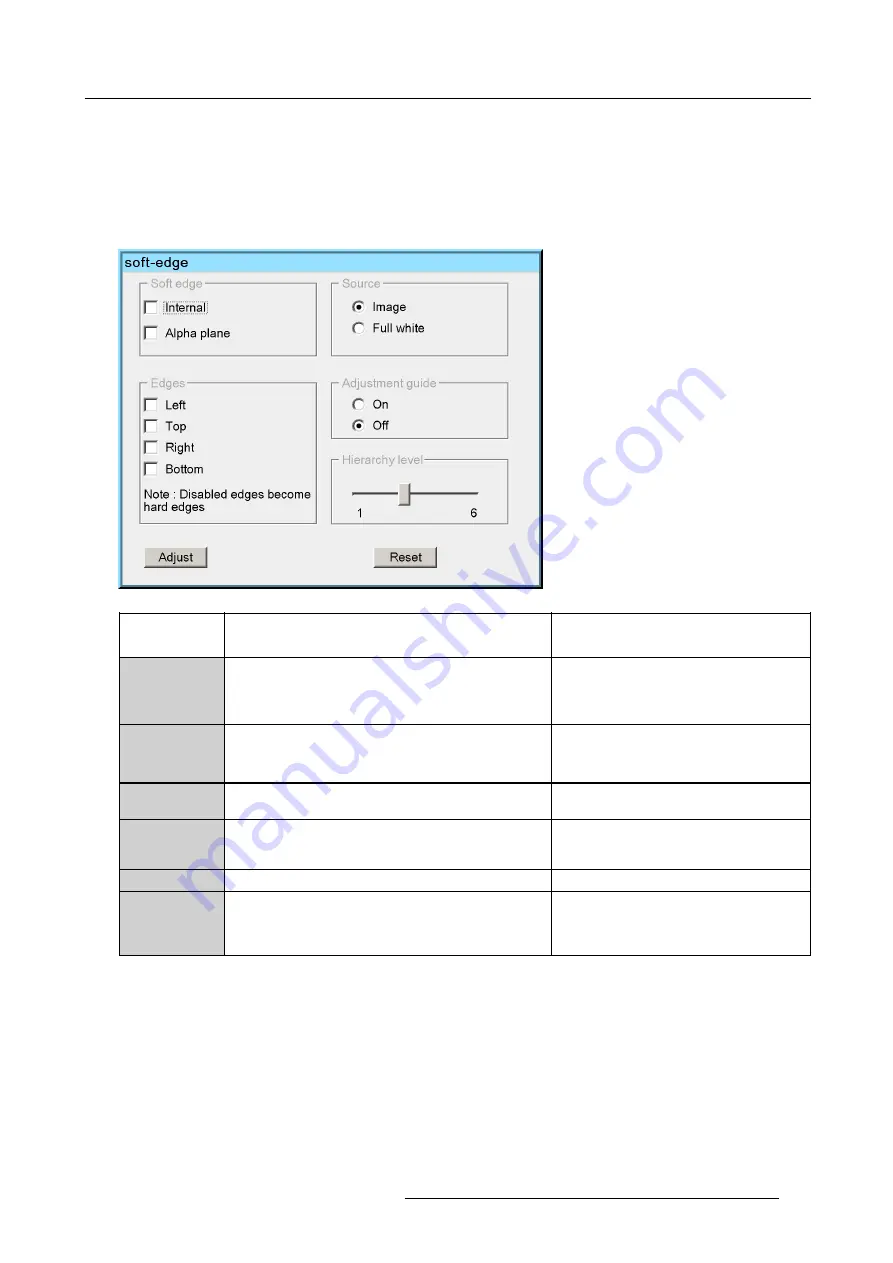
The soft edge edit wizard

The geometry wizard

When entering the

Edit

mode, the

Edit

dialog box is displayed.

Description of the Edit dialog box

An intuitive user interface is used to perform all the Soft edge adjustments.

Image 7-191

Field

/adjustment

Description

Notes

Planes

Allows to select the type of soft edges :

- internal soft edge

- Alpha-Beta planes

Edges

It is possible to select one or more of the 4 edges of the
image:

Left/Top/Right/Bottom

A Disabled edge is a hard edge. Adjusting a
hard edge results in a blanking adjustment.
See blanking

Source

The background image on which the soft edge adjustment
is applied can be the source or a full white image (pattern)

The procedures in this manual are explained
using a full white background

Adjustment guide

An adjustment guide consisting of a 4 brightness graduated
bars can be applied on the background image during the
soft edge adjustment

Hierarchy level

Allows to select the level of the adjustment.

Reset

The soft edge shape is set to default settings.

Soft edge shape follows geometry settings,
the shape of the soft edge is set to 12.5%,
enabled edges stay enabled, disabled edges
stay disabled

Table 7-12
dialog box legend

7.9.9.4.2

The soft edge edit modes

The Edit Modes

Select mode : allows to select the desired point using the

and

arrows or to select the desired level or edge using the

and

arrows.

Adjust mode : allows to perform the correction (in real time) using the arrows.

Edit mode : allows to select the desired control (edit box, ...) in the dialog box.

Change mode : allows to change the values in the edit boxes of the dialog box.

R59770288 GALAXY NW-12, GALAXY NW-7 20/06/2013

161

Summary of Contents for Galaxy NW-7

Page 1: ...Galaxy NW 12 Galaxy NW 7 User guide R9040410 R9040405 R59770288 10 20 06 2013...

Page 2: ...Barco nv Advanced Visualization Systems Noordlaan 5 B 8520 Kuurne Phone 32 56 36 82 11 Fax 32 56 36 84 86 Support www barco com esupport Visit us at the web www barco com Printed in Belgium...

Page 3: ...municipal waste disposal service For details please visit the Barco website at http www barco com en AboutBarco weee eCos The software in this product uses eCos the Embedded Configurable Operating Sys...

Page 4: ...uarantee coverage are system failures which are attributed to programs or special electronic circuitry provided by the purchaser e g interfaces Normal wear as well as normal maintenance are not subjec...

Page 5: ...ication 31 4 5 12 1 Network connections 31 4 5 12 2 Network settings 33 4 5 12 3 RS232 communication 35 4 5 13 Multichannel Installations 36 4 5 13 1 Linked CLO 36 4 5 13 2 Linked Dynacolor 37 4 5 13...

Page 6: ...eometry distortions 92 7 6 5 Load 94 7 6 6 Edit 95 7 6 6 1 Accessing the Geometry Edit menu 95 7 6 6 2 Geometry Edit wizard 96 7 6 6 3 Geometry Edit Modes 98 7 6 6 4 Editing a geometry file 100 7 6 6...

Page 7: ...10 Installation 177 7 10 1 Active InfitecTM wheel index 177 7 10 2 Internal Patterns 178 7 10 3 Scaled patterns 180 7 10 4 Formatter patterns 182 7 10 5 Stereo sync out 183 7 10 6 LFR 183 7 10 7 Conve...

Page 8: ...Table of contents 4 R59770288 GALAXY NW 12 GALAXY NW 7 20 06 2013...

Page 9: ...CAUTION For the latest version of the product manuals see http www barco com About the Galaxy NW series The Barco Galaxy NW series projector is the world s first active stereoscopic projector with Wi...

Page 10: ...1 Introduction 6 R59770288 GALAXY NW 12 GALAXY NW 7 20 06 2013...

Page 11: ...package is secured with banding and fastening clips Lens packaging The Lens is supplied as an individual item and is packed in a cardboard box Save the original shipping cardboard and packing material...

Page 12: ...pping carton and packing material they will be necessary if you ever have to ship your projector For maximum protection repack your projector as it was originally packed at the factory 8 R59770288 GAL...

Page 13: ...ing electronic surfaces degrading performance then it is highly advisable and desirable to have this contamination removed prior to it reaching the projectors clean air supply Devices or structures to...

Page 14: ...s will be located and go for the highest gain screen possible A high gain screen will provide a brighter picture but reduce the viewing angle For more information about screens contact your local scre...

Page 15: ...estricted by the tilt range of the lamp The images below show the maximum tilt range in both senses 20 5 Image 3 3 Projector tilt range 360 Image 3 4 Projector tilt range 3 4 Free space Service area M...

Page 16: ...3 Installation guidelines 200 mm 200 mm 200 mm 500 mm 500 mm 500 mm Image 3 5 Dimensions free space around the projector 12 R59770288 GALAXY NW 12 GALAXY NW 7 20 06 2013...

Page 17: ...n the RCU Lens installation Projector configuration Positioning the projector Connections Controls overview Projector dimensions Dimensions are given in mm and inch 1inch 25 4 mm weight without lens 7...

Page 18: ...ation in the RCU How are the batteries delivered The batteries not yet installed to save the battery life time are delivered inside the plastic bag with the power cord How to install 1 Remove the batt...

Page 19: ...ge Overview table Lens Partnumber TLD 0 73 1 R9842041 TLD 1 2 1 R9840775 TLD 1 5 2 0 1 R9842061 TLD 2 0 2 8 1 R9842081 TLD 4 5 7 5 1 R9842121 See the Maintenance appendix for more information about le...

Page 20: ...tion The maximum vertical and horizontal shift range depends on the lens Shifting outside this range will not guarantee a full image i e some corners of the image will be clipped and will not be visib...

Page 21: ...s Hexagonal key 4 mm hexagonal delivered with the projector Necessary parts Lens Lens interface plate pre mounted on the lens holder 4x M5x12 screws delivered with the projector and with the lens How...

Page 22: ...p side 3 Mount the assembly lens interface plate on the lens holder Insert and tighten the 4 screws with one hand while supporting the lens with the other hand Caution Mind the orientation of the lens...

Page 23: ...s present in the projector the corresponding kit must be installed first Contact a Barco trained and certified technician The different configurations Depending on the installation the projector can b...

Page 24: ...ay also be different depending on the installation Basically the projector can be positioned in an On Axis or Off Axis configuration Several parameters can be calculated determining the position in an...

Page 25: ...OFF Axis projector installation a Side view b Top view c Back view x Optical axis projection lens p Projector s Screen F Floor A 100 Off Axis position means that the position of the centre of the lens...

Page 26: ...Voltage AC Current Power Frequency NH 12 230V single phase 12 Amps 50 60 Hz Galaxy NH 12 230V single phase 12 Amps 50 60 Hz iD LH 12 230V single phase 12 Amps 50 60 Hz NW 12 220 240V single phase 12 A...

Page 27: ...14 Front panel connections The signal input output section The input output section has a modular architecture i e it is composed of several 5 slots which can be equipped with different input modules...

Page 28: ...1 1 1 56 9 5 LAYER2 LAYER3 LAYER4 LAYER5 LAYER1 9 9 Image 4 15 Input output layers Layer 2 3 4 5 are fixed i e they may only be fitted with the boards mentioned above The system section The bottom sy...

Page 29: ...1 1 1 1 1 1 56 56 9 9 5 5 Image 4 16 Connecting an RGB signal 4 5 4 Connecting a component video signal Introduction A component video signal can also be mentioned in the following way YUV PR Y PB R Y...

Page 30: ...onnecting a YUV signal 4 5 5 Connecting a DVI signal How to connect a DVI signal 1 Connect the DVI cable to the projector s DVI input 9 9 9 9 6 723 1387 6 723 1387 5 35 5 35 3 3 V V V V 9V 9V 9 2 9 2...

Page 31: ...ite video signal 1 Connect the BNC connector to the projector s video input 9 9 9 9 6 723 1387 6 723 1387 5 35 5 35 3 3 V V V V 9V 9V 9 2 9 2 6 9 2 6 9 2 1 1 1 1 67 5 2 1387 67 5 2 1387 67 5 2 287387...

Page 32: ...e desktop input 1 Connect the source to the desktop input connection DVI connector 9 9 9 9 6 723 1387 6 723 1387 5 35 5 35 3 3 V V V V 9V 9V 9 2 9 2 6 9 2 6 9 2 1 1 1 1 67 5 2 1387 67 5 2 1387 67 5 2...

Page 33: ...e projected image excluding Geometry corrections Soft edge and Black level correction Dynacolor settings and OSD CAUTION If the projector runs in synchronous mode the DVI output is synchronous with th...

Page 34: ...several projectors in a multichannel projection system see Multichannel installation The 2 BNC s are identical i e it does not matter to which BNC the emitter is connected How to connect the stereo in...

Page 35: ...setup menu for the stereo output and system settings and the Image menu for the stereo input settings 4 5 11 Active InfitecTM The Active InfitecTM feature is optional a software key is needed to activ...

Page 36: ...he local network LAN The Ethernet connection is also used to allow the Desktop integration The software on the delivered CDROM must therefore be installed on the desktop PC See the Desktop integration...

Page 37: ...ne In normal conditions the network detection takes few seconds This means that the total time needed to go from power ON to Standby mode is only a few seconds This value can vary depending on the spe...

Page 38: ...IP the IP settings fields are enabled IP Address Fixed IP Address of the projector this field can be edited when Fixed IP is selected Subnet Mask Subnet Mask this field can be edited when Fixed IP is...

Page 39: ...ons are shown with a checkbox The last operation Restarting network takes a few seconds more Image 4 31 4 5 12 3 RS232 communication What is possible with the RS232 connection 1 Remote control 2 Data...

Page 40: ...ction 4 5 13 Multichannel Installations Overview Linked CLO Linked Dynacolor Linked stereo 4 5 13 1 Linked CLO Linking CLO in a multichannel system The linking of the projectors to allow CLO and Dynac...

Page 41: ...lor Linking Dynacolor in a multichannel system The linking of the projectors to allow Dynacolor and CLO information interchange is done via the Ethernet connection To set the projector as Master see S...

Page 42: ...1 56 9 5 IR Emitter Active Glasses IR Emitter Image Generator CadWall 6 723 1387 5 35 3 V V 9V 9 2 6 9 2 1 1 67 5 2 1387 67 5 2 287387 1 1 1 1 56 9 5 9 9 9 9 9 9 Image 4 34 Connections linked stereo...

Page 43: ...o stop projection for a short time press PAUSE The image disappears but full power is retained for immediate restarting 6 STANDBY Standby button to start projector when the power switch is switched on...

Page 44: ...panel allows to inform the user on the status of the projector and other information like warnings etc DESKTOP INPUT Galaxy NW 12 standby Image 4 37 LCD Display See the Appendix for a listing of the...

Page 45: ...wer up the projector 1 Switch the power switch to 1 6 723 1387 6 723 1387 5 35 5 35 3 3 V V V V 9V 9V 9 2 9 2 6 9 2 6 9 2 1 1 1 1 67 5 2 1387 67 5 2 1387 67 5 2 287387 67 5 2 287387 1 1 1 1 1 1 1 1 56...

Page 46: ...Network settings IP address Baudrate RCU private address RCU common address Galaxy NW 12 standby Galaxy NW 12 150 158 193 179 Hostname Private 1 Common 0 57600 Image 5 4 Standby status 5 2 Starting u...

Page 47: ...d up This may take up to 15 seconds During this phase the LCD display and the keypad are lit 1 The progression is shown with the asterisk characters adding up 2 This is followed by the projector Power...

Page 48: ...1 Press the Address key recessed key on the RCU with a pencil 9 0 EN T ER M EN U B A C K D I G I Z O O M PH A SE P A U SE PI P L O G O Image 5 8 The projector s address will be displayed on the screen...

Page 49: ...9 is used for RCU communication 0 255 being used for RS232 serial communication Common address address may be 0 or 1 How to change the projector s address 1 Press MENU to activate the Tool bar 2 Pres...

Page 50: ...a bullet shows the active configuration 5 6 Adjusting the lens What must be done Depending on the projection distance and the lens used the image may not be at the desired size position and or may be...

Page 51: ...N Image 5 12 2 Use the arrow keys to adjust 9 0 ENTER MENU BACK DIGI ZOOM PHASE PAUSE PIP LOGO Image 5 13 How to Zoom focus or shift in the OSD 1 Press MENU to activate the Tool bar 2 Press to select...

Page 52: ...communicate with any other equipment disposing of an RS232 port generally a PC using the RS232 protocol The baud rate must be set to the same value on both the projector and the other equipment How t...

Page 53: ...guage Image 5 18 7 Press ENTER The language is adapted and a bullet shows the active selection 5 8 2 Automatic startup What can be done The automatic startup allows to bypass the standby state i e sta...

Page 54: ...tivate the Tool bar 2 Press to select the Installation item 3 Press to Pull down the Installation menu 4 Use or to select Automatic startup 5 Press to pull down the menu 6 Use or to enable disable the...

Page 55: ...he Master i e it allows to add the projector to the different control loops by a simple check CLO adding the projector to this control loop will allow the brightness light output of the projector to b...

Page 56: ...must be connected prior to check ing the Stereo boxes in the Linked projectors dialog box of the Master projector How to start up the linked projector menu 1 Press MENU to activate the Tool bar 2 Pre...

Page 57: ...x is displayed Image 5 23 How to set a projector to Master 1 In the linked projector menu of the projector to be set as Master Select the Master check box and press ENTER R59770288 GALAXY NW 12 GALAXY...

Page 58: ...the Master For example IP address 150 158 193 110 3 Select and press ENTER for the desired parameters to be controlled by the master i e CLO and or Dynacolor and or Stereo It is advised to declare the...

Page 59: ...control AUT AUTO IMAGE O IMAGE PC PC RGB RGB VIDEO VIDEO Fire W Fire Wire ire DVI DVI IQ PC IQ PC SDI SDI S VIDEO S VIDEO PHASE PHASE TINT TINT COLOR COLOR BRIGHTN BRIGHTN CONTR CONTR ZOOM ZOOM DIGI D...

Page 60: ...6 Getting started 56 R59770288 GALAXY NW 12 GALAXY NW 7 20 06 2013...

Page 61: ...this manual are of the advanced type all the items are visible The menus seen by a standard user on the screen will hence not correspond with the menus in the manual i e the advanced items will not be...

Page 62: ...eys on the remote control 1 Press ENTER to activate the input field Image 7 2 2 Key in the desired value Entering numeric values using the arrow keys on the remote control 1 Press ENTER to activate th...

Page 63: ...nstalled in the projector For example L2 RGB YUV L3 DVI In this case an RGB YUV board is installed in the second layer L2 a DVI board is installed in the third layer L3 When selecting a source with a...

Page 64: ...ble on the Mini Din connector of a camera VCR or DVD player Adjustments on a S Video signal The projectors allows different adjustment on a video signal Depending on the type of signal NTSC PAL the te...

Page 65: ...for example L1 RGB YUV if the signal is connected to layer 1 3 Use or to select Lx RGB YUV 4 Use to open the menu 5 Use or to select RGB or YUV Image 7 6 6 Press ENTER to confirm your choice A bullet...

Page 66: ...lor temperature Input balance RGB signals only Input stereo sync Passive Infitec Passive to Active Stereo 7 4 1 Image settings 7 4 1 1 Setting the Contrast Contrast adjustments Adjust the contrast to...

Page 67: ...ull down the menu 6 Use or to select Brightness 7 Press ENTER On the screen appears now a slider box Image 7 9 8 Use or the numeric keys on the remote or the keypad to change the brightness 7 4 1 3 Co...

Page 68: ...vate the Tool bar 2 Press to select the Image item 3 Press to Pull down the Image menu 4 Use or to select settings 5 Press to pull down the menu 6 Use or to select Sharpness 7 Press ENTER On the scree...

Page 69: ...Tool bar 2 Press to select the Image item 3 Press to Pull down the Image menu 4 Use or to select settings 5 Press to pull down the menu 6 Use or to select Phase 7 Press ENTER On the screen appears now...

Page 70: ...ess to select the Image item 3 Press to Pull down the Image menu 4 Use or to select Settings 5 Press to pull down the menu 6 Use or to select Gain Control on Video 7 Press to pull down the menu 8 Use...

Page 71: ...enu 6 Use or to select Gain Control on Video 7 Press to pull down the menu 8 Use or to select Manual Image 7 17 9 Press ENTER A scroll bar is displayed Image 7 18 10 Use or the numeric keys on the rem...

Page 72: ...the image is a real 16 9 format 16 9 2 35 1 Image 7 21 Aspect ratios in native HDTV DVD sources 16 10 Image 7 22 Aspect ratio for WUXGA 1920x1200 What can be done The aspect ratio setting forces the p...

Page 73: ...Auto function calculates an aspect ratio based on the information stored in the image files whereas Custom allows to set a personnel ratio The aspect ratio setting only affects the active source wind...

Page 74: ...tion setting is enabled How to set a custom Aspect ratio 1 Press MENU to activate the Tool bar 2 Press to select Image 3 Press to Pull down the Image menu Image 7 25 4 Use or to select Aspect ratio 5...

Page 75: ...tely How to select a preset color temperature 1 Press MENU to activate the Tool bar 2 Press to select the Image item 3 Press to Pull down the Image menu 4 Use or to select Color temperature 5 Press to...

Page 76: ...particular source there are conditions in fact we must know the black and the white level of the source i e 1 the considered source must be able to generate a white signal ideally a 100 white backgrou...

Page 77: ...nce 5 Press to pull down the menu 6 Use or to select Automatic Black level 7 Press to pull down the menu 8 Use or to enable ON or to disable OFF Automatic Black level Image 7 32 9 Press ENTER to confi...

Page 78: ...ear on the black part of the image 12 Adjust the Blue black level until bright spots appear on the black part of the image 13 Adjust the Red black level until bright spots appear on the black part of...

Page 79: ...l bright spots appear on the white part of the image 13 Adjust the Red white level gain until bright spots appear on the white part of the image The projected image should now be noisy neutral grey If...

Page 80: ...e input while the Invert Stereo see Display setup acts on the stereo emitter output How to swap the fields 1 Press MENU to activate the Tool bar 2 Press to select the Image item 3 Press to Pull down t...

Page 81: ...or has the Passive Infitec stereo option on board the according menu item becomes enabled The moment you select a Passive Infitec stereo source you must make the selection in the OSD to move the Passi...

Page 82: ...screen PiP s exactly aligned onto each other This implies that only one of the displayed images can be selected at a time e g to change Contrast By default the selected image is the input signal link...

Page 83: ...his is not critical in case of Always active stereo mode since the sync signal towards the emitter s can be inverted through the OSD Display setup Stereo Invert On Off 6 Repeat step 4 and step 5 to li...

Page 84: ...ge is now displayed and the image brightness has dropped CAUTION If Auto is selected only one out of both passive stereo source signals is displayed in mono Quick check of the active stereo image 1 Ma...

Page 85: ...pattern and the Left image content at the same time 7 5 Image files Overview Introduction to Image files Load file Forced file load Auto Image Edit file Save as create a custom file Rename file Copy...

Page 86: ...ion of the image file happens as follows Standard SXGA 60 xml Type of file standard or custom Resolution Vertical freq file extension xml Image 7 51 7 5 2 Load file When to load a file In some cases t...

Page 87: ...user wants only one particular file to be loaded for a particular input source i e to prevent the automatic load of an inadequate file One can link a file to every input of each layer If a file is alr...

Page 88: ...can be done Auto Image creates the best suited image file for the connected source It calculates measures several source parameters Total pixels per line Start pixel Phase Contrast Brightness levels A...

Page 89: ...n also be launched via the RCU with the dedicated AutoImage key 7 5 5 Edit file What can be done with the Edit file menu The Edit file menu makes it possible to change the settings of the file accordi...

Page 90: ...yed out fields can not be updated total pixels Which items can be adjusted The following items can be adjusted Total horizontal pixels Active horizontal pixels Horizontal start in pixels Horizontal pe...

Page 91: ...oor video signals ex poor TV signals Sharpness adjustment can be chosen to be coarse or fine It is recommended to use the default values Advanced settings for Analog Data sources e g RGB HS VS The adv...

Page 92: ...ave as create a custom file Creating a custom file When the loaded file is a standard file there is a possibility of saving it as a custom file creating a custom file this is done with the save as fun...

Page 93: ...se or or the numeric keys on the remote or the keypad to edit and change the values confirm with ENTER Image 7 66 7 5 8 Copy Copy a file The copy function allows to copy a file standard or custom to a...

Page 94: ...pied in the edit field 8 Use the keys on the remote to change the name of the destination file 7 5 9 Delete How to delete a file 1 Press MENU to activate the Tool bar 2 Press to select the Image files...

Page 95: ...inside the projector a correct geometry can be achieved on curved screens without requiring additional computational power on the IG s side 7 6 2 Geometry files Description A geometry file contains t...

Page 96: ...menu How to access the Geometry menu 1 Press MENU to activate the Tool bar 2 Press to select Geometry 3 Press to Pull down the Geometry menu Image 7 72 7 6 4 Geometry distortions What can be done The...

Page 97: ...0 21 21 21 21 21 21 19 20 18 20 19 20 20 21 17 21 21 20 21 19 21 20 21 18 21 20 21 19 21 21 20 21 21 21 21 21 21 19 20 18 20 19 20 20 21 17 21 21 20 21 19 21 20 21 18 21 20 21 19 21 21 20 21 21 21 21...

Page 98: ...this hierarchy the 2x2 points Adjusting points on level 1 will affect level 2 till 21 At the bottom of the structure we find the 33x33 points adjustment adjusting grid points on level 21 will not affe...

Page 99: ...a hatch pattern generated internally by the projector see internal patterns Overview Accessing the Geometry Edit menu Geometry Edit wizard Geometry Edit Modes Editing a geometry file Axis link Shift A...

Page 100: ...g the Edit mode the Edit dialog box is displayed When selecting a point in a certain adjustment a yellow box shows the selection and a blue dotted box is placed around the selected grid point indicati...

Page 101: ...erform all the geometry corrections This gives the user real time access to the distortion characteristics Each individual point can be selected and shifted to the desired location in real time Depend...

Page 102: ...PixelY this edit box allows to edit the position of the point along the y axis Axislink see Axislink Modes see Geometry Edit Modes Table 7 2 dialog box legend When applying a distortion to the image...

Page 103: ...7 Advanced Image 7 82 Image 7 83 Image 7 84 R59770288 GALAXY NW 12 GALAXY NW 7 20 06 2013 99...

Page 104: ...21 17 21 21 20 21 19 21 20 21 18 21 20 21 19 21 21 20 21 21 21 21 21 21 19 20 18 20 19 20 20 21 17 21 21 20 21 19 21 20 21 18 21 20 21 19 21 21 20 21 21 21 21 21 21 19 20 18 20 19 20 20 21 17 21 21 20...

Page 105: ...to be adjusted Note that in this mode 3 levels are involved level 4 5 and level 6 previous adjusted points are left out 31 30 0 10 9 8 7 6 5 1 4 3 2 25 29 24 23 11 12 13 14 15 16 17 18 19 20 21 22 26...

Page 106: ...splayed The Select mode is enabled and the top left row 0 colom 0 corner is selected Image 7 88 Image 7 89 How to select another point 1 Press to select the next adjustment point 102 R59770288 GALAXY...

Page 107: ...7 Advanced The column is adapted to 32 Image 7 90 Image 7 91 2 Press to select the next adjustment point The row is adapted to 32 R59770288 GALAXY NW 12 GALAXY NW 7 20 06 2013 103...

Page 108: ...7 Advanced Image 7 92 Image 7 93 3 Press to select the next adjustment point 104 R59770288 GALAXY NW 12 GALAXY NW 7 20 06 2013...

Page 109: ...How to adjust using the Adjust mode Adjusting point row 0 column 0 by 100 pixels along the x axis in the 2x2 mode 1 Press ENTER to go to the Adjust Mode The Adjust mode is selected R59770288 GALAXY N...

Page 110: ...djustment is done in small steps Adjusting for instance from 0 to 100 using the Adjust mode is not the ideal method The use of the Edit and Change mode is more appropriate How to adjust using the Edit...

Page 111: ...select the digit and use and to increment decrement the digit Tip One can also use the numeric digits to fill in the desired value The image is distorted along the X axis Notice the unaffected region...

Page 112: ...2 adjustment with AxisLink set On and Off 1 Start with a non distorted image assume the left top corner is selected 0 0 Image 7 100 2 Shift the left top corner 300 pixels to the left 0 0 Image 7 101 1...

Page 113: ...ge this will result in a quick adjustment when dealing with complex setups AxisLink OFF The coordinate system used for the adjustment is absolute Y 300 216 300 300 300 X Y Y 3 0 0 AxisLink OFF AxisLin...

Page 114: ...ment it is possible to shift the whole image This is considered as a displacement of the 4 corner points of the 2x2 mode The same dialog box is used as for the geometry edit How to use the Shift adjus...

Page 115: ...7 Advanced The Edit mode is selected Image 7 105 5 Use and to select the PixelsX edit box The PixelsX edit box is focused Image 7 106 6 Press ENTER R59770288 GALAXY NW 12 GALAXY NW 7 20 06 2013 111...

Page 116: ...age is shifted along the X axis Image 7 108 Geometry Shift 8 Press BACK to return to the Geometry Edit menu 7 6 6 7 Transport Delay What is Transport Delay The Transport Delay is the interval between...

Page 117: ...original line 1 but pixel x 1 of the original line 1 This means that every pixel which comes before pixel x in the original line 1 must be stored in a temporary memory before the processing of the fra...

Page 118: ...he Transport Delay Note The Transport Delay is by default set to 200 The Transport Delay Range can be set from 0 to 1023 Tip When the transport delay needs to be adjusted In a multi channel setup firs...

Page 119: ...the RCU or the local keypad to edit and change the value of the Sharpness Note The Sharpness can be set from 8 to 8 4 Press BACK to return to the Geometry Edit menu 7 6 6 9 Geometry Reset Overview Res...

Page 120: ...5 Press BACK to return to the Geometry Edit menu 7 6 6 9 2 Restore to a level What can be done Restore to a level means that all the higher level geometry corrections are reset all geometry correction...

Page 121: ...ring to a 9x9 level How to restore to a level 1 Start the Geometry Edit menu 2 Push or to select Reset 3 Push the key to pull down the menu 4 Push or to highlight the desired level to restore Restore...

Page 122: ...will be noticed in the image by a more or less accentuated jump 5 Press BACK to return to the Geometry Edit menu 7 6 7 Rename a Geometry File How to rename a geometry file 1 Start up the Geometry men...

Page 123: ...to browse through the characters 5 Press ENTER The file is renamed 6 Press BACK to return to the Geometry Edit menu 7 6 8 Copy a Geometry File How to Copy a Geometry File 1 Start up the Geometry menu...

Page 124: ...the RCU or the local keypad to edit and change the values confirm with ENTER 7 Press BACK to return to the Geometry Edit menu 7 6 9 Delete a Geometry File How to Delete a Geometry File 1 Start up the...

Page 125: ...efurbished Xenon lamp R9843090 New Xenon lamp R9843085 Galaxy NW 7 Refurbished Xenon lamp R9843095 7 7 2 Lamp info What can be done All information about the lamp is stored inside the lamp house EEPRO...

Page 126: ...warning What can be done When the lamp has reached a predetermined runtime a warning message will be displayed on the screen The lamp runtime warning can be set in a range from 30 to 200 hours The run...

Page 127: ...What can be done The Lamp can be set to the normal or economic mode Following Mode Settings are available NORMAL Normal Light Output ECONOMIC Reduced Light Output Table 7 6 Lamp Mode Settings Economi...

Page 128: ...of the lamp The light output is checked every 5 minutes if the target is not met the lamp power is adjusted Setting CLO off means that the lamp will operate at constant power no power adaptation to me...

Page 129: ...menu 6 Use or to select Mode 7 Press to pull down the menu 8 Use or to select ON or OFF Image 7 133 9 Press ENTER A bullet shows the active setting 7 7 5 2 CLO Target What must be done The light outpu...

Page 130: ...mps may slightly differ in their output and will in certain cases have different runtimes this will result in a difference in light output between the projectors By using the constant light output in...

Page 131: ...2 Press to select General 3 Press to Pull down the General menu 4 Use or to select Identification Image 7 136 5 Press ENTER On the screen appears a text box 6 Press MENU or BACK to exit or to go back...

Page 132: ...select Freeze Image 7 138 5 Press ENTER to activate the Freeze function The image can also be frozen using the FREEZE key on the RCU 7 8 4 Standby Timer What can be done If there is no sync signal at...

Page 133: ...hich is in general a PC can then be used to manage the projector sources which act as source windows on top of the desktop image An Ethernet link between the desktop PC and the projector allows the co...

Page 134: ...rent text boxes are displayed or not How to enable disable the Textbox 1 Press MENU to activate the Tool bar 2 Press to select the Display setup item 3 Press to Pull down the Display setup menu 4 Use...

Page 135: ...settings mentioned above A mono source means that no stereo sync is connected 48 120 f Hz FULL SCREEN SYNCHRONOUS MODE off ASYNC 120Hz STEREO MODE always active SOURCE mono In this case All the mono s...

Page 136: ...120Hz 120Hz 120Hz fsource 2Xfsource SOURCE stereo Image 7 147 Stereo source Full screen synchronous representation ON 48 120 f Hz FULL SCREEN SYNCHRONOUS MODE off ASYNC 120Hz SOURCE stereo Image 7 148...

Page 137: ...set the stereo mode 1 Press MENU to activate the Tool bar 2 Press to select the Display setup item 3 Press to Pull down the Display setup menu 4 Use or to select Stereo Mode 5 Press to pull down the m...

Page 138: ...elect the Display setup item 3 Press to Pull down the Display setup menu 4 Use or to select Full screen synchronous representation 5 Press to open the menu 6 Use or to select ON to enable or OFF to di...

Page 139: ...ncy of the displayed source Asynchronous frequency setting is only applicable in the Galaxy NW 7 The low and high asynchronous frequency values are 50 Hz or 100 Hz The high asynchronous frequency valu...

Page 140: ...he Display setup item 3 Press to Pull down the Display setup menu 4 Use or to select Menu bar position menu 5 Press ENTER Image 7 153 6 Use or to position the Menu bar 7 9 5 Status bar position What c...

Page 141: ...settings contrast How to reposition the slider box 1 Press MENU to activate the Tool bar 2 Press to select the Display setup item 3 Press to Pull down the Display setup menu 4 Use or to select Slider...

Page 142: ...roved grayscale tracking controlling the black white and grays across the different channels of the multi channel setup DynaColor eliminates channel to channel color variations or in case of a single...

Page 143: ...el setup these color differences between different projectors can be smoothened out by matching the color gamuts of the different projectors to a Common Color Gamut Image 7 159 Common Color Gamut The...

Page 144: ...Gamut Wc White Common Color Gamut The following parameters can be adjusted within DynaColor the x y coordinates and L Light Output of the 6 Common Color Gamut perimeter points the x y coordinates and...

Page 145: ...ight Output Blue L Blue Light Output Blue Lmax Maximum available Blue Light Output Cyan L Cyan Light Output Cyan Lmax Maximum available Cyan Light Output Yellow L Yellow Light Output Yellow Lmax Maxim...

Page 146: ...acolor sets Infitec A and Infitec B can be adjusted Set A is used for the left eye images while Set B is used for the right eye images These sets are automatically selected when the Infitec filter mov...

Page 147: ...ng DynaColor can be done by the operator What can be done Enabling DynaColor changes the projector s native color range to the color range as specified in the active DynaColor set Disabling DynaColor...

Page 148: ...can use Linked DynaColor which is part of the Linked Projectors feature of the projector Linking multiple projectors See the section Setup of Linked projectors in a Multichannel system Linking DynaCo...

Page 149: ...tain a common color gamut for the left and right eye image See Matching Infitec A and Infitec B page 145 7 9 7 5 Matching Infitec A and Infitec B What to be done In a single channel display system run...

Page 150: ...ative primary colors R red G green and B blue A set of all combinations of the device s primary colors is called the color gamut of that device It can be presented as a color triangle in the CIE chrom...

Page 151: ...point makes the image look more cyanish Increasing the desired Y value of the white point makes the image look more greenish Decreasing the desired Y value of the white point makes the image look mor...

Page 152: ...In the Dynacolor Set dialog enter a well considered new value for X and or Y of White Image 7 169 Note Make sure that the new X Y position is within the desired color triangle 148 R59770288 GALAXY NW...

Page 153: ...values if not needed Altered color values will not guarantee optimal image reproduction Overview Introduction Black Color adjustment for Set 1 7 9 7 7 1 Introduction Black Color uniformity In a multi...

Page 154: ...lect the Display setup item 3 Press to Pull down the Display setup menu 4 Use or to select Dynacolor 5 Press to open the menu 6 Use or to select Black Color matching 7 Press to open the menu 8 Use or...

Page 155: ...During the blanking period before projecting the right image the left shutter is closed and the right shutter will open 3 The right image is projected the right shutter is open allowing the right eye...

Page 156: ...s Left Shutter Open O p e n i n g O p e n i n g C l o s i n g C l o s i n g Closed Right Shutter Open Closed DLP Mirrors Active Blanking Time Opening Too Late and or Closing Too Early Color Artifacts...

Page 157: ...slider box is displayed Image 7 177 8 Use or the numeric keys on the remote or the keypad to change the Dark time setting 7 9 8 2 Invert stereo What can be done This menu allows to set the stereo emit...

Page 158: ...acts on the input stage How to invert stereo 1 Press MENU to activate the Tool bar 2 Press to select the Display setup item 3 Press to Pull down the Display setup menu 4 Use or to select Stereo 5 Pres...

Page 159: ...eft Stereo Sync Left Right Delay Time Stereo Sync Left Right Frame Left Frame Right Without Stereo Phase Adjustment With Stereo Phase Adjustment t Image 7 180 Stereo Phase Adjustment How to adjust the...

Page 160: ...in a multichannel setup the Soft edge feature enables an image blending that gives the appearance of a single image thus achieving realistic immersion for the majority of simulation and virtual reali...

Page 161: ...is a Test Pattern Generator software that can generate a user defined test pattern that is used to align projection systems It also has the ability to generate predefined patterns for standardized pro...

Page 162: ...7 Advanced Image 7 185 Soft edge adjustment points Image 7 186 Soft edge points numbering Top and bottom side edges 158 R59770288 GALAXY NW 12 GALAXY NW 7 20 06 2013...

Page 163: ...in the levels underneath The level of the adjustment gives a measure of this impact A level 1 adjustment happens on the 4 corners of the soft edge zone and will thus affect the whole zone whereas a l...

Page 164: ...t level 1 till 6 At the bottom of the structure we find the level 6 points adjusting on level 6 will not affect any other points these are called local points 7 9 9 3 Accessing the Soft edge menu How...

Page 165: ...ined using a full white background Adjustment guide An adjustment guide consisting of a 4 brightness graduated bars can be applied on the background image during the soft edge adjustment Hierarchy lev...

Page 166: ...7 Advanced Image 7 192 Image 7 193 Image 7 194 Image 7 195 162 R59770288 GALAXY NW 12 GALAXY NW 7 20 06 2013...

Page 167: ...g the x axis How to start up the edit dialog box 1 Press the MENU key to activate the Tool bar 2 Push the cursor key or to highlight Display setup 3 Push the key to pull down the menu 4 Push or to sel...

Page 168: ...item is focused Image 7 197 2 Press ENTER The internal soft edge is selected Image 7 198 How to enable the soft edges 1 Push or to select the desired Edges check box 164 R59770288 GALAXY NW 12 GALAXY...

Page 169: ...0 3 Do the same for the other desired edges The default soft edge is applied on the selected edges How to select the source background 1 Push or to select the desired Source check box in this case we...

Page 170: ...he item is focused Image 7 201 2 Press ENTER The selected check box is checked and a full white image is displayed with the soft edges on the 4 sides Image 7 202 166 R59770288 GALAXY NW 12 GALAXY NW 7...

Page 171: ...Image 7 203 How to enable the adjustment guide 1 Push or to select the check box ON to enable the adjustment guide The item is focused Image 7 204 2 Press ENTER R59770288 GALAXY NW 12 GALAXY NW 7 20 0...

Page 172: ...is checked and the guide is displayed vertical and horizontal grey scale bars Image 7 205 Image 7 206 How to set the hierarchy level 1 Push or to select the hierarchy level slider box 168 R59770288 GA...

Page 173: ...e level 1 Image 7 208 2 Use the arrows to select a point to be displaced 3 Press ENTER to go to the Edit mode 4 Use the arrows to select the desired field 5 Press ENTER to edit the field The edit fiel...

Page 174: ...an alpha plane file Alpha planes must be uploaded in the following projector directory accessible via FTP D display Softedge The file must be named as follows alpha tiff The free storage capacity on t...

Page 175: ...oduction Internal black level Beta planes 7 9 9 5 1 Introduction Brightness uniformity In a multi channel system the brightness can vary over the different channels projectors The brightness level can...

Page 176: ...h noting however that internal black level via the dialog box is to be used for simple linear soft edge zones like in the illustration above Curved soft edge zone should be done using external beta pl...

Page 177: ...5 3 Beta planes Beta plane specification A beta plane is a bitmap file which will be applied to the image outside the soft edge zones in order to obtain a desired brightness level The file must be a T...

Page 178: ...e applied 7 9 9 6 Blanking What can be done Blanking or hard edging affects only the edges of the image and is used to frame the projected image on the screen and to hide unwanted image information or...

Page 179: ...al pixels per line and uses this information to adapt the image to the display AutoImage can adapt the image based on following data Total pixels lines Start pixel lines Phase Contrast brightness leve...

Page 180: ...switching on True motion reproduction this smearing effect will be considerably reduced How to enable disable the true motion reproduction 1 Press MENU to activate the Tool bar 2 Press to select the D...

Page 181: ...ing will allow the perfect alignment of the wheel with the data image processing left right image processing CAUTION This setting is only for Barco certified service personnel Changing this setting ma...

Page 182: ...it and change the values Image 7 222 7 10 2 Internal Patterns Overview The projector is equipped with different internal patterns which can be used for adjustment purposes Geometry adjustments can not...

Page 183: ...229 Convergence Gray Levels Red Levels Green Levels Blue Levels Level 1 Level 16 Min Level 0 Level 1 Level 16 Max Level 255 Image 7 230 Purity How to select an internal pattern 1 Press MENU to activa...

Page 184: ...ed internal pattern 7 Press ENTER The active selection is shown with a white bullet 7 10 3 Scaled patterns Overview Unlike the Internal Patterns the Scaled Patterns will be distorted according to the...

Page 185: ...he Tool bar 2 Press to select the Installation menu 3 Press to Pull down the menu 4 Use or to select Internal Patterns Image 7 235 5 Press to Pull down the menu 6 Use or to select the desired pattern...

Page 186: ...ress MENU to activate the Tool bar 2 Press to select the Installation menu 3 Press to Pull down the menu 4 Use or to select Formatter Patterns Image 7 238 5 Press to Pull down the menu 6 Use or to sel...

Page 187: ...or OFF 7 Press ENTER The active selection is shown with a white bullet 7 10 6 LFR How to use the LFR 1 The LFR is by default ON Leave it in the default position 7 10 7 Convergence What can be done It...

Page 188: ...to Pull down the menu 4 Use or to select Convergence Image 7 240 5 Press ENTER The dialog box to adjust the convergence is displayed Image 7 241 How to adjust the convergence 1 In the box Adjustment...

Page 189: ...tion 7 11 2 Option key CAUTION This menu is only intended for authorized personnel Only to be used to activate your option key purchased at Barco How to activate a new purchased option 1 Press MENU to...

Page 190: ...g 7 11 4 2 Warning messages What can be done It is possible to block some Warning messages during projector runtime The table below gives an overview of those messages that can be suppressed during ru...

Page 191: ...n the Service menu 4 Use or to select Operation options 5 Press to pull down the Operation Options menu 6 Use of to select Warning Messages 7 Press to pull down the Warning Messages menu 8 Use or to s...

Page 192: ...7 Advanced 188 R59770288 GALAXY NW 12 GALAXY NW 7 20 06 2013...

Page 193: ...oling liquid level add cooling liquid if the reservoir is not full Qualified Product Specialist Time dependent maintenance Some maintenance tasks must be performed on a regular time base Frequency Mai...

Page 194: ...1 Check if all screws bolts and nuts are present and tight Insert missing screws or bolts add missing nuts and or tighten loose screws bolts or nuts 2 Check the housing on damage deformation discolor...

Page 195: ...urce cables Stereo sync cables Communication cables RS232 Ethernet Wired RCU All connectors should be well plugged in Reconnect in case of doubt 8 3 Cleaning housing and mechanical structure How to cl...

Page 196: ...d level of the cooling system must be checked before first use and then on a regular basis This must be done by a Qualified Product Specialist The interval depends on the size of the reservoir and can...

Page 197: ...nstalling the fan outlet Installing the rear cover 8 6 1 Lamp description Description The lamp is a 2 kW Xenon lamp A lamp that has reached its end of life can be refurbished a number of times This im...

Page 198: ...Image 8 2 Lamp Xenon lamp 8 6 2 Removing the rear cover Necessary tools Philips Ph2 How to remove the rear cover 1 Remove the fixing screw Image 8 3 Rear cover fixing screw 2 Lift the back side of the...

Page 199: ...lotted screwdriver 5 mm How to remove the fan outlet 1 Remove the rear cover see concerning chapter 2 Remove the fixing screw of the fan outlet Image 8 7 Fan outlet fixing screw 3 Take out the fan out...

Page 200: ...ter 3 Release the two no drop screws of the lamp Image 8 9 Lamp fixing screws 4 Pull the lamp to the left side of the projector away from the connector until the lamp feet are free and the lamp can be...

Page 201: ...lot Tip Use the top handle of the lamp Image 8 13 Lamp feet Image 8 14 Lamp house slider slot 2 Push the lamp down until it is at the bottom of the projector Image 8 15 Lamp installation 3 Slide the l...

Page 202: ...e lamp the correct alignment of the lamp info connector can be easily achieved 5 Fix the lamp using the two no drop screws Image 8 17 Lamp screws 6 Install the fan outlet muffler see concerning chapte...

Page 203: ...ear cover in the holes on the top cover Tip The rear cover must be tilted to perform this step Image 8 20 Installing the rear cover step 1 2 Slide the rear cover forward and bring the back side down I...

Page 204: ...8 Maintenance Image 8 24 Installing the rear cover step 5 200 R59770288 GALAXY NW 12 GALAXY NW 7 20 06 2013...

Page 205: ...act Barco s Helpdesk concerning an error code make sure to mention the prefix and both digits since this data is most useful for Barco engineers to determine which actions have to be taken 9 1 2 Overv...

Page 206: ...Data range Lamp info L 14 Lamp info error LPS comm LPS L 21 LPS1 error Lamp fail LPS L 22 Lamp fail No external error LPS1 L 23 LPS1 no external error LPS1 L 30 LPS1 error PFC failure LPS1 L 31 LPS1...

Page 207: ...DVI out file error Output layer H 72 FPGA file error 9 2 Trouble shooting through the OSD What can be done The projector bus allows the diagnostic of different hardware components divided in two main...

Page 208: ...nu 1 Press MENU to activate the Tool bar 2 Press to select the Service item 3 Press to Pull down the menu 4 Use or to select Diagnostics 5 Press to pull down the menu 6 Use or to select Lamps and powe...

Page 209: ...wn the menu 6 Use or to select Formatter and press ENTER Image 9 6 A text box is displayed Image 9 7 How to display the temperatures and the fan speeds 1 Press MENU to activate the Tool bar 2 Press to...

Page 210: ...to select Diagnostics 5 Press to pull down the menu 6 Use or to select Display mode and press ENTER Image 9 10 A text box is displayed Image 9 11 How to enable the warning messages 1 Press MENU to ac...

Page 211: ...this section we start from the symptoms that can be seen in case of an unusual situation to come to a possible cause and solution or to detect which module is causing the problem It is a first level...

Page 212: ...R IN STANDBY Replace lamp Select a source Connect a source Check wires and connectors Check image generator Switch to active state STRETCHED SHRUNK IMAGE Set Aspect ratio WRONG ORIENTATION Set the Ori...

Page 213: ...0 xml 625 576 864 675 SVGA 60 xml 628 600 1056 800 SVGA 85 xml 631 600 1048 800 1600 192 xml 651 600 2160 1600 ESVGA 73 xml 660 624 1120 832 SVGA_1 72 xml 666 600 1040 800 SG_60_3 60 xml 720 680 1260...

Page 214: ...1089 1050 1864 1400 HD_1080P 60 xml 1118 1080 2576 1920 HD_1080I 60 xml 1125 1080 2200 1920 HD_30P 30 xml 1125 1080 2200 1920 HD_25I 50 xml 1125 1080 2640 1920 HD_25P 25 xml 1125 1080 2640 1920 HD_24S...

Page 215: ...video 25 composite video 27 desktop input 28 linking 36 37 CLO 36 dynacolor 37 stereo 37 power 22 rgb 24 S Video 27 stereo 29 Connections 22 26 31 DVI 26 Stereo 31 Infitec 31 connectors 29 DVI output...

Page 216: ...n 9 11 15 17 19 22 23 39 50 178 180 182 183 configuration 19 connections 22 23 front panel 23 controls 39 convergence 183 guidelines 9 lens 15 17 formulas 15 lens range 15 password 50 patterns 178 180...

Page 217: ...startup 49 Preferences 49 projector 11 45 address 45 Projector position 11 R RCU address 44 rear cover 194 199 installing 199 removing 194 removing 194 195 fan outlet 195 lamp 195 rear cover 194 Renam...

Page 218: ...out 183 StereoCreatorTM 132 T Temperature 9 Ambient 9 Textbox 130 The soft edge edit wizard 161 Timer 128 tint 64 TMR 176 Transport Delay Geometry 112 trouble shooting 201 203 through the OSD 203 tro...

Page 219: ...1200 68 7 37 Stereo Swapped fields 76 7 42 Two DVI signals detected 78 7 49 Two sources displayed simultaneously bullet one source available Barco logo 81 7 71 Geometry file notation 91 7 73 The scree...

Page 220: ...ntal ramp 182 7 237 Vertical ramp 182 8 1 Container types 192 8 2 Lamp Xenon lamp 194 8 3 Rear cover fixing screw 194 8 4 Tilt the back side of the rear cover 195 8 5 Pull the rear cover backward 195...

Reviews: