


System Setup
For detailed installation instructions, refer to
“
EC-200
controller connection”
of the User’s Guide.
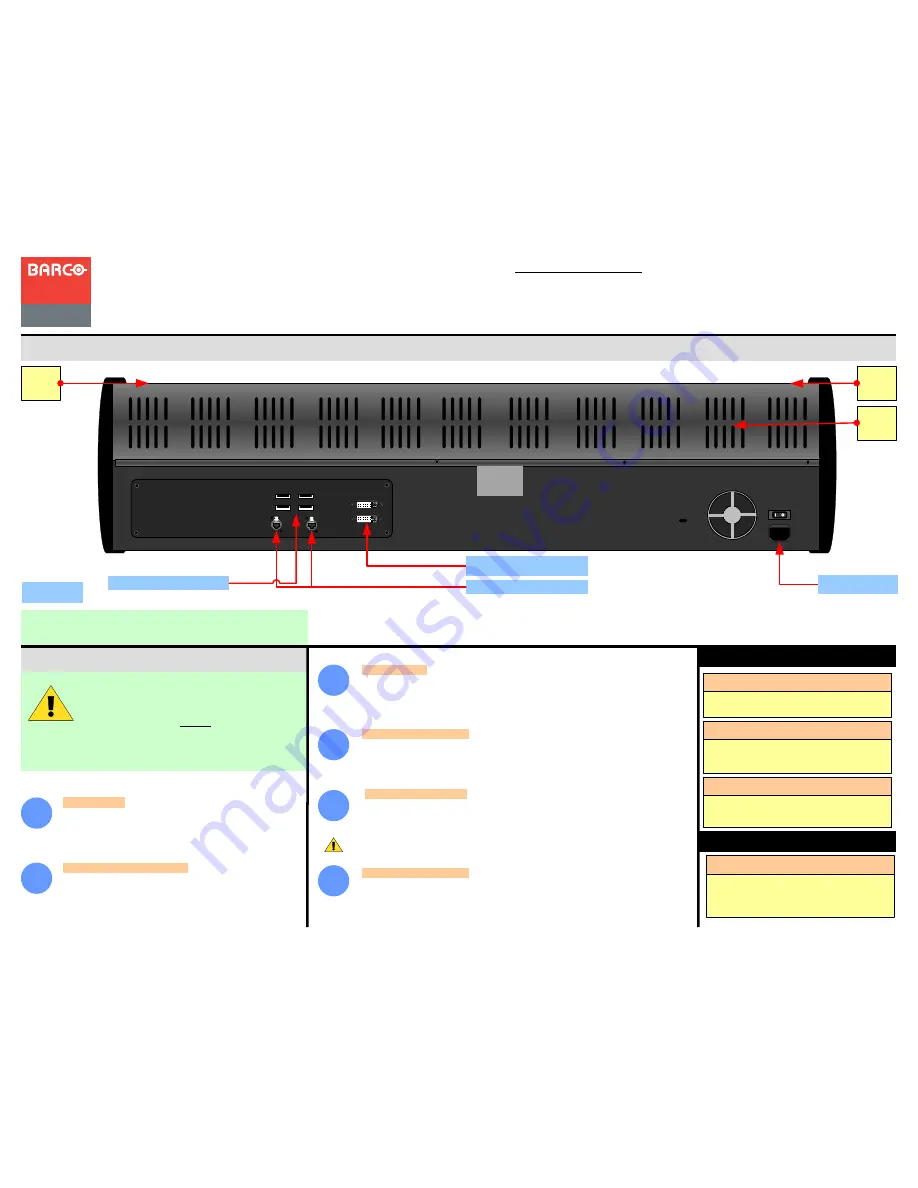
USB
DVI-D
EC-200 Event Controller
EC-200 Rear
Panel
Event Master Series EC-200
Quick Start Guide - Setup
Visibly yours
P/N 60600333, Rev 00
Power Up and Status Check
— Power up the
EC-200 by the power switch close to the power connector.
Unit should begin to power up within 10sec.
1
Connections
—
Connect the mains supply, USB keyboard
and Mouse (optional). Connect an Ethernet cable to the Event
Master processor, VP emulator or network switch. Mains
cables are provided for US and European plugs.
Network
connector 1 is static IP 192.168.0.180 Network connector 2
is DHCP assigned IP.
2
3
5
4
6
System setup is comprised of sequences,
each of which includes many steps.
For error-free setup, always refer to the
associated section in
Chapter
”Controller
Configuration”
of the User’s Guide.
Event Master Series Controller Installation: System Connection, startup and shut down
Start Up order
— The EC-200 has a very uncomplicated start up to the user. The two
screens have a Barco Logo that will light up and disapear when the EC-200 activates the
screen controller. Once the EC-200 start, screens will show a brief moment of white text
on black and then show the controller menupage on the left screen and the configuration
page on the right screen.
Communications Setup
— Connected processors should show up in in the left side of
the Configuration menu page. If there is no processor listed the Communication Setup
Tab should be checked for settings.
Startup state of the desk
— Once the EC-200 is connected and started it will retrive
the configuration of the connected processor. If there is no configuration it will have to
be assigned.
Script
Light
DVI-D Screen output 1 and 2
4 x USB A
The Red backlight on the EC indicates power is on.
This light can be adjusted in the Settings Menu
Rear light
LEDs
Rear
light
White light under the hand rest is for reading show
scripts. This light can be adjusted in the Settings
Menu
Work Light
Two flexible scriptlight connections and a LED
powered light adapter is supplied. Light can be
adjusted for brightness.
Scriptlight
Indications
If the Blue LED´s of the Destination buttons chase
back and forth they indicate that the communication
with the host controller is not established. For EC-200
this does not happen unless a failure.
Blue LEDs in Destination
Shutting down the desk
— The EC-200 has no shut down procedure as it is meant to
be able to lose power without any problem for the user.
Prior to turning off mains power,
it is recommended to press the save icon to save the settings to the video processor and
back up the show settings.
The only thing before simply power off the desk with the power switch is to press the
Save Icon and to make a Back Up of the show.
Barco Technical Support:
USA
: +1 (866) 374-7878
EMEA :
+32 (56) 36 8019
CHINA :
40088 22726
www.barco.com/support/eSupport.aspx
Ethernet Connection 1 and 2
BARCO
Script
Light
Tip
— If the network switch or other devices are not configured to allow for Auto
Discovery the Manual Connect can be used to add a Procesor.
AC 110 – 240V IEC