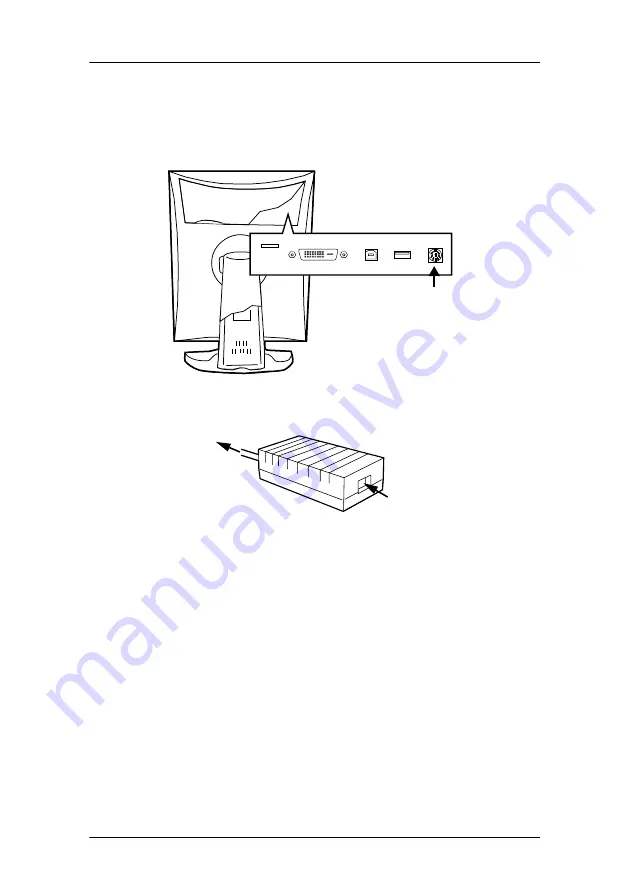
Power connection
44
Power connection
To connect the power:
Figure 13
Figure 14
1.
To get access to the connectors, remove the connector
compartment cover by pulling down the 2 clips at the top of the
cover.
2.
Connect the output of the 12V DC power supply to the DC input of
the display.
3.
Connect one end of the proper power cable to the AC input of the
12V DC power supply.
4.
Connect the other end of the power cord to a
grounded
power
outlet.
(2)
(3)
(2)
Summary of Contents for Coronis 21-inch Installation & user manua
Page 1: ...Installation User Manual Supported displays MFGD 2621 MFGD 3621 Coronis 21 inch...
Page 2: ...This page intentionally left blank 2 This page intentionally left blank...
Page 4: ...4 This page intentionally left blank...
Page 7: ...7 Preface...
Page 8: ...Preface This page intentionally left blank 8 This page intentionally left blank...
Page 16: ...Explanation of symbols This page intentionally left blank 16...
Page 17: ...17 Introduction...
Page 18: ...Introduction This page intentionally left blank 18 This page intentionally left blank...
Page 28: ...Parts controls and connectors This page intentionally left blank 28...
Page 29: ...29 Display controller installation...
Page 36: ...BARCOMED CORONIS display controller installation This page intentionally left blank 36...
Page 37: ...37 Display installation...
Page 38: ...Display installation This page intentionally left blank 38 This page intentionally left blank...
Page 51: ...51 Display controller software installation...
Page 57: ...Display controller software installation 57 Figure 21...
Page 58: ...Display controller software installation This page intentionally left blank 58...
Page 59: ...59 Settings for optimal display performance throughout the product lifetime...
Page 62: ...Avoiding image retention This page intentionally left blank 62...
Page 63: ...63 Display controller tools...
Page 71: ...71 Display operation...
Page 72: ...Display operation This page intentionally left blank 72 This page intentionally left blank...
Page 85: ...85 MediCal Pro software...
Page 86: ...MediCal Pro software This page intentionally left blank 86 This page intentionally left blank...
Page 88: ...MediCal Pro installation and operation This page intentionally left blank 88...
Page 89: ...89 Cleaning instructions...
Page 90: ...Cleaning instructions This page intentionally left blank 90 This page intentionally left blank...
Page 96: ...LCD panel This page intentionally left blank 96...
Page 97: ...97 Troubleshooting...
Page 98: ...Troubleshooting This page intentionally left blank 98 This page intentionally left blank...
Page 105: ...105 Technical Information...
Page 110: ...Technical specifications 110 Altitude 7500 m storage 3000 m operation Item Specification...
Page 113: ...113 Warranty Statement...
Page 114: ...Warranty Statement This page intentionally left blank 114 This page intentionally left blank...


