


149
R5911705 /02
Bragi
8.5.10 CLO
—
Constant light output
CLO introduction
This function will ensure that the projector adjusts its illumination power to maintain the same level of output
light during the lifetime of the light source. This requires that the LED power is not set to 100% from the start,
but to a lower value. The lower this value is set, the longer the projector will manage to maintain the level. This
is due to the fact that the light source has a naturally decreasing intensity over time.
How to set the CLO
1.
Enter the menu
Installation/Illumination
Note:
The CLO feature is not designed to compensate the Iris adjustment. This means that if the CLO is set,
and the Iris is adjusted, it will affect the output light.
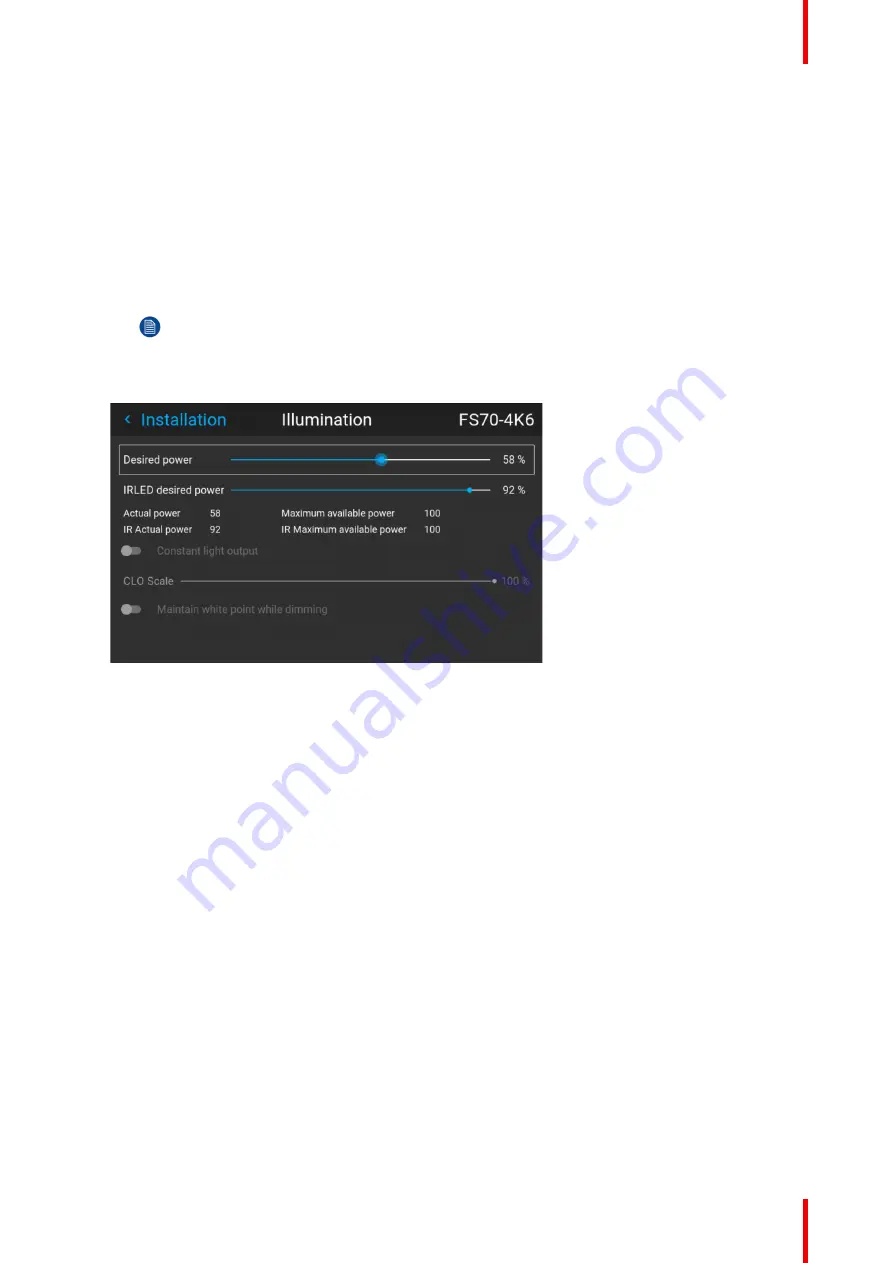
The illumination menu shows up
Image 8
–
52
2.
Set the desired power slider to an appropriate value, see
“”
, .
3.
Select the CLO button in the menu by the arrow keys on the remote control, and activate by pressing
enter.
The output power will now remain constant
CLO scale slider
When the CLO button is enabled, the Desired power slider will be disabled, and by that not possible to adjust.
But if there is a short term need for further reduction of the output power, the CLO Scale slider can be used.
The output will then be reduced with a percentage in relation to the desired power value.
E.g.; if desired power is set to 80%, and CLO scale is set to 50%, the output power will be 40% of max.
This will enable the users to calibrate luminance, and not only laser power in both single and multi-channel
setup. This enables the CLO to maintain and adjust the light output. In multi-channel setup this make it
possible to be able to dim the entire image using the same scale value on all channels.
This functionality is particularly useful for multi-channel installations. Only available through API commands,
and is by that not accessible via the projectors User Interface.
Summary of Contents for Bragi
Page 1: ...ENABLING BRIGHT OUTCOMES Installation Guide Bragi ...
Page 34: ...R5911705 02 Bragi 34 250mm 250mm Image 3 1 Physical installation ...
Page 48: ...R5911705 02 Bragi 48 Physical installation ...
Page 52: ...R5911705 02 Bragi 52 4 1 2 Connector Specifications Getting the projector started ...
Page 63: ...63 R5911705 02 Bragi 4 4 Power mode transitions Getting the projector started ...
Page 73: ...73 R5911705 02 Bragi 4 7 User interface Getting the projector started ...
Page 79: ...79 R5911705 02 Bragi Note You cannot change the EDID for SDI connectors Source menu ...
Page 88: ...R5911705 02 Bragi 88 6 6 Gamma Types Image menu ...
Page 93: ...93 R5911705 02 Bragi 6 8 Advanced image adjustments Image menu ...
Page 104: ...R5911705 02 Bragi 104 Image menu ...
Page 105: ...105 R5911705 02 Bragi Advanced picture adjustments 7 ...
Page 112: ...R5911705 02 Bragi 112 Advanced picture adjustments ...
Page 114: ...R5911705 02 Bragi 114 8 1 Lens Installation menu ...
Page 121: ...121 R5911705 02 Bragi Image 8 11 Installation menu ...
Page 122: ...R5911705 02 Bragi 122 8 4 Warping Installation menu ...
Page 128: ...R5911705 02 Bragi 128 Image 8 22 Installation menu ...
Page 137: ...137 R5911705 02 Bragi 8 5 Blending Installation menu ...
Page 154: ...R5911705 02 Bragi 154 Installation menu ...
Page 162: ...R5911705 02 Bragi 162 GUI Profiles ...
Page 165: ...165 R5911705 02 Bragi 10 2 IR control System settings menu ...
Page 180: ...R5911705 02 Bragi 180 System settings menu ...
Page 184: ...R5911705 02 Bragi 184 GUI Status menu ...
Page 186: ...R5911705 02 Bragi 186 3D ...
Page 190: ...R5911705 02 Bragi 190 Index ...
Page 191: ......


