


143
R5911705 /02
Bragi
8.5.5 Black level setup procedure
Black level introduction
The Purpose of the black level adjustment is to adjust the black levels in the non overlapped areas with the
black level in the overlapped areas (Blend Zone).
This is a necessary function, due to the fact that the black level will be brighter in the blend zones, since
multiple projectors will add light in these zones.
The width of the black level area shall ideally be slightly larger than the width of the blend zone in order to also
compensate for the
“
sea of mirrors
”
phenomenon.
The figure below shows how this occurs in a side by side configuration without any correction of the black
level.
Picture Left
Picture Right
Blend Zone
Image 8
–
44
Black level adjustment procedure
1.
Select the menu
Installation/Blend and mask/Black level.
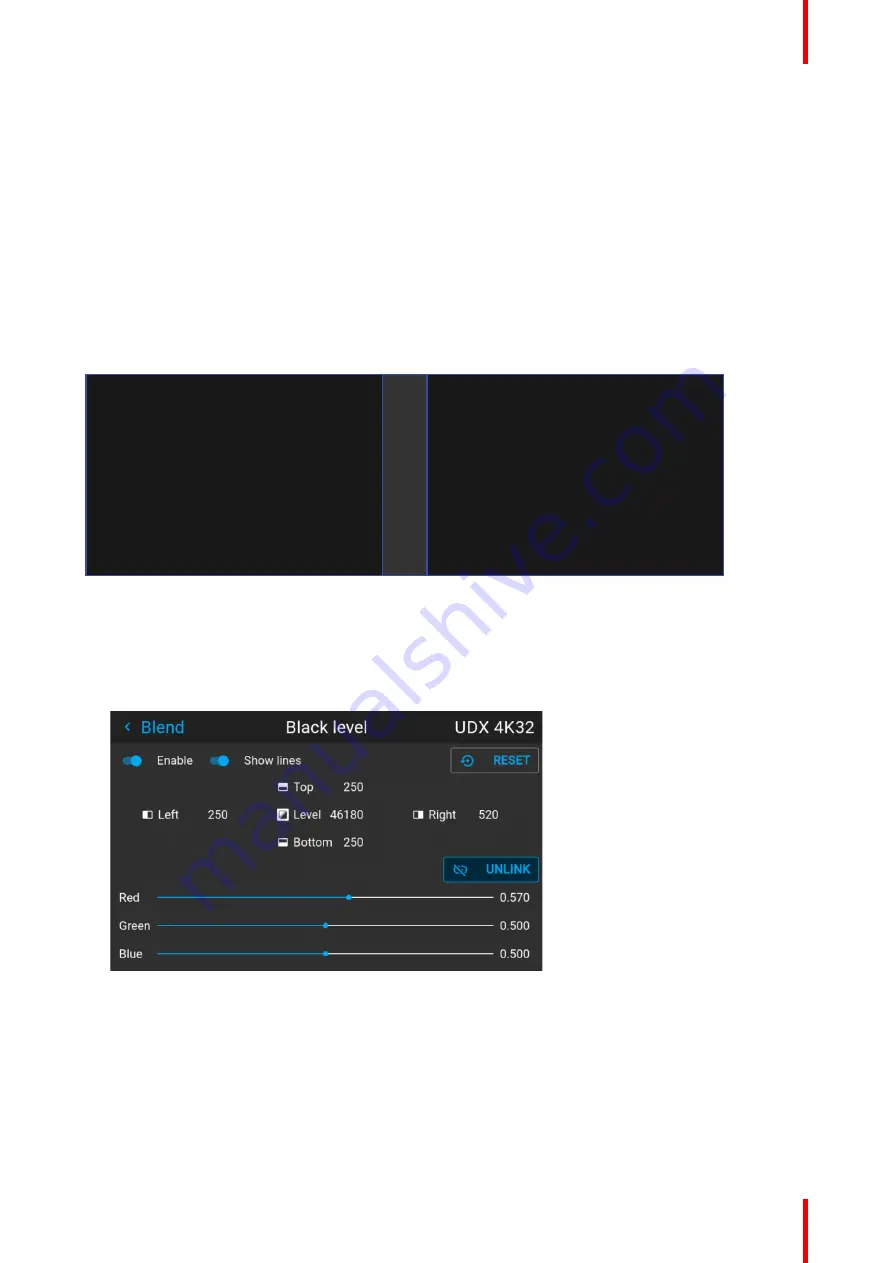
2.
Enable the
”
Black level
”
and
“
Show lines
”
buttons. A line that indicates the blend zones will be visible on
the screen when
“
Show lines
”
is enabled.
Image 8
–
45
3.
Move the cursor to the side where the overlapped area occurs. (Left/right/top/bottom.) For the left
projector, this will typically be the right side in the menu as an example.
4.
Press enter, and adjust the value with the arrow keys. The icon shown below will appear on the OSD when
the side is selected. The value shall typically be the same as for the basic blend line. (Same numeric
value).
Summary of Contents for Bragi
Page 1: ...ENABLING BRIGHT OUTCOMES Installation Guide Bragi ...
Page 34: ...R5911705 02 Bragi 34 250mm 250mm Image 3 1 Physical installation ...
Page 48: ...R5911705 02 Bragi 48 Physical installation ...
Page 52: ...R5911705 02 Bragi 52 4 1 2 Connector Specifications Getting the projector started ...
Page 63: ...63 R5911705 02 Bragi 4 4 Power mode transitions Getting the projector started ...
Page 73: ...73 R5911705 02 Bragi 4 7 User interface Getting the projector started ...
Page 79: ...79 R5911705 02 Bragi Note You cannot change the EDID for SDI connectors Source menu ...
Page 88: ...R5911705 02 Bragi 88 6 6 Gamma Types Image menu ...
Page 93: ...93 R5911705 02 Bragi 6 8 Advanced image adjustments Image menu ...
Page 104: ...R5911705 02 Bragi 104 Image menu ...
Page 105: ...105 R5911705 02 Bragi Advanced picture adjustments 7 ...
Page 112: ...R5911705 02 Bragi 112 Advanced picture adjustments ...
Page 114: ...R5911705 02 Bragi 114 8 1 Lens Installation menu ...
Page 121: ...121 R5911705 02 Bragi Image 8 11 Installation menu ...
Page 122: ...R5911705 02 Bragi 122 8 4 Warping Installation menu ...
Page 128: ...R5911705 02 Bragi 128 Image 8 22 Installation menu ...
Page 137: ...137 R5911705 02 Bragi 8 5 Blending Installation menu ...
Page 154: ...R5911705 02 Bragi 154 Installation menu ...
Page 162: ...R5911705 02 Bragi 162 GUI Profiles ...
Page 165: ...165 R5911705 02 Bragi 10 2 IR control System settings menu ...
Page 180: ...R5911705 02 Bragi 180 System settings menu ...
Page 184: ...R5911705 02 Bragi 184 GUI Status menu ...
Page 186: ...R5911705 02 Bragi 186 3D ...
Page 190: ...R5911705 02 Bragi 190 Index ...
Page 191: ......


