background image

Assembly Instructions 

DO NOT 

tighten screws until grill is completely assembled

Step 1 

Attach bottom mesh to leg (I Washer 4Pcs / D Wing nut 4Pcs).

I

D

Step 2 

Attach leg assembly to bottom bowl (B Screw 4Pcs / I Washer 4Pcs). 

2

B

I

Summary of Contents for GBBK/GBBKR

Page 1: ...ble Charcoal Grill For Outdoor Use Only WARNING BE CAREFUL OF SHARP EDGES DURING ASSEMBLY MADE IN CHINA Save these instructions for future reference If you are assembling this unit for someone else give this manual to him or her to save for future reference ...

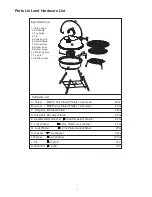
Page 2: ...g Nut M6 Steel Plated 6Pcs E Heat Resistant Washer 6 Heat Resistant Washer 6Pcs C Wing Nut M5 Steel Plated 4Pcs B Screw M6X15 Zinc Plated Phillips Truss Head 4Pcs A Screw M5X10 Zinc Plated Phillips Truss Head 4Pcs Hardware List 6 5 1 Wire handle 2 Lid handle 3 Top hinge 4 Lid 5 Cooking grid 6 Charcoal grid 7 Ash receiver 8 Bottom bowl 9 Bottom hinge 10 Warming rack 11 Leg 4 12 Bottom mesh 11 Explo...

Page 3: ...nstructions DO NOT tighten screws until grill is completely assembled Step 1 Attach bottom mesh to leg I Washer 4Pcs D Wing nut 4Pcs I D Step 2 Attach leg assembly to bottom bowl B Screw 4Pcs I Washer 4Pcs 2 B I ...

Page 4: ...Step 3 Attach wire handle to bottom bowl I Washer 2Pcs I Step 4 Attach bottom hinge to bottom bowl A Screw 2Pcs E Heat resistant washer 2Pcs H Washer 2Pcs F Lock washer 2Pcs C Wing nut 2Pcs 3 A E H F C ...

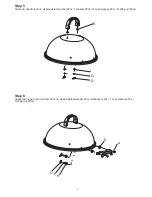
Page 5: ...to lid E Heat resistant washer 2Pcs I Washer 2Pcs G Lock washer 2Pcs D Wing nut 2Pcs 4 Step 6 Attach top hinge to lid A Screw 2Pcs E Heat resistant washer 2Pcs H Washer 2Pcs F Lock washer 2Pcs C F H A E I G D E C Wing nut 2Pcs ...

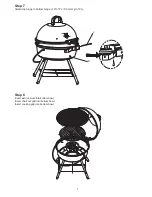
Page 6: ...Step 7 Attach top hinge to bottom hinge J Pin 1Pc K Cotter pin 1Pc K J Step 8 Insert ash receiver into bottom bowl Insert charcoal grid into bottom bowl Insert cooking grid into bottom bowl 5 ...

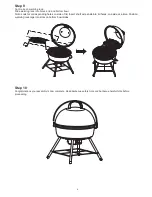
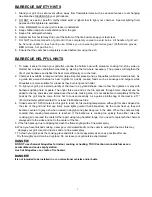
Page 7: ...ote Look for corresponding holes on side of lid Insert short wire ends into lid holes one side at a time Position warming rack legs into slots on bottom bowl sides 6 Step 10 Congratulations your assembly is now complete Read barbecue safety hints and barbecue helpful hints before proceeding ...

Page 8: ... lighters or spray with barbecue lighting fluid or paste Then light this area and as the fire spreads through more charcoal can be added to the top and sides and spread over the whole cooking area It is not advisable to completely fill the fire bowl as the grill may be come far too hot to cook successfully As a guide a 6 6lbs bag of charcoal in a 17 43cm diameter grill should last for at least 2 f...

Reviews: