background image

5.4

Clean the anti-reflective glass

Warning: Before the start of this procedure make sure the appliance is off and

cooled down to room temperature.

Caution:
• Do not use hard (scouring) sponges, steel wool, abrasive products, caustic

products, or cleaning agents that contain ammonia. The use of these items

on the glass can damage the coating layers.

• Use neutral cleaning agents to clean the glass. This includes products like

'Instanet' or 'Glassex'.

1. Clean the glass with a soft cloth or a sponge.
2. Make sure that the glass is dry. Water droplets can leave a mark on the coating.

Maintenance

Gas Fire Panorama 90-55

23

Summary of Contents for 90-55 PF2

Page 1: ...User manual Gas Fire Panorama 90 55 PF2 Serial number Production date...

Page 2: ...thout the prior written permission of Barbas Bellfires BV This document could contain technical inaccuracies or typographical errors Barbas Bellfires BV reserves the right to revise this document from...

Page 3: ...n 11 3 3 Safety instructions with regard to the environment 12 4 Operation 13 4 1 Preparation before first use 13 4 1 1 Do a check on the appliance 13 4 1 2 Prepare the appliance 13 4 1 3 Connect the...

Page 4: ...6 2 Troubleshooting procedures 24 6 2 1 Replace the batteries of the remote control 24 7 Technical data 26 7 1 Barbas Gas Fire Panorama 90 55 PF2 GB IE ES IT 26 8 Warranty Terms 28 9 EU Declaration of...

Page 5: ...The illustrations are for instructional use only 1 1 How to work with this document 1 Make yourself familiar with the structure and content of the document 2 Read the safety chapter in detail 3 Make...

Page 6: ...n F Inlet convection air optional G Outlet convection air optional H Overpressure hatch I Convection casing optional J Overpressure relief openings K Operating unit Figure 1 Overview of Gas Fire Panor...

Page 7: ...he buttons A Display B On off C Countdown timer D Thermostatic mode E Up F Program mode G Burner mode H Eco mode I Down J Fan Not applicable K Light Figure 2 Remote control buttons Description Gas Fir...

Page 8: ...e 3 Remote control display 2 4 Operation modes 2 4 1 Thermostatic mode In this mode the appliance measures the room temperature and compares this to the set temperature The appliance automatically adj...

Page 9: ...u can set a period of time after which the appliance stops The countdown timer mode only operates when the appliance is set to the manual thermostatic or eco mode 2 5 Overview of the control elements...

Page 10: ...he fan light module A Connection for the ambient lights B Connection for a convection fan C connection for the power supply D Connection for the receiver Figure 5 Fan light module Description 10 Gas F...

Page 11: ...ake sure that the appliance is installed correctly Refer to the Installation and Maintenance manual Make sure that the appliance is installed and connected as a room sealed system appliance by a certi...

Page 12: ...pose of batteries as chemical waste Dispose of ceramic heat resistant glass as household waste Do not dispose of ceramic heat resistant glass in a glass recycling container Dispose of an obsolete appl...

Page 13: ...ey becomes warm 4 Use the appliance with maximum flame height for several hours to remove the smell of the coating 5 When the appliance is cool clean the appliance Refer to 5 2 4 1 3 Connect the recei...

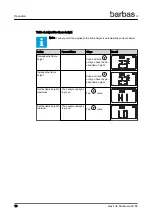
Page 14: ...nges into 2 when the remote control is set to the two button operation The 2 changes into 1 when the remote control is set to the one button operation 4 2 2 Set the temperature scale If you set the te...

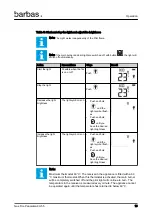
Page 15: ...ne button operation Refer to section 4 2 1 Push You hear a short beep You can use the re mote control when the main screen shows Start the appliance with two button opera tion The remote control is se...

Page 16: ...he child proof mode Push and at the same time You can only use the off function of the remote control Stop the child proof mode Push and at the same time Start the thermostatic mode Push Stop the ther...

Page 17: ...ner Note When you start the appliance the front burner is on and the rear burner is set to the last setting The rear burner is always set to the last selected setting even when the batteries of the re...

Page 18: ...t Decrease the flame height Push and hold until you have the de sired flame height Increase the flame height Push and hold until you have the de sired flame height Set the flame height to maximum The...

Page 19: ...sh es Push and hold until you have the desired light brightness Increase the light brightness The light symbol is on Push and hold until the light symbol flash es Push and hold until you have the desi...

Page 20: ...When the batteries are removed from the remote control the set temperatures days and times are reset Default settings Temperature when the appliance starts 21 C 70 F Temperature when the appliance st...

Page 21: ...settings 4 4 3 Set the countdown timer mode Note The maximum period of time you can set for this mode is 9 hours and 50 minutes 1 Push and hold the countdown timer button until the display shows the c...

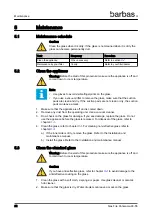
Page 22: ...m the operating unit Use a vacuum cleaner 3 Do a check on the glass for damage If you see damage replace the glass Do not use the appliance before the glass is replaced For disposal of the glass refer...

Page 23: ...asive products caustic products or cleaning agents that contain ammonia The use of these items on the glass can damage the coating layers Use neutral cleaning agents to clean the glass This includes p...

Page 24: ...e the batteries of the re mote control Refer to section 6 2 1 The appliance does not re spond to the remote control The batteries of the remote control are empty The system has a failure On the receiv...

Page 25: ...the cover of the remote control 2 Remove all batteries 3 Install new batteries For approved batteries refer to section 7 4 Close the cover of the remote control 1 2 Troubleshooting Gas Fire Panorama...

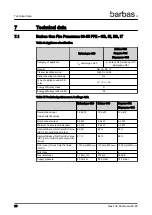
Page 26: ...Technical performance settings data Natural gas G20 Butane G30 Propane G31 Biopropane G31 Nominal heat input Gross calorific value 12 5 kW 12 5 kW 12 0 kW Nominal heat output 9 6 kW 9 6 kW 9 2 kW Min...

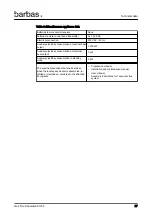
Page 27: ...5 kW Auxiliary electricity consumption at minimum heat output 0 kW Auxiliary electricity consumption in standby mode 0 kW The specific precautions that shall be taken when the local space heater is as...

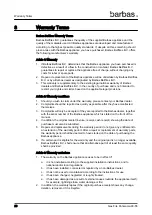
Page 28: ...they have manifested themselves 3 Complaints will only be accepted if they are reported to the Barbas dealer together with the serial number of the Barbas appliance which is stated on the front of the...

Page 29: ...t automatically imply that Barbas Bellfires B V also accepts liability for any possible damage The liability of Barbas Bellfires B V never extends further than that stated in these warranty conditions...

Page 30: ...9 EU Declaration of Conformity EU Declaration of Conformity 30 Gas Fire Panorama 90 55...

Page 31: ...EU Declaration of Conformity Gas Fire Panorama 90 55 31...

Page 32: ...Your Barbas dealer 001 02 04 2021 351327...

Reviews: