Installation of Transceiver
Select a safe and convenient site in your vehicle so as to reduce possible damage to your
passenger or yourself during vehicle movement. You may install the transceiver blow the
dashboard in front of the front passenger seats so that your knees and legs will not collide the
transceiver in case of emergency brake. It’s best to select a well ventilated location which is
shielded from direct sunlight.
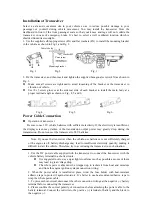
1. Use the supplied self-tapping screws (4X) and flat washers (4X) to install the mounting bracket
in the vehicle as shown in Fig. 1 and Fig. 2.
Fig. 1 Fig.2 Fig. 3
2. Fix the transceiver, and then insert and tighten the supplied hexagonal screws (4X) as shown in
Fig. 3.
z
Make sure all screws are tightened to avoid loosening of the bracket or the transceiver in
vibration of vehicle.
z
Use the 3 screw grooves at the side rear side of each bracket to install the main body at a
proper inclined angle as shown in Fig., 4, 5 and 6.
Fig. 4 Fig. 5 Fig. 6
Power Cable Connection
Operation of transceiver
Be sure to use 12V vehicle batteries with sufficient electricity. If the electricity is insufficient,
the display screen may darken or the transmission output power may greatly drop during the
transmission. Do not connect the transceiver to 24V batteries.
Note: If you use the transceiver when the vehicle-use batteries are not sufficiently charged
or the engine is off, battery discharge may lead to insufficient electricity quantity, making it
difficult to start the vehicle. Therefore, try to avoid using the transceiver in such situation.
1. Use the DC power cable supplied with the transceiver to connect the transceiver with the
vehicle battery terminal in a shortest route.
z
It is suggested not to use a cigar lighter outlet as much as possible as some of them
may lead to great voltage drop.
z
The whole power cable must be wrapped up to isolate it from heat and moisture
and from the engine ignition system/connection wiring.
2. When the power cable is installed in place, wind the fuse holder with heat-resistant
adhesive tape to protect it against moisture. It’s better to use heat-resistant adhesive tape to
wrap the whole power cable.
3. To prevent short-circuit, disconnect the other connection wirings at the negative (-) battery
terminal before connecting the transceiver.
4. Please confirm the correct polarity of connections before attaching the power cable to the
battery terminal. Connect the red wire to the positive (+) terminal of battery and the black to
the negative (-).
Vehicle body
Mounting bracket
Cone screw
Washer M5


