3.3.4 Unlocking the keypad
After power-on, the
Aurora H2O
keypad is locked as
indicated by the symbol
, lit up with a red backlight. It is
necessary to enter the keypad unlock sequence to make
any changes to the
Aurora H2O
.
Similar to a mobile phone, the
Aurora H2O
will prompt
the operator to unlock if any key is pressed. A passcode is
required to use certain factory service features only.
To unlock the keypad, press cancel
, enter
, cancel
in sequence.
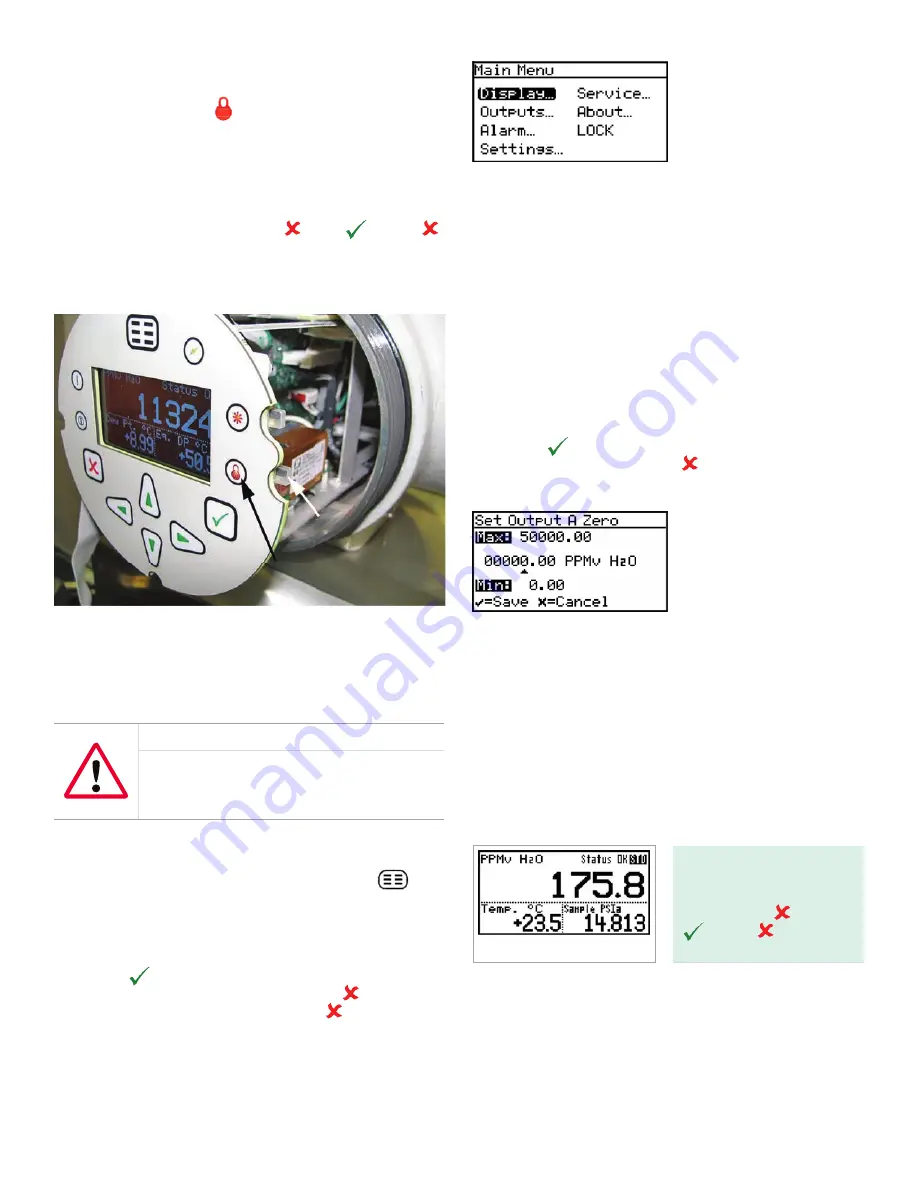
3.3.5 Keypad lock-out switch
Keypad lock indicator
Keypad
lock-out switch
Figure 37: Keypad lock-out switch location
NOTE:
If the keypad lock-out switch is in the “down” position,
the keypad is locked out and the
red
led on the keypad lock
indicator is on all the time.
WARNING!
Do not open or remove the cover with the
power on, unless the area is non-hazardous.
3.3.6 Accessing the menus
After successfully unlocking the keypad, press the
menu key. The
Aurora H2O
will display the main menu
(see Figure 38 below). Use the arrow keys to highlight
the menu item desired. Refer to menu map, Figure 45 on
page 50.
Press enter
to select the highlighted item. Many menu
items will display another menu. Use cancel
to return to
the previous menu page. Pressing cancel
from the main
menu will return the screen to the measurement display.
NOTE:
Menu items displayed with an ellipsis (shown as
a series of three dots after the menu item) will bring up
more choices, while those without take immediate action.
Figure 38: Main menu
3.3.7 Entering numeric values
Since the
Aurora H2O
has no numeric keypad, numeric
values are entered using a “combination lock” style of entry:
Use the left
and right
arrow keys to select the digit to
change. The digit selected will be indicated with a
.
Use the up
and down
arrow keys to increment or
decrement the digit.
NOTE:
If incrementing or decrementing a digit would
cause the numeric value to exceed its allowable range
(maximum/minimum value), the digit will not change.
Press enter
to save the new value and return
(see Figure 39 below), or cancel
to return, leaving the
original value intact.
Figure 39: Numeric entry
3.3.8 Starting up
After proper installation, the
Aurora H2O
transmitter can be
set up to accommodate the user’s requirements. Typically,
the user may need to configure the analog outputs, trim
the analog outputs, and program the digital outputs. Refer
to the menu map, Figure 45 on page 50, and complete
the following steps. Upon startup, the
Aurora H2O
proceeds
through several displays until a screen similar to the
following appears:
After startup, the screen
will need to be unlocked.
To unlock the screen,
select cancel
, enter
, cancel
NOTE:
In most instances; use the enter key to save an entry
and/or move ahead to the following screen; use the cancel
key to reject an entry and/or return to the previous screen.
26
Summary of Contents for Panametrics Aurora H2O
Page 2: ...ii...
Page 4: ...no content intended for this page proceed to next page iv...
Page 20: ...no content intended for this page 10...
Page 32: ...no content intended for this page 22...
Page 71: ...Figure 74 Exporting a simplified image Figure 75 Selecting enhanced metafile 61...


