


2.7.3 Setting the pressure
NOTE:
Perform these steps only after the entire system
has been plumbed, including the
Aurora H2O
.
1. Ensure the inlet sample gas isolation valve on the
Aurora H2O
sample system is closed. Open the isolation
ball valve at the optional pipeline insertion membrane
liquid separator/pressure regulator.
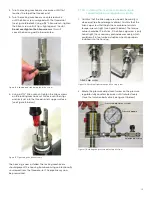
2. Turn the pressure adjustment screw clockwise to increase
the pressure (see Figure 23 below). The optional pipeline
insertion membrane liquid separator/pressure regulator
is the first stage pressure reduction of the system when
used. Depending upon your source pressure, you should
step down the pressure to a value in the range listed in
Table 2 below.
3. Tighten the lock nut down to the top of the pressure
regulator to avoid future possible changes in pressure
regulator setting, once the pressure is set.
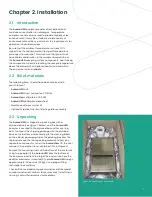
Table 2: Pressure settings
Source pressure
Outlet pressure setting
750 psig < source < 1500 psig
400-500 psig
500 psig < source < 750 psig
300 psig
< 500 psig
50% of the average
source pressure
Pressure
adjustment
screw
Lock
nut
Pressure
gauge
Figure 23: Turning the pressure adjustment screw
2.8 Making electrical connections
Refer to Figure 32 on page 21 for wiring connections.
1.
Aurora H2O
has three ¾” NPT conduit inlet ports for power
and I/O (see Figure 24 below). These will normally be
shipped plugged from the factory. Follow the applicable
wiring code and requirements for wiring the unit.
Figure 24: Conduit inlet ports
NOTE:
Use one conduit inlet for power. Use the two other
conduit inlets for input/output as needed. All unused conduit
inlet ports should be sealed with suitable blanking elements.
2. Select one conduit for inlet power to the
Aurora H2O
based on your configuration. The
Aurora H2O
comes
with a universal power supply, or optionally, as a 24VDC
powered unit. Remove the wiring cover to view the wiring
terminal block (see Figure 25 below).
Figure 25: Wiring terminal blocks
NOTE:
Supply connection wiring shall be rated at least 10°C
above the rate maximum service temperature of 85°C, be
stripped back 5/16 in. (8 mm) and torqued to a minimum of
4.4 in. lb. (0.5 Nm).
17
Summary of Contents for Panametrics Aurora H2O
Page 2: ...ii...
Page 4: ...no content intended for this page proceed to next page iv...
Page 20: ...no content intended for this page 10...
Page 32: ...no content intended for this page 22...
Page 71: ...Figure 74 Exporting a simplified image Figure 75 Selecting enhanced metafile 61...


