13
13
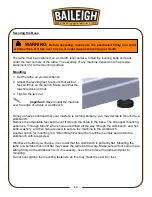
Securing the Base
The lathe must be positioned on a smooth, level surface. Install the leveling bolts and pads
under the four corners of the lathe. The accuracy of any machine depends on the precise
placement of it to the mounting surface.
Mounting
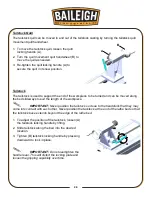
1. Set the lathe on your workbench.
2. Adjust the leveling feet to ensure that all four
feet sit firmly on the bench. Make sure that the
machine does not rock
3. Tighten the jam nut.
Important: Never install the machine
over the edge of a table or workbench.
Once you have confirmed that your machine is running properly, you may decide to mount it to a
workbench.
Remove the adjustable feet and mount it through the holes in the base. The strongest mounting
option is a "Through Mount" where holes are drilled all the way through the workbench, and hex
bolts, washers, and hex nuts are used to secure the machine to the workbench.
Another option for mounting is a "Direct Mount" where the machine is simply secured to the
workbench with a lag screw.
Whichever method you choose, it is crucial that the workbench is perfectly flat. Mounting the
lathe to a surface that is not flat may cause the lathe bed to warp. Make sure all four corners are
sitting firmly on the workbench and, if necessary, use shims to level the lathe and prior to
mounting.
Do not over tighten the mounting fasteners as this may crack the cast iron feet.
WARNING:
Before operating; make sure it is positioned firmly on a solid
work surface. If it tips over on you, it could cause severe injury or death.
Summary of Contents for WL-1218VS
Page 41: ...38 38 WIRING DIAGRAM ...
Page 42: ...39 39 LATHE PARTS DIAGRAM ...
Page 49: ...46 46 NOTES ...
Page 50: ...47 47 NOTES ...
Page 51: ...48 48 NOTES ...


