background image

ASSEMBLY ENSAMBLAR

ASSEMBLY ENSAMBLAR

9

10

 Copyright © 2022, Baby Trend Inc., All Rights Reserved. Todos los derechos reservados.

 Copyright © 2022 Baby Trend Inc., All Rights Reserved. Todos los derechos reservados.


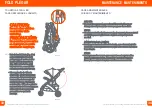
UNFOLD THE STROLLER FRAME

PARA DESPLEGAR EL BASTIDOR DEL CARRITO

1) 


• 

Release the fold latch by pulling it 

outward (Fig. 1a) and unfold stroller 

frame by pulling upward on the 

stroller handle until the frame locks 

(Fig. 1b).

Front wheel / rear wheels assembly:

the front wheel and rear wheels 

MUST

 be installed prior to use.

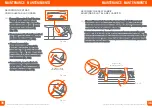
• To attach the front wheel, align the 

release pin with the notch by turning 

the front wheel to the right, while 

facing the front of the stroller. Press 

firmly to exceed the secondary pin 

and to secure in place (Fig. 1c).

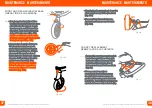
• Slightly lean the stroller forward. 

Press the rear wheel posts into the 

rear frame hub until it clicks into place 

(Fig. 1d). 

NOTE:

 Pull on the front and rear 

wheels to ensure all are securely 

attached to the stroller. NEVER 

use stroller if wheels do not lock 

into place. If you need assistance, 

please contact our customer service 

department at 1-800-328-7363, 

Monday-Friday, between 8:00 a.m. 

and 4:30 p.m. PST.

www.babytrend.com/contact-us

Fig. 1a

Fig. 1b

• Libere el pestillo jalando de él hacia 

afuera (Fig. 1a). y despliegue el 

armazón del carrito tirando hacia 

arriba de la manija del carrito hasta 

que el armazón se trabe (Fig. 1b).

Rueda delantera / ruedas traseras:


antes del uso 

SE DEBEN

 instalar 

las ruedas delanteras, las ruedas 

traseras.

• Para fijar la rueda delantera, 

alinee el pasador de liberación 

con la muesca girando la rueda 

delantera hacia la derecha, mientras 

mira hacia la parte delantera del 

cochecito. Presione firmemente 

para exceder el pasador secundario 

y para asegurar en su lugar (Fig. 1c). 

• Incline levemente el carrito hacia 

delante. Presione los postes de la 

rueda trasera dentro de los cubos 

del armazón trasero hasta que 

encajen (Fig. 1d). 


NOTA:

 tire de la rueda delantera y 

las trasera para cerciorarse de que 

están insertadas de manera segura 

al carrito. NUNCA use el carrito si las 

ruedas no se traban correctamente. 

Si necesita ayuda, comuníquese con 

nuestro departamento de servicio al 

cliente al 1-800-328-7363, de lunes 

a viernes, en el horario de 8:00 a.m. 

a 4:30 p.m., Hora Estándar 

del Pacífico. www.babytrend.com/

contact-us

.

Fig. 1c

Fig. 1d

Front

Frente

Opening

Abertura

Secondary pin

Pasador secundario 


Summary of Contents for Tango 3 All-Terrain Travel System

Page 1: ...RE USE Lea todas las instrucciones ANTES de armar y USAR el producto CONSERVE LAS INSTRUCCIONES PARA USO FUTURO Tango 3 All Terrain Travel System 1 800 328 7363 8 00 a m 4 30 p m PST www babytrend com...

Page 2: ...y Trend Please visit http babytrend com pages limited warranty for complete warranty details GARANTIA NO DEVUELVA SU PRODUCTO A LA TIENDA POR FAVOR CONTACTE A BABY TREND PARA PIEZAS DE REPUESTO SERVIC...

Page 3: ...NINGCare must be taken when Care must be taken when folding and unfolding the stroller to prevent folding and unfolding the stroller to prevent finger entrapment finger entrapment WARNINGWheel can det...

Page 4: ...njure harm your child your child Purses shopping bags parcels diaper bags or Purses shopping bags parcels diaper bags or accessory items may change the balance of the accessory items may change the ba...

Page 5: ...idad peligrosa El peso m ximo que se puede llevar en la canasta de El peso m ximo que se puede llevar en la canasta de almacenamiento es de 5 libras 2 27 kg El exceso de peso almacenamiento es de 5 li...

Page 6: ...at 1 800 328 7363 Monday Friday between 8 00 a m and 4 30 p m PST www babytrend com contact us Fig 1a Fig 1b Libere el pestillo jalando de l hacia afuera Fig 1a y despliegue el armaz n del carrito ti...

Page 7: ...ire hacia abajo Para poner el asiento en la posici n vertical presione los extremos de la presilla juntos sostenga el aro y empuje hacia arriba Fig 2 La posici n erguida se debe usar nicamente para un...

Page 8: ...roller to prevent damage Make sure all accessories Make sure all accessories mobile phones diaper mobile phones diaper bags or purses are removed bags or purses are removed before folding Failure to r...

Page 9: ...5a Alinee las pesta as de la bandeja para padres principal con las pesta as internas de ambos lados del carrito Presione la bandeja firmemente hasta que ambas pesta as encajen en su posici n Fig 5b Fi...

Page 10: ...tar el carrito Sea prudente al colocar la bandeja para ni os en prudente al colocar la bandeja para ni os en el carrito cuando haya un ni o en el carrito No el carrito cuando haya un ni o en el carrit...

Page 11: ...a atr s para activar el freno Verifique que el carrito no se mueve una vez que los frenos est n aplicados correctamente Para soltarlos levante suavemente la palanca del freno Fig 7 8 The shoulder stra...

Page 12: ...a entre las piernas del ni o Introduzca el extremo macho del cintur n de cada hombro o de la cintura en la hebilla de la correa de la entrepierna Apriete todas las hebillas para ajustarlas adecuadamen...

Page 13: ...a ver la tabla de compatibilidad ATTENTION CS01 EZ Lift CS02 EZ Lift PLUS and CS03 EZ Lift PRO Infant Car Seats must attach to the module of the strollers front seat These models Car seats module conn...

Page 14: ...a de la sillita para el autom vil y lev ntelo para retirarlo del carrito Fig 10d Fig 10c Fig 10d Press Prensa OTHER COMPATIBLE CAR SEATS OTROS ASIENTOS DE COCHE COMPATIBLES Fig 11a Fig 11b 11 Attachin...

Page 15: ...ck Clic NOTE It is very important that the short clip is always tightly fastened around the infant car seat When the infant car seat is seated firmly into place locate the short clip on the left side...

Page 16: ...g stroller to prevent damage Make sure folding stroller to prevent damage Make sure all accessories mobile phones diaper bags all accessories mobile phones diaper bags or purses are removed before fol...

Page 17: ...at fabric Fig 12d NOTE You may rotate the tray down for a compact fold Press the 2 buttons and rotate the tray down Fig 12e Coloque la correa dentro del bolsillo del asiento Con una mano tire de la co...

Page 18: ...r adjusting the tray Libere jalando de l hacia afuera Fig 13a y despliegue el armaz n del carrito tirando hacia arriba de la manija del carrito hasta que el armaz n se trabe Fig 13b Consulte las instr...

Page 19: ...de la correa se anclen correctamente Fig 14c Para retirarla use el m todo de ensartar Fig 14b y desens rtela de la disposici n que se encuentra debajo del asiento Fig 14a Fig 14a Fig 14b Fig 14c Thre...

Page 20: ...cubo de la rueda Oprima el perno de liberaci n y tire de la rueda hacia afuera Fig 16a NOTA utilice el pestillo delante del cochecito para enganchar y desconectar el giro de la rueda delantera Fig 16...

Page 21: ...rtment can be contacted at 1 800 328 7363 Monday through Friday between 8 00 a m and 4 30 p m PST Return Authorizations are required prior to returning product s to Baby Trend BABY TREND SERVICIO AL C...

Page 22: ...41 42 Copyright 2022 Baby Trend Inc All Rights Reserved Todos los derechos reservados Copyright 2022 Baby Trend Inc All Rights Reserved Todos los derechos reservados...

Reviews: