background image


10 


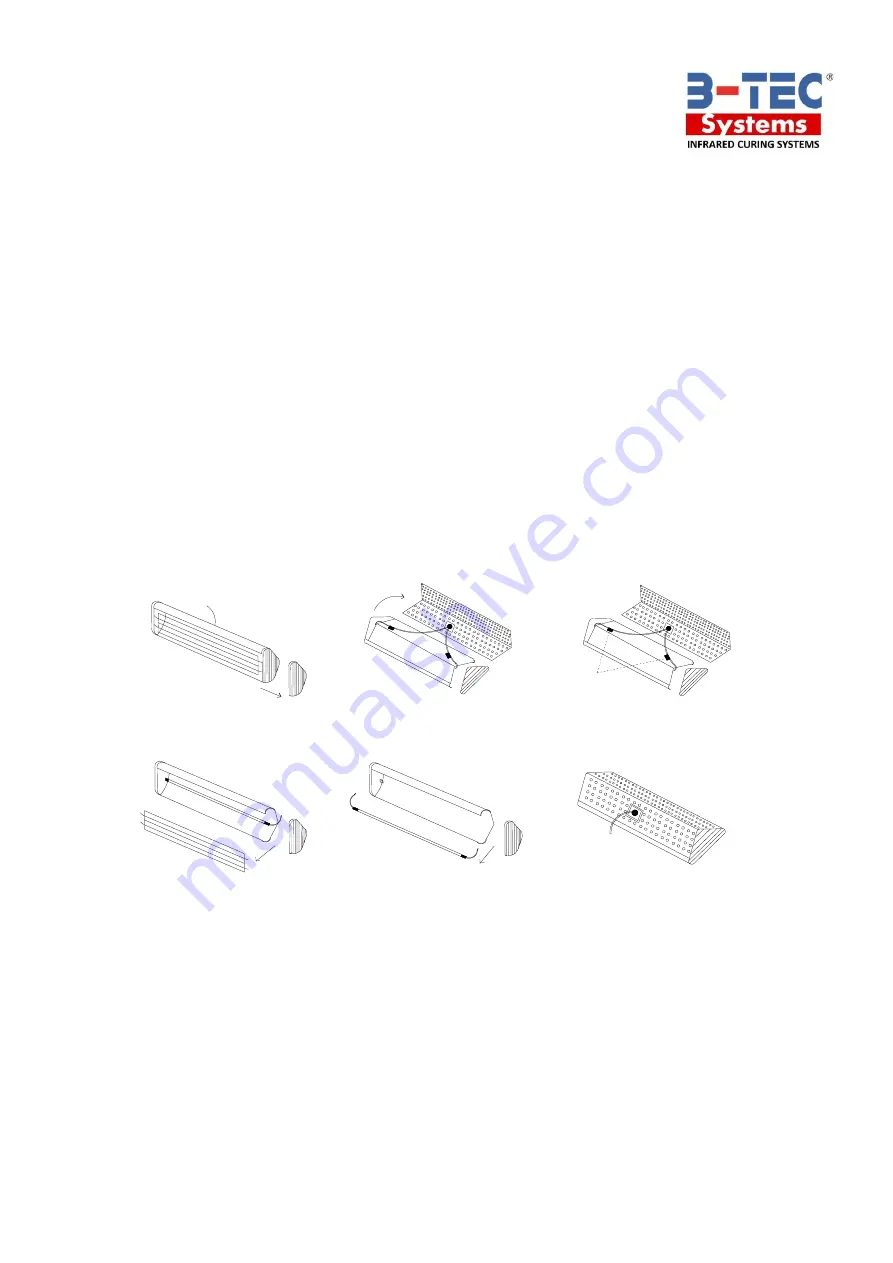
6. Replacement of Emitter Lamp Tube 
 

Un-plug from the power supply, before replacing the infrared emitter / tube. 
 

1.  Remove the side panel. 
2.  Release the radiating panel. 
3.  Loosen the two leads in the lamp and remove them. 
4.  Remove the protective grill in front of the emitter. 
5.  Take out the defective emitter and fit the new emitter after checking that the part you 

purchased is correct. Ensure that you attach the wires correctly. 

6.  Install the protective grill, radiating panel and the side panel. 


Use a piece of soft cloth or cotton to clean the reflector panel and the emitter with alcohol. 
Cleaning must be conducted after the machine is disconnected from the power source and 
cooled down if necessary. Do not restart the equipment until all solvent / cleaning fluid 
residue has evaporated. 15 minutes advised as the evaporation time.

Disconnect


the  wires of the emitter 


1


2


3


4


5


6


Summary of Contents for IR-B01

Page 1: ...Infrared Model IR B01...

Page 2: ...ted voltage Rated current Rated frequency Rated power input Protection class Degree of protection 110 V 4 167 A 60 Hz 500 W I IPX0 Tested according to EN 60335 1 A2 2006 EN 60335 2 30 A2 2007 EN 50366...

Page 3: ...ea 4 2 2 Use 5 2 3 Maintenance and Care 5 2 4 More Information 5 3 Technical Description of the Machine 6 3 1 Technical Information 6 3 2 Wiring Diagram 6 3 3 Spare Parts 7 4 Assembly Installation 8 5...

Page 4: ...these instructions thoroughly before commencing assembly or operation of the machine Failure to do so could result in damage or injury for which B TEC Systems will accept no responsibility or liabilit...

Page 5: ...n the socket in the connection box Replace any chaffed or damaged cables wires immediately to avoid the possibility of electric shock Don t misuse the electric cable Do not drag the machine with the p...

Page 6: ...le up to an average vehicles glass line 4 2 x Electronic timers are incorporated to regulate the bake cycles half power and full bake 3 1 Technical Information 3 2 Wiring Diagram Input current 10 A In...

Page 7: ...te with Handle B01 17 6 Control Box B01 6 18 Side Panel of Emitter B03 19 7 Power Connection B01 7 19 Power Button B01 19 8 Handle big B03 11 20 Handle B01 20 9 Transformer 220V 6W B01 9 21 Power cord...

Page 8: ...Attach the power wire 6 Important Remove the sticker from the protection cover 7 Important Take out the red foam cubes behind the tube Notes Power supply 10Amp 1 PH 110V 60Hz When adjusting the heigh...

Page 9: ...ect the Infrared head directly to the power supply and turn on the power switch In that situation there are no time limits no automatic stops and no half power facility 5 1 Curing Times All curing tim...

Page 10: ...cking that the part you purchased is correct Ensure that you attach the wires correctly 6 Install the protective grill radiating panel and the side panel Use a piece of soft cloth or cotton to clean t...

Page 11: ...necessary on second application DIFFICULTY IN POLISHING OUT DIRT NIBS Too long on bake cycle Reduce cure time Unit too close to panel Move unit further away UNEVEN CURE IR cassettes not shaped to cont...

Reviews: