background image

Enter the Main Menu

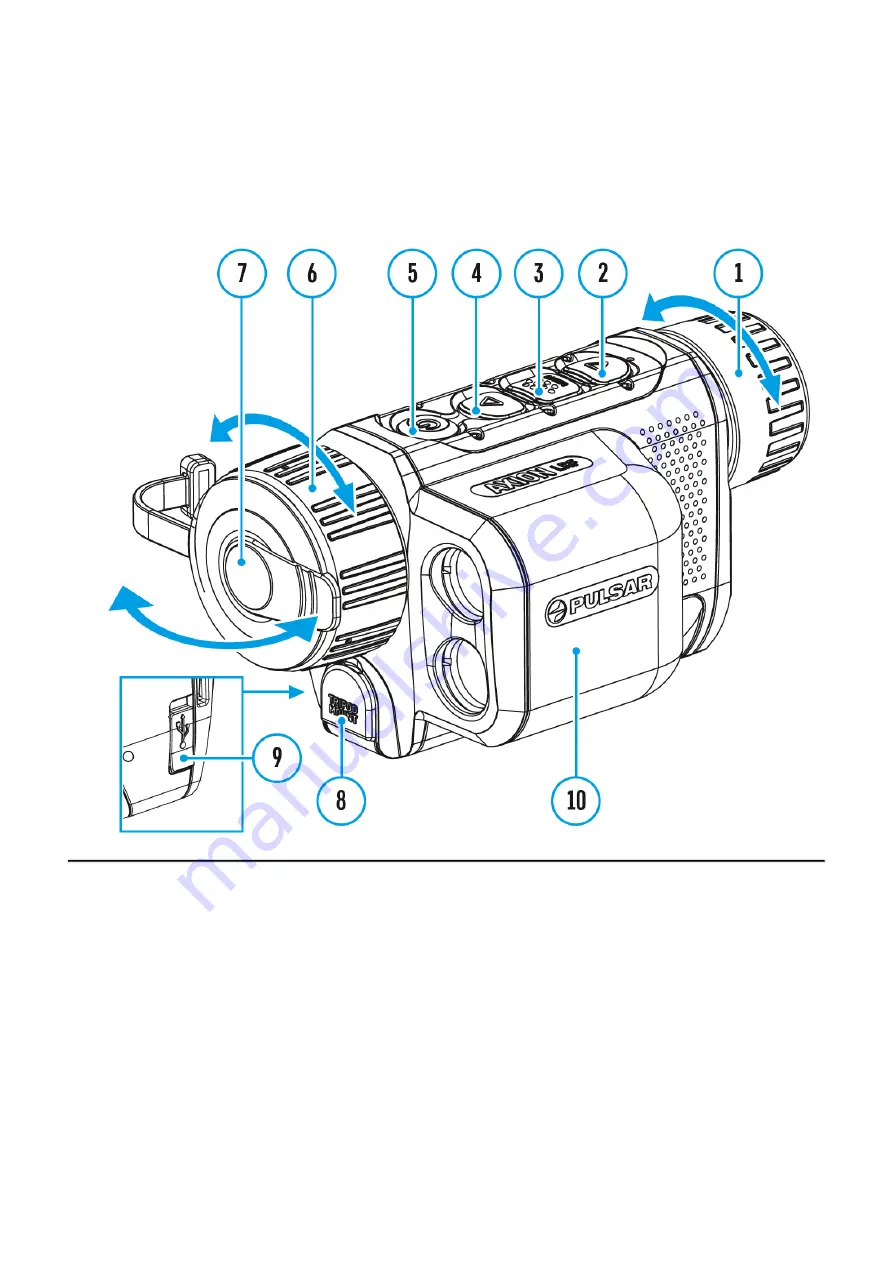
Show device diagram

1. Enter the main menu with a long press of the MENU (3) button.
2. Press the UP (4) / DOWN (2) buttons to move through the menu items.
3. Press the MENU (3) button briefly to select the menu item.
4. Press and hold the MENU (3) button to exit the menu or wait for 10 seconds to exit 

automatically.

General View of Menu:

Tab 1  

Summary of Contents for XQ LRF

Page 1: ...Axion XQ LRF Manual...

Page 2: ...Bar Quick Menu Functions Main Menu Functions Enter the Main Menu Mode Image Detail Boost Color Modes Calibration Mode PiP Mode Icon Brightness General Settings Rangefinder Defective Pixel Repair Defec...

Page 3: ...r target detection Unlike night vision devices based on electron optical converters thermal imaging devices do not need an external light source and are resistant to bright light Axion XQ LRF thermal...

Page 4: ...F thermal monocular APS 5 rechargeable battery 2 battery locking covers Battery charger Power adapter USB Type C cable Carrying case Hand strap Quick reference user manual Lens cleaning cloth Warranty...

Page 5: ...tomatic Automatic Detection range up to 1350 m 1475 yds Smooth digital zoom 3 5 14x 4 observation modes Forest Rocks Identification User Integrated laser rangefinder Display Off function Defective pix...

Page 6: ...MENU button 4 UP ZOOM button 5 Power ON OFF CALIBRATION button 6 Lens focus ring 7 Lens cover 8 Tripod adapter socket 9 USB Type C connector 10 Laser rangefinder LED indicator displays the current sta...

Page 7: ...The device is turned on battery charge 10...

Page 8: ...ess Single distance measurement short press Activate rangefinder scan mode long press Deactivate rangefinder scan mode short press Turn off rangefinder long press Main Menu Button Enter main menu long...

Page 9: ...omes with an APS 5 rechargeable Lithium ion battery APS 5 batteries support USB Power Delivery fast charging technology when using a standard charging set charger USB Type C cable power adapter Before...

Page 10: ...in the battery compartment 19 of the device 2 Connect the USB cable 16 to the USB Type C connector 9 of the device 3 Connect the other end of the USB cable 16 to the Power Adapter 15 4 Plug the Power...

Page 11: ...device and sold separately 2 Connect the plug of the USB Type C cable 16 to the USB Type C connector of the Power Adapter 15 3 Plug the Power Adapter 15 into a 100 240 V socket 17 4 Connect the other...

Page 12: ...harge level is from 26 to 50 Battery charge level is from 51 to 80 Battery charge level is from 81 to 99 Battery is fully charged It can be disconnected from the charger Defective battery Do not use t...

Page 13: ...rechargeable APS 5 battery 11 2 Insert the APS 5 battery 11 along the guide into the battery compartment 19 3 Lock the battery 11 by turning the Lock cover 18 clockwise until it stops 4 Turn the Lock...

Page 14: ...o not leave the battery unattended while charging Do not use the charger if it has been modified or damaged Do not leave the battery in a plugged in charger after charging is complete Do not expose th...

Page 15: ...span of the battery will decrease significantly Using the battery at sub 0 C 32 F ambient temperature decreases battery capacity This is normal and not a defect Using the battery at temperatures outsi...

Page 16: ...gradually recharged 3 A battery icon will appear on the display showing the percentage charged level 4 An icon will be displayed when the device is powered by an external power source and the PS5 batt...

Page 17: ...device only after it has been turned on and working warming for at least several minutes...

Page 18: ...e object being observed 5 Enter the main menu with a long press of the MENU 3 button and select the desired calibration mode Manual M Semi Automatic SA or Automatic A 6 Calibrate the image by briefly...

Page 19: ...quick menu by briefly pressing the MENU 3 button to adjust the brightness contrast and smooth digital zoom for more details see the Quick Menu Functions section 10 After use turn the device off by a...

Page 20: ...meter background temperature During calibration the image on the display briefly freezes for up to 1 second There are three calibration modes Manual M Semi Automatic SA and Automatic A Select the requ...

Page 21: ...ers the microbolometer automatically A mode Automatic The device is calibrated autonomously according to firmware algorithms There is no need to close the lens cover because an internal shutter covers...

Page 22: ...om Show device diagram The device functionality allows you to quickly increase the base magnification by 2 or 4 times as well as return to the base magnification Press and hold theUP 4 button to chang...

Page 23: ...on Mode Calibration Mode in Automatic calibration mode a countdown timer will appear instead of the calibration mode icon 3 seconds before automatic calibration begins Magnification Time Power Indicat...

Page 24: ...ttings adjusting brightness and contrast using the Smooth Digital Zoom can be changed using the quick access menu Enter the menu by briefly pressing the MENU 3 A short press of the ENU 3 button enable...

Page 25: ...in the memory when the device is turned off Base Mode allows you to select one of the three other observation modes Forest Rocks Identification as the base for the User mode Smooth Digital Zoom press...

Page 26: ...press of the MENU 3 button 2 Press the UP 4 DOWN 2 buttons to move through the menu items 3 Press the MENU 3 button briefly to select the menu item 4 Press and hold the MENU 3 button to exit the menu...

Page 27: ...Tab 2...

Page 28: ...Rocks mode for high temperature contrast conditions Identification high detail mode and User personalized brightness and contrast settings mode Option 1 Press the UP 4 button briefly to switch the ob...

Page 29: ...object and landscape details RocksMode The most suitable mode for observing objects after a sunny day or in urban environments IdentificationMode The most suitable mode for observation in adverse weat...

Page 30: ...ion depend on the selected mode and the observation conditions the higher the object contrast the more noticeable the effect This option is enabled by default but can be disabled in the main menu Enab...

Page 31: ...Color Modes Show device diagram...

Page 32: ...e following 1 Press and hold the MENU 3 button to enter the main menu 2 Use the UP 4 DOWN 2 buttons to select Color Modes icon 3 Press the MENU 3 button briefly to enter the submenu 4 Use the UP 4 DOW...

Page 33: ...Black Hot a black and white palette where white corresponds to cold temperatures and black to hot temperatures Red Hot Red Monochrome Rainbow Ultramarine Violet Sepia...

Page 34: ...enu 2 Use the UP 4 DOWN 2 buttons to select the Calibration Mode icon 3 Press the MENU 3 button briefly to enter the submenu 4 Use the UP 4 DOWN 2 buttons to select one of the calibration modes descri...

Page 35: ...on based on the image quality and can act at a convenient time depending on the object being observed Manual M In the Manual silent calibration mode the user determines the need for calibration as in...

Page 36: ...Show device diagram Picture in Picture mode 1 Press and hold the MENU 3 button to enter the main menu 2 Use the UP 4 DOWN 2 buttons to select the PiP Mode icon 3 Press the MENU 3 button briefly to tur...

Page 37: ...ay 1 Press and hold the MENU 3 button to enter the main menu 2 Use the UP 4 DOWN 2 buttons to select the Icon Brightness icon 3 Press the MENU 3 button briefly to enter the submenu 4 Use the UP 4 DOWN...

Page 38: ...measure and also return the device to factory default settings 1 Press and hold the MENU 3 button to enter the main menu 2 Use the UP 4 DOWN 2 buttons to select the General Settings icon 3 Press the M...

Page 39: ...briefly to enter the Time menu item 2 Select the time format 24 hour clock or AM PM by pressing the UP 4 DOWN 2 3 Press the MENU 3 button to select the hours 4 Press the UP 4 DOWN 2 buttons to select...

Page 40: ...lecting the No option will cancel the reset and exit the submenu The following settings will be returned to their defaults before being changed by the user Observation Mode Forest Calibration Mode Aut...

Page 41: ...nder 1 Press and hold the MENU 3 button to enter the main menu 2 Select the submenu Rangefinder with the UP 4 DOWN 2 buttons 3 Press the MENU 3 button briefly to enter the submenu Reticle Type 1 Press...

Page 42: ...ight corner of the display 1 Select TPA with the UP 4 DOWN 2 buttons 2 Turn TPA on off with a short press of the MENU 3 button THD THD True Horizontal Distance function allows you to measure true hori...

Page 43: ...e diagram This menu item allows the user to view the following information about the device SKU Number Firmware Version Device Name Hardware Version Device Serial Number Service Information To display...

Page 44: ...1 Press and hold the MENU 3 button to enter the main menu 2 Use the UP 4 DOWN 2 buttons to select the Device Information icon 3 Press the MENU 3 button briefly to view exit the information...

Page 45: ...Built In Laser Rangefinder Show device diagram The Axion XQ LRFthermal imager is equipped with an integrated laser rangefinder...

Page 46: ...ent results are displayed in the upper right corner 5 Deactivate the rangefinder by long pressing the DOWN 2 Notes Additional rangefinder settings are available in the Rangefindersection of the main m...

Page 47: ...It is easier and more reliable to measure the distance to large objects than to small ones...

Page 48: ...eactivates the image transmission to the display by minimizing its brightness This allows the user to remain unseen However the device stays on When this function is in use the device switches to the...

Page 49: ...oes blank and the message Display off 2 Press the ON OFF 5 button briefly to turn on the display 3 When you press and hold the ON OFF 5 button the display shows the message Display off with a countdow...

Page 50: ...PiP Function Show device diagram The PiP Picture in Picture function allows you to see both the main image and a magnified image in a dedicated window...

Page 51: ...in a dedicated window while the image in the rest of the screen is displayed at base magnification 3 5x When the PiP is turned on you can control both the discrete and smooth digital zoom In this cas...

Page 52: ...2 Switch the device on with a short press of the ON OFF 5 button 3 With a computer used as an external power supply the icon appears in the status bar The device will continue operating and all funct...

Page 53: ...g the Device on a Tripod 1 Open the cover 21 of the socket 8 2 Attach the tripod adaptor 20 to the socket 8 3 Rotate the adaptor handle clockwise until it stops 4 Secure the adaptor with the device on...

Page 54: ...pearance there should be no cracks on the body The state of the objective eyepiece and rangefinder lenses there should be no cracks grease spots dirt or other deposits The state of the rechargeable ba...

Page 55: ...e substances solvents etc Clean the electrical contacts of the rechargeable battery on the device using a non greasy organic solvent Check lenses of objective eyepiece and rangefinder If necessary rem...

Page 56: ...Possible cause The USB cable is damaged Solution Replace the USB cable Possible cause The external power supply is discharged Solution Charge the external power supply if necessary The image is blurr...

Page 57: ...de close the lens cover and calibrate the device Image is too dark Possible cause Brightness or contrast level is too low Solution Adjust the brightness or contrast level in the Quick Menu Color bars...

Page 58: ...use of thermal conductivity thereby generating a high temperature contrast Consequently the image quality produced by the thermal imager will be better In low temperature conditions objects being obse...

Page 59: ...ick an object at a distance not longer than 1000m Possible cause Low reflection ratio i e leaves of trees Solution Pick an object with higher reflection ratio see point Additional Informationin sectio...

Page 60: ...384x288 Pixel Pitch m 17 Frame Rate Hz 50 Optical Characteristics Optical Magnification x 3 5 Smooth Digital Zoom 3 5 14 Digital Zoom x 2 4 Lens Focus mm 38 Relative Aperture D f 1 2 Minimum Focus Dis...

Page 61: ...4 2 Battery Type Capacity Nominal Output Voltage APS 5 Li ion Battery Pack 4900 mAh DC 3 7 V External Power Supply 5 15 V USB Type C Battery Run Time at t 22 C hours 7 Degree of Protection IP Code IEC...

Page 62: ...Measurement Accuracy m 1 Depends on the characteristics of the object under observation and environmental conditions...

Page 63: ......

Page 64: ...European standard EN 55032 2015 Class A Warning Operation of this equipment in a residential environment could cause radio interference Caution use of controls or adjustments or performance of proced...

Reviews: