background image

P6187W-V3 

User’s Manual 


System Setup 

Section 2 


System Setup 

This chapter details the system parts and components with figures. Sections include: 


System Configuration 


Panel Mounting 


Wall Mounting 


VESA Mounting 


2.1 

System Configuration 

The figure below shows the side views of P6187W-V3 series. 
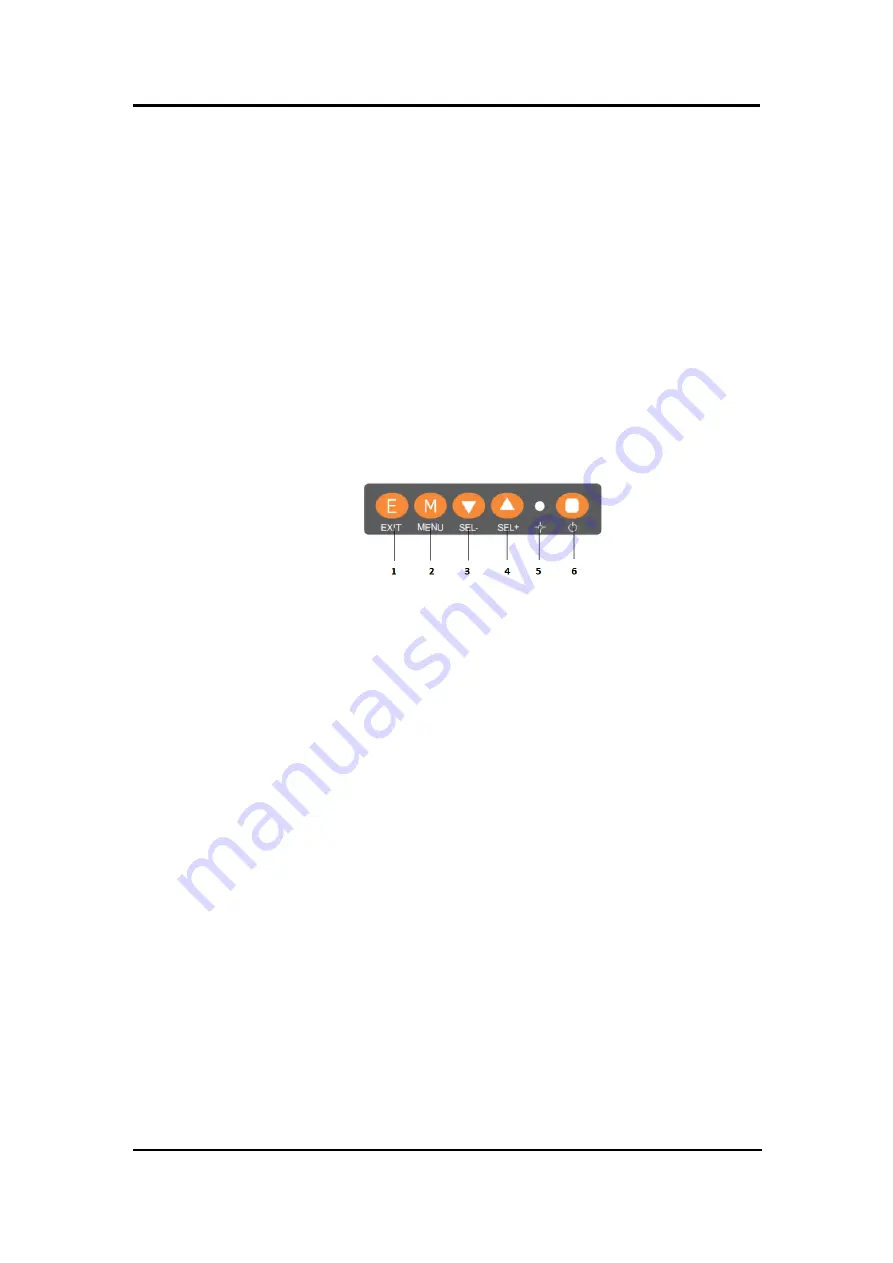


1. 

Exit: 

Jump out the selection icon / Auto adjust. 

2. 

Menu:


Press this button to turn on/off the OSD (On Screen Display) main menu. 

Press this button to activate selected items. 

3. 

SEL-:


To scroll down the menu to decrease the value of selected item. 

4. 

SEL+:


To scrolling up the menu to increase the value of selected item. 

5. 

Power LED: 


When the light is green, the power is on, red light when stand by. 

6. 

Power switch: 


Press this button to turn on/off the monitor. 

Summary of Contents for P6187W-V3

Page 1: ...P6187W V3 18 5 WXGA TFT Monitor User s Manual...

Page 2: ...ual Axiomtek reserves the right to change or revise this document and or product at any time without notice No part of this document may be reproduced stored in a retrieval system or transmitted in an...

Page 3: ...ained technician is allowed to do so Integrated circuits on computer boards are sensitive to static electricity To avoid damaging chips from electrostatic discharge observe the following precautions B...

Page 4: ...nsions and Outlines 3 1 5 I O Outlets 4 1 6 Packing List 5 Section 2 System Setup 7 2 1 System Configuration 7 2 2 Panel Mounting 8 2 3 Wall Mounting 8 2 4 VESA Mounting 8 2 5 OSD Key Configuration 9...

Page 5: ...erent input source from PC system or multimedia system that let you upgrade the display don t change anything from your system Besides for varied HMI field you can choose one of resistive touch or gla...

Page 6: ...ected capacitive touch or glass Front bezel design with NEMA4 IP65 Control OSD On Screen Display control pad on the side Mounting Support Panel mount VESA arm mount and Wall mount optional Net Gross W...

Page 7: ...P6187W V3 User s Manual Introduction 3 1 4 Dimensions and Outlines The following diagrams show the dimensions and outlines of P6187W V3 P6187W V3 AC Version by project...

Page 8: ...anual 4 Introduction 1 5 I O Outlets Please refer to the following illustration for I O locations of the P6187W V3 No Function No Function 1 Menu Enter function 4 Exit Auto Adjust 2 SEL 5 Power LED 3...

Page 9: ...contain the following items P6187W V3 unit x 1 VGA cable x1 USB cable cable x1 for touch version only Panel mount kit set x 1 optional HDMI cable x1 optional DP cable x1 optional Wall mount bracket x1...

Page 10: ...P6187W V3 User s Manual 6 Introduction This page is intentionally left blank...

Page 11: ...iews of P6187W V3 series 1 Exit Jump out the selection icon Auto adjust 2 Menu Press this button to turn on off the OSD On Screen Display main menu Press this button to activate selected items 3 SEL T...

Page 12: ...V3 the standard set of mounting kit included in the system packaging is needed P6187W V3 Panel Mount kits 2 3 Wall Mounting The P6187W V3 provides VESA mount and wall mount Screw four screws to fix th...

Page 13: ...selected items 2 SEL a To scroll up the menu b To increase the value of selected item 3 SEL a To scroll down the menu b To decrease the value of selected item 4 Exit a Jump out the selection icon b Au...

Page 14: ...Type NOTE 640 480 60 Hz Industry Standard 75 Hz VESA Standard 800 600 60 Hz VESA Guidelines 75 Hz VESA Standard 1024 768 60 Hz VESA Guidelines 75 Hz VESA Standard 1280 1024 60 Hz VESA Standard 70 Hz...

Page 15: ...P6187W V3 User s Manual Supported Input Timing Modes 11 This page is intentionally left blank...

Page 16: ...trast or Sharpness Backlight Adjust the Backlight of the screen Brightness Adjust the brightness of the signal Contrast Adjust the contrast of the screen Sharpness Adjust the Sharpness of the screen D...

Page 17: ...off Color Temp You can select the screen s color level of the white color field from the default color temperature settings Also you can fine tune the color temperature by USER option if necessary Set...

Page 18: ...P6187W V3 User s Manual 14 OSD Operation Input Select the Video input Source Auto Select VGA DP HDMI Audio Volume Adjust the Volume Mute Set the Mute on off...

Page 19: ...OSD H Position Adjust the horizontal position of the OSD Menu screen s image OSD V Position Adjust the vertical position of the OSD Menu screen s image Language Set the Language English Transparency...

Page 20: ...P6187W V3 User s Manual 16 OSD Operation This page is intentionally left blank...

Reviews: