


Device Management
105
Select the USB device in “Device Name” option and go to the path where the
upgrade software exists. Select the upgrade software and then click “Upgrade”.
The system may automatically restart during upgrading. Please wait for a while
and do not power off the DVR during upgrading.
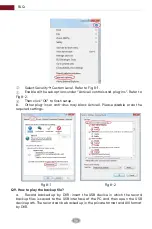
Note
: The file system of the USB mobile device which is used for upgrading,
backing up and restoring should be FAT32 format.
Cloud Upgrade
Select the USB device in “Device Name” option; go to the path where you want
to store the configuration backup file and then click the “Backup” button; finally
click the “OK” button in the popup window.
Backup
Select the USB device in “Device Name” option; find the configuration backup
file and then click the “Recover” button; finally click the “OK” button in the popup
window.
Recover
Note: Before you use cloud upgrade, please enable NAT2.0.
①
Click Start
Settings
Network
Cloud Upgrade as shown below.
②
③
Select “Accept Notification Only” or click “Check for Updates” to check
whether the current version is the latest. If your software version is not the latest,
click “Upgrade” to download and upgrade from the cloud server.
Please don’t power off during the upgrade process.
11.5 Backup and Restore
You can back up the configuration file of the DVR by exporting the file to other
storage devices; you can recover the configuration to other DVRs which are of
the same model with the DVR by importing the configuration file to other DVRs
for time saving.
Insert the USB storage device into the USB interface of the DVR and then click
Start
Settings
System
Maintenance
Backup and Restore to go to the
interface.
Summary of Contents for AVR HT Series
Page 1: ...AVR HT NT Series MANUAL Digital Video Recorder ...
Page 128: ...Fig 9 2 FAQ 120 ...