background image


ADVANCED CONFIGURATIONS 

28 


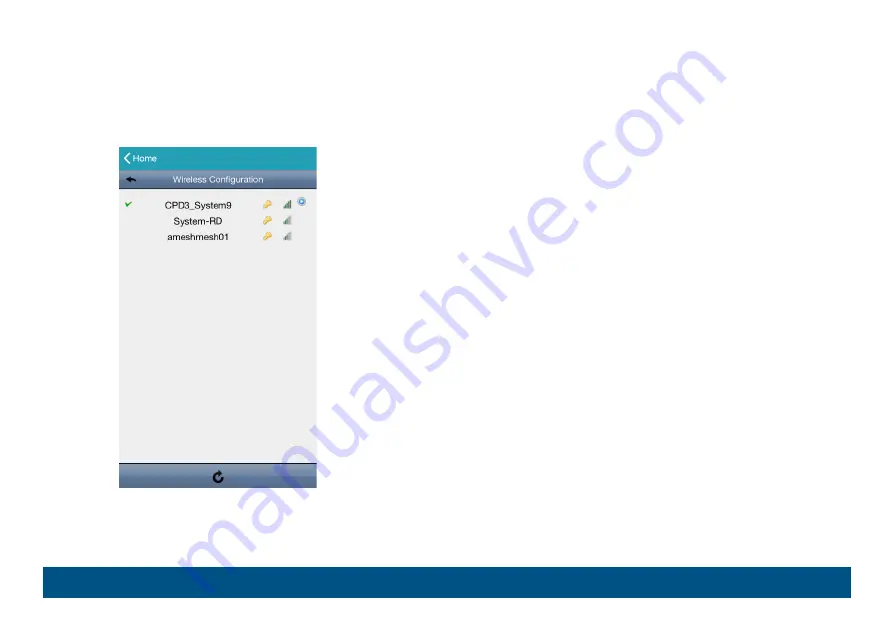
Wireless Configuration 


Here shows the available Wi-Fi networks around you and the one this 
camera is currently connected to, and you can change the network when 
necessary. 
When the Wi-Fi network is changed, you’ll need to reconfigure the network 
of the camera since the router used for internet access has changed.   
Please check “Connecting camera to internet” at page 6 to know how to 
configure the camera to the internet. 


Summary of Contents for YGN2003

Page 1: ...y2003_manual_beta User Manual Panoramic Navigation 1080P Wi Fi IP Camera...

Page 2: ...this symbol Do not dispose of these products as unsorted municipal waste Contact your local dealer for procedures for recycling this equipment This apparatus is manufactured to comply with the radio i...

Page 3: ...safety nor interfere a legal communication if an interference is found the service will be suspended until improvement is made and the interference no longer exists Disclaimer any legal liability or r...

Page 4: ...ined by turning the equipment off and on the user is encouraged to try to correct the interference by one or more of the following measures Reorient or relocate the receiving antenna Increase the sepa...

Page 5: ...IONAL INFORMATION INCLUDING THAT RELATING TO PROMOTIONAL INTERNAL AND COMMERCIAL USES AND LICENSING MAY BE OBTAINED FROM MPEG LA LLC SEE HTTP WWW MPEGLA COM GPL Licensing This product contains codes w...

Page 6: ...e 1 Package content 2 Status indicator 2 Default values 3 GETTING STARTED 4 Getting camera ready 4 Connecting camera to internet 6 ADDRESS BOOK 7 LIVE VIEW 8 Snapshot 9 Manual recording 9 Audio 9 Vide...

Page 7: ...backup 15 PUSH VIDEO 16 How to enable Push Video 16 How to check Push Video 17 ADVANCED CONFIGURATIONS 19 Menu 20 Camera Configuration 22 Record Configuration 24 Trigger 25 Audio Configuration 26 Tim...

Page 8: ...APPENDIX 32 Account user levels 32 Playing video footage saved in microSD card on PC 33 MicroSD card compatible list 35 Specifications 36...

Page 9: ...1 CAMERA OVERVIEW Hardware...

Page 10: ...e Flashing slowly Connecting to Wi Fi network Wi Fi signal strength Blue Stable Strong Purple Stable Normal Red Stable Weak Others Blue red Flashing Resetting camera Red Flashing Internet connection f...

Page 11: ...CAMERA OVERVIEW 3 Default values Wired Wireless IP address 192 168 1 10 192 168 2 10 Port number 88 88 User name admin Admin Password Admin admin SSID IPCAM mac_address SSID password no...

Page 12: ...to power NOTE This camera doesn t support plug and play Please make sure the power is off before inserting or removing the microSD card NOTE If you want to mount this camera to a wall or ceiling plea...

Page 13: ...the black wall mount adapter to where you want to install the camera 2 2 Attach camera to wall Align the bottom of the camera with the wall mount adapter a Then rotate the camera 90o clockwise to sec...

Page 14: ...camera to internet By EaZy Networking P2P cloud service Please check Quick Start or video demo to know more details Quick Start Video Demo By configuring your router Please check the advanced network...

Page 15: ...ADDRESS BOOK 7 ADDRESS BOOK For details about each element on this page 1 Click on Information or 2 Scan the QR code below...

Page 16: ...IEW 8 LIVE VIEW The functions available depend on the user level of your account There are four user levels SUPERVISOR POWER USER NORMAL and GUEST Please check Account user levels at page 32 to know d...

Page 17: ...address book NOTE The resolution of the footage depends on the video profile you chose for video recording For details please check Record Configuration at page 24 Audio Click on to choose whether yo...

Page 18: ...horizontal and 45 vertical rotations to allow you moving to any area you want to see remotely Click on to show more operations for the camera and choose the one you want to use Vertical horizontal mov...

Page 19: ...nd hold a numbering from 1 6 till you see the message Set Success How to use a preset point When the camera view has been moving to other area click on and choose the numbering which has configured a...

Page 20: ...re using this function make sure you ve enabled the recording function to get video footage For details please check Record Configuration at page 24 There are two ways to go to the event search and ba...

Page 21: ...alendar In the calendar view 1 Choose the date within which includes the video footage you need The date with video footage will be circled 2 Tap and hold on the time bar to slide to the time you want...

Page 22: ...L All events List of all alarm and motion events ER Event Record Record triggered by alarm detection MT Motion Trigger Record triggered by motion detection To narrow down the list select on the top ri...

Page 23: ...footage iOS Version Android Version Description Email Email Email this footage with the Email account saved in your device Other App Export Send this footage to an App which supports this function fo...

Page 24: ...ded NOTE This function is available only for SUPERVISOR and POWER USER accounts For details please check Account user levels at page 32 NOTE This function requires network transmission and the receipt...

Page 25: ...e open the message and EagleEyes will be opened automatically to play the event footage that triggers Push Video The footage will start from 3 seconds prior to the time that actually triggers Push Vid...

Page 26: ...list choose the log that includes the footage you want to check to start video playback The footage will start 3 seconds prior to the time that actually triggers Push Video pre alarm recording NOTE In...

Page 27: ...ection adjust audio volume create an account and so on For details please check the following sections To access the advanced setting page click on Setting on the top toolbar in the live view and choo...

Page 28: ...default ON Denoise 0 1 2 default 3 4 5 Day and Night Sensor default Day Night Defog OFF default ON Record Configuration Profile Profile1 Profile2 default Profile3 Profile4 Motion OFF default ON Trigg...

Page 29: ...ATIONS 21 Normal Setup Time Configuration OSD Enable default Disable Date Hour Min Sec GMT NTP Server Sync Period None default Daily Advanced Configuration Wireless Configuration Account Configuration...

Page 30: ...tem to detect automatically otherwise choose Flicker free 50Hz or Flicker free 60Hz to manually change it when needed Exposure Value Choose the exposure level from 1 4 The higher the value the more th...

Page 31: ...e level 0 means off Day and Night This function is used to configure the day and night mode Day Always stay in the day mode color Night Always stay in the night mode B W Sensor Use the built in light...

Page 32: ...0 Profile2 H 265 704 x 480 Profile3 H 265 352 x 240 Profile4 JPEG 352 x 240 Motion Choose ON to enable video recording for motion events NOTE The motion detection function should also be set to ON in...

Page 33: ...ON to enable motion detection The detection area is as follows If you want to record motion events please go to Record Configuration to set Motion to ON Duration Choose the duration between two motion...

Page 34: ...10 Mute Microphone Check to mute the microphone even when the audio function is enabled Speaker Choose the volume of the built in speaker from 1 10 Mute Speaker Check to mute the speaker even when the...

Page 35: ...ly the camera will adjust the local area time of the system automatically GMT Choose the correct time zone and the camera will adjust the local area time of the system automatically NTP Server Simply...

Page 36: ...era is currently connected to and you can change the network when necessary When the Wi Fi network is changed you ll need to reconfigure the network of the camera since the router used for internet ac...

Page 37: ...y cloud account s To know how to use Buddy please go to Information Add account Click on to create an account and enter the information needed User Level defines how the account can do when it s been...

Page 38: ...d like to modify first and click on Change the password user level or life time of the selected account and click on to save and return to the account page NOTE When there s only one account the user...

Page 39: ...NFIGURATIONS 31 Delete account Choose the account you d like to modify first and click on You ll be prompted to confirm the account deletion again NOTE When there s only one account the account can t...

Page 40: ...level for each account SUPERVISOR POWER USER NORMAL GUEST ADDRESS BOOK Guard Push Video on off V V Playback V V LIVE Playback V V Information V V V V Setting Advanced Configurations V Snapshot V V V...

Page 41: ...remove the microSD card Step2 Insert the card to your laptop PC and access to the card Step3 Download our video player from the link below and double click it to start installation http download dvrtw...

Page 42: ...APPENDIX 34 Step4 You ll see the event list including the event logs saved in the microSD card Find the log you want and double click it to play...

Page 43: ...list Brand Capacity Class SanDisk 32GB Class 4 128GB Class 10 Samsung 128GB Class 10 Silicon Power 64GB Kingmax 64GB Transcend 128GB Class 10 Kingston 32GB Class 4 64GB Class 10 128GB Class 10 TOSHIBA...

Page 44: ...PSK data encryption Video Video Compression H 265 Resolution 1920 1080 30FPS Audio Audio Compression G 711 Two way Intercom YES Software Mobile APP EagleEyes on iOS android devices Alarm Notification...

Page 45: ...Vertical 108 Diagonal Night Vision IR Cut 6PCS IR LEDs Pan Tilt Pan 0 350 Tilt 0 45 Socket MicroSD Card Slot 1 up to 256GB microSD card Working Condition Temperature 0 C 40 C Humidity 90 or less rela...

Reviews: