background image


4-4  

System Administrator’s Guide      

Classification: Avery Dennison – Public


S e t t i n g   t h e W ri t e   P o w e r 

The write power setting increases the strength of the RF Field emitted by the printer’s antenna.  
The amount of power to encode (program) the RFID inlay.  The range is -15 to 23.   
The default is -15.  You 

must

 change the default setting – the default write power is not strong 

enough to program an inlay. 

We recommend using Auto Calibrate Power initially.  If the auto power values do not work, 
adjust the write power by one decibel at a time.  Additionally, the 

RFID Printer Setup Utility

 is 

available on our web site to determine the optimal read power.  Enter the value at the printer.  


Select 

To 

Decrease the 
setting 

Decrease the setting.  

Increase the 
setting 

Increase the setting. The higher the value, the greater the power of the 
RF Field.  If the W rite power setting is too high, you may change the 
data that was programmed into adjacent RFID inlays. 


Use caution when increasing or decreasing the Read and W rite Powers because the RFID 
tags may become non-functional! 

R e a d   T ag  

Use this option to read what is programmed into an RFID tag.   

Before you can read a tag, you must set the read power.  The default read power is not strong 
enough to read an inlay.  To read a programmed inlay: 

1.


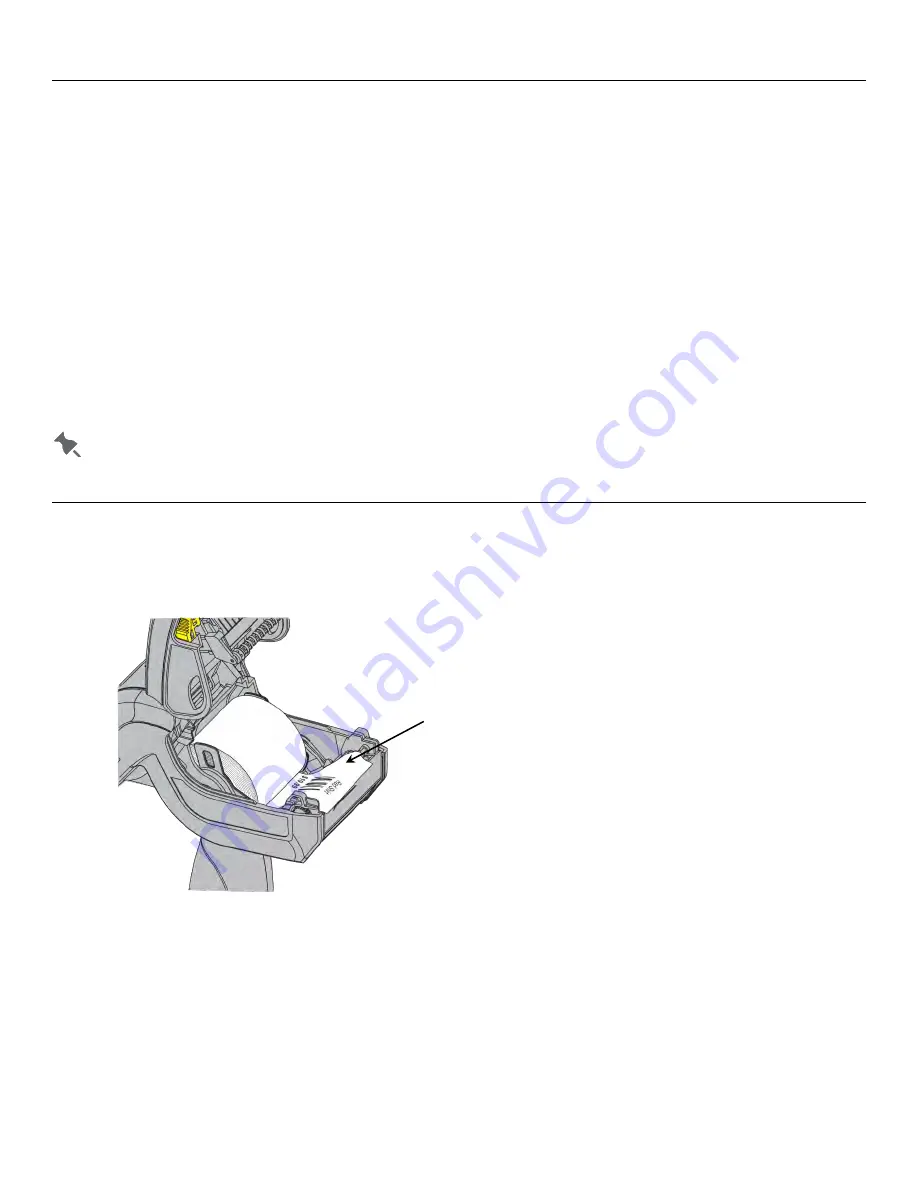
Lay the programmed RFID tag inside the printer’s supply path as shown. 

2.


Close the cover.  


P rogram m ed RFI D tag 

Summary of Contents for Monarch Pathfinder 6059

Page 1: ...SYSTEM ADMINISTRATOR S GUIDE TC6059SA Rev AA 8 19 2019 Avery Dennison Corp All rights reserved Classification Avery Dennison Public Avery Dennison Pathfinder 6059 Printer...

Page 2: ...y Dennison Corporation All rights reserved No part of this publication may be reproduced transmitted stored in a retrieval system or translated into any language in any form by any means without the p...

Page 3: ...ory Defaults 1 4 Using the Asset Tracking Application 1 4 Editing Owner Data 1 4 SETTING SUPPLY PRINTER OPTIONS 2 1 Setting the Sensor Type 2 2 Calibrating the Sensors 2 2 Feeding a Label 2 2 Setting...

Page 4: ...x Bar Codes 3 10 Configuring QR Code Bar Codes 3 10 Performing a Scanner Test 3 10 Test Current Settings 3 10 Test All Barcodes 3 10 Resetting the Scanner to Defaults 3 10 Scannable Bar Codes vs Print...

Page 5: ...rinter scanner and performs diagnostics using the Printer Setup and Asset Tracking Applications Printer Setup and Asset Tracking are pre loaded applications on each 6059 printer A Setup Guide is inclu...

Page 6: ...ng the Printer to a Wireless Network The printer has an optional 802 11 a b g n ac WLAN plus Bluetooth 4 2 dual mode radio The radio is dual band and operates within the 2 4GHz and the 5GHz RF Bands U...

Page 7: ...ns off then on while processing the update You see a message Installing System Update and the red LED The update is complete when the red LED stops blinking Customer installed applications remain when...

Page 8: ...ssword passcode in a secure location Using the Asset Tracking Application Asset tracking contains the manufacturer s product ID and serial number and the owner s product ID and serial number A passwor...

Page 9: ...d Die Cut with black marks Black Mark Calibrate Blackmark sensor NA NA Calibrate On Demand sensor NA NA Feed Feeds a blank label NA Supply Position 99 to 99 0 Overfeed Distance 10 to 255 0 Max Supply...

Page 10: ...Black Mark Black mark supplies have black marks on the back of the supply for sensing Non indexed Continuous supplies such as fax or receipt paper that do not have any sense marks Die Cut with black m...

Page 11: ...that your supply is fed out of the chute after it prints The adjustments are in steps 0 00333 inch The default value is 0 Select To Increase the value Feed more supply out of the chute after printing...

Page 12: ...ortant because it affects how well your barcodes scan and how long your printhead lasts The default value is 0 Select To Increase the value The print becomes darker Decrease the value The print become...

Page 13: ...1 to 4 1 Picklist Mode On Off Off Setting the Scanner Operating Mode Select the operating mode for the scanner The default is Compatible An unsuccessful scans turns off the scanner and activates the t...

Page 14: ...ger is pressed The default is 30 Select To Increase the setting Increases the amount of time the scanner s beam is on when the trigger is pressed Decrease the setting Decreases the amount of time the...

Page 15: ...both directions forward and reverse for the scan to be complete The options are 1 through 4 The default is 1 This is used in conjunction with linear security Select To 1 The scanner must scan a bar co...

Page 16: ...SYSCHAR System Character or SYSCOUNT Country Code and System Character UPCE Allows the scanner to scan UPCE bar codes UPCE1 Allows the scanner to scan UPCE1 bar codes EAN8 Allows the scanner to scan E...

Page 17: ...de32 Tells the scanner to convert Code 39 bar codes to Code 32 bar codes Verify Check Digit Tells the scanner to check the integrity of all Code 39 bar codes that it scans Use this option only for Cod...

Page 18: ...The default is 4 The range for Length 2 is 0 to 99 The default is 55 Configuring Code 128 Bar Codes Code 128 is a high density linear code for alphanumeric or numeric data Use the Printer Setup Applic...

Page 19: ...to 0 For a variable range set Length 1 to the lower limit and Length 2 to the upper limit For one fixed length bar codes set both Length 1 and Length 2 to the same length This specifies a single leng...

Page 20: ...r Length 1 is 0 to 99 The default is 5 The range for Length 2 is 0 to 99 The default is 55 Configuring MSI Bar Codes MSI is a linear bar code for numeric data Use the Printer Setup Application to conf...

Page 21: ...e 2D Composite Component encodes supplementary information GS1 CC A B Allows the scanner to scan GS1 CC A B Composite Component bar codes The 2D Composite Component encodes supplementary information T...

Page 22: ...QR Code Bar Codes QR Quick Response Code is a two dimensional bar code which is made up of square modules arranged in an overall square pattern A unique finder pattern is located at three corners of t...

Page 23: ...ix GS1 DataBar MaxiCode Micro PDF417 PDF417 POSTNET Quick Response Use the following table to see which bar codes the printer can scan and print Bar Code Scan Print Bar Code Scan Print Codabar I2of5 C...

Page 24: ...3 12 System Administrator s Guide Classification Avery Dennison Public...

Page 25: ...the printer cannot program an inlay it prints an overstrike pattern on the label The overstrike pattern prevents someone from using a bad label RFID Overview To effectively use RFID your printer may...

Page 26: ...e printer s antenna to read the RFID inlays RF Field Area inside the printer where the RFID inlay is programmed The RF field area is controlled by the RFID power level and the antenna Note The printer...

Page 27: ...librate power values or RFID Printer Setup Utility values produce errors on your printer adjust the Read or Write power by one decibel at a time Setting the Read Power The read power setting increases...

Page 28: ...our web site to determine the optimal read power Enter the value at the printer Select To Decrease the setting Decrease the setting Increase the setting Increase the setting The higher the value the g...

Page 29: ...read power may not be strong enough or the inlay is not in the correct place For example The programmed data is displayed in ASCII Hex format The top line displays the EPC data the bottom line display...

Page 30: ...in the RFID module hardware software or firmware The RFID module may need to be replaced or has become disconnected If this error continues call Technical Support Message will say reboot press button...

Page 31: ...is below 7 0 Backup Battery Voltage Black Mark Calibration Value the valid range is between 100 1 00 and 9500 95 00 The typical value will be between 500 5 00 and 1500 15 00 Black Mark Voltage the va...

Page 32: ...anner revision Model number Display board hardware version Serial number Display board software version Kernel version Total inches printed Core version Total Service inches printed Android version To...

Page 33: ...wer Button If you need to restart the printer you can use the power button 1 With the printer on press and hold the power button for approximately eight seconds 2 Press the power button again The prin...

Page 34: ...ound queue full The requested sound cannot be played because the sound queue is full Refer to the PlaySound method in the SDK documentation 682 The sound replay count is invalid The range is 1 to 8 Re...

Page 35: ...l Technical Support if you receive any error messages greater than 900 900 Ram test failure 904 No configuration memory for Native layer 906 Power failure Call Technical Support 907 No configuration m...

Page 36: ...5 6 System Administrator s Guide Classification Avery Dennison Public...

Page 37: ...u Structure A 1 M E N U S T R U C T U R E The Printer Setup application has the following menu Blue items are accessible without a password Green items require the Admin password A Codabar MSI GS1 Dat...

Page 38: ...A 2 System Administrator s Guide Classification Avery Dennison Public...

Page 39: ......

Page 40: ...3169 Fax 852 2995 0014 WESTERN EUROPE 1 Thomas Road Wooburn Green Bucks HP10 0PE Tel 44 1628 859500 Fax 44 1628 859567 ASIA PACIFIC NEW SOUTH WALES 61 Vore Street Silverwater NSW 2128 Tel 02 9647 1833...

Reviews: