background image


50 

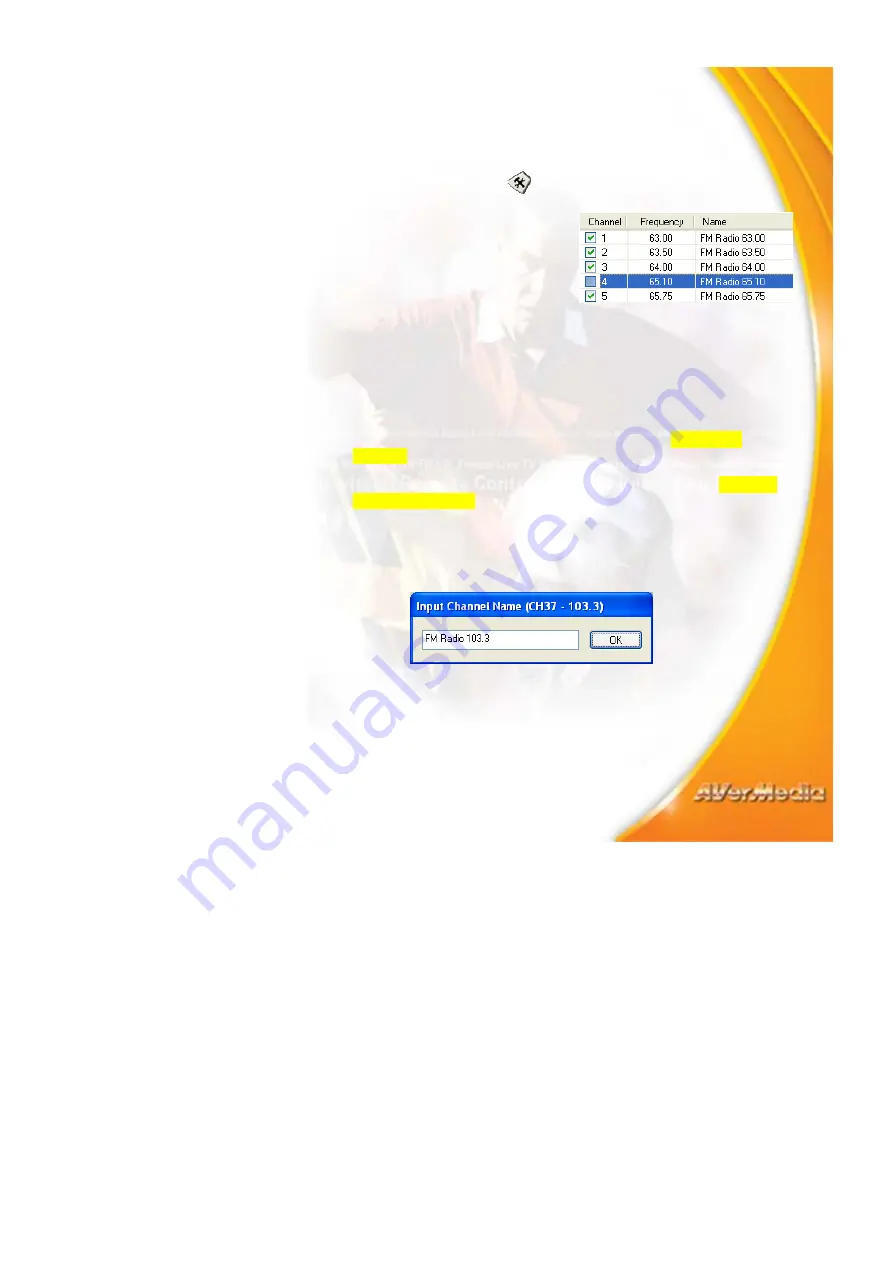
Skipping Unwanted Channels 

If you want to exclude undesirable channels from your FM channel list, 
do the following: 

1. Click 

the 

Setup 

button 

 and click the 

FM Radio

 tab. 

2. In 

the 

S

etup


dialog box, 

Channel 

column, click the 

unwanted channel. The check 
mark will be removed, 
indicating that the channel will 
be excluded from your channel 
list and that you won’t be able to access and hear them through the 

Channel Up/Down

 button. 

Saving a Radio Frequency to a Channel


To assign a selected radio frequency to a channel: 

1.  First, select a channel. Refer to the section titled 

Selecting a 

Channel

 for details. 

2.  Now select a radio frequency. Refer to the section titled 

Selecting 

a Radio Frequency

 for details. 

3. Click 

the 

Memory


button. The 

Input Channel Name

 dialog box 

will then appear. 

4.  Enter a descriptive channel name and click 

OK


Summary of Contents for AVerTV series

Page 1: ...een TV Signals air cable or Channel Groups 9 Adding and Deleting Channel Groups 9 Memorizing TV Channels 10 Skipping Unwanted Channels 12 Selecting a TV Channel 12 Specifying a Channel Name or Descrip...

Page 2: ...Customizing Time Shift Settings 32 Using the Time Shift Function 33 Chapter 7 DVR 34 DVR Controls 34 Recording Programs or Video 35 Playing the Recorded Programs or Video 35 Picture in Picture Displa...

Page 3: ...adio Frequencies 53 Specifying the Tuning Increment 54 Recording FM Radio Broadcast 54 Playing the Recorded Audio 55 Using the FM Time Shift Function 56 Customizing Audio Recording Settings 57 Chapter...

Page 4: ...e Because AVerMedia AVerTV comes with a scheduler wherein you can configure to show or record your preset TV programs or FM radio broadcasts whenever they are aired Video Conferencing on your PC Along...

Page 5: ...e AVerTV application allows you to watch TV or video record still or motion video and listen to FM radio on your PC while you work on your computer Launching the AVerTV Application Run the AVerTV appl...

Page 6: ...appear prompting you to adjust settings for your AVerMedia AVerTV card The configuration dialog box first displays the Video tab where you are prompted to choose a video capture device driver Your AVe...

Page 7: ...you click Next the Audio tab is displayed You need to choose the appropriate audio option respectively in the Live and Record section otherwise NO SOUND CAN BE HEARD OR RECORDED when you are watching...

Page 8: ...he User Interface The TV monitor allows you to watch live TV or video The Control Panel provides button controls for selecting channels changing between TV and external video source capturing images a...

Page 9: ...Signal Strength The table below describes what the button controls on the Control Panel are used for BUTTON FUNCTION BUTTON FUNCTION iEPG Link to an interactive content guide on a Web site such as Tit...

Page 10: ...es of audio Mute Turn off the sound FM Radio Switch to listening to FM radio Volume Control Drag your mouse up down to increase decrease the volume level 16 Channel Preview Display 16 consecutive TV c...

Page 11: ...er program windows right click on the TV Monitor choose Video Screen and make sure Always on Top is checked Changing Skins If you want to change the look and appearance of the TV Monitor and Control P...

Page 12: ...ws you to switch between the channels of the selected group only when pressing the Channel Up Down button If you want to add or delete a channel group do the following To add a new channel group 1 Cli...

Page 13: ...en t done channel scanning when you first started using the application simply follow the auto scan procedure below Refer to the section titled Skipping Unwanted Channels for more detailed information...

Page 14: ...ollowing message will appear 8 Click Yes to start all frequency auto scan The application will then scan frequencies starting from 54 MHz to over 800 MHz increasing by 1 MHz at a time The application...

Page 15: ...own button Selecting a TV Channel There are three ways of switching between TV channels Click the Channel Up Down buttons repeatedly until you reach your desired channel Click to open the Numeric Pane...

Page 16: ...to assign a name or description 3 Type in the channel name or description then press Enter Changing the TV Channel Order You may change the sequence of TV channels in the channel list as you prefer 1...

Page 17: ...channel 1 Click the Setup button and click the Channel tab 2 Under the Lock column double click the UnLock item of a TV channel that you want to be locked 3 The Channel Lockout dialog box will then ap...

Page 18: ...gs appropriately Set the Length of time in units of minutes that is how long the TV channel will be locked out 6 Type a Password to use for unlocking the TV channel in the future 7 Type the same passw...

Page 19: ...to remember your password You won t be able to unlock a channel or change the password without your current password If you forget your password you must reinstall the application Adjusting Volume On...

Page 20: ...k on the TV Monitor and choose OverScan to have it checked OR Click the Setup button and click the Video tab Then enable the Enable OverScan check box and select the width in pixels you d like to hide...

Page 21: ...s Enter You will then be tuned in to that channel Or Click the right mouse button or press ESC to return to the originally selected TV channel Selecting Between TV and External Video If you want to wa...

Page 22: ...ncies 1 Click the Setup button and click the Channel tab 2 In the Channel List section drag the horizontal slider rightward to the end 3 Double click over the channel frequency that you want to modify...

Page 23: ...an accurate color If you change your mind and want to change back to the factory default settings click Default If the TV video picture appears unclear or you see lines on the picture select one of t...

Page 24: ...button then click the Snapshot tab Click to choose a folder where you want to save captured images Capturing a TV Video Image To capture a still image click the Snapshot button The Album will then ap...

Page 25: ...he Save As dialog box will then appear 2 From the File Format drop down menu select the format for saving the captured image 3 Choose the Color format Choose 24 bit to capture image in 16M colors Choo...

Page 26: ...age size select Customize and enter the image Width and Height If you want to maintain relative width and height select the Keep Proportion option Choose a measurement unit from the Unit drop down lis...

Page 27: ...mber of Pictures box specify the number of images you want to capture 3 In the Time Interval in seconds box specify the interval between captures For instance if you specify 10 seconds an image will b...

Page 28: ...e most updated information on TV Schedules News Stock Market Prices Concert Theatre information and so on Teletext information may not be available if there is no such service provided in your region...

Page 29: ...ser Teletext information is displayed in this area The information would be the TV schedules news stock market reports concert theater information and so on Status Bar Status bar is located at the low...

Page 30: ...letext Window float over the top of other applications Teletext File Switches between the Teletext file which is opened from the previously saved file and the most recent Teletext information LED Lamp...

Page 31: ...selected teletext page There will be no changes on the page when there is no page data transmitted with the number you have selected A teletext page can be selected with one of the following methods...

Page 32: ...the filename and the default file format choose Save from the File menu or press Ctrl S To save the file by specifying your own filename and different file format choose Save As from the File menu or...

Page 33: ...the file containing the teletext page you want and click OK Opening Another Teletext Window To open another teletext window choose New Window from the File menu or press Ctrl W Closing the Active Tel...

Page 34: ...ols Use the following button controls in the Control Panel to start recording a live TV program play back the program from where you left off advance forward rewind and more Mute Volume Forward Click...

Page 35: ...s function If you want to save the video file select the Save recorded file to disk option 3 Select the video Quality that you want for the recorded program When you click an option details such as vi...

Page 36: ...can also click the Backward button to move backward in fixed intervals until you reach the part where you left off 4 To advance forward and skip some parts of the recording for example TV commercials...

Page 37: ...cording while watching live TV in a picture in picture window DVR Controls Use the following button controls for recording and video playback Mute Volume Forward Click to skip forward in intervals Bac...

Page 38: ...rmat to use for saving the recorded video files Click the Record tab then choose MPEG 1 MPEG 2 AVI VCD SVCD or DVD format Refer to the section titled Setup for more details 3 Click the Record button t...

Page 39: ...This is the default playlist of video files 2 To delete files from the playlist select them from the list in the bottom pane and click Delete or click Delete All to delete all files in the playlist 3...

Page 40: ...s icon to enable the picture in picture window When you see the icon on the Control Panel it means that picture in picture window is enabled By default you will be able to play back recorded video fil...

Page 41: ...pecific time length requirement select the Unlimited option The application will record the largest clip that your hard disk can accommodate If you will be recording programs or video for burning to d...

Page 42: ...ble video formats MPEG 1 Choose MPEG 1 format for video files that are intended for CD ROM playback on a computer or for Internet transmission MPEG 1 allows file compression and offers VHS quality pic...

Page 43: ...ame rate are 480 x 480 pixels at 29 97 fps for NTSC and 480 x 576 at 25 fps for PAL DVD When you choose this format the recorded video file will be saved in MPEG 2 format that is compliant with DVD st...

Page 44: ...electing Auto Selection allows the application to automatically set the video standard for recorded video files based on the video system used by the current video source selected in the Channel tab R...

Page 45: ...drop down list Frame Rate This sets the number of frames to capture per second You can choose from the available frame rates Quality Select Highest quality to capture high quality video clips This cre...

Page 46: ...t Ratio Aspect ratio is the proportion of the width to the height of the picture Choose one of the following aspect ratios 1 1 keep original frame size 4 3 resize frame size to TV standard aspect rati...

Page 47: ...tends to produce videos that have better response to movement since the I frames are closer together but this would result in a lower compression rate In encoding you can select different values for...

Page 48: ...ring something close to the original sound 44 1 Khz is CD quality sound and is the default setting Mode You have four audio channel choices to choose from for MPEG 1 2 Stereo Joint Stereo Dual Channel...

Page 49: ...FM radio channels adjusting volume scanning FM channels recording radio programs as MP3 or WAV files and more Mute Volume Stop Pause Setup Memory Channel Loop Switch between Channel and Frequency Cha...

Page 50: ...active FM radio stations in your area To auto scan FM radio stations 1 If this is your first time to switch to FM radio the FM Radio dialog box will automatically appear 2 Click the Auto Scan button...

Page 51: ...closest ACTIVE FM frequency 5 Click the Save button if you d like to keep the newly scanned frequency 6 If the Save and Next Channel Scan check box is enabled in Step 2 the application will automatica...

Page 52: ...s to select a radio frequency Click the Numeric buttons on the Numeric Panel Click the Tuning button to increase decrease the radio frequency OR Use the numeric keys on your keyboard to enter a radio...

Page 53: ...ded from your channel list and that you won t be able to access and hear them through the Channel Up Down button Saving a Radio Frequency to a Channel To assign a selected radio frequency to a channel...

Page 54: ...olumn of the existing or blank FM channel which you want to modify or add 3 Enter the frequency and the name you want in the provided text box es and then press Enter 4 To add or modify more channels...

Page 55: ...k the Setup button and then click the FM Radio tab 2 Click on the channel whose audio mode you want to change 3 Select the Audio Mode option you want Mono or Stereo Note If the audio quality of a FM r...

Page 56: ...t steps 2 to 4 To delete a channel group 1 Click the Setup button and then click the FM Radio tab 2 From the Group Name drop down list select the name of the group you want to remove 3 Click Delete to...

Page 57: ...as your tuning increment 3 Click OK Afterward when you click the Tuning buttons or in the FM Radio tab the frequency will increase decrease based on the Tuning Step you have specified Recording FM Rad...

Page 58: ...playlist of audio files 2 To delete files from the playlist select them from the list in the bottom pane and click Delete or click Delete All to delete all files in the playlist 3 To add more audio f...

Page 59: ...orm background recording of an FM radio program and even replay 1 Click the Time Shift button You can now leave your computer and let the application record the FM program 2 When you re back and want...

Page 60: ...esume 6 To return to real time FM radio program click the Stop button This switches off the Time Shift function and returns you to live FM radio Note The application will create a temporarily recorded...

Page 61: ...cord tab 5 Determine the audio file format to use for saving the recorded audio files Choose either MP3 or WAV file format 6 Choose the desired recording Quality from the drop down list 7 If you selec...

Page 62: ...cording To run this application click Scheduler from the AVerTV program menu or right click the Quick TV launcher located at the lower right corner of the screen then in the list menu select Scheduler...

Page 63: ...tton in the Scheduler dialog box 2 The following dialog box will then appear 3 From the Action drop down list select Active to watch a TV program or listen to an FM radio broadcast live Otherwise sele...

Page 64: ...xt box Or you may just leave it blank 9 Click Next The Record Format dialog box then appears 10 If you have set a schedule for recording choose the file format and customize settings for recording 11...

Page 65: ...EYS Channel or Frequency Selection Use NUMERIC KEYS to directly enter the TV channel number FM channel number or radio frequency ESC Stop or Change back to Normal View Stop playback recording Time Shi...

Page 66: ...F Freeze Freeze the image of current TV program or video M Mute Turn off on the sound Ctrl N Play Next File Play the next file in the playlist Ctrl P Play Previous File Play the previous file in the...

Page 67: ...In order to use the AVerMedia AVerTV card for video conferencing do the following 1 Make sure the AVerMedia AVerTV card is properly mounted into your PC 2 Make sure you have a sound card in your syste...

Page 68: ...listed click the Add or Install button Double click Protocol Click Microsoft select TCP IP and click OK Properly set up the TCP IP environment Click TCP IP then click Properties and provide all neces...

Page 69: ...l for any troubleshooting requests To contact the customer service for troubleshooting 1 Click the Setup button and click the System Information tab 2 You will see all of your system s information is...

Reviews: