


8
On/Off
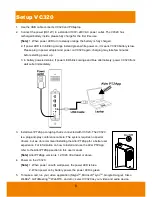
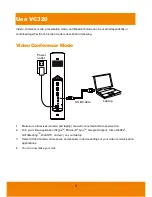
Setup VC320
1. Use the USB cable connects VC320 and PC/laptop.
2. Connect the power (DC12V) to a standard 100V~240V AC power outlet. The VC320 has
recharged battery inside, please fully charge for the first time use.
[Note]
1.
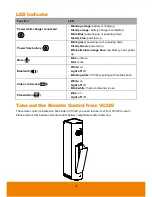
When power LED turn to steady orange, the battery is fully charged.
2. If power LED is in blinking orange instead green while power on, it means VC320 battery is low.
Please plug in power adapter and power on VC320 again; charging may take few minutes
before starting power up.
3. In battery powered status, if power LED blinks orange and blue alternatively, power VC320 from
wall outlet immediately.
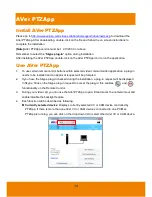
3. Install Aver PTZApp on laptop that is connected with VC320. The VC320
is a plug-and-play conference camera. The system requires no special
drivers, but we do recommend installing the AVer PTZApp for a better user
experience
.
For information on how to install and use the AVer PTZApp,
refer to the AVer PTZApp section in this user manual.
[Note]
AVer PTZApp version is 1.2.1028.30 at least or above.
4. Power on the VC320.
[Note]
1.
When power on with wall power, the power LED is blue.
2. When power on by battery power, the power LED is green.
5. To make a call, run your video application (Skype
TM
, Microsoft
®
Lync
TM
, Google Hangout, Cisco
WebEx
®
, GoToMeeting
TM
, WebRTC, and etc.); select VC320 as your video and audio device.