background image

7

6

OP1-19-GB(V1)

OP1-19-GB(V1)

PART4-SET UP THE POOL

Step1. ACCOUNT FOR ALL PARTS. 

Remove all the parts from the carton(s) and place them on the ground in the location where they are to be assembled  
Check each part according to “PART REFERENCE” .Make sure all the pieces to be assembled are accounted for. 

IMPORTANT:

 Do not start assembly if any pieces are missing. For replacement pieces call the Consumer Service 

telephone number in your area.
The number of persons required for installation: 2 adult at least.
Total installation time except the time for site preparation and water filling : 
10 minutes for size Ф8’x25”/Ф10’x30”/Ф12’x30”/Ф12’x33”/Ф12’x36”
30 minutes for size  Ф14’ x 33”

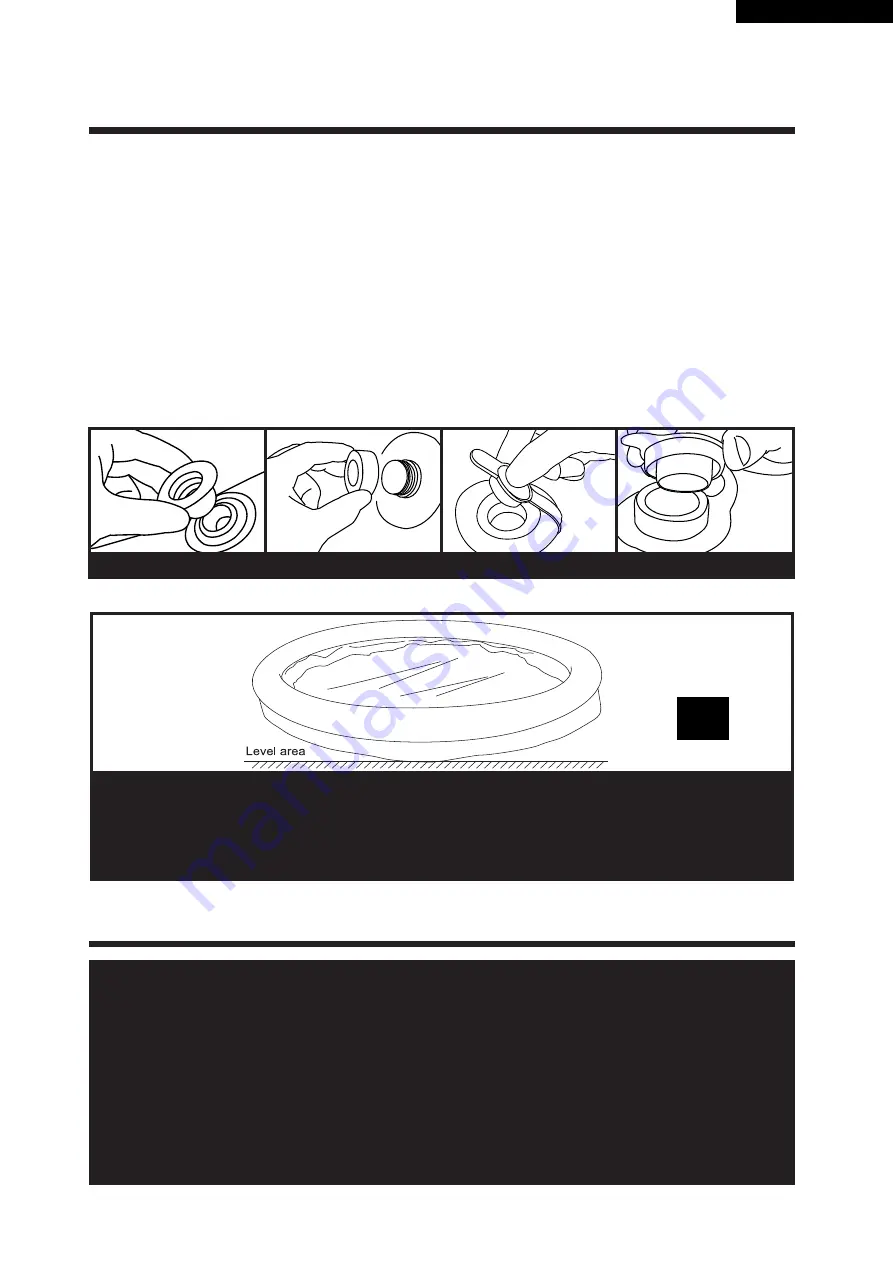
Step2. INSTALL DRAIN VALVES COVER AND STOPPER

Make sure that outer drain plug is inserted into the outer drain cap and drain valve cover is screwed on tightly.Plug the con-
nection holes with the stoppers. (The out drain plug changes according to different size of pool.)

STOPPER

Out Drain Plug A

Out Drain Plug B

Drain Vavle Cover

Step3.


INFLATE THE TOP RING

Keeping the top ring in the middle of the pool (the top ring must be kept inside the circumference of 

the pool bottom.) 

VERY IMPORTANT

: The top ring should be filled to approx. 85% capacity only. DO NOT attempt 

to inflate the ring past this point.Excessive inflation of the top ring can cause the ring to burst or 

cause damage to the ring’s seams.

80

%

WARNING:


Do not leave pool unattended while filling with water.

WARNING: 

If more than 1~2 inches of water collects on any one side before you 

start filling in the center.The pool is not level enough, and must be corrected! You 

shall pull out the drain plug, release the water completely, disassemble the pool 

completely,locate the pool on a plane surface, repeat set up instruction. 

WARNING: 

DO NOT OVERFILL as this could cause the pool to collapse.In times of 

heavy rainfall you may need to empty some of the water to ensure the level is correct.

PART5-FILL THE POOL WITH WATER

Summary of Contents for 17792

Page 1: ...cm DO NOT RETURN PRODUCT TO STORE Drawing for illustration purpose only Actual product may vary Not to scale Please read carefully and keep for future reference Detailed information of product model and size is shown at the end of this manual STOP Shanghai Jilong Plastic Products Co Ltd 2555 XiuPu Road Pudong Area Shanghai China www avenli com JILONG PLASTIC PRODUCTS JIANGSU CO LTD NO 1 Industrial...

Page 2: ... similar safety devices are helpful aids but they are not substitutes for continuous and competent adult supervision Safety equipment 1 It is recommended to keep rescue equipment e g a ring buoy by the pool 2 Keep a working phone and a list of emergency phone numbers near the pool Safe use of the pool 1 Encourage all users especially children to learn how to swim 2 Learn Basic Life Support Cardiop...

Page 3: ...hall be done by adults WARNING Read and follow the the instruction for use and maintenance to ensure a safe use of the swimming pool kit Not following the instructions for use and maintenance can cause serious health hazards in particular for children WARNING Only for domestic outdoor use WARNING Drowning hazard Children have drowned in portable swimming pools WARNING Empty the pool when not in us...

Page 4: ...r 1 290364 1 290364 4 Hole Strainer B 2 290312 2 290312 5 Pool Liner 1 393242 1 393243 Color Blue Blue 1 2 4 5 3 Ф8 x 25 Ф2 4m x63 cm Ф10 x 30 Ф3m x76 cm Model Size Water Capacity Pump Ladder 17792DE 17792EU 17792FR 17792GB Ф8 x 25 Ф2 4mx 63 cm 548Gal 2074L 17792 Ф8 x 25 Ф2 4mx 63 cm 548Gal 2074L 17793DE 17793EU 17793FR 17793GB Ф10 x 30 Ф3 0m x 76 cm 956Gal 3618L 17793 Ф10 x 30 Ф3 0m x 76 cm 956Ga...

Page 5: ...0312 5 Pool Liner 1 393244 1 393246 Color Blue Blue 1 2 4 5 3 NOTE Drawing for illustration purpose only Actual product may vary Not to scale Ф12 x 30 Ф3 6m x76 cm Ф14 x 33 Ф4 2m x84 cm Model Size Water Capacity Pump Ladder 17794DE 17794EU 17794FR 17794GB 17794RU Ф12 x 30 Ф3 6m x 76 cm 1421Gal 5377L 17794 Ф12 x 30 Ф3 6m x 76 cm 1421Gal 5377L 17796DE 17796EU 17796FR 17796GB 17796RU Ф14 x 33 Ф4 2m x...

Page 6: ...rect sunlight This will help to warm your pool WARNING Pools installed on inadequately level surfaces are subject to leaking forming irregularities or collapse which can result in property damage or serious in jury for those in or around the pool area WARNING Do not use sand during setup process If it appears that there is a need for use of a leveling agent then your set up site is likely unsuitab...

Page 7: ...e out drain plug changes according to different size of pool STOPPER Out Drain Plug A Out Drain Plug B Drain Vavle Cover Step3 INFLATE THE TOP RING Keeping the top ring in the middle of the pool the top ring must be kept inside the circumference of the pool bottom VERY IMPORTANT The top ring should be filled to approx 85 capacity only DO NOT attempt to inflate the ring past this point Excessive in...

Page 8: ...g on the inside of the pool and the water will begin to drain immediately Step7 Disconnect the hose and drainage valve connector when finished Step8 Replace the out drain plug on the inside of the pool Step9 Be sure that the pool liner is completely dry before folding the pool for long term storage Leaving the pool exposed to sunlight for a few hours will clean and speed the drying process and mak...

Page 9: ...rine concentration in the water is optimal for safe and enjoyable bathing throughout the season Please consult your pool supply retailer to find a suitable testing kit and instructions on its use WARNING Non respect of the maintenance rules may result in serious hazards for health and especially for the children This product is designed to be storable seasonal pools If you live in a temperate area...

Page 10: ... your pool liner so please take corrective action as soon as possible if testing reveals either condition The tasks of removing larger debris from your pool and keeping the inside of the pool liner clean are simplified by using a Prompt Set Pool Maintenance Kit which includes a leaf skimmer and garden hose powered vacuum Maintenance Kits are included as a bonus feature in larger pool systems and c...

Page 11: ... we recommend using a Silicone or rubber based glue for repair Repair Glue Instructions 1 Locate the leak place 2 Deflate if necessary and drain thoroughly 3 Clean the area surrounding the leakage and wipe up all water from the surface 4 Thoroughly clean the area surrounding the leak Cut a piece of repair material in round shape which should be larger than the damaged area 5 Gluing need to purchas...

Page 12: ...of the top ring Make sure ground underneath pool is very flat level and free of any mounds of soil COLORED WATER Water turns blue brown or black when first treated with chlorine The chlorine is oxidizing minerals in your water This commonly occurs with water from different sources Adjust pH to recommended level Run filter until water is clear Regularly clean cartridge PARTICALS SUSPENDED IN WATER ...

Page 13: ...LIRE ATTENTIVEMENT ET À CONSERVER POUR CONSULTATION ULTÉRIEURE NE RETOURNEZ PAS LE PRODUIT AU MAGASIN Dessin à but d illustration uniquement Le produit réel peut varier N est pas à l échelle Des informations détaillées sur le modèle et les dimensions du produit se trouvent à la fin de ce manuel Shanghai Jilong Plastic Products Co Ltd 2555 XiuPu Road Pudong Area Shanghai China www avenli com JILONG...

Page 14: ...ve et continue par un adulte compétent des enfants qui ne savent pas bien nager et des non na geurs est requise en permanence en gardant à l esprit que le risque de noyade est le plus élevé pour les enfants de moins de cinq ans 2 Désignez un adulte compétent pour surveiller le bassin à chaque fois qu il est utilisé 3 Il convient que les enfants qui ne savent pas bien nager ou les non nageurs porte...

Page 15: ...sinfection par exemple hors de portée des enfants 9 Utilisez les pictogrammes décrits ci dessous pas nécessaire pour piscine hors sol en kit puisque les pictogrammes sont déjà placés sur la piscine dans une position visible 10 Placez les échelles amovibles sur une surface horizontale 11 Avertissement une piscine vide à l extérieur peut causer des dangers inconnus ATTENTION Le montage doit être eff...

Page 16: ...e purge 1 290364 1 290364 4 Crépine de l orifice B 2 290312 2 290312 5 Liner de la piscine 1 393242 1 393243 Couleur Bleu Bleu 1 2 4 5 3 Ф8 x 25 Ф2 4m x63 cm Ф10 x 30 Ф3m x76 cm Modèle Taille Capacité en eau Pompe Échelle 17792DE 17792EU 17792FR 17792GB Ф8 x 25 Ф2 4mx 63 cm 548Gal 2074L 17792 Ф8 x 25 Ф2 4mx 63 cm 548Gal 2074L 17793DE 17793EU 17793FR 17793GB Ф10 x 30 Ф3 0m x 76 cm 956Gal 3618L 1779...

Page 17: ...2 290312 5 Liner de la piscine 1 393244 1 393246 Couleur Bleu Bleu 1 2 4 5 3 REMARQUE Dessin à but d illustration uniquement Le produit réel peut varier N est pas à l échelle Ф12 x 30 Ф3 6m x76 cm Ф14 x 33 Ф4 2m x84 cm Modèle Taille Capacité en eau Pompe Échelle 17794DE 17794EU 17794FR 17794GB 17794RU Ф12 x 30 Ф3 6m x 76 cm 1421Gal 5377L 17794 Ф12 x 30 Ф3 6m x 76 cm 1421Gal 5377L 17796DE 17796EU 1...

Page 18: ...us permettra de chauffer votre piscine AVERTISSEMENT Les piscines installées sur des surfaces insuffisamment de niveau sont soumises à des fuites à la formation d irrégularités ou à l effondrement ce qui peut entraîner des dommages matériels ou des blessures graves pour les personnes à l intérieur ou autour de la piscine AVERTISSEMENT N utilisez pas de sable pendant le processus d installation S i...

Page 19: ...lacement où elles doivent être assemblées Vérifiez chaque pièce selon la RÉFÉRENCE DES PIÈCES Assurez vous que toutes les pièces à assembler sont prises en compte Étape2 INSTALLEZ LE CACHE ET LE BOUCHON DES SOUPAPES DE VIDANGE Assurez vous que le bouchon de vidange extérieur est inséré dans le capuchon de vidange extérieur et que le cache de la soupape de vidange est vissé fermement Insérez les tr...

Page 20: ...idange à l intérieur de la piscine et l eau commence à s évacuer immédiatement Étape7 Débranchez le tuyau et le connecteur de la soupape de vidange dès que terminé Étape8 Remettez le bouchon de vidange à l intérieur de la piscine Étape9 Assurez vous que le liner de la piscine a complètement séché avant de plier la piscine pour un stockage à long terme Laisser la piscine exposée à la lumière du sol...

Page 21: ...enir un kit d essai adapté et des instructions sur son utilisation AVERTISSEMENT Le non respect des consignes d entretien peut engendrer des risques graves pour la santé notamment celle des enfants Ce produit est conçu pour être une piscine saisonnière stockable Si vous habitez dans une zone tempérée où la piscine ne sera pas utilisée toute l année il est FORTEMENT RECOMMANDÉ de vider votre piscin...

Page 22: ...rendre des actions correctives dès que possible si le test indique l un des deux états Les tâches de retrait des débris plus importants de vote piscine et de maintenir l intérieur du liner de votre piscine propre sont simplifiées par l utilisation d un Kit de maintenance de piscine Prompt Set qui comprend une écumoire à feuilles et un aspirateur alimenté par le tuyau d arrosage Les Kits de mainten...

Page 23: ...de serrage des tuyaux Maintenez la piscine couverte quand elle n est pas utilisée ALGUES L eau a une teinte verdâtre Des taches vertes marron ou noires apparaissent sur le liner de la piscine Le fond de la piscine est glissant et ou une odeur désagréable est présente Des algues sont présentes Appliquez le traitement choc super chlorinateur Vérifiez le pH et ajustez le à un niveau approprié selon v...

Page 24: ...ait été présentée Cette garantie limitée n est pas valide si le produit est utilisé à des fins commerciales ou si le dommage est causé par un accident une catastrophe naturelle une utilisation abusive du consommateur une négligence ou des mauvais traitements des actes de vandalisme une mauvaise utilisation de produits chimiques une exposition à des conditions météorologiques extrêmes ou une néglig...

Reviews: