


5
Preparation and Startup
© Copyright Reserved Autonics Co., Ltd.
39
5.2.3
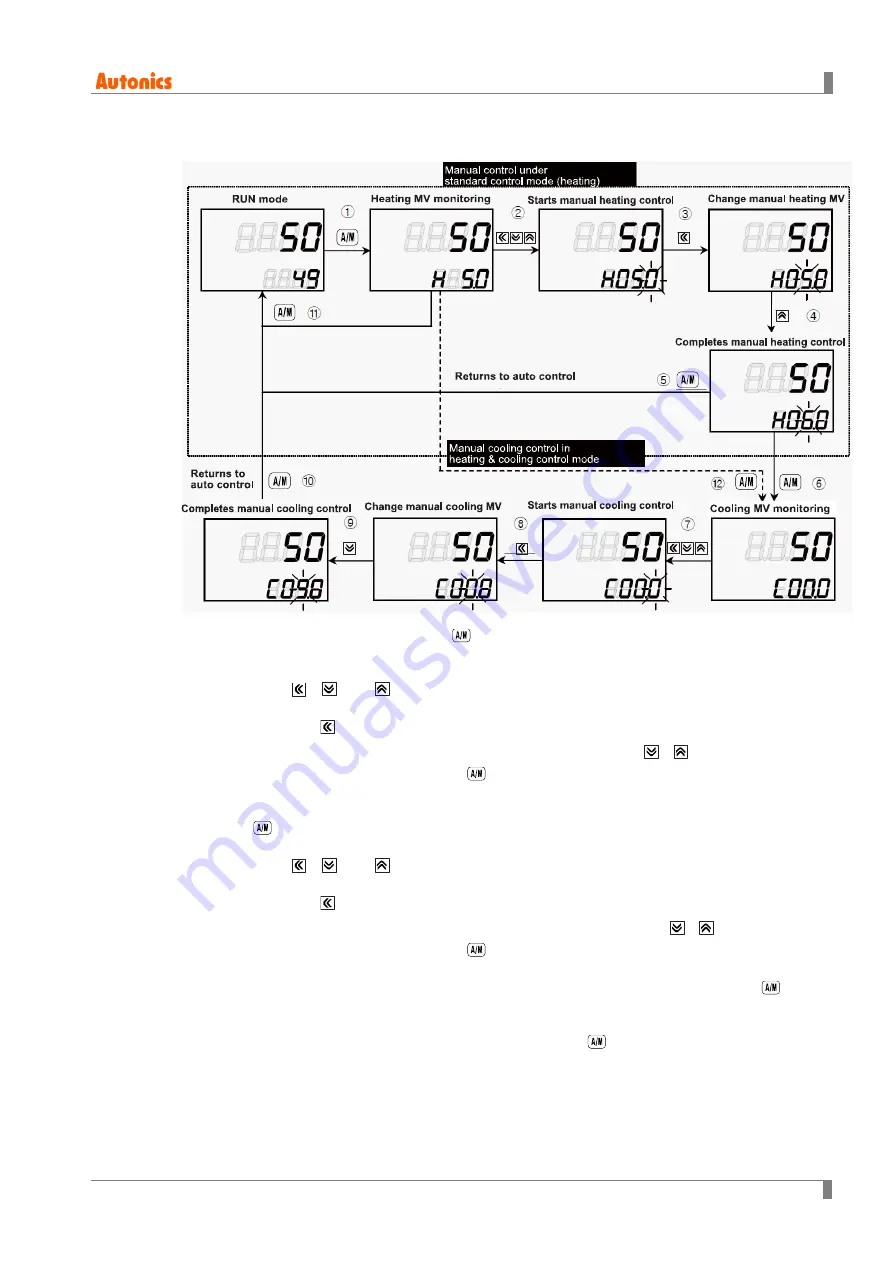
MV monitoring and manual control
①
While in RUN mode, press the
key to commence manual control. The SV display will
then show H (heating control) or C (cooling control) and simultaneously display the MV to
indicate commencement of MV monitoring.
②
If the
,
, or
is pressed while MV monitoring is in progress, the MAN indicator
will turn on and the last digit will start to flash to indicate activation of manual control.
③
Press the
key to change the flashing digit (10
0
→
10
1
→
10
2
→
10
3
→
10
0
).
④
Select the digit and configure the desired MV value using the
,
keys.
⑤
To end manual control, press the
key. The MAN indicator will turn off, and the system
will revert to auto control mode.
⑥
While in heating & cooling control mode, set the manual heating MV and then press the
key to see C (cooling control) and the current cooling MV value on the SV display
indicating commencement of cooling MV monitoring.
⑦
If the
,
, or
is pressed while MV monitoring is in progress, the MAN indicator
turns on and the last digit starts to flash to indicate activation of manual control.
⑧
Press the
key to change the flashing digit (10
0
→
10
1
→
10
2
→
10
3
→
10
0
).
⑨
Select the digit and configure desired cooling MV value using the
,
keys.
⑩
To end manual control, press the
key. The MAN indicator will turn off, and the system
will revert to auto control mode.
⑪
While in standard control mode (heating control or cooling control), pressing the
key
once from the MV monitoring stage, or any other stage, will revert the system to auto
control mode.
⑫
During heating & cooling control mode, pressing the
key once from the MV
monitoring stage, or any other stage, will skip the system to the cooling MV monitoring
stage.
Summary of Contents for TK Series
Page 1: ...1 Product Introduction Copyright Reserved Autonics Co Ltd 1 USER MANUAL ...
Page 2: ...1 Product Introduction 2 Copyright Reserved Autonics Co Ltd ...
Page 8: ...1 Product Introduction 8 Copyright Reserved Autonics Co Ltd ...
Page 12: ...1 Product Introduction 12 Copyright Reserved Autonics Co Ltd ...
Page 24: ...1 Product Introduction 24 Copyright Reserved Autonics Co Ltd ...
Page 28: ...3 Dimensions 28 Copyright Reserved Autonics Co Ltd 5 TK4H Series 6 TK4W Series 7 TK4L Series ...
Page 32: ...3 Dimensions 32 Copyright Reserved Autonics Co Ltd ...
Page 36: ...4 Connections 36 Copyright Reserved Autonics Co Ltd ...
Page 41: ...5 Preparation and Startup Copyright Reserved Autonics Co Ltd 41 5 3 Parameter group ...
Page 42: ...5 Preparation and Startup 42 Copyright Reserved Autonics Co Ltd ...
Page 45: ...5 Preparation and Startup Copyright Reserved Autonics Co Ltd 45 5 4 2 Parameter 2 group PAR2 ...
Page 46: ...5 Preparation and Startup 46 Copyright Reserved Autonics Co Ltd ...
Page 47: ...5 Preparation and Startup Copyright Reserved Autonics Co Ltd 47 5 4 3 Parameter 3 group PAR3 ...
Page 49: ...5 Preparation and Startup Copyright Reserved Autonics Co Ltd 49 5 4 4 Parameter 4 group PAR4 ...
Page 50: ...5 Preparation and Startup 50 Copyright Reserved Autonics Co Ltd ...
Page 51: ...5 Preparation and Startup Copyright Reserved Autonics Co Ltd 51 ...
Page 52: ...5 Preparation and Startup 52 Copyright Reserved Autonics Co Ltd 5 4 5 Parameter 5 group PAR5 ...
Page 53: ...5 Preparation and Startup Copyright Reserved Autonics Co Ltd 53 ...
Page 54: ...5 Preparation and Startup 54 Copyright Reserved Autonics Co Ltd ...
Page 63: ...6 Parameter Settings and Functions Copyright Reserved Autonics Co Ltd 63 1 Using a Deadband ...
Page 124: ...8 DAQMaster 124 Copyright Reserved Autonics Co Ltd MCT TKU1 V2 3 1703EN ...


