


Understanding the OP-1212
17
Understanding the OP
-
1212 Panel
The OP-1212 Lamp/Pushbutton panel provides various features and options that
can be used together or stand alone with your logic program. The link to the PLC is
one of the important aspects of the configuration process. Part of this link is called
“memory mapping”. Once the panel has been mapped and configured correctly, you
will be able to use the many functions the OP-1212 provides. This section will
discuss the functions and get you more familiar with the panel itself before showing
the actual configuration and programming examples.
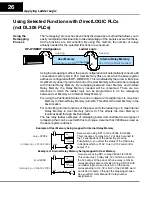
Memory mapping is a technique that tells the panel what part of the PLC memory you
want to use. These memory areas are frequently referred to as registers. Once you
have selected a memory address, you will be able to manipulate the data via your
ladder logic program. The OP-1212 will occupy a bank of 6 contiguous registers as
illustrated in the tables below. In the first table,
m+0
represents the first register of the
bank of memory required for mapping the OP-1212. This can be any address in your
PLC that can be used for data storage. The second table shows the bit orientation for
each panel feature. These mapping assignments will be the same for any PLC type,
the only difference being the address location selected for mapping. The information
for specific PLC types will be discussed in the
Applying Ladder Logic
section.
1
2
3
4
5
6
7
8
9
10
11
12
Indicator Lamp Flash
1
2
3
4
5
6
7
8
9
10
11
12
1
2
3
4
5
6
7
8
9
10
11
12
1
2
3
4
5
6
7
8
9
10
11
12
1
2
3
4
5
6
7
8
9
10
11
12
1
2
3
4
5
6
7
8
9
10
11
12
Button LEDs ON/OFF
Button LEDs Flash
Button ON/OFF
Force Data & Comm
M3
M2
M1
Indicator Lamp
LSB
MSB
m+0
m+1
m+2
m+3
m+4
m+5
The 12 pushbuttons on the OP-1212 panel provide a means of control for any
process connected to your PLC. The pushbuttons can be configured as either
momentary
or
maintained
(also called alternate). The momentary pushbuttons
remain ON for as long as you are manually pressing them while the maintained will
change status every time you press them. You can select either operation for each
pushbuttons when you are configuring the panel. When the PLC and panel are
properly mapped, the pushbuttons are used just like relay contacts. If you refer to the
table above, the pushbuttons status will be determined by the status of the bits in the
m+4
memory register.
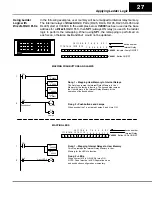
There are 12 Lamps available on the OP-1212 panethat are arranged in 3 rows of
four. The panel is shipped with all red Lamps, however, you can order additional red,
green, and yellow packs of lamps for more customized arrangements. Refer to our
catalog for the lamp kit part numbers and prices.
After the PLC and panel have been properly mapped, the lamps can be activated
by writing a 1 to its associated bit in the
m+0
address location. The bit is turned
on via your ladder logic usually through activation of a contact. The contact can
also be one of the 12 pushbuttons on the OP-1212 panel. We will provide
examples of these applications in the
Applying Ladder Logic
Section of this
manual.
Overview
Memory Mapping
Pushbuttons
Lamps