


Getting Started
4
Using the Pushbutton Panel...5 Easy Steps
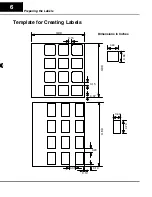
First, you need to prepare the labels for each of
the pushbuttons and lamps. The labels insert
into plastic sleeves behind the main cover. To
access the sleeve, you merely snap loose the
front bezel.
Preparing for installation, you will want to
check the individual specifications. These
include dimensions, power requirements,
cabling requirements, and NEMA ratings.
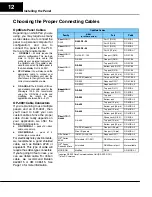
We include information you will need for
mounting; i.e. cutout dimensions, cabling
requirements, components needed, etc.
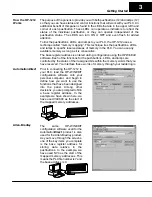
External Power
Cables
You will need the OP--WINEDIT configuration
software in order to configure the panel and
PLC. OP--WINEDIT is ordered as a separate
item
from
the
OptiMate
panel
from
Automation
Direct
.
The software is used for both
Direct
LOGIC
and Allen--Bradley PLCs.
After setting a DIP switch on the rear of the panel
and attaching the programming cable, you are
ready to configure your panel. The simple and
easy-to-follow screens make configuration a
painless process.
DIP
Switch
The amount of ladder logic programming
knowledge you need is very basic. In most
cases, you are already familiar with the
elements of logic that are required. We’ll
give you examples in the final section of
this manual, and you will see right away
just how easy it is.
C100
OUT
C101
Y10
OUT
Y11
Step 1: Prepare
Your Labels
(Pages 5--6)
Step 2: Install the
Panel
(Pages 7--14)
Step 3: Use
OP--WINEDIT
Software
Step 4: Configure
the Panel to Work
with your PLC
(Pages 15)
Step 5: Write the
Ladder Logic
(Pages 19--31)