background image

Chapter 3:  Applications

3.4.5 – How Much Energy?

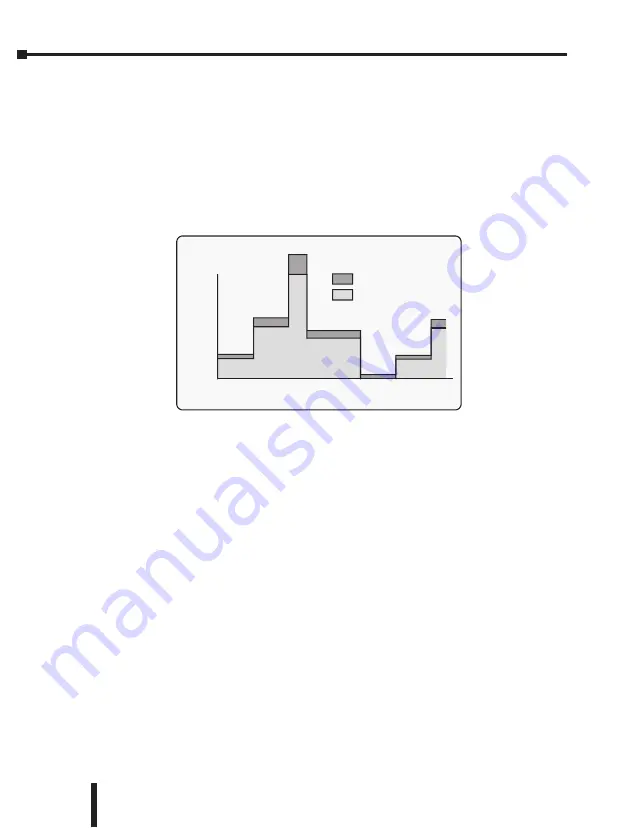
The amount of energy used by a squirrel-cage induction motor operating with a soft starter in
energy-optimizing mode is shown in the following figure (Figure 3.4.5.1), for the same duty cycle
as Figure 3.4.1.2.  By reducing the voltage when torque demand is below maximum, the
magnetizing current is proportioned to the torque current.
Compare Figure 3.4.5.1 (energy-optimizing) with Figure 3.4.1.2 (non-optimizing).  (These graphical
representations are illustrative only and not to scale.)  Arriving at any exact figure for the energy
cost saved requires each individual case to be examined in detail, taking into account the motor
rating, type, and any special characteristics such as load, load characteristics, duty cycle, supply
voltage, and the cost of electricity.

Figure 3.4.5.1:  Energy Savings

The calculations to cover all the likely or possible conditions would be laborious.  An empirical
method for arriving at a usefully realistic estimate has been devised.  Used with a proper sense of
engineering circumspection, the tables in Section 3.4.6 allow a user to gain a reasonably close
estimate of the savings to be achieved within the motor by using the SR44 optimizing Soft Starter.
The method does not include any additional savings and benefits conferred by other sources, such
as:

• reduction of 

heating losses

in cabling because of the lower voltages;

• potential reduction of 

maximum demand

charges;

• further energy savings and other benefits deriving from the soft-starting process itself;

• reduced 

total energy demand

;

• reduced 

wear and tear

;

• reduced 

maintenance and replacement

costs.

40         60        80      100      120     140      160

seconds

%

FLC

100

50

0

Current demand with Energy Saving in operation

Magnetizing current
Torque current

SR44 Series Soft Starter User Manual

1st Ed, Rev B     07/31/2019

3–18

Summary of Contents for Stellar SR44

Page 1: ...STELLAR SR44 SOFT STARTER USER MANUAL SR44 M WO 1st Edition Revision B...

Page 2: ...BLANK PAGE SR44 Series Soft Starter User Manual 1st Ed Rev B 07 31 2019...

Page 3: ...il safe performance such as in the operation of nuclear facilities aircraft navigation or communication systems air traffic control direct life support machines or weapons systems in which the failure...

Page 4: ...r exemple l exploitation d installations nucl aires les syst mes de navigation a rienne ou de communication le contr le de la circulation a rienne les quipements de survie ou les syst mes d armes pour...

Page 5: ...dance with the applicable wiring and safety regulations The owner installer and user are responsible for the correct installation and use of the Stellar SR44 for ensuring that only qualified personnel...

Page 6: ...SR44 Series Soft Starter User Manual 1st Ed Rev B 07 31 2019 w 4 BLANK PAGE...

Page 7: ...riginal Issue 1st Ed Rev A 09 2011 Ch2 Bypass Control external CT 2 4 1 2 5 2 Fuse and Current Ratings 2 10 1 2 10 2 Ch5 Modified parameter explanations especially with regard to Auto Jog Optimise byp...

Page 8: ...BLANK PAGE SR44 Series Soft Starter User Manual 1st Ed Rev B 07 31 2019...

Page 9: ...nnections 2 12 2 7 Control Card Connections 2 13 2 8 Reserved for Future Use 2 13 2 9 Typical Motor Power at Rated Voltage 2 14 2 10 Fuse and Current Ratings 2 15 Chapter 3 Applications 3 1 3 1 Motor...

Page 10: ...44 Soft Starter 5 3 5 2 Keypad Menu Structure 5 8 5 3 Parameter Basic Information 5 15 5 4 Menu Settings and Parameter Descriptions 5 23 5 5 Definitions for Chapter 5 5 79 Chapter 6 Serial Communicati...

Page 11: ...le with SR44 Soft Starters D 3 DL105 PLC I O Compatible with SR44 Soft Starters D 4 DL205 PLC I O Compatible with SR44 Soft Starters D 4 DL305 PLC I O Compatible with SR44 Soft Starters D 5 DL405 PLC...

Page 12: ...Table of Contents BLANK PAGE SR44 Series Soft Starter User Manual 1st Ed Rev B 07 31 2019 t 4...

Page 13: ...ial Symbols 1 2 1 Mechanical Installation 1 3 1 1 Mounting 1 3 1 2 Requirements for an Enclosure 1 3 1 3 Ventilation 1 3 1 4 Storage and Derating 1 3 1 5 Altitude 1 3 1 6 Assisted Flow 1 4 1 7 Heat Ou...

Page 14: ...m 6 00 p m E T On the Web www automationdirect com Our technical support group is glad to work with you in answering your questions If you cannot find the solution to your particular application or if...

Page 15: ...a suitable temperature range periodically measure the internal temperature of the enclosure If you situate the unit above equipment that generates a significant amount of heat reduce the unit full lo...

Page 16: ...sure in Watts W tmax maximum permissible temperature within the enclosure C tamb temperature of the air entering the enclosure C If you prefer to work in CFM substitute F for C Refer to the table in s...

Page 17: ...Unit Air Intake Mounting Surface Outline of Enclosure S Minimum Clearance for Heat Dissipation SR44 Mounting Clearances Model Number Unit Cooling Method Minimum Clearance mm in Top T Bottom B Side S...

Page 18: ...362 0 14 25 125 0 4 92 222 0 8 74 150 0 5 91 195 0 7 68 SR44 Chassis Size 1 Mounting Specifications Model Number Mass Weight kg lb Unit Mounting Holes Top Bottom SR44 9 to SR44 44 7 3 16 2 holes 2 slo...

Page 19: ...4 500 0 19 69 265 0 10 43 SR44 Chassis Size 2 Mounting Specifications Model Number Mass Weight kg lb Unit Mounting Holes Top Bottom SR44 174 to SR44 202 16 35 2 keyholes suitable for M6 or 1 4 fitting...

Page 20: ...Chapter 1 Mechanical Installation BLANK PAGE SR44 Series Soft Starter User Manual 1st Ed Rev B 07 31 2019 1 8...

Page 21: ...gurations 2 4 2 3 1 Wiring Diagram for In Line Connection of Motors 2 4 2 3 2 Wiring Diagram for In Delta Connection of Motors 2 5 2 4 Motor Control Circuits 2 6 2 4 1 Bypass Control 2 6 2 4 2 Multipl...

Page 22: ...rol Inputs 2 13 2 7 2 Control Outputs 2 13 2 8 Reserved for Future Use 2 13 2 9 Typical Motor Power at Rated Voltage 2 14 2 9 1 Chassis Size 1 Motor Power Ratings 2 14 2 9 2 Chassis Size 2 Motor Power...

Page 23: ...ELECTRICAL INSTALLATION 2 CHAPTER CHAPTER 2 2 CHAPTER BLANK PAGE 2 1c...

Page 24: ...internal control circuitry Do NOT install power factor correction capacitors on the output side of the SR44 Caution Always replace the cover on the Soft Starter after gaining access to the electrical...

Page 25: ...L1 L2 L3 T1 T2 T3 M8 metric threaded studs Use 75 C copper CU conductor only and the wire shall be installed with eyelet lug 1 0 50 n a 106 lb in 12 N m Ground PE Size 2 SR44 174 to SR44 370 Power L1...

Page 26: ...ase control power Mains Supply L1 L2 L3 Circuit Contactor Feeder cables Isolation and Protection Switch gear provided by the customer Electrical Ground 1 L1 2 T1 4 T2 6 T3 3 L2 5 L3 C1 Induction Motor...

Page 27: ...L1 L2 L3 W1 3 V1 2 U1 1 V2 5 U2 4 W2 6 V1 2 W1 3 U1 1 W2 6 U2 4 V2 5 Circuit Contactor C1 Isolation and Protection Switch gear provided by the customer 1 L1 2 T1 4 T2 6 T3 3 L2 5 L3 SR44 X1 X2 Control...

Page 28: ...Auto Bypass Auto Feature should be ON P18 B2 P86 B2 Using a bypass contactor with Auto Bypass in the OFF state can cause thyristor faults An external user supplied current transformer is required if...

Page 29: ...oad is high inertia extended start time then a longer trip time may be required 2 4 4 Motor Reversing The diagram in figure 2 4 6 shows a typical motor reversing circuit using two contactors C1 and C2...

Page 30: ...15V 230V C2 Mains Supply L1 L2 L3 Mechanical Interlock Feeder cables Isolation and Protection Switch gear provided by the customer Electrical Ground 1 L1 2 T1 4 T2 6 T3 3 L2 5 L3 C1 Forward Contactor...

Page 31: ...ARD To remove cover unscrew 2 positions size 1 only ELECTRONIC CONTROL CARD Refer to sections 2 5 2 and 2 7 1 POWER TERMINALS T1 T2 T3 Output Induction motor For correct motor rotation these connectio...

Page 32: ...AD CIRCUIT CARD To remove cover unscrew 4 positions size 2 only ELECTRONIC CONTROL CARD Refer to sections 2 5 2 and 2 7 1 POWER TERMINALS T1 T2 T3 Output Induction motor For correct motor rotation the...

Page 33: ...Programmable Input Control Input 1 S1 S0 A voltage applied to these terminals will either SET or CLEAR the parameter bit mapped by P65 Default Start Stop Programmable output Programmable output Progra...

Page 34: ...0V The diagrams in section 2 5 show the location of the terminals X1 and X2 for each model of SR44 Supply voltage must be in the range 115V 15 10 or 230V 15 10 SR44 Power Electrical Tolerances Nominal...

Page 35: ...r selects and enters REMOTE STARTING at the keypad The application of a voltage as specified between these terminals will initiate a START The removal of this voltage will initiate a STOP Control Card...

Page 36: ...SR44 soft starters have been discontinued Please consider SR55 soft starters as a replacements SR44 Chassis Size 1 Motor Power Ratings Model Current Amps 208 Volts 230 Volts 400 Volts 460 Volts kW HP...

Page 37: ...ated in Table 2 10 1 It is the responsibility of the installer and system designer specifier to ensure that the required standards or regulations are not affected by so doing SR44 Fuse and Current Rat...

Page 38: ...the fuse melting the filling of the fuse into glass Being an insulator glass suppresses arc over and breaks the circuit instantly This behavior minimizes the possibility of a continuing dangerous high...

Page 39: ...4 242 to SR44 370 242 to 370 AC 53a AC 53a 4 6 3 35 60 3 60 3 Index ratings AC 53a and AC 53b are specified by IEC standard 60947 4 2 AC 53a Overload Current Profiles applicable to specified Soft Star...

Page 40: ...53a and AC 53b are specified by IEC standard 60947 4 2 AC 53b Overload Current Profiles applicable to specified Soft Starter models Soft Starter Model X Overload Current multiple of Ie Tx Duration of...

Page 41: ...7 8 9 10 Overload start point adjustable by P34 or P93 default setting 110 1000 100 10 1 0 1 0 01 P35 or P94 Parameter selected through either the primary or secondary group of value parameters Delay...

Page 42: ...Chapter 2 Electrical Installation BLANK PAGE SR44 Series Soft Starter User Manual 1st Ed Rev B 07 31 2019 2 20...

Page 43: ...rection Capacitors 3 3 3 1 6 Lightly Loaded Small Motors 3 3 3 1 7 Motors Installed with Integral Brakes 3 3 3 1 8 Older Motors 3 3 3 1 9 Wound rotor or Slip ring Motors 3 3 3 1 10 Enclosures 3 3 3 1...

Page 44: ...eplacement of Fluid Couplings 3 6 3 2 10 Two speed Motor Applications 3 6 3 2 11 Multiple Motor Starting 3 6 3 2 12 Overhauling Loads 3 6 3 2 13 Application Table 3 6 3 3 Concepts and Principles of Fi...

Page 45: ...mizing Mode 3 15 3 4 1 Principles 3 15 3 4 2 Advantages of Energy Optimizing 3 16 3 4 3 Additional Benefits in Practice 3 16 3 4 4 Optimizing with the SR44 System 3 17 3 4 5 How Much Energy 3 18 3 4 6...

Page 46: ...maintain full speed efficiently at all torque levels up to the design full load torque Most modern three phase induction motors have characteristics that are wholly suitable for use with soft starter...

Page 47: ...ally connected to the motor input terminals can only be soft started when the brake is re connected to the supply through its own contactor Do NOT soft start the brake 3 1 8 Older Motors The action of...

Page 48: ...any Soft Starter users and installers in European countries must comply with the EMC Directive 89 336 EEC The manufacturer of the soft starter has a statutory obligation to provide a guide for compli...

Page 49: ...plete motor data Current Voltage Power Speed Rotor Inertia Speed Torque Current curves Complete load data Type of load Speed Inertia Speed Torque curve Power absorbed or Full load Torque Consideration...

Page 50: ...e coupling is used to magnify the available breakaway torque it may be necessary to replace the installed motor with another of a larger size or one with a high starting torque characteristic before a...

Page 51: ...ded 10 Escalator unloaded 25 50 Optimizing feature can be effective Fan axial flow propeller 20 40 Feeder screw 100 175 Needs high starting torque motor Feeder vibrating motor driven 100 150 Needs hig...

Page 52: ...controller it is important to have some understanding of the characteristics and limitations of the induction motor and the electro mechanical systems currently used to control them The standard fixe...

Page 53: ...figure 0 SPEED S Locked Rotor Torque LRT MA Pull Out Torque MK Pull up Torque Full Load Torque FLT MN Synchronous speed Figure 3 3 2 3 Torque Speed Curve Accelerating Torque TORQUE Pull Out Torque MK...

Page 54: ...eristic chosen for lifting and hoisting applications Figure 3 3 2 4 Torque Speed Curve High Starting Torque However most induction motors are designed to have a standard characteristic that provides a...

Page 55: ...or transition point is controlled by the time switch and is usually arranged to be approximately at 80 of full speed The effect of starting in the wye connection is to alter the voltage across each s...

Page 56: ...esser extent to compensate for some of the disadvantages of each type of starter discussed Nevertheless the fundamental problems of electro mechanical starters remain and it is only in the last decade...

Page 57: ...nges in load Where motor speeds cannot be varied an optimizing version of semiconductor motor controller such as the SR44 will also produce energy savings in lightly loaded motors Less sophisticated s...

Page 58: ...so called inverters and soft starters available to the unsuspecting purchaser international standards for these products have been developed So far IEC 60947 4 2 AC Semiconductor Motor Controllers and...

Page 59: ...oad torque is determined by the torque demand As load torque increases the rotor slows down a little ie slip increases causing induced rotor currents to also increase in order to increase the torque T...

Page 60: ...echanical and electrical losses to overcome friction and windage of the rotor at speed and the electrical heating and hysteresis losses The ideal response to the no load condition would be to supply p...

Page 61: ...is can produce a significant reduction in the kVA demand This is an operating condition that may at light or partial load conditions provide the benefit of energy saving and if selected is continuous...

Page 62: ...3 4 5 1 Energy Savings The calculations to cover all the likely or possible conditions would be laborious An empirical method for arriving at a usefully realistic estimate has been devised Used with...

Page 63: ...rating ie 55 kW From Table 2 apply the pole number factor of 0 5 The savings would be approximately 3 5 0 5 x 37 5 kW 1 125 kW 3 37 5 kW 2 pole low slip motor From Table 1 use the estimated savings fi...

Page 64: ...ngs of pedestal voltage may not allow sufficient torque to be developed by the motor to cause acceleration Overload Level The level of current at which the controller overload begins to integrate For...

Page 65: ...63 0 45 4 1 00 34 0 83 64 0 44 5 1 00 35 0 82 65 0 42 6 0 99 36 0 81 66 0 41 7 0 99 37 0 80 67 0 39 8 0 99 38 0 79 68 0 37 9 0 99 39 0 78 69 0 36 10 0 98 40 0 77 70 0 34 11 0 98 41 0 75 71 0 33 12 0 9...

Page 66: ...Chapter 3 Applications BLANK PAGE SR44 Series Soft Starter User Manual 1st Ed Rev B 07 31 2019 3 22...

Page 67: ...Implications of Meeting an EMC Standard 4 3 4 7 Basic EMC Considerations 4 4 4 7 1 Immunity 4 4 4 7 2 Emissions 4 4 4 7 3 Emissions Harmonics 4 4 4 7 4 Emissions Radio Frequency RF 4 4 4 7 5 Emission...

Page 68: ...60947 4 2 The SR44 has been type tested in accordance with the test procedures and levels laid down in the product standard 4 3 Mandatory Requirements Within the EU Applicable to any person involved i...

Page 69: ...immunity levels and permit higher levels of conducted and radiated emissions than those for non industrial installations On the other hand lower levels of emissions output and lower immunity levels a...

Page 70: ...io Frequency RF Radio frequency emissions are propagated in two ways 1 Conduction along the leads supplying the soft starter 2 Radiation from the operating equipment They also have two sources 1 The h...

Page 71: ...ystems are not considered in this document In the case of an isolated or high impedance grounded system seek advice from your supplier before fitting a capacitive high frequency filter to an SR44 Soft...

Page 72: ...d ramp down features remain effective in this configuration b By running the soft starter in phase loss only mode Where a special purpose system filter has been applied at the point of common coupling...

Page 73: ...1 3 System Status Mode 5 5 5 1 4 Menu Navigation Mode 5 5 5 1 5 Data Entry Mode 5 6 5 1 6 Changing Parameter Value 5 6 5 1 7 Soft Starter Data Types 5 6 5 1 8 Bit Masks 5 7 5 1 9 Keypad Boot up Messa...

Page 74: ...1 Example of Menu Settings and Parameters Descriptions 5 23 5 4 2 Applications Menu 5 24 5 4 3 Auto Features Menu 5 27 5 4 4 Basic Menu 5 30 5 4 5 Advanced Menu 5 33 5 4 6 Monitoring Menu 5 42 5 4 7...

Page 75: ...KEYPAD MENU ITEMS AND PARAMETERS CHAPTER 5 CHAPTER CHAPTER 5 BLANK PAGE 5 5 1c...

Page 76: ...in the same groups and sequential order as they can be accessed through a keypad menu 3 Parameter Basic Information This section contains tables that list and briefly describe all of the Parameters Th...

Page 77: ...ters of this User Manual then select a suitable application from the Applications Menu described later in this chapter 5 2 2 5 4 2 The unit can then be started with the keypad This will give a good ba...

Page 78: ...ters which are most commonly used by operators are shown and described in section 5 2 Keypad Menu Structure Section 5 3 Parameter Basic Information shows basic information for the Parameters and secti...

Page 79: ...s Errors These messages CRC Error Slave Busy Illegal Address and Illegal Function tell the user when there has been a Modbus Comms Error See the Modbus chapter for more details Running Status This mes...

Page 80: ...e a parameter value is given in Appendix A 1 3 5 1 7 Soft Starter Data Types There are basically four types of data held in parameters Analog Multiple Percentile and Bit data Their definitions are giv...

Page 81: ...key once To move the cursor to the Auto Pedestal bit bit 7 the user would now press the OPTIMISE button five times Then to turn on the Auto Pedestal bit just pressing the key once will change the bit...

Page 82: ...Disable Starter Enable Starter Starting etc Protection Full Full Optimize Start Bypass Phase Loss Only Rated Current Low Current Low Amps Level etc Current Optimize Rate Optimize etc Power Protection...

Page 83: ...own Up Arrow key up Level 0 Level 1 Level 2 Parameter Bit Level 3 Parameter Bit Stopped and Ready 1 or Starter Disabled 1 to Enable Applications Settings n a Default Keypad Default Auto Small Pump Lar...

Page 84: ...1 Level 2 Parameter Bit Level 3 Parameter Bit Stopped and Ready 1 or Starter Disabled 1 to Enable Basic Disable Starter P52 B1 B2 n a Enable Starter Starting Keypad Remote P51 B7 Start Pedestal 20 P1...

Page 85: ...Off P51 B3 Shearpin Level 3 125xIe P32 Shearpin Time 100 cycles P33 Overload Level 1 1xIe P34 Overload Delay 140 P35 Optimise Rate 5 P19 n a Optimise On Off P121 B4 Kickstart On Off P51 B0 Kick Pedes...

Page 86: ...ter Disabled 1 to Enable Monitoring Power n a Protection full optimise P7 Current P26 P27 Peak Start P27 P40 Supply Volts P40 Real PF P39 P22 Delay Angle P22 P23 Max Angle P23 P20 Reference PF P20 P21...

Page 87: ...rrent Limiting K Ovld Integrating K Stall K Cooling K Enable Status K I P1 K 60Hz K Shearpin K Undercurrent K C L Timeout K Thermistor not available K Overload K Thermal Switch K RYB phase sequence AB...

Page 88: ...tarter Disabled 1 to Enable Parameters P1 to P21 See the Parameter Descriptions section and table for parameter descriptions as they appear on the keypad P22 to P40 P41 to P60 P61 to P80 P81 to P100 P...

Page 89: ...255 1 none R W 1 Language 3 5 56 5 none R 1 Program Type 4 11 255 0 none R 1 Software Ver 5 0 255 0 none R W 1 Password 6 0 1 0 none R W 1 Firing Mode 7 192 192 0 none R W 1 Protection 8 0 255 0 flag...

Page 90: ...5 255 1 seconds R W 1 Dwell Time 16 10 60 10 R W 1 Stop Ped 17 0 255 0 seconds R W 1 Stop Time 18 6 255 0 flags R W 1 Auto Config 0 1 0 1 0 Auto Ramp 1 2 1 Auto 3MC 2 4 1 Auto Bypass 3 8 0 Auto Jog 4...

Page 91: ...100 255 5 cycles R W 1 Shear Time 34 1 0938 1 25 0 5 x Ie R W 0 03125 Ovld Level 35 140 140 10 none R W 1 Ovld Delay 36 0 100 0 R 0 39216 Overload 37 Reserved 38 0 255 0 flags R W 1 UserFlags 5 Reserv...

Page 92: ...minal Starting 52 0 255 0 flags R W 1 User Flags 2 0 1 0 1 0 Low Voltage Soft Stop 1 2 0 Not Global Enable 1 2 4 0 Not Global Enable 2 3 8 0 Pod Start Stop 4 16 0 Board Start Stop 5 32 0 Main Contacto...

Page 93: ...8 128 0 mask R W 1 K2 Bit Mask 61 Reserved 62 Reserved 63 Reserved 64 Reserved 65 52 123 0 prmtr R W 1 i p1 Map 66 16 128 0 mask R W 1 i p1 bit Msk 67 Reserved 68 Reserved 69 Reserved 70 Reserved 71...

Page 94: ...64 0 Auto Endstart 7 128 0 Auto Pedestal 87 0 125 0 7813 0 x Ie R W 0 03125 Low I 2 88 50 255 5 cycles R W 1 Low I time 2 89 4 7 9688 0 375 x Ie R W 0 03125 C L 2 90 15 255 5 seconds R W 1 C L Time 2...

Page 95: ...U1 O P Mask 101 0 125 0 prmtr R W 1 U2 I P srce 102 0 20 0 mask R W 1 U2 I P Mask 103 0 125 0 prmtr R W 1 U2 O P Dest 104 0 11 0 mask R W 1 U2 O P Mask 105 Reserved 106 Reserved 107 Reserved 108 Rese...

Page 96: ...4 16 0 Optimise 5 32 0 Quick Ramp Times 6 64 0 Two Stop Bits 7 128 0 Auto Stop 2 122 5 25 1 none R W 1 Stop Smooth 123 0 50 0 R W 1 Temp Alt Derate 124 0 255 0 none R W 1 Off Line Command 125 Reserved...

Page 97: ...Chapter 6 Serial Communications for scaling example To keep Menu Item and Parameter setting changes they must be permanently saved using the Permanent Store menu See section A 1 5 for more informatio...

Page 98: ...ngs Range n a Default n a Displays information relevant to the SR44 s current state V1 069LM 10 12 16 This message shows the keypad firmware version number and release date date displayed in European...

Page 99: ...eatures menu Further details can be found in section 5 4 7 and Appendix B Applications Data Small Pump Setting for Small Pump 60 hp application See Appendix B Applications Data for details Large Pump...

Page 100: ...Torque See Appendix B Applications Data for details Motor Gen set Setting for Motor Generator Set application See Appendix B Applications Data for details aerator Setting for Aerator application See A...

Page 101: ...face display While this icon is present all of the Auto options that appear on the bottom line of the display have been switched On Auto Jog P18 B3 Auto Pedestal P18 B7 Auto End Start P18 B6 Auto Stop...

Page 102: ...art Range P18 B6 Default Off Scaling n a Type R W Auto End Start turns On and Off the automatic detection of motor full speed during the start up Having detected motor full speed achieved before the e...

Page 103: ...enu item works in conjunction with the Start Time parameter P12 which should be set to the estimated start time of the load This would be suitable for starts with varying loads Auto All OFF Range n a...

Page 104: ...signal Disabling the starter also allows the user to change certain parameters which cannot be changed while the unit is enabled such as Password and Station Enable Starter Range P52 B1 B2 Default On...

Page 105: ...Range 10 to 60 percent Default 10 Scaling n a Type R W Soft Stop Pedestal sets the percentage of supply voltage at which the Soft Stop will cease The actual value is affected by certain load variatio...

Page 106: ...ing function turned off 192 FULL OPTIMIZE full protection optimize 128 START BYPASS protection during start then bypass 0 PHASE LOSS ONLY I p phase loss detection only Start and Optimize mode is force...

Page 107: ...art Pedestal voltage P11 to which the unit drops after the kick pedestal has passed 4 This is the Stop Pedestal voltage P16 which can be set to values lower than 40 of VMAX if Low Volts Stop is on 5 T...

Page 108: ...ameter is not available in Bypass Operation unless a user supplied external current transformer is installed Refer to P18 B2 Auto Bypass Low Amps Time Current sub menu of Advanced menu Range 5 to 255...

Page 109: ...er is not fully functional in Bypass Operation unless a user supplied external current transformer is installed Refer to P18 B2 Auto Bypass C L Time Current sub menu of Advanced menu Range 5 to 255 se...

Page 110: ...ndition will exist Refer to Shearpin Explanation Diagram This parameter is not available in Bypass Operation unless a user supplied external current transformer is installed Refer to P18 B2 Auto Bypas...

Page 111: ...ad Delay parameter holds an arbitrary dimensionless number which slows down the integration of an Overload trip The larger the value of the number stored here the longer a given Overload will take to...

Page 112: ...ntactor is energized to eliminate the soft starter thyristor losses Kick Start Range P51 B0 Default Off Scaling n a Type R W This menu item turns the Kick Start function On or Off The Kick Start appli...

Page 113: ...itivity holds an arbitrary number to adjust the sensitivity of the fault trips of P 127 Hidden Trip Flags The larger the setting of P 72 the slower the trips of P 127 Station No Range 1 32 Default 1 S...

Page 114: ...should NOT be reduced as it will invalidate the manufacturer s warranty Temp Alt Derate Range 0 to 50 Default 0 Scaling n a Type R W This parameter enables the user to derate by percentage of Unit Fu...

Page 115: ...uired motor FLC SR44 FLC 32 Bypass Lower Limit Range 0 to 150 Default 10 Scaling n a Type R W Bypass Lower Limit Associated with P121 B4 Optimize Typically set about 40 of motor FLC Current required m...

Page 116: ...monitored in one phase This is the source parameter for the Overload Current Limit Shearpin Under Current Trip etc The divisor is 32 and the multiplier is the rated current of the unit P27 Peak Start...

Page 117: ...motor to stall P20 Reference PF Range 0 to 146 76 degrees Default 146 76 Scaling n a Type R Reference PF shows the Power Factor Angle that the SR44 has calculated as the target for the optimizing cont...

Page 118: ...tored and will be recalled the next time the unit boots up Power on Param Range n a Default n a Power on Parameters recalls all the parameter settings from the last Save Param and loads the current pa...

Page 119: ...fault 0 Change Password enables the user to change a previously set password to enter a password for the first time or to clear the password If the password is non zero then you must unlock the passwo...

Page 120: ...ives access to the setup parameters for the first programmable input see section 2 7 2 of Electrical Installation An example showing how to set up a digital input is given in Appendix A 2 4 I p1 Map T...

Page 121: ...ss contactor energizes when the unit reaches Top of Ramp P8 B3 1 K Alarm Energizes when an Alarm condition is present K Current Limitng Energizes when the unit is current limiting K Ovld Integrating E...

Page 122: ...g K Bypass Relay Usually for controlling the bypass contactor energizes when the unit reaches Top of Ramp P8 B3 1 K Alarm Energizes when an Alarm condition is present K Current Limitng Energizes when...

Page 123: ...1 Type R Program Type shows the generic firmware type always 5 something Software Ver Range 0 to 255 Default 11 Scaling 1 Type R Software Version shows the issue number for particular firmware type Pa...

Page 124: ...ling 1 Type R Status 1 flags Read this parameter by individual bits Bit 0 Stopped start stop signal inactive thyristors off main contactor open 1 Starting starter is in start ramp 2 Current Limit duri...

Page 125: ...er supplied external current transformer is installed Refer to P18 B2 Auto Bypass 3 Forced Override starter has turned off optimizing since the current has risen above 80 FLC 4 Noise starter is experi...

Page 126: ...0 percent Default 75 Scaling 1 Type R W Kick Pedestal provides a short kick of voltage at start of ramp to dislodge sticky load P 81 Kick Pedestal 2 is the 2nd parameter set counterpart of P 13 Kick P...

Page 127: ...request are forced to 0 stop time Use this feature for short jogging of light loads For details timing chart refer to subsection 5 4 3 Auto Features Menu 4 Auto Endstop enable Detect Stalled Motor dur...

Page 128: ...lowed Firing Delay Angle during optimizing The Optimize function reduces energy consumption by reducing voltage but the system also senses motor conditions and automatically adjusts the maximum delay...

Page 129: ...03125 Type R W Current Limit Level sets the current level at which the the Soft Start ramp will be held The Current Limit only holds the ramp if its level is reached The current naturally falls as mot...

Page 130: ...arameter is not available in Bypass Operation unless a user supplied external current transformer is installed Refer to P18 B2 Auto Bypass P 93 Start of Overload Level 2 is the 2nd parameter set count...

Page 131: ...nal current transformer is installed Refer to P18 B2 Auto Bypass Supply Volts Range 108 to 1000 Volts Default 416V Scaling 4 Type R Supply Volts is the manually entered main supply voltage It also wor...

Page 132: ...This parameter bit is not available in Bypass Operation unless a user supplied external current transformer is installed Refer to P18 B2 Auto Bypass 4 Under Current Selected selects Under Current oper...

Page 133: ...imit 3 User Trip 4 Invert Controller Input 5 Cooling Inhibit Restart 6 Unused 7 Unused I O Polarity Range 0 to 255 flags Default 255 Scaling 1 Type R W I O Polarity sets the I O polarity for output re...

Page 134: ...0 to 128 bit mask Default 8 Scaling 1 Type R W K2 Bit Mask holds the parameter bit for the internal starter function assigned to drive the K2 relay output Works in conjunction with P59 reserved reser...

Page 135: ...p 1 Phase Loss Trip 4 SCR Firing Thyristor Sensing Trip Type C Trip 5 SCR Signal Edge Sensing Trip Trip 6 SCR Signal Sensing Trip Type A Trip 7 Sensing Signal Sensing Trip Type B Trip 8 SCR Loss Motor...

Page 136: ...Time Out E13 Overload E14 Shearpin E15 Thermistor not available E16 External trip E17 Comms Timeout 3rd Last Trp Range 0 to 17 trip number Default 0 Scaling 1 Type R 3rd Last Trip holds the number of...

Page 137: ...5 Thermistor not available E16 External trip E17 Comms Timeout 5th Last Trp Range 0 to 17 trip number Default 0 Scaling 1 Type R 5th Last Trip holds the number of the fifth to last trip Trip E0 no tri...

Page 138: ...ied to the load before the ramp starts P 11 Start Ped is the 1st parameter set counterpart of P 79 Start Ped 2 Start Time 2 Range 1 to 255 seconds Default 5s Scaling 1 Type R W Soft Start Time 2 Use w...

Page 139: ...the 1st parameter set counterpart of P 83 Dwell Time 2 Stop ped 2 Range 10 to 60 percent Default 10 Scaling 1 Type R W Soft Stop Pedestal 2 Use with 2nd parameter set Soft Stop Pedestal 2 sets the pe...

Page 140: ...Auto Endstop enable Detect Stalled Motor during soft stop and turn off thyristors 5 Auto Stop detect variations in PF during stop smooth stall 6 Auto Endstart enable detection of full speed during St...

Page 141: ...or current level P 31 Current Limit Time is the 1st parameter set counterpart of P 90 Current Limit Time 2 Shearpin 2 external CT required for bypass mode see P 86 Bit 2 for note Range 1 063 to 5 x Ie...

Page 142: ...s not available in Bypass Operation unless a user supplied external current transformer is installed Refer to P18 B2 Auto Bypass P 34 Start of Overload Level is the 1st parameter set counterpart of P...

Page 143: ...in Bypass Operation unless a user supplied external current transformer is installed Refer to P18 B2 Auto Bypass 4 Under Current Selected selects Under Current operation This parameter bit is not ava...

Page 144: ...97 parameter 98 bit mask 99 100 the destination flag address 99 parameter 100 bit mask U1 O P Dest Range 0 to 125 parameter Default 0 Scaling 1 Type R W The opf1_addr parameter holds the parameter fo...

Page 145: ...tination flag address 103 parameter 104 bit mask U2 O P Dest Range 0 to 125 parameter Default 0 Scaling 1 Type R W The opf2_addr parameter holds the parameter for the internal starter output function...

Page 146: ...to P18 B2 Auto Bypass Typically set about 80 of motor FLC Current required motor FLC SR44 FLC 32 Bypass Lower Limit Range 0 to 150 Default 10 Scaling 1 Type R W Bypass Lower Limit Associated with P121...

Page 147: ...oad overload has passed Trip Level This parameter bit is not available in Bypass Operation unless a user supplied external current transformer is installed Refer to P18 B2 Auto Bypass 7 Thermal Switch...

Page 148: ...sed with a circuit breaker then set bit 3 to a one 1 Read the description of the Line Contactor Menu Item in section 5 4 5 Advanced Menu for a more detailed explanation of this functionality 0 Line Co...

Page 149: ...tion following a bus failure Active only with certain Comms Options 0 No Trip 1 Trip Trip Flags Range 0 to 255 flags Default 0 Scaling 1 Type R W Hidden Trip Flags Enable or Disable certain trips Read...

Page 150: ...voltage Input side phase loss during the ramp and after full voltage 07 Sensing Signal Sensing Trip Type B Short circuit thyristor or external noise during the ramp and after full voltage Motor side...

Page 151: ...efault 0 Scaling n a Type R W Bus Action on Fail Action following a bus failure Active only with certain Comms Options 0 No Trip 1 Trip Cooling Range P53 B5 Default On Scaling n a Type R W This menu i...

Page 152: ...selects Shearpin operation Overload Range P51 B2 Default On Scaling n a Type R W Overload Selected selects Overload operation The Overload menu item switches On and Off the Overload Trip Special case...

Page 153: ...Load Current The current drawn by the application or load Optimize This is an optional energy saving feature The SR44 will reduce voltage to a lightly loaded motor Refer to the Applications chapter o...

Page 154: ...tatic load would be a resistor bank Top of Ramp This is the point at which the Soft Starter reaches maximum output voltage Unit Full Load Current This is another name for the Rated Current of the unit...

Page 155: ...Writing Single Register Modbus Function 06 6 16 6 5 4 P 124 Offline Commands 6 17 6 5 5 Read Exception Status Modbus Function 07 Starter 01 6 18 6 5 6 Returned Errors 6 18 6 7 Example PLC Communicati...

Page 156: ...00 1127 Coils flags 0 1024 Refer to the Parameter Memory Addresses section of this chapter for more information SR44 has a Modbus offset of one address for registers and bits PLC programs should targe...

Page 157: ...chapter for supported Modbus function codes 6 3 Specifications 1 Refer to Modicon Modbus Protocol Reference Guide PI MBUS 300 at www modbus org for full protocol specification 2 Baud rate is 9600 3 8...

Page 158: ...Current Limit 3 8 67 43 Top of Ramp 4 16 68 44 Dwell 5 32 69 45 Full Conduction 6 64 70 46 Energy Saving 7 128 71 47 Stopping 9 40009 Status 2 R 0 1 72 48 Alarm 1 2 73 49 Overload Integrating 2 4 74...

Page 159: ...p Ped R W 17 40017 Stop Time R W 18 40018 Auto Config R W 0 1 144 90 Auto Ramp 1 2 145 91 Auto 3MC 2 4 146 92 Auto Bypass 3 8 147 93 Auto Jog 4 16 148 94 Auto end stop 5 32 149 95 Auto stop 6 64 150 9...

Page 160: ...40036 Overload R 37 40037 Reserved 38 40038 UserFlags 5 Reserved n a 0 1 304 130 unused 1 2 305 131 Reserved 2 4 306 132 Reserved 3 8 307 133 unused 4 16 308 134 unused 5 32 309 135 unused 6 64 310 1...

Page 161: ...417 1A1 Not Global Enable 1 2 4 418 1A2 Not Global Enable 2 3 8 419 1A3 Pod Start Stop 4 16 420 1A4 Board Start Stop 5 32 421 1A5 Main Contactor 6 64 422 1A6 Second Parm Set 7 128 423 1A7 Zero Start...

Page 162: ...Bit Mask R W 61 40061 Reserved 62 40062 Reserved 63 40063 Reserved 64 40064 Reserved 65 40065 i p1 Map R W 66 40066 i p1 bit Msk R W 67 40067 Reserved 68 40068 Reserved 69 40069 Reserved 70 40070 Res...

Page 163: ...o Bypass 3 8 691 2B3 Auto Jog 4 16 692 2B4 Auto Endstop 5 32 693 2B5 Auto Stop 6 64 694 2B6 Auto Endstart 7 128 695 2B7 Auto Pedestal 87 40087 n a Low I 2 R W 88 40088 Low I time 2 R W 89 40089 C L 2...

Page 164: ...770 302 Not Global Enable 2 2 3 8 771 303 Pod Start Stop 2 4 16 772 304 Board Start Stop 2 5 32 773 305 Main Contactor 2 6 64 774 306 Second Parm Set 2 7 128 775 307 Zero Start Time 2 97 40097 n a U1...

Page 165: ...n a Reserved 114 40114 StopProfile R W 115 40115 Last App R W 116 40116 CoolingTime R W 117 40117 Reserved 118 40118 System Use Only 119 40119 Reserved 120 40120 Status 5 R 0 1 960 420 Over Temperatu...

Page 166: ...0 1 1016 458 Trip 1 Enabled Phase Loss 1 2 1017 459 Trip 8 Enabled SCR Loss Motor Motor Side Thyristor Loss 2 4 1018 45A Trip 9 Enabled Sensing Signal Thyristor Sensing Trip Type A 3 8 1019 45B Trip 1...

Page 167: ...Default value 160 ms Scaling Factor 4 For default value 160 ms Keypad shows 160 ms Comms data reads 40 multiply by 4 to get actual value of 160 To change value to 200 ms Enter 200 through keypad or Wr...

Page 168: ...SR44 automatically calculate CRC checksum values CRC High Byte The SR44 has a Modbus offset of one address for registers bits PLC targets one address higher SR44 PLC Parameter Address Byte Data Value...

Page 169: ...unction 05 Bit Address 1A7 decimal 423 Bit Address 1A7 bit 422 bit 06 of P 52 Force Data 01 select 2nd parameter set Force Data 01 select 2nd parameter set CRC Low PLC SR44 automatically calculate CRC...

Page 170: ...06 Function 06 Address High 00 Address High 00 Address Low 7D decimal 125 Address Low 7D P 124 Force Data High n a doesn t matter Force Data High n a ignored Force Data Low 02 Enable Starter Force Dat...

Page 171: ...ing to start commands remote or local If running the SR44 will stop immediately The status of any start signal is not changed 2 Enable Starter Always The SR44 will respond to new or existing start com...

Page 172: ...dbus Function 07 Transaction Table Showing Error Response Query Response Field Hex Byte Field Hex Byte Slave Address 01 Slave Address 01 Function 07 Function 87 CRC Low 41 Exception Data 01 CRC High E...

Page 173: ...ter CT1 counts the attempts by both Receive and Send instructions and CT2 counts errors CT1 will normally be counting rapidly while CT2 will be counting very infrequently if at all If both counters ar...

Page 174: ...words So the single value that is retrieved from the soft starter contains 2 values Since both values are actually bit patterns they are placed directly into a Hex data register DH1 This will be copi...

Page 175: ...C100 thru C115 could be used in your program to turn on outputs and or they could just be monitored by an Operator Interface to generate messages Copy Src Des Unpack Status Word from Strtr hDH1 Stopp...

Page 176: ...P11 and P12 from Strtr hDH10 Receive Port3 Slave ID Modbus Function Code Slave Addr NO of Master Addresses Word Swap MODBUS 1 03 400012 1 OFF Master Time Comm Receiving bC206 Status Comm Success bC20...

Page 177: ...e Receive Send sequence Then the new value is copied to DS32 which will turn off the rung This rung will be activated until DS31 is equal to DS41 which is the Received value from the unit When equal t...

Page 178: ...yte back to the lower byte again shifting 8 bits Now the result is the bare lower byte value from the original word and this result is output to DH13 as our final value To summarize the original data...

Page 179: ...are problems which could be in addressing wiring or PLC SR44 setup Port 2 Busy SP116 CT10 3 Status Comm Interlock Status Comm Intlk C10 MRX CPU DCM Slot Port Number Slave Address Function Code Start...

Page 180: ...ed operation of the soft starter then those Status bits will reset C21 and C23 Updates the Soft Start Time P12 value of the SoftStart Enable Ramp Comm C11 Port 2 Busy SP116 Status Comm Interlock Statu...

Page 181: ...Read Holding Registers 584 984 Mode CPU These next 2 rungs will handle changing P12 Soft Start Time Since the soft starter is 8 bit based there has to be a conversion operation to get the proper value...

Page 182: ...ry V6020 V6021 Last value of SS Time Old SS Time LD Entry from OIT for example SS Time Entry V6020 OUT Last value of SS Time Old SS Time V6021 Updates the Soft Start Time P12 value of the SoftStart En...

Page 183: ...n Shift Right by the same amount to put it back in its original location convert to BCD and this leaves the value for P12 and place it in V6012 Next perfom a similar operation different of bits to ext...

Page 184: ...9 and will reset itself These 2 counters give us an easy way to monitor comms to verify attempts and the occurence of errors If both counters are counting up in synch then there are problems which cou...

Page 185: ...o Word Swap Map 32 bit data to 16 bit Slave Modbus Starting Address 125 Modbus Decimal Addressing Modbus Function Code 6 Write Single Register Tag Name Mapping Non Array Tag P124 Starter Control Start...

Page 186: ...esulting value is stored in tag SoftStartTimeResult Finally P11 12 is Shifted Right to move the upper byte to the lower byte and the value is stored in tag SoftStartPedestalResult This is the value th...

Page 187: ...g and then start the Write Read confirmation sequence When the value read from the soft starter is equal to the new entry the sequence resets WriteReadTime RST SET WriteReadTime 12 12 1 13 Enable COPY...

Page 188: ...Chapter 6 Serial Communications BLANK PAGE SR44 Series Soft Starter User Manual 1st Ed Rev B 07 31 2019 6 34...

Page 189: ...2 7 1 2 Connecting the Communication Card 7 3 7 2 SR44 KPD Remote Keypad 7 4 7 2 1 Remote Keypad General information 7 4 7 2 2 Connecting the Remote Keypad 7 5 NOTE SR44 soft starters have been disco...

Page 190: ...ions Allows connection via RJ45 connectors or through screw terminals 2 wire SR44 Main PCB not to scale J7 Connector J1 J5 B A G LEDs 4 pin socket 2 pin socket 26 pin connector primary RJ45 socket 2nd...

Page 191: ...should have this jumper installed It passes 12V through to the RJ45 connectors to supply power to the remote keypad J2 This jumper is for use only with the SR44 KPD Remote Keypad and only the starter...

Page 192: ...Seven buttons with individual Start and Stop Display via a 2 line 32 character LCD Eliminates panel mounted Start and Stop pushbuttons ammeters and pilot lights Gives continuous display of motor phas...

Page 193: ...itching to Local disables the Remote Keypad and enables the integral Local Keypad Remote Keypad requires installation of an SR44 RS485 communication card The Remote Keypad and the soft starter s integ...

Page 194: ...Chapter 7 Optional Hardware BLANK PAGE SR44 Series Soft Starter User Manual 1st Ed Rev B 07 31 2019 7 6...

Page 195: ...s Menu Option A 10 A 1 9 Changing a Password A 11 A 1 10a Unlocking and Locking the Keypad A 12 A 1 10b Clearing the Password A 12 A 1 11 Using the Pre programmed Relay Options A 13 A 1 12 Setting the...

Page 196: ...ition thecirclednumberindicatesthat instruction 1isassociatedwiththeEnter button so the instruction will probably read Press the Enter button Thearrowthatispart of the button icon showsthedirectionof...

Page 197: ...thatthis is the start point for this page This graphic represents the screen flashing whichitwilldotoconfirmthatan instructionorachangeinvalue hasbeen accepted Theseiconsrepresentthebuttonsonthe keypa...

Page 198: ...ge There is only one menu driven way to disable the unit and that follows the same procedure as above except choosing Disable Starter at the point where Enable Starter was previously chosen There is a...

Page 199: ...nt the unit will flash the message Cancelled three times The display will flash the message Storing twice to indicate this has been done 6 At any of the above stages pressing will return the user to t...

Page 200: ...ting on the top line press ENTER to toggle the bottom line of display from Keypad Starting to Remote Starting 6 At any of the above stages pressing will return the user to the previous menu 7 The SR44...

Page 201: ...3 Press ENTER to select Permanent Store menu 4 With Save Param shown at top of display press ENTER to permanently save parameters The display will flash twice to indicate this has been done 5 At any...

Page 202: ...keypad is shown on the top line of the display 4 Press the ENTER button and the display will flash three times to indicate that the default parameters with keypad starting have been loaded 5 Press th...

Page 203: ...eters have been loaded The display will then show the selected starting option Remote and the selected protection option Full Optimise before returning Default Param to the top line of the display 6 P...

Page 204: ...nd their current values including the firmware version numbers the starting option Remote or Keypad the current protection mode the selected application if none the lower line of the display will rema...

Page 205: ...nge has been made 9 Press the button three times to return to Starter Disabled Enter Enter 1 2 3 4 5 6 9 8 7 9 9 press button multiple times or hold to scroll press button multiple times or scroll Not...

Page 206: ...password Press the ENTER button once and the display will now say that it is Locked 8 Press the button three times to return to Stopped and ready A 1 10b Clearing the Password 1 Press the and buttons...

Page 207: ...y 3 Press ENTER to select the Outputs menu 4 With K1 on the top line of the display press the button until K2 is shown at the top of the display 5 Press ENTER to select K2 6 With Map From on the top l...

Page 208: ...ess the button until Advanced is shown on the top line 3 Press the ENTER button to select the Advanced menu 4 With Current on the top line of the display press ENTER to select the Current menu 5 With...

Page 209: ...s the ENTER button to select Outputs 12 Press the button until K2 is shown on the top line of the display 13 Press the ENTER button to select K2 14 With Map From on the top line of the display press E...

Page 210: ...3 may already be a one 22 Press the Enter button to confirm any changes the display will flash 23 Press the button four times to return to Stopped and ready Only one bit in any relay bit mask may be...

Page 211: ...is shown at the top of the display 3 Press ENTER to select the Outputs menu 4 With K1 on the top line of the display press the button until K2 is shown at the top of the display 5 Press the ENTER but...

Page 212: ...Press the Optimise button three times so the cursor is displayed on bit 3 13 Press the button to change the bit state to zero 0 14 Press the Optimise button once so the cursor is displayed on bit 4 1...

Page 213: ...also be changed via the menu structure However the Secondary group parameters can only be changed via the dedicated parameter numbers As a default the Soft Starter uses the Primary group of parameters...

Page 214: ...hown at the top of the display 3 Press ENTER once to select the Parameters menu 4 With P1 P20 shown on the display press the button until P81 P100 is shown at the top of the display 5 Press ENTER to s...

Page 215: ...ress ENTER to select P98 U1 I P Mask 13 Press the button once to change the bit state of bit 0 to zero 0 14 Press the OPTIMISE button three times so that the cursor is displayed on bit 3 15 Press the...

Page 216: ...ress once to return to P99 U1 O P Dest 22 Press once until P100 U1 O P Mask is shown at the top of the display 23 Press ENTER to select P100 U1 O P Mask 24 Press the OPTIMISE button six times so that...

Page 217: ...3 Press ENTER once to select the Inputs menu 4 With Digital i p 1 on the top line of the display press ENTER once 5 With Map To on the top line of the display press ENTER once 6 With 52 Parameter show...

Page 218: ...to one 1 15 Press ENTER once to accept the change The display will flash once to confirm that the change has been accepted 16 Press once to return to Bit Number 17 With Bit Number on the top line of t...

Page 219: ...ntents of this Appendix SR44 Applications Data B 2 NOTE SR44 soft starters have been discontinued Please consider SR55 soft starters as a replacements APPENDIX APPENDIX APPENDIX APPLICATIONS DATA B B...

Page 220: ...C Auto Bypass R Auto Stop R Soft Stop Smoothing R Low Voltage Soft Stop R Auto Ramp R Auto End Stop Notes Application Type Small Pump Start Pedestal 10 Stop Pedestal 10 Start Time s 5 Soft Stop Time s...

Page 221: ...Smoothing R Low Voltage Soft Stop R Auto Ramp Auto End Stop Notes Application Type High Inertia Fan Start Pedestal 40 Stop Pedestal 0 Start Time s 3 Soft Stop Time s 0 Current Limit Level x FLC 2 812...

Page 222: ...destal R Auto Jog Auto End Start R Auto 3MC R Auto Bypass R Auto Stop Soft Stop Smoothing Low Voltage Soft Stop Auto Ramp Auto End Stop Notes Application Type Crusher Start Pedestal 40 Stop Pedestal 0...

Page 223: ...0 Soft Stop Time s 60 Current Limit Level x FLC 3 Current Limit Time s 60 Optimize Rate 5 Auto Pedestal Auto Jog Auto End Start Auto 3MC R Auto Bypass R Auto Stop R Soft Stop Smoothing R Low Voltage S...

Page 224: ...Appendix B Applications Data BLANK PAGE SR44 Series Soft Starter User Manual 1st Ed Rev B 07 31 2019 B 6...

Page 225: ...cal Hints C 2 Category General C 2 Category Troubleshooting C 3 Category Wiring C 3 NOTE SR44 soft starters have been discontinued Please consider SR55 soft starters as a replacements APPENDIX APPENDI...

Page 226: ...ect Commissioning 1 It is a good idea to start by using one of the standard applications Refer to Applications Menu Settings in Ch 5 No 4 Subject Slip Ring Motors 2 Slip rings may be shorted at partia...

Page 227: ...the unit has its original front cover and keypad No 4 Subject Stopped Cooling This message is displayed during the cooling time pnu116 and is the period allowed for the unit to cool before a restart...

Page 228: ...Appendix C Technical Hints BLANK PAGE SR44 Series Soft Starter User Manual 1st Ed Rev B 07 31 2019 C 4...

Page 229: ...patible with SR44 Soft Starters D 4 DL305 PLC I O Compatible with SR44 Soft Starters D 5 DL405 PLC I O Compatible with SR44 Soft Starters D 6 P3000 PLC I O Compatible with SR44 Soft Starters D 6 Termi...

Page 230: ...R D PLC 8 DC IN 6 RELAY OUT MICRO PLC REQUIRES 24VDC POWER C0 02DD1 D MICRO ANLG PLC 4 DC IN 4 SINK OUT 2 CH IN 2 CH OUT REQUIRES 24VDC PWR C0 02DD2 D MICRO ANLG PLC 4 DC IN 4 SOURCE OUT 2 CH IN 2 CH...

Page 231: ...VDC OR 6 240VAC D0 10TD1 10PT 12 24VDC SINK OUTPUT D0 10TD2 10PT 12 24VDC SOURCE OUTPUT D0 16TD1 16PT 6 27 VDC SINK OUTPUT D0 16TD2 10PT 12 24VDC SOURCE OUTPUT F0 04TRS 4PT ISO RELAY OUTPUT 5 30VDC OR...

Page 232: ...18 110VAC OUTPUT F2 08TA 8PT 24 140VAC OUTPUT HIGH CURRENT 1 5A PT DL205 DC I O D2 04TD1 4PT 12 24VDC SINK OUTPUT D2 08TD1 8PT 12 24VDC SINK OUTPUT D2 08TD2 8PT 12 24VDC SOURCE OUTPUT D2 16TD1 2 16PT...

Page 233: ...DC SINK OUTPUT D3 08TD1 8PT 5 24VDC SINK OUTPUT D3 08TD2 8PT 5 24VDC SOURCE OUTPUT D3 16TD1 1 16PT 5 24VDC SINK OUTPUT D3 16TD2 16PT 5 24VDC SOURCE OUTPUT DL305 AC DC I O Relay Outputs D3 08NE3 8PT 24...

Page 234: ...OUTPUT 80 288VAC PRODUCTIVITY3000 AC OUTPUT MODULE P3 08TRS 8PT ISOLATED RELAY 8 FORM A PRODUCTIVITY3000 RELAY OUTPUT MODULE P3 08TRS 1 8CH ISOLATED 5A RELAY OUTPUT MODULE PRODUCTIVITY 3000 RELAY OUTP...

Page 235: ...OLATED COMMONS T1K 08TD1 8PT 12 24VDC SINK OUTPUT T1K 08TD2 1 16PT 12 24VDC SOURCE OUTPUT T1K 08TR 8PT RELAY OUTPUT 5 30VDC OR 5 240VAC T1K 08TRS 8PT ISO RELAY OUTPUT 5 30VDC OR 5 240VAC T1K 16TA 16PT...

Page 236: ...Appendix D Using AutomationDirect PLCs with SR44 Soft Starters BLANK PAGE SR44 Series Soft Starter User Manual 1st Ed Rev B 07 31 2019 D 8...

Page 237: ...BLANK PAGE SR44 Series Soft Starter User Manual 1st Ed Rev B 07 31 2019...

Page 238: ...SR44 Series Soft Starter User Manual 1st Ed Rev B 07 31 2019...

Reviews: