background image

7

Rev. (30-JAN-98) • RLM v4.7

© 1995-98 Automated Logic Corporation

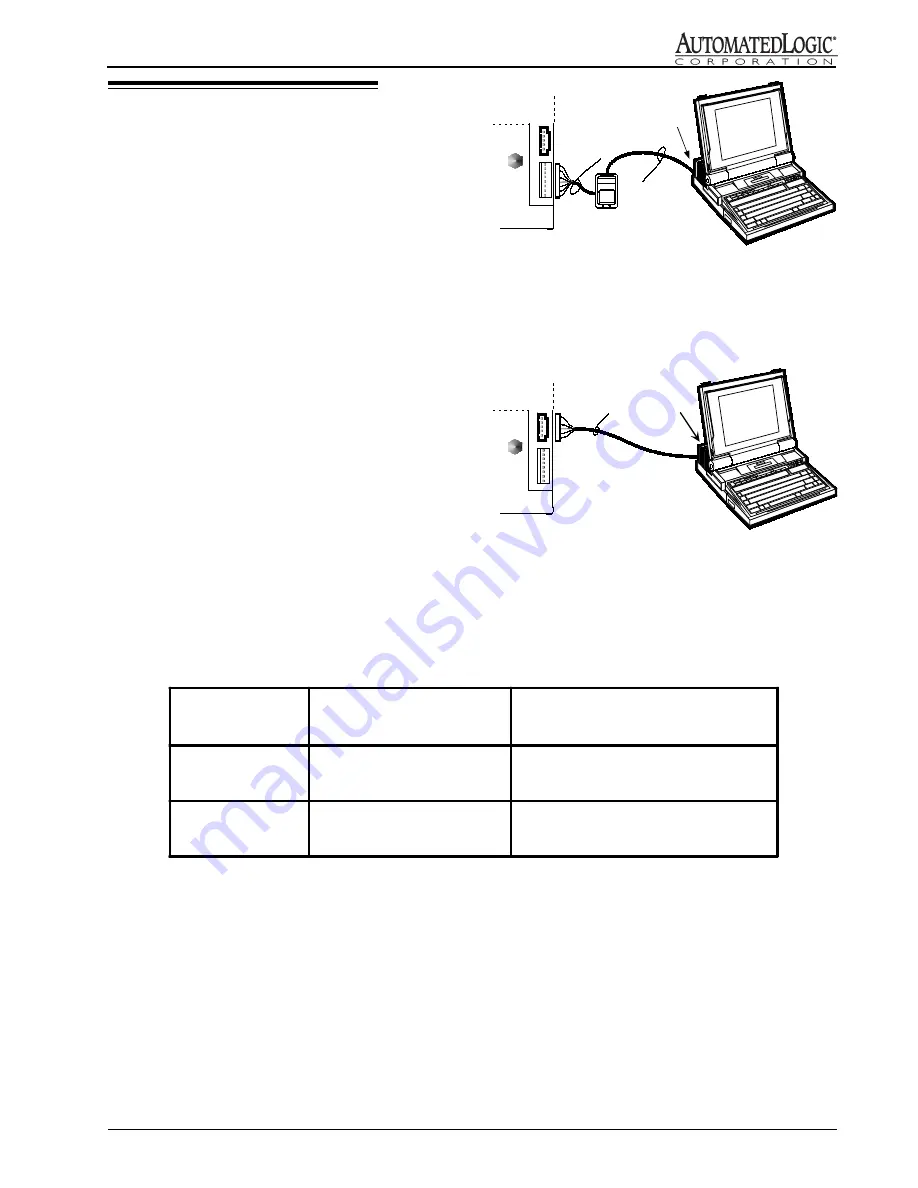
Figure 9:  Connecting to the ZONE port

Local Access

The R683 allows you to connect a computer to the
ACCESS port or the ZONE port.  You can connect to the
ZONE port either at the module or through an Enhanced
Zone Sensor (see Figure 9).  The computer’s connection
type must be set to Direct Network.

The ZONE port uses an 8-pin connector.  To make a cable
for this connection (see Figure 7), use ALC part no. CON,
a package of 8-wire connectors and covers (AMP part
no’s. 641237-8 and 640550-8) which require 22 AWG
stranded wire.  Other connectors are available by calling
your local Amp distributor at 800-526-5142.  The cable
wiring configuration is shown below.  The cable should
not exceed 50 ft.  See Figure 11 for how to use the
switches on the NI485 cable.

NOTE:  When making a sensor cable, disregard the
numbers imprinted on the plastic connector.

The ACCESS port uses a 5-pin connector.  To connect to
this port, use the NI485 cable head and the 235015 cable
(see Figure 10).  See Figure 11 for how to use the switches
on the NI485 cable.

N   I4 8 5

C a b l e

H e a d                     

2 3 5 0 1 5

C a b l e                     

R 6 8 3

ACCESS

ZONE

R S Z +

N   I4 8 5

C a b l e

H e a d                     

R 6 8 3

ACCESS

ZONE

A L C

p a r t  n o .

C O N                     

2 3 5 0 1 5

C a b l e                     

Figure 10: Connecting to the ACCESS port

Figure 11:  NI485 Switch Table

NI485 Switch

Position

Module ACCESS Port

5 position

ZONE Sensor Port

8 position

Network

connected to module
connected to net

disconnected from the module
disconnected from the net

Isolated

connected to module
disconnected from net

connected to module
disconnected from net

Summary of Contents for R683

Page 1: ...ne Sensor 5 Enhanced Zone Sensor 5 Using the Enhanced Zone Sensor 6 Local Setpoint Adjust 6 Timed Local Override 6 Occupancy Indication 6 LocalAccess 7 UniversalInputs 9 Procedure 9 Custom Translation...

Page 2: ...s provided for diagnostic operations The R683 module can store a single Graphic Function Block GFB Specifications Power 24 VAC 50 60 Hz 20 VA 0 83 A maximum Inputs One enhanced zone sensor port and 8...

Page 3: ...he two large holes allow screws to pass through the module and hold the enclosure to the surface on which it is mounted see Figure 2 Panel Mounting To mount the R683 module directly to a surface the N...

Page 4: ...cation 6 Verify that 24 VAC is present at the power input NOTE Before turning the power on see Addressing and Baud Rate later in this document An error condition will occur if the address of the R683...

Page 5: ...nput 1 UI 1 connect the zone sensor wires to pins 1 and 2 on the 8 pin receptacle on the R683 module see Figure 5 3 Turn the module s power switch back ON 4 Input the channel number offset and gain on...

Page 6: ...page For example if the increment is set at 60 toggle the switch once for an occupancy of 60 minutes twice for 120 minutes etc Once the zone is occupied from this switch pressing it again and holding...

Page 7: ...ation is shown below The cable should not exceed 50 ft See Figure 11 for how to use the switches on the NI485 cable NOTE When making a sensor cable disregard the numbers imprinted on the plastic conne...

Page 8: ...8 Rev 30 JAN 98 RLM v4 7 1995 98 Automated Logic Corporation Figure 12 R683 I O Connections...

Page 9: ...pply see Figure 6 In some special cases when the module s power is limited a 4 20 mA passive transducer does require and external power supply to avoid power consumption from the module Table 1 Proced...

Page 10: ...r voltage to the desired units Procedure 1 Display the R683 module driver parameter page FB 15 in SuperVision 2 For thermistor slidepot and other resistance inputs set the option Is input specified in...

Page 11: ...dure 1 Turn the R683 s power switch OFF 2 Terminate the output wiring to the top termination strip as shown in Figure 12 3 Turn the R683 s power switch ON Digital Outputs The R683 has six digital outp...

Page 12: ...683 s power switch OFF 6 Set the R683 s address and baud rate using the 8 position dip switch see Figure 1 for location 7 Turn the R683 module s power ON The module is now formatted LEDs Identificatio...

Page 13: ...age and verify that the module type and number agrees with the module to be transferred 4 Transfer memory to this module For SuperVision 2 6 and earlier click on the Download icon and choose the Memor...

Page 14: ...5 06 Is input specified in voltage YES 0 Millivolts 0 00 500 Millivolts 50 00 1000 Millivolts 100 0 1500 Millivolts 150 0 2000 Millivolts 200 0 2500 Millivolts 250 0 3000 Millivolts 300 0 3500 Millivo...

Page 15: ...0 00 1 5 88 27 to 1 0 0 6 C 0 00 1 5 69 Zo ne Se nso r Inp ut RS Z Zo ne Se nso r Inp ut RS Z The rm isto r The rm isto r 39 39 1 7 to 2 13 F 0 00 1 5 88 27 to 1 0 0 6 C 0 00 1 5 69 S etpo int Ad jus...

Page 16: ...imer Normally at 10 minutes when the module is not halted Counts down when the module is halted or has other serious errors When it reaches zero the module re initializes itself to try to clear the so...

Reviews: