background image

Wichtige Informationen

14

COMfortel 1200/1400 - Firmware V1.8 - COMfortel Set V3.10.0 - Inbetriebnahme V02 05/2015

Stellen Sie die Helligkeit des Displays nur so hoch wie unbedingt not-
wendig ein.

Weitere Umweltinformationen

Unsere Umweltinformationen finden Sie im Internet (siehe 

www.auerswald.de

unter 

Unternehmen > Umwelt

).

Informationen zu den beiliegenden Anleitungen

Weitere Anleitungen

Bedienung und Einrichtung der Telefone sind ausführlich beschrieben in der
Bedienungsanleitung. Beachten Sie zusätzlich die Informationen zu Garantie,
Service, Umwelt, CE-Zeichen und Konformitätserklärung im Beileger „Garantie-
bedingungen, Informationsservice“.

Aktuelles

Nach einem Firmware-Update benötigen Sie ggf. eine neue Anleitung. Aktuelle
Anleitungen finden Sie im Internet (siehe 

www.auerswald.de/service

).

Copyright und Marken

Weitergabe und Vervielfältigung dieser Anleitung, sowie Verwertung und Mittei-
lung des Inhalts, auch auszugsweise, ist nur mit unserer ausdrücklichen
Genehmigung gestattet. Zuwiderhandlung verpflichtet zu Schadenersatz. Alle
Rechte vorbehalten. 

 Auerswald GmbH & Co. KG, 38162 Cremlingen, 2015

Microsoft und Windows sind eingetragene Marken der Microsoft Corporation in
den USA und/oder anderen Ländern.

Bitstream Vera Font  2003 Bitstream, Inc. Alle Rechte vorbehalten.
Bitstream Vera ist eine eingetragene Marke von Bitstream, Inc.

Arev Font  2006 Tavmjong Bah. Alle Rechte vorbehalten.

Alle anderen genannten Marken sind Eigentum der jeweiligen Hersteller.

Dieses Produkt enthält Software, die in Teilen auf der Arbeit der Independent
JPEG Group basiert.

Summary of Contents for COMfortel 1200

Page 1: ...Inbetriebnahmeanleitung Setup Guide Systemtelefone System Telephones COMfortel쏐 1200 COMfortel쏐 1400 ...

Page 2: ......

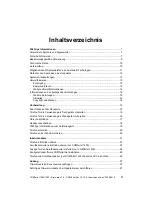
Page 3: ...nformationen zu den beiliegenden Anleitungen 14 Weitere Anleitungen 14 Aktuelles 14 Copyright und Marken 14 Vorbereitung 15 Anschlüsse auf der Rückseite 15 Telefon für die Verwendung als Tischgerät vorbereiten 15 Telefon für die Verwendung als Wandgerät vorbereiten 16 Hörer anschließen 17 Headset anschließen 18 Wichtige Informationen zum Aufstellungsort 19 Telefon aufstellen 20 Telefon an der Wand...

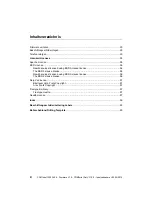
Page 4: ...cense 55 BSD License 56 Newlib sources licensed using BSD 3 clause license 56 The BSD 3 clause license 56 Newlib sources licensed using BSD 2 clause license 56 The BSD 2 clause license 56 Deja Vu License 57 Bitstream Vera Fonts Copyright 57 Arev Fonts Copyright 57 Freetype2 Library 57 Freetype credits 57 Newlib License 57 Index 59 Beschriftungsschilder Lettering Labels 63 Bohrschablone Drilling Te...

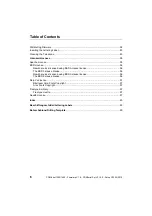
Page 5: ...on 38 Copyright and Trademarks 38 Preparation 39 Connections at the Back 39 Preparing the Telephone for Use as Desktop Unit 39 Preparing the Telephone for Use as Wall mounted Unit 40 Connecting the Receiver 41 Connecting a Headset 42 Important Information on the Location of the Telephone 43 Assembling the Telephone 43 Wall Mounting of the Telephone 44 Commissioning 45 Commissioning the Telephone 4...

Page 6: ...cense 55 BSD License 56 Newlib sources licensed using BSD 3 clause license 56 The BSD 3 clause license 56 Newlib sources licensed using BSD 2 clause license 56 The BSD 2 clause license 56 Deja Vu License 57 Bitstream Vera Fonts Copyright 57 Arev Fonts Copyright 57 Freetype2 Library 57 Freetype credits 57 Newlib License 57 Index 60 Beschriftungsschilder Lettering Labels 63 Bohrschablone Drilling Te...

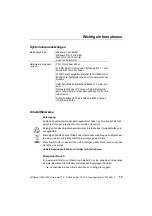
Page 7: ...m Betrieb führen könnten Hinweis Kennzeichnet ergänzende Hinweise Sicherheitshinweise Warnung Unsachgemäßer Umgang mit dem Gerät kann zu einem lebens gefährlichen elektrischen Schlag führen oder das Gerät beschädigen oder zerstören Lesen Sie die zum Gerät gehörenden Anleitungen und bewahren Sie diese zum späteren Gebrauch auf Warnung In das Gehäuse eindringende Flüssigkeiten können zu einem lebens...

Page 8: ...ßen von Leitungen Lassen Sie von einer Elektrofachkraft alle Kabel innerhalb des Gebäu des verlegen Schützen Sie die Geräte durch Installation eines Überspannungs schutzes Warnung Headsets externe Lautsprecher oder Hörer die nicht zugelas sen sind können zu Gehörschäden führen oder die Sprachverbindung stö ren Benutzen Sie in Verbindung mit diesem Telefon nur zugelassenes Zubehör mit CE Zeichen Wa...

Page 9: ...sicher sind fragen Sie Ihren Fachhändler Lesen Sie die zum Gerät gehörenden Anleitungen und bewahren Sie diese zum späteren Gebrauch auf Bei den Geräten COMfortel 1200 und 1400 handelt es sich um sogenannte Systemtelefone Die Systemtelefone sind für den Betrieb in geschlossenen tro ckenen Räumen vorgesehen Die Systemtelefone sind ausschließlich für den Anschluss an einen internen S0 oder UP0 Port ...

Page 10: ...000 R RX COMmander Basic 2 19 COMmander Business 19 Speicher Micro SD SDHC Karte bis 8 GB empfohlen nicht im Lieferumfang Anzeigen 14 LEDs teilweise mehrfar big FSTN Monochromdis play 128 x 64 Pixel Hintergrundbeleuchtung 14 LEDs teilweise mehrfarbig 3 5 Zoll TFT Farbdisplay 320 x 240 Pixel Hintergrundbe leuchtung Bedienelemente Wähltastatur 13 Festfunkti onstasten Steuerkreuz 10 programmierbare F...

Page 11: ...s internen S0 Ports Ein zweites Tele fon am selben Port kann zu diesem Zeitpunkt keinen Ruf einleiten keinen kommenden Ruf annehmen und kein Pick up durchführen Die gleichzei tige Rufannahme und Aufzeichnung durch den lokalen Anrufbeantworter ist nicht möglich während ein weiteres Telefon am selben Port im Gespräch ist Um den vollen Funktionsumfang zu gewährleisten sollten Sie nur 1 Telefon pro Po...

Page 12: ...Stromaufnahme Mikrofon Max 0 5 mA Empfindlichkeit Mikrofon 45 dB Impedanz Lautsprecher 150 Ohm Empfindlichkeit Lautsprecher bei 1 kHz 19 5 앧3 dBPa V Schallpegelgrenze 24 dBPa Belegung der Hörerbuchse 1 Mikrofon 2 Lautsprecher 3 Lautsprecher 4 Mikrofon Belegung der Headsetbuchse nur COMfortel 1400 1 Mikrofon 2 Lautsprecher 3 Lautsprecher 4 Mikrofon ...

Page 13: ...ungen können wir leider nicht annehmen Energieverbrauch Ihr Auerswald Telefon verbraucht automatisch nur die unbedingt notwendige Energie Beachten Sie trotzdem die folgenden Energiesparhinweise Verwenden sie den Stromsparmodus so häufig wie möglich Betriebssysteme Windows 7 32 64 Bit Windows 8 8 1 32 64 Bit Mac OS X ab Yosemite Linux ab Kernel 2 6 Hardware Vorausset zungen CPU 1 GHz oder höher 512...

Page 14: ...te benötigen Sie ggf eine neue Anleitung Aktuelle Anleitungen finden Sie im Internet siehe www auerswald de service Copyright und Marken Weitergabe und Vervielfältigung dieser Anleitung sowie Verwertung und Mittei lung des Inhalts auch auszugsweise ist nur mit unserer ausdrücklichen Genehmigung gestattet Zuwiderhandlung verpflichtet zu Schadenersatz Alle Rechte vorbehalten 쏘 Auerswald GmbH Co KG 3...

Page 15: ...llungsort bzw die Wandmontage Anschlüsse auf der Rückseite A Hörerbuchse B Headsetbuchse nur COMfortel 1400 C Micro SD SDHC Kartenfassung nur verwendbar am COMfortel 1400 D ISDN Kabelbuchse Telefon für die Verwendung als Tischgerät vorbereiten Voraussetzungen Die dem Telefon beiliegenden Gehäusefüße 1 Stecken Sie die Gehäusefüße in der gewünschten Stellung auf siehe Abb 2 auf Seite 16 Hinweis Zur ...

Page 16: ...ahme V02 05 2015 Telefon für die Verwendung als Wandgerät vorbereiten Voraussetzungen Handwerkszeug Kleiner Schraubendreher ca 4 mm breit 1 Stecken Sie den Schraubendreher in den Schlitz an der unteren Kante der Hörermulde siehe Abb 3 Abb 2 Gehäusefüße Abb 3 Schraubendreher ansetzen ...

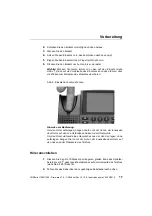
Page 17: ...u führen dass die Klinken zum Einrasten des Einsatzes abscheren Hinweise zur Bedienung Um den Hörer aufzulegen hängen Sie ihn mit der Nut an der Innenseite des Hörers auf den so entstandenen Haken in der Hörermulde Um den Hörer während eines Gespräches aus der Hand zu legen ohne aufzulegen hängen Sie ihn mit der Nut an der Innenseite des Hörers auf den Haken an der Oberkante des Telefons Hörer ans...

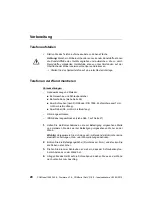
Page 18: ...Stecken Sie den Anschlussstecker des Headsets ein COMfortel 1200 Ziehen Sie den Anschlussstecker des Hörers aus der mit gekennzeichneten Buchse auf der Unterseite und stecken Sie stattdessen den Anschlussstecker des Headsets in diese Buchse siehe Abb 5 COMfortel 1400 Stecken Sie den Anschlussstecker des Headsets in die mit gekennzeichnete Buchse auf der Unterseite siehe Abb 6 2 Führen Sie das Kabe...

Page 19: ...efährlichen elektrischen Schlag oder zur Beschädigung oder Zer störung des Geräts führen Betreiben Sie das Systemtelefon nur in geschlossenen trockenen Räu men Reinigen Sie das Gehäuse des Geräts nur mit einem leicht feuchten Tuch oder einem Antistatiktuch Achtung Mechanische Belastungen und elektromagnetische Felder kön nen zur Beschädigung oder Zerstörung des Geräts oder zur Beeinträchti gung de...

Page 20: ...reher Bohrschablone siehe Seite 65 Zwei Schrauben nach DIN 96 oder DIN 7996 Kopfdurchmesser 7 mm nicht im Lieferumfang Zwei Dübel S5 nicht im Lieferumfang Hörer angeschlossen ISDN Kabel angeschlossen siehe Abb 7 auf Seite 21 1 Halten Sie die Bohrschablone an die zur Befestigung vorgesehene Stelle und markieren Sie die zwei zur Befestigung vorgesehenen Löcher an der Wand Wichtig Vergewissern Sie si...

Page 21: ...rt der TK Anlage eingetra gene interne Rufnummer für das Systemtelefon Hinweis Verwenden Sie jede der internen Teilnehmerrufnummern jeweils nur für eins der ISDN Geräte die an Ihrer TK Anlage angeschlossen sind Der bestimmungsgemäßen Verwendung entsprechende TK Anlage siehe Wichtige Informationen Bestimmungsgemäße Verwendung 1 Stecken Sie einen Stecker des mitgelieferten ISDN Kabels in die mit gek...

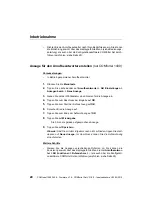
Page 22: ... Name des internen Teilnehmers werden angezeigt Das Telefon ist jetzt betriebsbereit Hinweis Kennt die TK Anlage Datum und Uhrzeit noch nicht werden lediglich Name und Version des Telefons angezeigt Weitere Schritte Richten Sie das Telefon nach Ihren Bedürfnissen ein Sie können die Ein richtung sowohl über das displaygeführte Menü siehe Bedienungsanlei tung als auch über die Konfigurationssoftware...

Page 23: ...worterfunkti onen werden automatisch vom Telefon auf die Speicherkarte kopiert nur deutsch und englisch Sie können die Bereitschaft Rufannahme durch Tippen auf ausschal ten und durch Tippen auf einschalten Das Symbol zeigt jeweils den aktuellen Zustand an Wichtig Führt die Initialisierung nach dem Einstecken der Speicherkarte nicht zum Erfolg wird mit kurzen Unterbrechungen weiter angezeigt wird d...

Page 24: ...rb Neue Ansage 3 Geben Sie mit der Wähltastatur einen Namen für die Ansage ein 4 Tippen Sie zum Abschluss der Eingabe auf OK 5 Tippen Sie zum Start der Aufzeichnung auf OK 6 Sprechen Sie die Ansage auf 7 Tippen Sie zum Ende der Aufzeichnung auf OK 8 Tippen Sie auf Wiedergabe Sie hören die gerade aufgesprochene Ansage 9 Tippen Sie auf Speichern Hinweis Sind Sie mit dem Ergebnis noch nicht zufrieden...

Page 25: ...lation der Konfigurationssoft ware COMfortel Set werden automatisch Standardansagen in drei ver schiedenen Landessprachen deutsch englisch und italienisch für ver schiedene Anrufbeantworterfunktionen auf den PC kopiert Es handelt sich dabei um die Ansage für die Rufannahme STANDARD wav die Ansage für die Fernabfrage REMOTE wav und die Ansage für die Nachrichtenweiter leitung FORWARD wav Telefon un...

Page 26: ...können Sie die Hilfe öffnen 6 Nur COMfortel 1400 Haben Sie eine Speicherkarte in das Telefon ge steckt laden Sie die Standardansagen für Rufannahme Fernabfrage und Nachrichtenweiterleitung in das Telefon Seite COMfortel Set Anrufbe antworter Datenaustausch Standardansagen Hinweis Die deutschen und englischen Standardansagen werden beim Einstecken der Speicherkarte automatisch vom Telefon auf die S...

Page 27: ... zuletzt aufgerufene Information wird angezeigt 4 Blättern Sie zur gewünschten Information COMfortel 1200 Drücken Sie die Pfeiltasten bzw COMfortel 1400 Tippen Sie auf bzw oder drücken Sie die Pfeil tasten bzw Sofortiges Firmware Update über Update Server durchführen Wichtig Nur bei Betrieb an den TK Anlagen COMpact 3000 analog ISDN VoIP COMpact 4000 COMpact 5000 R COMpact 5010 VoIP COMpact 5020 V...

Page 28: ...HC Karte nur COMfortel 1400 durchführen Achtung Bei einem COMfortel 1200 das an eine COMpact 2206 USB oder COMpact 4410 USB angeschlossen ist ist diese Alternative nicht möglich Weitere Schritte Haben Sie das Firmware Update durchgeführt können Sie diese neue Firmwareversion von demselben Telefon aus auf alle anderen an der TK Anlage angeschlossenen Systemtelefone COMfortel 1200 1400 1600 2600 ver...

Page 29: ...mtelefons wird während des Verteilvorgangs Server Mode angezeigt Eine Bedienung ist währenddessen nicht möglich Beschriftungsschild einlegen Voraussetzungen Beschriftungsschild Auf Seite 63 dieser Anleitung finden Sie einige Beschriftungsschilder zum Ausschneiden und Beschriften von Hand Mit der Konfigurationssoftware COMfortel Set können Sie Ihre Beschriftungs schilder auch selbst erstellen und d...

Page 30: ...ngende Flüssigkeiten können zu einem lebensgefährlichen elektrischen Schlag führen und das Telefon beschädi gen oder zerstören Reinigen Sie das Gehäuse des Geräts nur mit einem leicht feuchten Tuch oder einem Antistatiktuch Achtung Die Oberfläche kann durch Reinigungsmittel beschädigt werden Verwenden Sie keine scharfen oder lösemittelhaltigen Reinigungsmit tel Wichtig Feuchtigkeit kann Fehlfunkti...

Page 31: ...hich could for exam ple cause function limitations or malfunctions during operation Note Marks complementary hints and notes Safety Information Warning Improper handling of the device can result in life threatening electrical shock and can damage or destroy the device Read the instructions for the device and keep them for future reference Warning Liquid that penetrates the casing can cause life th...

Page 32: ...hone receiver creates a weak magnetic field which may attract small magnetic objects such as needles and paper clips To avoid injuries do not put down the receiver close to such objects Caution Improper cleaning or operation can damage or destroy the dis play Keep the display clean To do this use a soft dry cloth To operate the telephone use your fingers fingernails Under no cir cumstance use ball...

Page 33: ...are version 6 0E COMmander Basic 2 19 as of firmware version 4 2E COMmander Business 19 as of firmware version 4 2E Note Connecting to a PBX from another manufacturer or to the external S0 connection of a network provider is not intended Technical Data COMfortel 1200 COMfortel 1400 Power voltage Supply via internal S0 or UP0 port from the PBX Power consumption Min 1 1 W max 2 0 W System connection...

Page 34: ...ay not exceed the listed values in the fol lowing table User elements Keypad 13 permanently assigned function keys direc tional pad 10 programmable function keys Keypad 13 permanently assigned function keys col our display with touch func tion directional pad 10 programmable function keys Receiver Wideband audio electret microphone dynamic receiver hear ing aid compatible Loudspeakers 8 Ohm diamet...

Page 35: ...neous call acceptance and recording by the local answering machine is not possible while another telephone is on a call at the same port In order to ensure that the full scope of functions is available you should connect only 1 telephone per port Data for Connecting a Headset PBX Max power distribu tion of the total of all internal S0 and UP0 ports Max no of COMfortel 1200 and COMfortel 1400 COMpa...

Page 36: ...1200 1400 Firmware V1 8 COMfortel Set V3 10 0 Setup V02 05 2015 Receiver jack pin out 1 Microphone 2 Loudspeaker 3 Loudspeaker 4 Microphone Headset jack pin out only COMfortel 1400 1 Microphone 2 Loud speaker 3 Loud speaker 4 Microphone ...

Page 37: ... shipments Energy Consumption Your Auerswald telephone automatically uses only the absolutely necessary amount of power Nevertheless please observe the following recommendations for power saving Use the power save mode as often as possible Operating systems Windows 7 32 64 Bit and Windows 8 8 1 32 64 Bit Mac OS X as of Yosemite Linux Hardware requirements CPU 1 GHz or more 512 MB RAM for Windows 7...

Page 38: ...are update you usually require a new version of the instruc tions Current instructions can be found in the internet see www auer swald de service Copyright and Trademarks Dissemination and reproduction of these instructions as well as exploitation and disclosure of the contents even in part is permitted only with our express permission Compensation will be demanded for any violations All rights re...

Page 39: ...n a suitable location or mount ing it on a wall Connections at the Back A Receiver socket B Headset socket only COMfortel 1400 C MicroSD SDHC card socket only functional on the COMfortel 1400 D ISDN cable socket Preparing the Telephone for Use as Desktop Unit Requirements The feet of the casing delivered with the telephone 1 Assemble the feet of the casing in the required position see Fig 10 on pa...

Page 40: ...etup V02 05 2015 Preparing the Telephone for Use as Wall mounted Unit Requirements Tools Small screw driver approx 4 mm wide 1 Insert the screw driver into the slot at the lower edge of the receiver recess see Fig 11 Fig 10 Feet of the casing Fig 11 Inserting a screw driver ...

Page 41: ...r off the ratchets holding the insert Notes regarding handling To hang up the receiver use the slot on the inside of the receiver to hang it onto the hook you have just inserted in the receiver recess To hang up the receiver without terminating a call use the slot on the inside of the receiver to hang it onto the hook at the top of the telephone Connecting the Receiver 1 Insert the RJ 10 connector...

Page 42: ...d on page 35 1 Insert the headset connector COMfortel 1200 Pull the connector of the receiver out of the socket at the back marked with and insert the connector of the headset into this socket instead see Fig 13 COMfortel 1400 Insert the connector of the headset into the jack labelled with on the lower side of the telephone see Fig 14 2 Guide the cable to the outside using the corresponding cable ...

Page 43: ...perate the telephone in closed dry rooms Only clean the casing of the device with a slightly moist cloth or an anti static cloth Caution Mechanical stress and electro magnetic fields can result in dam age to or destruction of the device or impairment of its functions Avoid mechanical loads e g vibrations Avoid the proximity of devices which radiate electro magnetic fields for example radio sets pr...

Page 44: ...ole not included in the scope of delivery Receiver connected ISDN cable connected see Fig 15 on page 45 1 Hold the drilling template onto the area where the device is to be mounted and place marks where the two mounting holes are to be drilled into the wall Important Make sure that there are no electrical leads gas or water con ductions in the section where you want to drill the holes 2 Drill the ...

Page 45: ... 230 V mains The internal telephone number for the telephone entered in the configura tion on the internal S0 or UP0 port on the PBX Note Only connect one ISDN device for each internal subscriber tele phone number to your PBX For the operation as system telephone PBX according to the proper use see Important Information Proper Use 1 Insert the plug of the ISDN cable included in the package into th...

Page 46: ...s now ready for use Note If the date and time are not yet configured in the PBX only the name and version of the telephone are displayed Further Steps Configure the telephone according to your requirements Carry out the con figuration either using the menu on the telephone display see the Opera tion Guide or using the configuration software COMfortel Set recom mended see page 49 If necessary chang...

Page 47: ...omatically only German and English You can switch off the readiness call acceptance by tapping on and switch it on again by tapping on The symbol always reflects the current status Important If the initialisation is not successful after inserting the memory card is still visible with short interruptions the card is not supported 2 Press the menu key 3 Tap successively on answer machine activation ...

Page 48: ...name for the announcement using the keypad 4 Tap on OK to complete the entry 5 Tap on OK to start the recording 6 Record the announcement 7 Tap on OK to stop the recording 8 Tap on playback You will hear the announcement you just recorded 9 Tap on store Note If you are not satisfied with the results tap on new announcement After doing this you can make a new recording Further steps Assign the anno...

Page 49: ...on software standard announcements for different answering machine functions are copied to the PC in three different languages Ger man English and Italian These are announcements for call acceptance STANDARD wav the announcement for remote access REMOTE wav and the announcement for message forwarding FORWARD wav Configuring the Telephone and Answering Machine only COM fortel 1400 using a PC Requir...

Page 50: ... inserted a memory card into the tele phone load the standard announcements for accepting calls remote ac cess and message forwarding into the telephone page COMfortel Set Answering machine Data exchange Standard announcements Notes The German and English standard announcements are copied from the telephone to the memory card automatically at memory card insertion Which type of standard announceme...

Page 51: ...desired information COMfortel 1200 Press the arrow keys or COMfortel 1400 Tap on or or press the arrow keys or Performing a Firmware Update via the Update Server Important Only available for operation on the PBXs COMpact 3000 ana logue ISDN VoIP COMpact 4000 COMpact 5010 VoIP COMpact 5020 VoIP COMmander 6000 R R COMmander Basic 2 19 and COMmander Business 19 On the other PBXs a manual firmware upd...

Page 52: ...carried out the firmware update you can distribute this new firmware version from this telephone to all the other COMfortel 1200 1400 1600 2600 system telephones of the same model connected to the PBX If there are system telephones of different designs an additional manual firm ware update is necessary for each design In order to use new features after a firmware update you usually need a new vers...

Page 53: ...re you can easily create and print your lettering labels page Function keys Print button A flat tool for example a small flat head screw driver 1 Insert a flat tool for example a small flat head screwdriver into the slot at the top of the transparent cover and remove the cover in upward direction 2 Insert the lettering label 3 Reinsert the cover with the mat surface upwards Cleaning the Telephone ...

Page 54: ...ndix 54 COMfortel 1200 1400 Firmware V1 8 COMfortel Set V3 10 0 Setup V02 05 2015 Important Humidity may cause malfunctions of the display of the COM fortel 1400 Clean the display only with a soft dry cloth ...

Page 55: ...ribution s alone or by combination of their Contribution s with the Work to which such Contribution s was submit ted If You institute patent litigation against any entity including a cross claim or counterclaim in a lawsuit alleging that the Work or a Contri bution incorporated within the Work constitutes direct or contributory patent infringement then any patent licenses granted to You under this...

Page 56: ... OR CONTRIBUTORS BE LIABLE FOR ANY DIRECT INDIRECT INCIDENTAL SPECIAL EXEMPLARY OR CONSEQUENTIAL DAMAGES INCLUDING BUT NOT LIMITED TO PROCURE MENT OF SUBSTITUTE GOODS OR SERVICES LOSS OF USE DATA OR PROFITS OR BUSINESS INTERRUPTION HOWEVER CAU SED AND ON ANY THEORY OF LIABILITY WHETHER IN CONTRACT STRICT LIABILITY OR TORT INCLUDING NEGLIGENCE OR OTHERWISE ARISING IN ANY WAY OUT OF THE USE OF THIS ...

Page 57: ...ompanying this license Fonts and associated documentation files the Font Software to reproduce and distribute the modifications to the Bitstream Vera Font Software including without limitation the rights to use copy merge publish distribute and or sell copies of the Font Software and to permit persons to whom the Font Software is furnished to do so subject to the following conditions The above cop...

Page 58: ...IABLE FOR INCIDENTAL OR CONSEQUENTIAL DAMAGES IN CONNECTION WITH OR ARISING FROM THE FURNISHING PER FORMANCE OR USE OF THIS SOFTWARE So that all may benefit from your experience please report any problems or suggestions about this software to the 29K Technical Support Center at 800 29 29 AMD 800 292 9263 in the USA or 0800 89 1131 in the UK or 0031 11 1129 in Japan toll free The direct dial number...

Page 59: ...ght 14 E Einrichtung 25 per PC 25 F Firmware Update 27 Version abfragen 27 verteilen 29 H Headset 18 Buchsenbelegung 12 technische Daten 11 Hinweissymbole 7 Hörer 17 I Inbetriebnahme Anrufbeantworter 22 Telefon 21 K Konfigurationssoftware 25 L Lieferumfang 10 Lizenz 55 M Marken 14 R Reinigung des Telefons 30 S Sicherheitshinweise 7 Signalwörter 7 Speicherkarte einstecken 23 Symbole 7 Systemvorauss...

Page 60: ...of Guarantee Information Ser vice device description 32 F feet assembly 15 feet of casing assembling 39 firmware distributing 52 update performing 51 version 51 G guarantee see leaflet Conditions of Guar antee Information Service H headset socket assignment 35 technical data 36 L lettering label 63 inserting 53 licenses 55 M memory card inserting 46 N number of telephones at PBX 34 O operation see...

Page 61: ...COMfortel 1200 1400 Firmware V1 8 COMfortel Set V3 10 0 Setup V02 05 2015 61 telephone assembling 43 cleaning 53 desktop unit 39 height 39 wall mounted unit 40 trademarks 38 W wall mounting 44 ...

Page 62: ...62 COMfortel 1200 1400 Firmware V1 8 COMfortel Set V3 10 0 Setup V02 05 2015 ...

Page 63: ...COMfortel 1200 1400 Firmware V1 8 COMfortel Set V3 10 0 Setup V02 05 2015 63 Beschriftungsschilder Lettering Labels ...

Page 64: ...64 COMfortel 1200 1400 Firmware V1 8 COMfortel Set V3 10 0 Setup V02 05 2015 ...

Page 65: ...COMfortel 1200 1400 Firmware V1 8 COMfortel Set V3 10 0 Setup V02 05 2015 65 Bohrschablone Drilling Template ...

Page 66: ...66 COMfortel 1200 1400 Firmware V1 8 COMfortel Set V3 10 0 Setup V02 05 2015 ...

Page 67: ......

Page 68: ...884351 V02 05 2015 ...

Reviews: