background image

6

First Steps

Gigaset SL560 / Aton CL303 / SWZ PTT EN / A31008-M1710-F151-1-7619 / starting.fm / 10.7.06

Reception strength:

The display shows the quality of the radio 

contact between the base station and 

handset:

u

Good to poor: 

Рi Ñ Ò

,

u

No reception: 

|

 flashes.

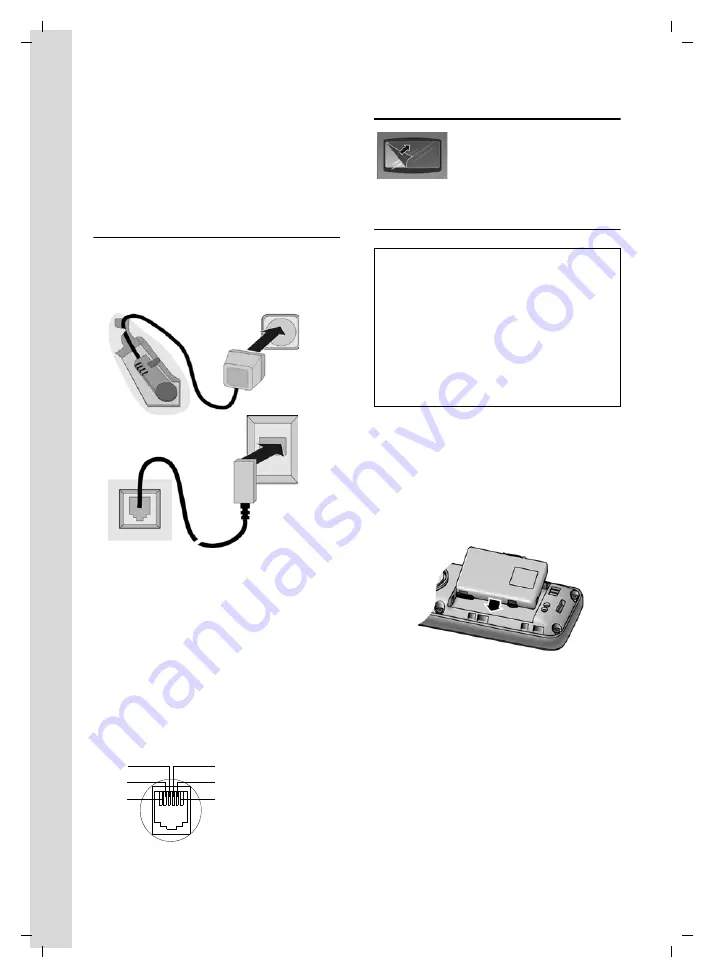
Connecting the base station

¤

First

 connect the mains adapter and 

then

 the phone jack as shown below-

and place the cables in the cable 

recesses.

1 Underside of the base station (detailed 

view)

2 Mains adapter 230 V

3 Phone jack with phone cord

Please note: 

u

The mains adapter must be 

always 

connected

, as the phone will not oper-

ate without mains connection.

u

If you buy a replacement phone cord 

from a store, ensure that the phone 

jack is connected correctly.

Setting up the handset for use

The display is protected 

by a plastic film. Please 

remove the protective 

film!

Fitting the battery pack 

¤

Insert the battery pack at an angle from 

the right introducing the lugs into the 

cavity first.

¤

Then push the casing from the top, 

until the retaining clip on the side of 

the battery pack clicks securely into 

place in the casing.

Please note: 

You must press the retaining clips down in 

order to remove the battery pack.

Correct phone jack assignment


1 unused

2 unused

3 a

4 b

5 unused

6 unused

1

3

2

1

1

1


2
1


Caution: 

Use only the recommended rechargeable bat-

tery pack (page 53). Never use a conventional 

(non-rechargeable) battery pack, as this may 

cause significant damage to health and prop-

erty. For example, the outer casing of the bat-

tery pack could be destroyed or the battery 

pack could explode. The phone could also mal-

function or be damaged as a result of using 

batteries that are not of the recommended 

type.

Summary of Contents for CL303

Page 1: ...1 Gigaset SL560 Aton CL303 SWZ PTT EN A31008 M1710 F151 1 7619 cover fm 28 6 06 Aton CL303 User guide...

Page 2: ...2 Gigaset SL560 Aton CL303 SWZ PTT EN A31008 M1710 F151 1 7619 cover fm 28 6 06...

Page 3: ...7 Swisscom Voice Portal key page 15 8 Connection socket for headset and PC in terface 9 Microphone 10 Recall key Confer Flash Insert a dialling pause press and hold 11 Star key Ringtones on off press...

Page 4: ...eceiving an SMS 29 Notification by SMS 30 SMS mailboxes 31 Setting SMS centre 32 SMS to a PABX 32 Activating deactivating the SMS function 32 SMS troubleshooting 33 Using the network mailbox Combox 34...

Page 5: ...to the PABX 49 Flash time 49 Save access code 49 Setting pauses 49 Switching temporarily to tone dialling DTMF 50 Appendix 51 Care 51 Contact with liquid 51 Faults and Self help with Troubleshooting 5...

Page 6: ...ing cradle in bathrooms or shower rooms The base and the charging cradle are not splash proof page 51 Do not use the phone in environments with a potential explosion hazard e g auto paint shops If you...

Page 7: ...ntries the telephone will dial on voice command page 22 u You can store appointments page 44 and anniversaries page 20 in your phone and it will remind you of them in advance Have fun using your new t...

Page 8: ...use The display is protected by a plastic film Please remove the protective film Fitting the battery pack Insert the battery pack at an angle from the right introducing the lugs into the cavity first...

Page 9: ...r forefinger into the notches on the lower edge Gently lift the cover up out of the not ches Placing the handset in the charging cradle Plug the charging cradle mains adapter into a mains power socket...

Page 10: ...ng procedure if you remove the battery pack from the handset and insert it again u The battery pack may warm up as it is charging This is not dangerous u After a time the charge capacity of the batter...

Page 11: ...e 29 1 3 Outgoing 0 page 28 You have activated an SMS mailbox with a PIN or 2 3 mailboxes 1 1 Mailbox 1 1 1 New SMS page 27 1 1 2 Incoming 0 page 29 1 1 3 Outgoing 0 page 28 1 2 to 1 4 Mailbox 1 Mailb...

Page 12: ...SIM page 21 3 1 4 Entry to SIM page 21 3 2 Bluetooth 3 2 1 Activation page 46 3 2 2 Search Headset page 46 3 2 3 Search Data Device page 46 3 2 4 Known Devices page 46 3 2 5 Own Device Name page 47 3...

Page 13: ...e 39 8 3 3 Contrast page 39 8 3 4 Backlight page 40 8 4 Handset 8 4 1 Language page 39 8 4 3 Auto Answer page 40 8 4 4 Add Emerg No page 39 8 4 5 Register H Set page 35 8 4 6 Select Base page 35 8 4 7...

Page 14: ...he dis play key Silence You can take the call as long as it is displayed on the screen Answering a call on the Bluetooth headset Precondition Bluetooth is activated connection has been established bet...

Page 15: ...on or off If you wish to place the handset in the charging cradle during a call Press and hold the handsfree key d while placing the handset in the base station If handsfree key d does not light up p...

Page 16: ...ght v or left u In lists and submenus t s Scroll up down line by line w Open submenu or confirm selection u Go back one menu level or cancel During an external call s Open the directory u Initiating i...

Page 17: ...e functions in the submenus are dis played as lists To access a function Scroll to the function with the control key q and press OK Or Enter the corresponding digit combina tion page 9 Pressing briefl...

Page 18: ...No Press the display key Edit Enter number to which call is to be diverted and press Save Entry OK or Press s Select a number from the directory and press OK To save press Save Status Activating deac...

Page 19: ...waiting call Accept Press the display key You have the option of toggling or holding a conference call Accept call waiting Options Accept waiting call Reject call waiting Options Reject waiting call...

Page 20: ...max 60 characters Storing a number in the directory s New Entry Change multiple line input First Name Surname Enter a name in at least one of the fields Phone Home Phone Mobile Phone Office Enter a nu...

Page 21: ...ctory only Play voice patterns page 23 Delete Pattern directory only Delete voice patterns page 23 Copy Entry Send a single entry to a handset page 19 Delete List Delete all entries in the directory C...

Page 22: ...ectory Numbers that appear in a list e g the calls list or the last number redial list in a text message or displayed during a call can be added to the directory A number is displayed Options Copy to...

Page 23: ...e 45 Transferring SIM card entries Where necessary a SIM card reader is integrated in the base station Insert the SIM card as shown You can copy entries from SIM cards to the directory and vice versa...

Page 24: ...you must record a voice pattern for each name i e say the name loudly into the handset and store it You can also set your phone so that it announces the name of a caller for an external call instead o...

Page 25: ...ax 32 numbers If one of the numbers is in the directory then the corresponding name will be displayed Manual last number redial c Press the key briefly s Select entry c Press the talk key again The nu...

Page 26: ...y INT Select a list with q Press w or OK to open If entries are only available from one list the other list options are not needed and only the relevant list will be shown SMS incoming message list Al...

Page 27: ...t page 8 u Type of entry accepted calls missed calls Pressing the display key Delete deletes the marked entry After pressing the display key Options you can select more functions with q Copy to Direct...

Page 28: ...ONI see page 57 Rules u An SMS can be up to 612 characters long u If there are more than 160 characters or a lot of image data the text message is sent as a linked SMS up to 4 mes sages with 153 chara...

Page 29: ...ly applies to the current SMS SMS status report Precondition Your service provider sup ports this feature If you have activated the status report you will receive a message with a confirmation text af...

Page 30: ...the saved SMS and then send page 27 Character Set Text is shown in the selected character set Deleting draft message list Open the draft message list and then Options Open menu Delete all Select press...

Page 31: ...il box PIN The incoming message list is displayed as follows example 1 bold number of new entries not bold number of read entries 2 name of mailbox here general mailbox Open list with OK An entry in t...

Page 32: ...n be notified by SMS about missed calls Precondition For missed calls the caller s number CLI must have been transmit ted Notification is sent to your mobile phone or another phone with SMS functional...

Page 33: ...lbox 2 and press OK Change multiple line input On Off Activate or deactivate mailbox ID Select mailbox ID 0 9 You can only select the available numbers Protection Activate deactivate PIN protection PI...

Page 34: ...tification is for warded to the extension of the PABX CLIP The CLIP of the phone number for the SMS centre is evaluated in your Aton CL303 u If required you must prefix the number for the SMS centre w...

Page 35: ...2 The provider has not yet sent the rest of the message You have stopped receiving messages 1 You have changed the ID of your mailbox Tell your SMS contacts your new ID or undo the change page 31 2 Yo...

Page 36: ...ilbox number w Voice Mail Set Key 1 Network Mailb Select and press OK on Enter the number for the network mailbox Save Press the display key a Press and hold idle status The setting for fast access ap...

Page 37: ...ionality as follows On the handset Start to register the handset as described in its user guide On the base station Press and hold the registration paging key on the base station page 1 approx 3 secs...

Page 38: ...nal call When diverting a call you can also press the end call key a before the internal participant lifts the receiver Then if the internal participant does not answer or is busy the call will automa...

Page 39: ...all key a the handset that has lis tened in remains connected to the exter nal caller Changing the name of a handset The names INT 1 INT 2 etc are assigned automatically at registration You can change...

Page 40: ...menu for activating SMS notification page 30 Settings Notify Type Alarm Clock Assign key with the menu for setting and activating the alarm clock page 44 Alarm Clock Calendar Open the calendar enter n...

Page 41: ...everal different contrasts w Display Colour Scheme Select and press OK s Select a colour scheme and press OK current col our a Press briefly Contrast Select and press OK r Select contrast Save Press t...

Page 42: ...lume can only be adjusted when this function is set You are conducting an external call t Press the control key r Select volume Save Press display key if necessary to save the setting perma nently If...

Page 43: ...can be deactivated permanently or just for the current call The ringtone cannot be re activated while an external call is in progress Deactivating the ringtone permanently Press the star key and hold...

Page 44: ...ou can use as caller pictures or screensa vers Precondition Calling Line Identifica tion CLIP My stuff can manage the follo wing media types The icon is displayed before the name in My stuff There are...

Page 45: ...ced Checking the memory You can view both the memory space available and the proportion of memory used by the screensavers CLIP pictures and sounds w Capacity Back press the display key Activating dea...

Page 46: ...y The wake up call is deacti vated and then repeated after 5 minutes After the second repetition the wake up call is deactivated completely Setting an appointment Calendar You can receive reminders fo...

Page 47: ...he appointment reminder Or SMS Press display key to answer the appointment reminder with an SMS Displaying missed appointments anniversaries Missed appointments anniversaries page 20 are displayed in...

Page 48: ...h can take up to 30 seconds After the device has been found its name is shown in the display Options Press the display key Trust Device Select and press OK Enter the PIN of the Bluetooth device to be...

Page 49: ...emporarily i e for as long as it is in the receiving range or until you switch off the handset or you can include it in the list of known devices After confirming the PIN include in the list of known...

Page 50: ...rease the range and reception strength of your base sta tion First you must activate the repeater mode This will terminate any calls cur rently running through the base station Precondition A repeater...

Page 51: ...e access code when dialling manually and when entering directory emergency quick dial num bers and number for SMS centres manually u When sending an SMS if you copy the number of the recipient from th...

Page 52: ...ing DTMF If your PABX still operates with dial pulsing DP but you need tone dialling DTMF for a connection e g to listen to the net work mailbox you must switch to tone dialling for the call Precondit...

Page 53: ...cable to the place of purchase The display is blank 1 The handset is not switched on Press and hold the end call key a 2 The batteries are flat Charge or replace the batteries page 5 The handset does...

Page 54: ...neces sary the device must be returned to the place of purchase If Technical Assistance is made available during the warranty period as well the fault action is charged route lump sum price as well as...

Page 55: ...f Conformity or can be ordered from the following postal address Swisscom Fixnet AG RES Voice Customer Premises Equipments CPE 3050 Bern Specifications Recommended battery pack Valid at the time of go...

Page 56: ...etting confirm selec tion c Q etc Press the corresponding key on the handset DECT standard is supported GAP standard is supported No of channels 60 duplex channels Radio frequency range 1880 1900 MHz...

Page 57: ...sing the control key q r In the display header Settings is displayed Press w or the display key OK to confirm the Settings function The Settings submenu is displayed Press the bottom of the control ke...

Page 58: ...Press the star key to show the table of special characters u The first letter of the name of directory entries is automatically capitalised fol lowed by lower case letters You can call up the table of...

Page 59: ...quired let ter is reverse highlighted on the display line and copied into the text panel If you press and hold the hash key you switch from Abc mode to 123 and from 123 to abc and from abc to Abc Deac...

Page 60: ...ger Including mains adapter Repeater V2 or Type RTX The repeater can be used to increase the reception range between your Aton CL303 handset and the base Data Cable USB DCA 510 For connecting your pho...

Page 61: ...answer 40 Automatic call acceptance 12 Automatic redial 23 B Base station changing 35 connecting and setting up 5 connecting to PABX 49 range 5 restoring to factory settings 48 setting 48 system PIN...

Page 62: ...ns 23 De registering handset 35 De registering devices Bluetooth 47 Dialling directory 18 quick dial 38 voice dialling 23 with quick dial 19 Dialling code setting own dialling code 42 Dialling pause 4...

Page 63: ...registering 35 registering on another base station 35 restoring to factory settings 47 screensaver 39 settings 38 setup 6 using several handsets 35 Handsfree key 1 Handsfree talking 13 Hash key 1 13...

Page 64: ...line entry 55 Muting 13 first ring 41 Muting handset 13 My stuff 42 N Name of a handset 37 Network mailbox 34 Network services 16 Notification via SMS 30 Number adding to directory 20 copying from an...

Page 65: ...28 draft message list 28 forwarding 29 input language 27 linked 26 mailbox ID 31 mailboxes 31 notification number 30 notification type 30 notification via SMS 30 PIN protection 31 reading 28 receiving...

Page 66: ...3SIX fm 10 7 06 dialling 23 Voice patterns voice dialling Deleting 23 playing 23 recording 22 Volume earpiece 40 handset loudspeaker 40 loudspeaker 40 ringtone 40 48 setting 40 W Wait melody 13 48 Wal...

Page 67: ...65 Gigaset SL560 Aton CL303 SWZ PTT EN A31008 M1710 F151 1 7619 montage_charger fm 10 7 06 Mounting the base on the wall approx 9 mm...

Reviews: