


Technical Manual & Parts Lists
14
Setting Up the Machine to Make Borders
To setup the machine to make the desired borders go to
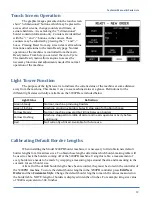
the main
Ready – New Order
screen and press the large
Edit New Order
button.
The new screen
Edit Order
displays all available
options: the style, quantity of borders, and the type of fill
material in the border (foam or fiber) can be set here. Select
the desired combination and press
Exit
button to get back to
the main
Ready – New Order
screen. You are now ready to
make borders.
There are two
Start
buttons on the
Ready - New Order
screen. The top
Start
button is used to start the auto cycle
when the next order will use the same tick style. When the
machine is started with this button, the last border of the
current order will be completed without stopping for a tick
change. When you are ready
to start the last order on the current tick style, start the machine with
the lower
Start (Final Order)
button. When the last border of the
order is about half way complete the machine will stop and display
the message
Pause to Splice
. The prefeed rollers will back
up slightly to create some slack material.
WARNING: DO
NOT OPEN THE ROLLERS DURING THIS
PROCEEDURE
. Cut off the border material between the
roll and the prefeed table. Load the new roll of border
material onto the spindle. Pull the slack material back and
attach the new roll of border material to it. Press
Continue
to restart the machine. The unfinished border will be
completed and the machine will stop to allow you to enter
the new order for the new tick. Adjust the guides to fit the
new tick width. When the machine is started, the splice will
be cut out automatically as the first border is made.
Setup Screen
Bobbin Monitor:
Pressing this button allows users to adjust the amount of sewing time between
bobbin warnings and the amount of sewing time before the next bobbin warning.
Show All Settings
: When this button is pressed, all
of the values for the different settings are displayed in a
table format.
System Information
: Pressing this button allows
users to view the machine version and serial number, the
software revision and controller serial number, and the total
piece count.
Security
: Pressing this button allows the user to raise
their security clearance with a 5 digit security code.
Summary of Contents for 3200PC
Page 2: ......
Page 16: ...Technical Manual Parts Lists 11 Component Identification Power and Air supply hookups ...
Page 26: ...Technical Manual Parts Lists 21 ...
Page 30: ...Technical Manual Parts Lists 25 ...
Page 32: ...Technical Manual Parts Lists 27 ...
Page 34: ...Technical Manual Parts Lists 29 ...
Page 36: ...Technical Manual Parts Lists 31 ...
Page 38: ...Technical Manual Parts Lists 33 ...
Page 40: ...Technical Manual Parts Lists 35 ...
Page 42: ...Technical Manual Parts Lists 37 ...
Page 44: ...Technical Manual Parts Lists 39 ...
Page 46: ...Technical Manual Parts Lists 41 ...
Page 48: ...Technical Manual Parts Lists 43 ...
Page 50: ...Technical Manual Parts Lists 45 ...
Page 52: ...Technical Manual Parts Lists 47 ...
Page 54: ...Technical Manual Parts Lists 49 ...
Page 56: ...Technical Manual Parts Lists 51 ...
Page 57: ...Technical Manual Parts Lists 52 32007600P Transport Assembly AAC Drawing Number 192087A Rev5 ...
Page 58: ...Technical Manual Parts Lists 53 ...
Page 60: ...Technical Manual Parts Lists 55 ...
Page 62: ...Technical Manual Parts Lists 57 ...
Page 65: ...Technical Manual Parts Lists 60 3200PC PD Pneumatic Diagram 125621B ...
Page 66: ...Technical Manual Parts Lists 61 3200PC WD Wiring Diagram Control panel 125622B ...