ATIGO A1702 User Manual Download Page 6


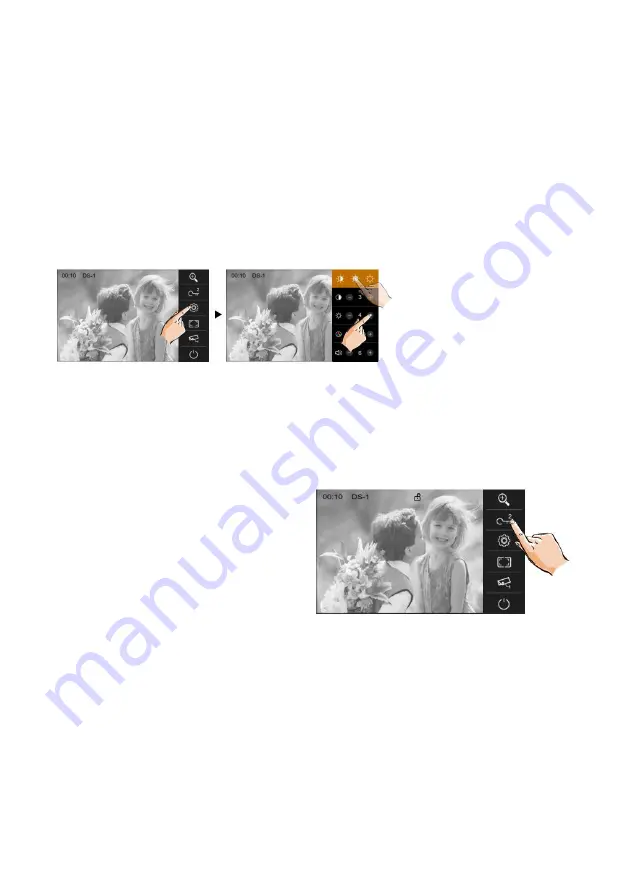
Screen  and  volume adjustments 


During an active call either from the door entry panel or intercom communication, you can adjust the 

contrast, brightness, colour or volume.  
 

Image adjustments 


There are three predefined modes to select from: 

Normal

Bright,

 and 

Soft. 

Each mode can have 

its contrast, brightness or colour further tweaked as needed. 
 

1. 

Adjust the contrast of the screen within the range zero to nine by pressing the “+” or “-”. 

2. 

Adjust the brightness of the screen within the range zero to nine by pressing the “+” or “ -”. 

3. 

Adjust the colour of the screen within the range zero to nine by pressing the “+” or “ -”. 


Volume adjustments 
 

In the same way as the image, the volume can be adjusted if it is too low or too high.  
 

1. 

Adjust the volume of the screen within the range zero to nine by pressing the “+” or “ -” 

 
Door release 

 
When a visitor pushes the call button from the 
entry panel, the receiver will start ringing. To 
answer the call, touch 

Talk/Mon

 button. Press 

the unlock button to release the primary door. 

If the call comes from a secondary entrance, 
press 

unlock 2

nd

 button. Check with your 

installer if the lock is electric and if it can 
connect to the system.


Call another room or apartment (Intercom) 


It is possible to communicate with another receiver located in another room of the house or with a 

monitor in another apartment.  
 

1. 

Select 

Intercom

 function from the 

Main Menu

2. 

Select the 

Keypad

 button you wish to call a receiver extension that you know and type the 

receiver number. 

3. 

Select the 

Name list

 button if you wish to view a list of saved receiver numbers. 

4. 

You can also select 

Inner Call

 to open communication with another room in the same 

house. 

5. 

Selecting the Guard Station will call the concierge unit. 


Summary of Contents for A1702

Page 1: ...A1702 2 Wire Video Receiver User manual ...

Page 2: ... adjustments 6 Image adjustments 6 Volume adjustments 6 Door release 6 Call another room or apartment Intercom 6 Do Not Disturb 7 General settings 7 Ring tone setting 7 Ring tone volume 8 Setting screen time 8 Intercom function 8 Restoring the default settings 9 Installer menu 9 Concierge unit 10 Date and time format 10 Unlock mode 11 Unlock time 11 Setting the user code 11 ...

Page 3: ...unlock the door Connection port BUS terminal and monitor addressing Terminal description SW SW Extra doorbell call button connection port Ring GND Extra buzzer connection port POW GND 12 16V extra power connection port DIP switches Total 6 bits can be configured Bit1 Bit5 User code setting switch Bit6 Video impedance matching switch L1 L2 BUS line terminal Mounting A Embed the mounting boxinto the...

Page 4: ...age while the receiver is in communication Answering a call 1 Touch Talk Mon button to answer the call To end the call touch the button again 2 If necessary during the call touch the Setting button to display the audio video settings 3 To unlockthe doorto the visitor touch the door lock key button An indicator thatthe door lock has been released will displayon the screen briefly ...

Page 5: ...door entry panel press the Monitor button to cycle through 3 Touch the Back arrow to return to previous menu Zoom If you want to see more details you can move to the desired positionby touching the magnifying glass button and choose a part on the screen to ZOOMthe image view Note Thisfunction requiresa fisheye cameralens Scale To adjust the Scale of the image use one of the following two modes 1 4...

Page 6: ... the range zero to nine by pressing the or Door release When a visitor pushesthe call button from the entry panel the receiverwillstart ringing To answer the call touch Talk Monbutton Press the unlock button to release the primarydoor If the call comesfroma secondary entrance press unlock2nd button Checkwith your installer if the lock iselectricand if it can connect to the system Call another room...

Page 7: ...tivate the Do Not Disturb function Note The indicator changes to GREEN to indicate that the Do Not Disturb function is ON The indicator is GREY when the function is OFF When the function is turned ON you will not receive any calls General settings Ring tone setting The ring calltone can be set individuallyto distinguish different calling sources There are a total of 12 ring tones to choose from 1 ...

Page 8: ...er 30 secondsof inactivity the screen willturn off This setting can be adjusted as needed by choosing between a range of sixseconds and up to 10 minutes 1 Select Settings from the Main Menu 2 Press the Screen time button 3 Use up and down arrows to scrollthrough the time setting Intercom function The intercom function can be enabled or disabled as required 1 Select Settings from the Main Menu 2 Pr...

Page 9: ...store button on the side menu 4 Press the Check button to confirm alternativelyif you want to Cancel pressthe X button Note The system willsound a beep when the restore to factorysettingshasfinished Installer menu To enter the Installer menu follow below steps 1 Select Settings from the Main Menu 2 Press and hold for three seconds the Unlock key button 3 On the keypad type the installercode accord...

Page 10: ...sed as a concierge unit to the system Follow below stepsto enable this function 1 Select Settings from the Main Menu 2 Press and hold for 3 secondsthe Unlock key button 3 On the keypad type a 8004 to enable the concierge function on the monitor b 8005 to disable the concierge function on the monitor Date and time format The format of the date ortime can be set in two ways Follow below stepsto chan...

Page 11: ... Unlock key button 3 On the keypad type 8401 for one second 8499 for 99 seconds to set the unlocktime Setting the user code On the ATIGO system everyreceiver must have assigned an identification code called User Code DIP Switch addresses The DIP switchesare used to set the user code for each monitorand maximum are 6 Bits Bit 1 Bit 5 are used for addressing Thevalue range is from 0 to 31 a total of...

Page 12: ...er anyimpact 2 Please clean the screen with a soft cotton cloth without using anyorganicorchemical cleaning agent If necessary please use as little as possible water ordilute soap into water to clean the dust 3 Image distortion may occurif the monitor ismounted too close to magnetic fields like TV s microwaves computers etc 4 Please keep away from high temperatures dust oxidation orwater to avoid ...

Reviews: