background image

Upgrading the Message Memory

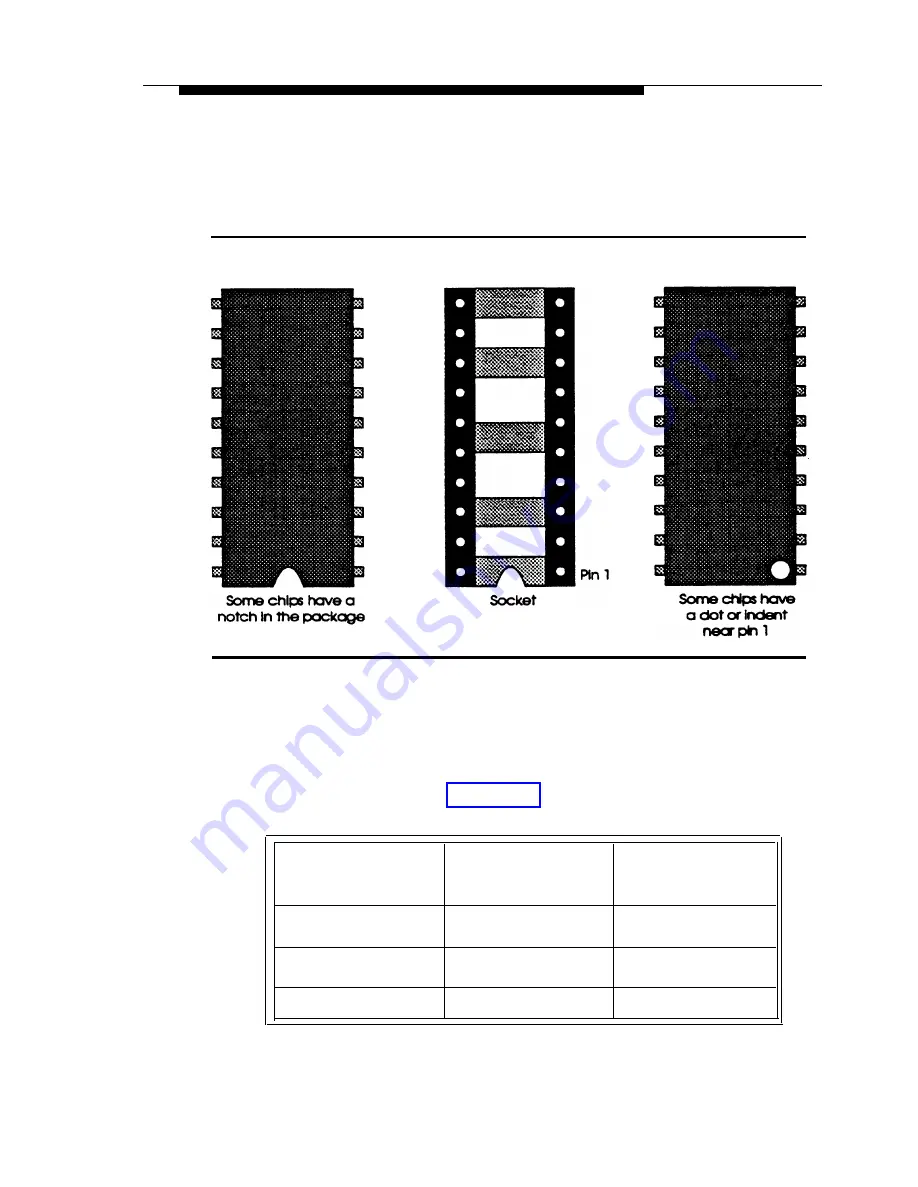
Figure 4-6. Memory Chip and Socket

8.

Using the following table, configure the voice jumpers (JP1
and JP2) to the settings specified for the total message
memory of the unit. Figure 4-7 shows the location and
settings of the jumpers.

Total Message

JP1 Setting

Memory

128 seconds

1-2

192 seconds

2-3

256 seconds

 2-3

JP2 Setting

4-5

5-6

4-5

4-10

Summary of Contents for Digital Announcer

Page 1: ...AT T AT T Digital Announcer Installation and Use ...

Page 2: ...ce MERLIN LEGEND and Digital Announcer are trademarks of AT T MERLIN MERLIN II and DEFINlTY are registered trademarks of AT T Phillips is a registered trademark of the Phillips Screw Company Document Ordering Information The order number for this book is 514 616 100 To order additional books call 1 800 432 6600 in the U S and 1 800 255 1242 in Canada Product Ordering Information The order addition...

Page 3: ...w Preparing for Installation Verifying Equipment Materials Required Gathering Information Selecting a Site Installing the Digital Announcer Setting the Switches Applying AC Power Connecting the Unit to the Telephone System Setting the Battery Option Switch Mounting the Unit on a Wall 2 1 2 1 2 1 2 2 2 4 2 4 2 6 2 7 2 9 2 12 2 13 2 13 2 14 i ...

Page 4: ...ape Player Listening to an Announcement Selecting the Announcement to be Played Setting the Power Failure Answer Option Changing the Lengths of the Announcements Changing the Ring Count Delay 3 1 3 1 3 2 3 2 3 4 3 5 3 6 3 7 3 8 3 11 4 Upgrading the Message Memory 4 1 Overview 4 1 Tools Required 4 2 Upgrading the Message Memory 4 3 ii ...

Page 5: ...rocedures LED Status Table 5 1 5 1 5 2 5 6 A Overview Planning Form Appendix A Planning Form A 1 A 1 A 1 B Appendix B Administering the AT T Digital Announcer on DEFINITY System 75 and System 25 Overview Administering the Digital Announcer B 1 B 1 B 1 iii ...

Page 6: ...s C Appendix C Technical Specifications C 1 C 1 C 1 C 1 C 2 C 2 C 2 C 3 Overview Specifications Power Requirements Physical Requirements Environmental Requirements Battery Backup Operation Audio Input Jack iv ...

Page 7: ...ting the Digital Announcer on a Wall 2 15 4 Upgrading the Message Memory 4 1 4 2 4 3 4 4 4 5 4 6 4 7 4 8 Rear Panel of the Digital Announcer Front Panel of the Digital Announcer Location of Case Screws on the Front Panel Removing the Circuit Board Layout of Circuit Board Memory Chip and Socket Location of Jumpers Mounting Slots for the Circuit Board 4 1 4 4 4 4 4 5 4 7 4 9 4 10 4 11 4 12 v ...

Page 8: ...T T call management system CMS for Merlin MERLlN II and MERLIN LEGEND a standard 2 wire tip ring telephone circuit a contact activated start application such as an emergency announcement over a loudspeaker paging system The Digital Announcer provides the following features Up to two Recorded Announcements May Be Stored and Played to Callers The Digital Announcer can record and store either one or ...

Page 9: ...ow the total message memory capacity is allocated between the two messages For example if you were using two messages message 1 for day and message 2 for night and needed two messages of equal length you could split the total message memory time between message 1 and message 2 equally However if you realized later that you needed a longer message for the day and a shorter message for the night you...

Page 10: ...cer is intended for the AT T authorized technician and describes how to upgrade the message memory and firmware Chapter 5 Troubleshooting explains LED status and general problem resolution Appendix A Planning Form is intended for the AT T technician to determine unit configurations and customer requirements before installing the Digital Announcer Appendix B Administering the AT T Digital Announcer...

Page 11: ...tal Announcer NOTE The information presented in this chapter is intended only for AT T authorized technicians Preparing for Installation Before installing the Digital Announcer perform the following procedures 1 Verify that you received all of the equipment 2 Make sure you have the necessary tools to perform the installation 2 1 ...

Page 12: ... received the following equipment AT T Digital Announcer power supply bracket for wall mount handset and handset cord modular cord NOTE If you are using this unit with MERLIN MERLIN II or MERLIN LEGEND CMS you must also obtain the Announcer unit interface cord included with the CMS interface board Figure 2 1 shows the equipment required NOTE An external power surge suppression unit such as an AT T...

Page 13: ...Installing the AT T Digital Announcer Figure 2 1 AT T Digital Announcer Equipment 2 3 ...

Page 14: ...lication To install the Digital Announcer properly for MERLIN MERLIN II or MERLIN LEGEND CMS you need the following items the Announcement interface cord provided with the CMS interface board 1 Phillips screwdriver Gathering Information Before installing the Digital Announcer you must determine the following information on the planning form in Appendix A whether the user wants the unit to answer c...

Page 15: ... a conventional tip ring telephone line interface including System 25 CMS and System 75 CMS with a contact activated start application the number of announcements the user wants either one or two announcements the total message memory available in this unit the length of time the user wants to allocate to each announcement the number of rings before the unit answers a call and plays an announcemen...

Page 16: ...m interface near a properly grounded power outlet Ungrounded machines may be harmed by static electricity may fail to work properly and can be a safety hazard Extensive internal circuit damage can result by connecting the unit to an ungrounded outlet well ventilated and away from heat sources Excessive heat and direct sunlight can cause undesirable conditions such as low humidity which can cause s...

Page 17: ...m the following procedures 1 Set the switches on the rear panel of the unit 2 Apply AC power to the unit 3 Connect the unit to the telephone system 4 Activate the Battery option 5 Mount the unit on a wall if necessary When installing this unit refer to the planning form in Appendix A and Figures 2 2 and 2 3 2 7 ...

Page 18: ...Installing the AT T Digital Announcer Figure 2 2 Rear Panel of the Digital Announcer Figure 2 3 Front Panel of the Digital Announcer 2 8 ...

Page 19: ...ition to turn off the Power Failure Answer option If you turn off this option the unit ignores incoming calls during a power failure and retains its announcements for up to three hours NOTE The position of this switch has no effect if the unit is used with MERLIN MERLIN II or MERLIN LEGEND CMS or contact activated start applications When used with CMS or contact activated start applications the un...

Page 20: ...unit to a conventional tip and ring telephone circuit move switch 3 to the T R position and then proceed to Step 4 If you are using the unit in a contact activated start application move switch 3 to the T R position and then proceed to Step 4 4 If the unit has 64 seconds of message memory factory default configuration use the following table to set switches 4 and 5 to specify how the unit will all...

Page 21: ...the back panel is pressed If you make any changes to the switch settings the unit will not put the changes into effect until one of the previous conditions occurs 5 Move switch 6 either to the 1 position to have the unit answer after the first ring or pair of rings in a split ring environment or to the 4 position to have the unit answer after the fourth ring This step sets the Ring Count Delay NOT...

Page 22: ... blinking rapidly Next the M1 LED turns on and the Mode LED turns red and remains on for the amount of time allocated for message 1 If you allocated any time for message 2 the M1 LED turns off the M2 LED turns on and then the Mode LED turns red and remains on for the amount of time allocated for message 2 After the unit completes the diagnostic and initialization procedure the Mode LED turns off a...

Page 23: ... start applications connect one end of the modular cord supplied with the unit to the Line connector on the rear panel of the unit and connect the other end of the modular cord to an RJ25 jack providing tip ring from the host telephone system Then add the contact activation signal to the jack so that it appears at the unit on pins 1 and 6 Setting the Battery Option Switch After the unit is powered...

Page 24: ... a wall perform the following steps NOTE The unit is not wall mounted when used with a CMS application 1 Fasten the bracket to the wall 2 Hang the unit on the bracket by placing the mounting hole on the bottom of the unit on the hook of the bracket The front panel faces the ceiling 2 14 ...

Page 25: ...Installing the AT T Digital Announcer Figure 2 4 Mounting the Digital Announcer on a Wall 2 15 ...

Page 26: ... Record an announcement Listen to an announcement Select the announcement to be played to callers Set the Power Failure Answer option Change the lengths of the announcements Change the number of rings before the unit answers a call Ring Count Delay NOTE You cannot use message 2 unless you have allocated message memory for it 3 1 ...

Page 27: ...nnouncement To record an announcement with the handset perform the following steps 1 Plug the handset cord into the Handset jack on the rear panel of the unit 2 Press the Select button on the front panel of the unit to select the Message LED M1 or M2 of the announcement you want to record Depending on the announcement you selected either the M1 or M2 LED turns on If no announcement has been record...

Page 28: ...y When you are finished speaking your announcement press and release the Mode button If you reach the end of the time allotted for the announcement the unit automatically stops recording the message The red Mode LED turns off and the Message LED remains on signifying that the announcement has been recorded Disconnect the handset from the rear panel of the unit and place the handset in a secure pla...

Page 29: ...ont panel of the unit to select the Message LED M1 or M2 of the announcement you want to record Depending on the announcement you selected either the M1 or M2 LED turns on If no announcement has been recorded yet for the Message LED you selected the Message LED blinks slowly Cue and pause the cassette tape Press and hold the Mode button until the Message LED you selected starts blinking rapidly Re...

Page 30: ... is being used in a contact activated application reconnect its cord to the Line connector on the rear panel Listening to an Announcement To listen to a recorded announcement perform the following steps NOTE If this unit is being used with a contact activated start application the announcement may also be heard over its broadcast channel If this announcement is not desirable refer to page 3 2 Reco...

Page 31: ...lecting the Announcement to be Played The Digital Announcer can record and store either one or two announcements depending on your needs For example if you want a day message and a night message you can record both messages and manually activate the appropriate message at the appropriate time of day To select the announcement that callers hear when they access the Digital Announcer press the Selec...

Page 32: ... 3 hours depending on the number of calls serviced by the unit during the power outage The Power Failure Answer option affects the unit only when it is in tip ring mode that is it is not used with MERLIN MERLIN II or MERLIN LEGEND CMS or a contact activated start application If the unit is used with CMS or a contact activated start application the unit retains your announcements for up to three ho...

Page 33: ...me you can change how the total message memory is allocated between the two announcements However when you perform this procedure your recorded messages are destroyed To change the lengths of the announcements perform the following steps NOTE Make sure you know the total message memory for your unit that is 64 sec 128 sec 192 sec or 256 sec To determine the total message memory for your unit refer...

Page 34: ...Down 32 seconds 32 seconds Up Down 38 seconds 26 seconds Down Up 51 seconds 13 seconds Up Up 64 seconds 0 seconds Total Message Memory 128 seconds Switch 4 Switch 5 MSG 1 Length MSG 2 Length Down Down 64 seconds 64 seconds Up Down 76 seconds 52 seconds Down Up 102 seconds 26 seconds Up Up 128 seconds 0 seconds 3 9 ...

Page 35: ...conds Switch 4 Switch 5 MSG 1 Length MSG 2 Length Down Down 128 seconds 128 seconds Up Down 152 seconds 104 seconds Down Up 204 seconds 52 seconds Up Up 256 seconds 0 seconds 2 Using a small pointed object such as the tip of a bent paper clip press the Reset button on the rear panel NOTE Unless you press the Reset button the lengths of the announcements will not change Now you must re record your ...

Page 36: ...erform the following steps 1 Move switch 6 to one of these positions 2 If you want the unit to answer after one ring set the switch to 1 If you want the unit to answer after four rings set the switch to 4 NOTE The position of this switch has no effect in MERLIN MERLIN II or MERLIN LEGEND CMS or contact activated start applications Using a small pointed object such as the tip of a bent paper clip p...

Page 37: ...mory 4 Overview This chapter provides the procedures you will use to upgrade the message memory of the AT T Digital Announcer NOTE The information presented in this chapter is intended only for AT T authorized technicians 4 1 ...

Page 38: ... unless you are properly grounded Grounding can be established by placing the equipment on a properly grounded work mat and by wearing a properly grounded wrist strap The wrist strap must have intimate contact with the bare skin and must never be worn over clothing Do not work on equipment unless you are familiar with the necessary procedures for preventing damage caused by electrostatic discharge...

Page 39: ...ps to upgrade the unit s message memory to 128 seconds 192 seconds or 256 seconds Each upgrade of 64 seconds of memory consists of two memory chips Therefore if the user upgrades his or her system to 192 seconds of message memory the upgrade will consist of installing four additional memory chips two chips for each 64 second increment of memory When upgrading this unit refer to Figures 4 1 and 4 2...

Page 40: ...Upgrading the Message Memory Figure 4 1 Rear Panel of the Digital Announcer Figure 4 2 Front Panel of the Digital Announcer 4 4 ...

Page 41: ...power connection and the CMS or modular cable connector from the rear panel 4 Remove the unit from the wall if it is wall mounted 5 Remove the two screws from the front panel Figure 4 3 Location of Case Screws on the Front Panel 6 Remove the front panel from the unit press on the CMS DIN connector on the rear panel to start moving the internal circuit board and pull out the internal circuit board ...

Page 42: ...l to support the front panel and do not pull on the connector cable The existing memory chips are located on the lower right corner of the circuit board NOTE Do not remove the cable or keyed connector from the circuit board Also do not pull on the cable when you are removing the circuit board from the unit 4 6 ...

Page 43: ...4 Removing the Circuit Board 7 Insert the new pair or pairs of message memory chips above the existing pair or pairs of message memory chips Figure 4 5 For example if you are upgrading the message memory to 128 seconds that is adding 64 4 7 ...

Page 44: ...SSAGE Memory First 64 second upgrade U24 U25 128 sec Second 64 second U26 U27 192 sec upgrade Third 64 second upgrade U28 U29 256 sec NOTE The memory chips for the initial 64 seconds of message memory that the unit is shipped with from the factory are located in U22 and U23 When inserting the additional memory chips make sure you observe the position of the notch or dot near pin 1 of the original ...

Page 45: ...Upgrading the Message Memory Figure 4 5 Layout of Circuit Board 4 9 ...

Page 46: ...ng table configure the voice jumpers JP1 and JP2 to the settings specified for the total message memory of the unit Figure 4 7 shows the location and settings of the jumpers Total Message JP1 Setting Memory 128 seconds 1 2 192 seconds 2 3 256 seconds 2 3 JP2 Setting 4 5 5 6 4 5 4 10 ...

Page 47: ...1 2 JP2 5 6 Figure 4 7 Location of Jumpers 9 Insert the circuit board into the slot of the unit Be sure that you mount the circuit board in the slot when you insert it into the unit Figure 4 8 NOTE Make sure the front panel is connected to the circuit board The front panel connects to the circuit board via a keyed connector While you work on the circuit 4 11 ...

Page 48: ...the unit Figure 4 8 Mounting Slots for the Circuit Board 10 11 12 13 14 Insert the front panel on the unit Insert the screws on the front panel Connect the Power connector and the CMS or modular connector to the rear panel Plug the power supply into an electrical outlet Move switch 1 to the ON position to turn on the internal battery 4 12 ...

Page 49: ...Troubleshooting 5 Overview This chapter provides the following information the procedures to troubleshoot the AT T Digital Announcer the meaning of the various states of the LEDs 5 1 ...

Page 50: ...END Service with LEDs properly CMS Reports illuminated and properly connected Message Unit Out of Service SECOND Insure that the switch on the rear panel is set for CMS operation If it is not set properly correct the setting press the Reset switch and re test THIRD Insure that the message length in the unit is not in conflict with the CMS delay message length option FOURTH Follow the procedures in...

Page 51: ...outlet and the power cord is connected to the connector on the rear panel If the outlet is not working or the cord is not connected correct and re test If the unit is properly connected to a working AC outlet and the LEDs are still off contact the appropriate AT T Helpline provided in the front of this manual 5 3 ...

Page 52: ...e rear panel If the switches are not correct for your installation set them correctly press the Reset switch and re test If the switches are set correctly check the LED Status table on page 5 6 Correct such items as message not recorded or selected and then re test If the battery light indicates an Out of Service Error Code press the Reset switch and re test If this does not correct the problem co...

Page 53: ... the rear panel If it is set to CMS set it to T R press the Reset switch and re test If this fails to correct the problem contact the appropriate AT T Helpline provided in the front of this manual This is normal operation The power supply is normally warm when plugged into a working AC outlet and properly connected to the unit 5 5 ...

Page 54: ...to callers Message LED off The message is not selected Message LED on The selected announcement is being Green Mode LED played on Message LED on The selected announcement is being Red Mode LED on recorded or the unit is in the process of being initialized Message LED If this occurs when the Mode button is blinks quickly being pressed the selected announcement is ready to be recorded If this occurs...

Page 55: ...s without interruption Battery LED The battery is charged remains on Power LED The unit is running on AC power remains on Power LED off The unit is running on its internal Battery LED on battery Battery LED blinks This is an error condition slowly 16 times or less with interruption 5 7 ...

Page 56: ...This appendix provides the Planning Form that the AT T authorized technician must complete before installing the AT T Digital Announcer Planning Form Complete the Planning Form on the next page before installing the Digital Announcer A 1 ...

Page 57: ...ls during a power failure Yes No NOTE Choosing Yes causes the announcements to be erased after only 30 minutes of power failure operation Will this unit be used for MERLIN MERLIN II or MERLIN LEGEND CMS as a Tip Ring T R or contact activated start application CMS T R or Contact Activated Start NOTE System 25 and System 75 CMS require this option to be set to T R If you selected CMS enter 2 in ques...

Page 58: ...ion 5 that is 64 128 192 or 256 sec and enter 0 for message 2 in question 6 What is the total message memory available in this unit 64 sec 128 sec 192 sec 256 sec What are the time allocations for each message Message 1 sec Message 2 sec How long does the customer want the Ring Count Delay option to be 1 Ring 4 Rings Wall Mount Flat Surface Prepared by Date Serial of Unit Customer A 3 ...

Page 59: ...tem 25 B Overview This appendix describes how to administer the AT T Digital Announcer on a DEFINITY System 75 or System 25 Administering the Digital Announcer To use the AT T Digital Announcer on a DEFINITY System 75 or System 25 you must administer it as an analog announcement B 1 ...

Page 60: ...ifications C Overview This appendix provides the technical specifications for the Digital Announcer Specifications Power Requirements AC Line Voltage Frequency 120 Volts nominal 103 5 Volts minimum 126 5 Volts maximum 60 Hz C 1 ...

Page 61: ...0 o C shipping 13 to 122 o F 0 to 95 Non condensing Battery Backup Operation The following table provides battery run time information When viewing this table please keep the following in mind These figures are for a fully charged battery The figures for Power Failure Answer On which list how long the unit will operate during a power outage with the Power Failure Answer option activated depend on ...

Page 62: ...econds 128 seconds 192 seconds 256 seconds 180 minutes 90 minutes 60 minutes 45 minutes 30 minutes 15 minutes 10 minutes 7 5 minutes Audio Input Jack Input Impedance 100K Ohms single ended Connector 3 5 mm miniature monoral phone plug NOTE The audio input jack can be used with amplified and non amplified sources C 3 ...

Page 63: ...stallation information required 2 4 materials required 2 4 preparation 2 1 procedures 2 7 selecting a site 2 6 M P power failure answer option setting 3 7 R ring count delay setting 3 11 U upgrade message memory 4 1 tools required 4 2 message memory changing the allocation 3 8 upgrade 4 1 Index 1 ...

Reviews: