background image

66

4. Click 

Apply

.

NOTES:

• 

The Keyword Filter is based on a DNS query. If a network client has 

already accessed a website such as http://www.abcxxx.com, then 

the website will not be blocked (a DNS cache in the system stores 

previously visited websites). To resolve this issue, clear the DNS cache 

before setting up the Keyword Filter.

• 

Web pages compressed using HTTP compression cannot be filtered. 

HTTPS pages also cannot be blocked using a keyword filter.

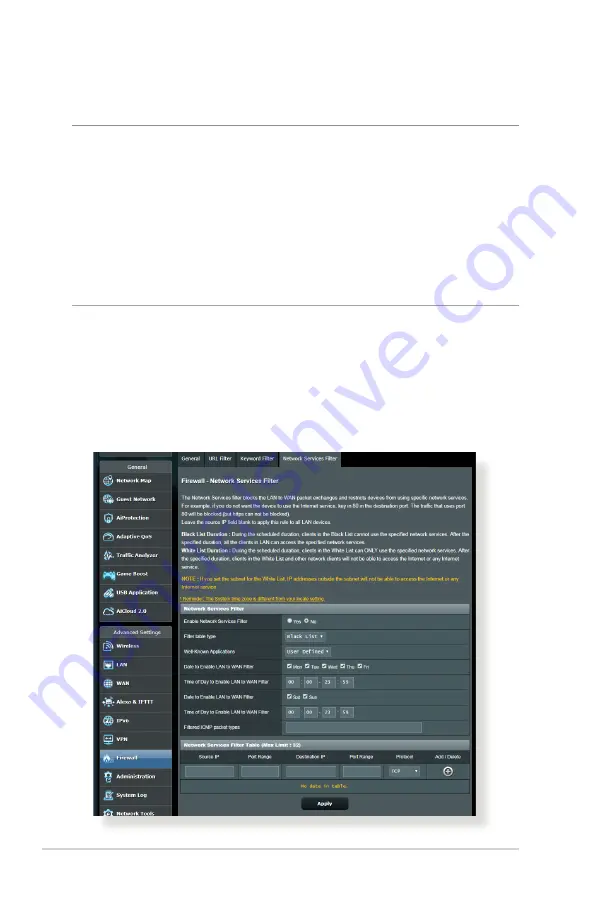
4.5.4 Network Services Filter

The Network Services Filter blocks LAN to WAN packet exchanges 

and restricts network clients from accessing specific web services 

such as Telnet or FTP.

Summary of Contents for RT-AX1800U

Page 1: ...User Guide RT AX1800U RT AX1800U Wireless AX 1800 Dual Band WiFi 6 Wireless AX 1800 Dual Band WiFi 6 Router Router ...

Page 2: ...TICULAR PURPOSE IN NO EVENT SHALL ASUS ITS DIRECTORS OFFICERS EMPLOYEES OR AGENTS BE LIABLE FOR ANY INDIRECT SPECIAL INCIDENTAL OR CONSEQUENTIAL DAMAGES INCLUDING DAMAGES FOR LOSS OF PROFITS LOSS OF BUSINESS LOSS OF USE OR DATA INTERRUPTION OF BUSINESS AND THE LIKE EVEN IF ASUS HAS BEEN ADVISED OF THE POSSIBILITY OF SUCH DAMAGES ARISING FROM ANY DEFECT OR ERROR IN THIS MANUAL OR PRODUCT SPECIFICAT...

Page 3: ...Setup QIS with Auto detection 15 2 3 Connecting to your wireless network 19 3 Configuring the General settings 20 3 1 Using the Network Map 20 3 1 1 Setting up the wireless security settings 21 3 1 2 Managing your network clients 22 3 2 Creating a Guest Network 23 3 3 AiProtection 25 3 3 1 Network Protection 26 3 3 2 Setting up Parental Controls 29 3 4 Using the Traffic Manager 31 3 4 1 Managing Q...

Page 4: ...4 3 WAN 52 4 3 1 Internet Connection 52 4 3 2 Port Trigger 55 4 3 3 Virtual Server Port Forwarding 57 4 3 4 DMZ 60 4 3 5 DDNS 61 4 3 6 NAT Passthrough 62 4 4 IPv6 63 4 5 Firewall 64 4 5 1 General 64 4 5 2 URL Filter 64 4 5 3 Keyword filter 65 4 5 4 Network Services Filter 66 4 6 Administration 68 4 6 1 Operation Mode 68 4 6 2 System 69 4 6 3 Firmware Upgrade 70 4 6 4 Restore Save Upload Setting 70...

Page 5: ...tents 4 7 System Log 71 5 Utilities 72 5 1 Device Discovery 72 5 2 Firmware Restoration 73 6 Troubleshooting 75 6 1 Basic Troubleshooting 75 6 2 Frequently Asked Questions FAQs 78 Appendices 87 Service and Support 95 ...

Page 6: ...aming and the ASUS Green Network Technology which provides up to 70 power saving solution 1 2 Package contents RT AX1800U Wireless Router Network cable RJ 45 Power adapter Quick Start Guide NOTES If any of the items are damaged or missing contact ASUS for technical inquiries and support Refer to the ASUS Support Hotline list at the back of this user manual Keep the original packaging material in c...

Page 7: ... network WAN 2 4GHz LED Off No 2 4GHz signal On Wireless system is ready Flashing Transmitting or receiving data via wireless connection 5GHz LED Off No 5GHz signal On Wireless system is ready Flashing Transmitting or receiving data via wireless connection USB 2 0 LED Off No power or no physical connection On Has physical connection to USB devices Reset button This button resets or restores the sy...

Page 8: ...rives into this port WAN Internet port Connect a network cable into this port to establish WAN connection LAN 1 3 ports Connect network cables into these ports to establish LAN connection NOTES Use only the adapter that came with your package Using other adapters may damage the device Specifications DC Power adapter DC Output 12V with max 1 5A current OperatingTemperature 0 40o C Storage 0 70o C O...

Page 9: ... the device away from metal obstructions and away from direct sunlight Keep the device away from 802 11g or 20MHz only Wi Fi devices 2 4GHz computer peripherals Bluetooth devices cordless phones transformers heavy duty motors fluorescent lights microwave ovens refrigerators and other industrial equipment to prevent signal interference or loss Always update to the latest firmware Visit the ASUS web...

Page 10: ...r to your computer to connect to the network With its dual band technology your wireless router supports 2 4GHz and 5GHz wireless signals simultaneously This allows you to do Internet related activities such as Internet surfing or reading writing e mail messages using the 2 4GHz band while simultaneously streaming high definition audio video files such as movies or music using the 5GHz band Some I...

Page 11: ...setup problems Before setting up your ASUS wireless router do the followings If you are replacing an existing router disconnect it from your network Disconnect the cables wires from your existing modem setup If your modem has a backup battery remove it as well Reboot your cable modem and computer recommended ...

Page 12: ...ess router via wired connection 1 Insert your wireless router s AC adapter to the DCIN port and plug it to a power outlet 2 Using the bundled network cable connect your computer to your wireless router s LAN port IMPORTANT Ensure that the LAN LED is blinking 3 Using another network cable connect your modem to your wireless router s WAN port 4 Insert your modem s AC adapter to the DCIN port and plu...

Page 13: ...ower outlet 2 Using the bundled network cable connect your modem to your wireless router s WAN port 3 Insert your modem s AC adapter to the DCIN port and plug it to a power outlet 4 Install an IEEE 802 11a b g n ac ax WLAN adapter on your computer NOTES For details on connecting to a wireless network refer to the WLAN adapter s user manual To set up the security settings for your network refer to ...

Page 14: ...ures may vary with different firmware versions To log into the web GUI 1 On your web browser enter http router asus com 2 On the login page key in the default user name admin and password admin 3 You can now use the Web GUI to configure various settings of your ASUS Wireless Router Navigation panel QIS Top command buttons Information banner Middle column Right column NOTE If you are logging into t...

Page 15: ...y NOTES By default the login username and password for your wireless router s Web GUI is admin For details on changing your wireless router s login username and password refer to section 4 6 2 System The wireless router s login username and password is different from the 2 4GHz 5GHz network name SSID and security key The wireless router s login username and password allows you to log into your wir...

Page 16: ... connection type is Dynamic IP PPPoE PPTP L2TP and Static IP Key in the necessary information for your ISP connection type IMPORTANT Obtain the necessary information from your ISP about the Internet connection type for Automatic IP DHCP for PPPoE PPTP and L2TP ...

Page 17: ...type takes place when you configure the wireless router for the first time or when your wireless router is reset to its default settings If QIS failed to detect your Internet connection type click Skip to manual setting and manually configure your connection settings ...

Page 18: ...me SSID and security key for your 2 4GHz and 5GHz wireless connection Click Apply when done 4 Your Internet and wireless settings are displayed Click Next to continue 5 Read the wireless network connection tutorial When done click Finish ...

Page 19: ...reless network that you want to connect to then click Connect 3 You may need to key in the network security key for a secured wireless network then click OK 4 Wait while your computer establishes connection to the wireless network successfully The connection status is displayed and the network icon displays the connected status NOTES Refer to the next chapters for more details on configuring your ...

Page 20: ...20 3 Configuring the General 3 Configuring the General settings settings 3 1 Using the Network Map Network Map allows you to configure your network s security settings and manage your network clients ...

Page 21: ...navigation panel go to General Network Map 2 On the Network Map screen and under System status you can configure the wireless security settings such as SSID security level and encryption settings NOTE You can set up different wireless security settings for 2 4GHz and 5GHz bands 2 4GHz security settings 5GHz security settings 3 On the Wireless name SSID field key in a unique name for your wireless ...

Page 22: ...ryption methods your data rate will drop to IEEE 802 11g 54Mbps connection 5 Key in your security passkey 6 Click Apply when done 3 1 2 Managing your network clients To manage your network clients 1 From the navigation panel go to General Network Map tab 2 On the Network Map screen select the Client Status icon to display your network client s information 3 To block a client s access to your netwo...

Page 23: ...tworks without providing access to your private network NOTE RT AX1800U supports up to six SSIDs three 2 4GHz and three 5GHz SSIDs To create a guest network 1 From the navigation panel go to General Guest Network 2 On the Guest Network screen select 2 4GHz or 5GHz frequency band for the guest network that you want to create 3 Click Enable ...

Page 24: ...twork screen 6 Assign a wireless name for your temporary network on the Network Name SSID field 7 Select an Authentication Method 8 Select an Encryption method 9 Specify the Access time or choose Limitless 10 Select Disable or Enable on the Access Intranet item 11 When done click Apply ...

Page 25: ...iProtection provides real time monitoring that detects malware spyware and unwanted access It also filters unwanted websites and apps and allows you to schedule a time that a connected device is able to access the Internet ...

Page 26: ...revents network exploits and secures your network from unwanted access Configuring Network Protection To configure Network Protection 1 From the navigation panel go to General AiProtection 2 From the AiProtection main page click on Network Protection ...

Page 27: ...gly 4 Optional From the Router Security Assessment page manually configure the items marked as No Weak or Very Weak To do this a Click an item NOTE When you click an item the utility forwards you to the item s setting page b From the item s security settings page configure and make the necessary changes and click Apply when done c Go back to the Router Security Assessment page and click Close to e...

Page 28: ...revention and Blocking This feature prevents infected devices from communicating personal information or infected status to external parties NOTE This function is automatically enabled if you run the Router Weakness Scan To enable Infected Device Prevention and Blocking 1 From the navigation panel go to General AiProtection 2 From the AiProtection main page click on Network Protection 3 From the I...

Page 29: ...lows you to control the Internet access time or set the time limit for a client s network usage To go to the Parental Controls main page 1 From the navigation panel go to General AiProtection 2 From the AiProtection main page click on the Parental Controls tab ...

Page 30: ...rental Controls Time Scheduling 2 From the EnableTime Scheduling pane click ON 3 From the Clients Name column select or key in the client s name from the drop down list box NOTE You may also key in the client s MAC address in the Client MAC Address column Ensure that the client name does not contain special characters or spaces as these may cause the router to function abnormally 4 Click to add th...

Page 31: ...on panel go to General Traffic Manager QoS tab 2 Click ON to enable QoS Fill in the upload and download bandwidth fields NOTE Get the bandwidth information from your ISP 3 Click Save NOTE The User Specify Rule List is for advanced settings If you want to prioritize specific network applications and network services select User defined QoS rules or User defined Priority from the drop down list on t...

Page 32: ...ups of two hexadecimal digits separated by colons in transmission order e g 12 34 56 aa bc ef For source or destination port range you can either a Enter a specific port such as 95 b Enter ports within a range such as 103 315 100 or 65535 The Transferred column contains information about the upstream and downstream traffic outgoing and incoming network traffic for one section In this column you ca...

Page 33: ... are available for specified network applications NOTES Low priority packets are disregarded to ensure the transmission of high priority packets Under Download Bandwidth table set Maximum Bandwidth Limit for multiple network applications in corresponding order The higher priority upstream packet will cause the higher priority downstream packet If there are no packets being sent from high priority ...

Page 34: ...nd speed of your Internet wired or wireless networks It allows you to monitor network traffic in real time or on a daily basis It also offers an option to display the network traffic within the last 24 hours NOTE Packets from the Internet are evenly transmitted to the wired and wireless devices ...

Page 35: ...35 4 Configuring the Advanced 4 Configuring the Advanced Settings Settings 4 1 Wireless 4 1 1 General The General tab allows you to configure the basic wireless settings ...

Page 36: ...s 4 In the Hide SSID field select Yes to prevent wireless devices from detecting your SSID When this function is enabled you would need to enter the SSID manually on the wireless device to access the wireless network 5 Select any of these wireless mode options to determine the types of wireless devices that can connect to your wireless router Auto Select Auto to allow 802 11AX 802 11AC 802 11n 802...

Page 37: ...ption provides strong security You can use either WPA with TKIP WPA2 with AES or WPA3 If you select this option you must use TKIP AES encryption and enter the WPA passphrase network key WPA WPA2 WPA3 Enterprise WPA Auto Enterprise This option provides very strong security It is with integrated EAP server or an external RADIUS back end authentication server NOTE Your wireless router supports the ma...

Page 38: ...panel go to Advanced Settings Wireless WPS tab 2 In the EnableWPS field move the slider to ON 3 WPS uses 2 4GHz by default If you want to change the frequency to 5GHz turn OFF the WPS function click Switch Frequency in the Current Frequency field and turn WPS ON again NOTE WPS supports authentication using Open System WPA Personal WPA2 Personal and WPA3 Personal WPS does not support a wireless net...

Page 39: ...ogo NOTE Check your wireless device or its user manual for the location of the WPS button c The wireless router will scan for any available WPS devices If the wireless router does not find any WPS devices it will switch to standby mode 6 To set up WPS using the Client s PIN code follow these steps a Locate the WPS PIN code on your wireless device s user manual or on the device itself b Key in the ...

Page 40: ...er to connect to another wireless access point exclusively preventing other wireless devices or stations to access your ASUS wireless router It can also be considered as a wireless repeater where your ASUS wireless router communicates with another access point and other wireless devices ...

Page 41: ...ces connected to the ASUS wireless router will only receive half the connection speed of the Access Point 4 In the Connect to APs in list field click Yes if you want to connect to an Access Point listed in the Remote AP List 5 In the Control Channel field select the operating channel for the wireless bridge Select Auto to allow the router to automatically select the channel with the least amount o...

Page 42: ...Settings Wireless Wireless MAC Filter tab 2 Tick Yes in the Enable Mac Filter field 3 In the MAC Filter Mode dropdown list select either Accept or Reject Select Accept to allow devices in the MAC filter list to access to the wireless network Select Reject to prevent devices in the MAC filter list to access to the wireless network 4 On the MAC filter list click the Add button and key in the MAC add...

Page 43: ...he wireless router s authentication mode is set to WPA Enterprise WPA2 Enterprise or WPA3 Enterprise NOTE Please refer to section 4 1 1 General section for configuring your wireless router s Authentication Mode 2 From the navigation panel go to Advanced Settings Wireless RADIUS Setting 3 Select the frequency band 4 In the Server IP Address field key in your RADIUS server s IP Address 5 In the Conn...

Page 44: ...commend that you use the default values on this page In the Professional Settings screen you can configure the followings Band Select the frequency band that the professional settings will be applied to Enable Radio Select Yes to enable wireless networking Select No to disable wireless networking ...

Page 45: ...nd click OK when done Set AP isolated The Set AP isolated item prevents wireless devices on your network from communicating with each other This feature is useful if many guests frequently join or leave your network Select Yes to enable this feature or select No to disable Multicast rate Mbps Select the multicast transmission rate or click Disable to switch off simultaneous single transmission ...

Page 46: ...val DTIM Delivery Traffic Indication Message Interval or Data Beacon Rate is the time interval before a signal is sent to a wireless device in sleep mode indicating that a data packet is awaiting delivery The default value is three milliseconds Beacon Interval Beacon Interval is the time between one DTIM and the next The default value is 100 milliseconds Lower the Beacon Interval value for an unst...

Page 47: ...P settings of your wireless router NOTE Any changes to the LAN IP address will be reflected on your DHCP settings To modify the LAN IP settings 1 From the navigation panel go to Advanced Settings LAN LAN IP tab 2 Modify the IP address and Subnet Mask 3 When done click Apply ...

Page 48: ...on your network To configure the DHCP server 1 From the navigation panel go to Advanced Settings LAN DHCP Server tab 2 In the Enable the DHCP Server field tick Yes 3 In the Domain Name text box enter a domain name for the wireless router 4 In the IP Pool Starting Address field key in the starting IP address 5 In the IP Pool Ending Address field key in the ending IP address ...

Page 49: ...n specifying an IP address range An IP Pool Starting Address should not be greater than the IP Pool Ending Address 7 In the DNS and Server Settings section key in your DNS Server and WINS Server IP address if needed 8 Your wireless router can also manually assign IP addresses to devices on the network On the Enable Manual Assignment field choose Yes to assign an IP address to specific MAC addresse...

Page 50: ...ault route settings unless you have advanced knowledge of routing tables To configure the LAN Routing table 1 From the navigation panel go to Advanced Settings LAN Route tab 2 On the Enable static routes field choose Yes 3 On the Static Route List enter the network information of other access points or nodes Click the Add or Delete button to add or remove a device on the list 4 Click Apply ...

Page 51: ...pports connection to IPTV services through an ISP or a LAN The IPTV tab provides the configuration settings needed to set up IPTV VoIP multicasting and UDP for your service Contact your ISP for specific information regarding your service ...

Page 52: ... 1 From the navigation panel go to Advanced Settings WAN Internet Connection tab 2 Configure the following settings below When done click Apply WAN ConnectionType Choose your Internet Service Provider type The choices are Automatic IP PPPoE PPTP L2TP or fixed IP Consult your ISP if the router is unable to obtain a valid IP address or if you are unsure the WAN connection type ...

Page 53: ...ata transfer Using UPnP a new network device is discovered automatically Once connected to the network devices can be remotely configured to support P2P applications interactive gaming video conferencing and web or proxy servers Unlike Port forwarding which involves manually configuring port settings UPnP automatically configures the router to accept incoming connections and direct requests to a s...

Page 54: ...ct to their service and reject any unrecognized device that attempt to connect To avoid connection issues due to an unregistered MAC address you can Contact your ISP and update the MAC address associated with your ISP service Clone or change the MAC address of the ASUS wireless router to match the MAC address of the previous networking device recognized by the ISP ...

Page 55: ... for the same application at a different time An application requires specific incoming ports that are different from the outgoing ports To set up PortTrigger 1 From the navigation panel go to Advanced Settings WAN PortTrigger tab 2 Configure the following settings below When done click Apply Enable PortTrigger Choose Yes to enable Port Trigger Well Known Applications Select popular games and web ...

Page 56: ...t Trigger is disabled the router drops the connection because it is unable to determine which PC is requesting for IRC access When Port Trigger is enabled the router assigns an incoming port to receive the inbound data This incoming port closes once a specific time period has elapsed because the router is unsure when the application has been terminated Port triggering only allows one client in the...

Page 57: ...provided by a PC in your network NOTE When port forwarding is enabled the ASUS router blocks unsolicited inbound traffic from the Internet and only allows replies from outbound requests from the LAN The network client does not have access to the Internet directly and vice versa To set up Port Forwarding 1 From the navigation panel go to Advanced Settings WAN Virtual Server Port Forwarding tab 2 Co...

Page 58: ...66 789 or Mix 1015 1024 3021 NOTES When your network s firewall is disabled and you set 80 as the HTTP server s port range for your WAN setup then your http server web server would be in conflict with the router s web user interface A network makes use of ports in order to exchange data with each port assigned a port number and a specific task For example port 80 is used for HTTP A specific port c...

Page 59: ... has been successful you should be able to access the files or applications Differences between port trigger and port forwarding Port triggering will work even without setting up a specific LAN IP address Unlike port forwarding which requires a static LAN IP address port triggering allows dynamic port forwarding using the router Predetermined port ranges are configured to accept incoming connectio...

Page 60: ...n or you want to host a domain web or e mail server CAUTION Opening all the ports on a client to the Internet makes the network vulnerable to outside attacks Please be aware of the security risks involved in using DMZ To set up DMZ 1 From the navigation panel go to Advanced Settings WAN DMZ tab 2 Configure the setting below When done click Apply IP address of Exposed Station Key in the client s LA...

Page 61: ...owing settings below When done click Apply Enable the DDNS Client Enable DDNS to access the ASUS router via the DNS name rather than WAN IP address Server and Host Name Choose ASUS DDNS or other DDNS If you want to use ASUS DDNS fill in the Host Name in the format of xxx asuscomm com xxx is your host name If you want to use a different DDNS service click FREETRIAL and register online first Fill in...

Page 62: ... by a yellow text The router may be on a network that uses multiple NAT tables 4 3 6 NAT Passthrough NAT Passthrough allows a Virtual Private Network VPN connection to pass through the router to the network clients PPTP Passthrough L2TP Passthrough IPsec Passthrough and RTSP Passthrough are enabled by default To enable disable the NAT Passthrough settings go to the Advanced Settings WAN NAT Passth...

Page 63: ... if your Internet service supports IPv6 To set up IPv6 1 From the navigation panel go to Advanced Settings IPv6 2 Select your ConnectionType The configuration options vary depending on your selected connection type 3 Enter your IPv6 LAN and DNS settings 4 Click Apply NOTE Please refer to your ISP regarding specific IPv6 information for your Internet service ...

Page 64: ...mance 4 You can also monitor packets exchanged between the LAN and WAN connection On the Logged packets type select Dropped Accepted or Both 5 Click Apply 4 5 2 URL Filter You can specify keywords or web addresses to prevent access to specific URLs NOTE The URL Filter is based on a DNS query If a network client has already accessed a website such as http www abcxxx com then the website will not be...

Page 65: ... 4 5 3 Keyword filter Keyword filter blocks access to webpages containing specified keywords To set up a keyword filter 1 From the navigation panel go to Advanced Settings Firewall Keyword Filter tab 2 On the Enable Keyword Filter field select Enabled 3 Enter a word or phrase and click the Add button ...

Page 66: ...res previously visited websites To resolve this issue clear the DNS cache before setting up the Keyword Filter Web pages compressed using HTTP compression cannot be filtered HTTPS pages also cannot be blocked using a keyword filter 4 5 4 Network Services Filter The Network Services Filter blocks LAN to WAN packet exchanges and restricts network clients from accessing specific web services such as ...

Page 67: ...s Filter field select Yes 3 Select the Filter table type Black List blocks the specified network services White List limits access to only the specified network services 4 Specify the day and time when the filters will be active 5 To specify a Network Service to filter enter the Source IP Destination IP Port Range and Protocol Click the button 6 Click Apply ...

Page 68: ...ration Mode tab 2 Select any of these operation modes Wireless router mode Default In wireless router mode the wireless router connects to the Internet and provides Internet access to available devices on its own local network Access Point AP mode In this mode the router creates a new wireless network on an existing network Repeater mode This mode turns the router into a wireless repeater to exten...

Page 69: ... Server The wireless router can access a NTP Network time Protocol server in order to synchronize the time EnableTelnet Click Yes to enable Telnet services on the network Click No to disable Telnet Authentication Method You can select HTTP HTTPS or both protocols to secure router access EnableWeb Access fromWAN Select Yes to allow devices outside the network to access the wireless router GUI setti...

Page 70: ... To recover or restore the system refer to section 5 2 Firmware Restoration 4 6 4 Restore Save Upload Setting To restore save upload wireless router settings 1 From the navigation panel go to Advanced Settings Administration Restore Save Upload Setting tab 2 Select the tasks that you want to do To restore to the default factory settings click Restore and click OK in the confirmation message To sav...

Page 71: ...log resets when the router is rebooted or powered off To view your system log 1 From the navigation panel go to Advanced Settings System Log 2 You can view your network activities in any of these tabs General Log Wireless Log DHCP leases IPv6 Routing Table Port Forwarding Connections ...

Page 72: ...elease Wireless Rescue zip The utilities are not supported on MAC OS 5 1 Device Discovery Device Discovery is an ASUS WLAN utility that detects an ASUS wireless router device and allows you to configure the wireless networking settings To launch the Device Discovery utility From your computer s desktop click Start All Programs ASUS Utility Wireless Router Device Discovery NOTE When you set the rou...

Page 73: ...outer that failed during its firmware upgrading process It uploads the firmware that you specify The process takes about three to four minutes IMPORTANT Launch the rescue mode on the router before using the Firmware Restoration utility NOTE This feature is not supported on MAC OS ...

Page 74: ...outer is in the rescue mode 3 Set a static IP on your computer and use the following to set up your TCP IP settings IP address 192 168 1 x Subnet mask 255 255 255 0 4 From your computer s desktop click Start All Programs ASUS Utility Wireless Router Firmware Restoration 5 Specify a firmware file then click Upload NOTE This is not a firmware upgrade utility and cannot be used on a working ASUS Wire...

Page 75: ...US Technical Support 6 1 BasicTroubleshooting If you are having problems with your router try these basic steps in this section before looking for further solutions Upgrade Firmware to the latest version 1 Launch the Web GUI Go to Advanced Settings Administration Firmware Upgrade tab Click Check to verify if the latest firmware is available 2 If the latest firmware is available visit the ASUS glob...

Page 76: ...for 2 minutes 7 Turn on computers Check if your Ethernet cables are plugged properly When the Ethernet cable connecting the router with the modem is plugged in properly the WAN LED will be on When the Ethernet cable connecting your powered on computer with the router is plugged in properly the corresponding LAN LED will be on Check if the wireless setting on your computer matches that of your rout...

Page 77: ...e wireless router s DHCP server to assign IP addresses to computers on your network Some cable modem service providers require you to use the MAC address of the computer initially registered on the account You can view the MAC address in the web GUI Network Map Clients page and hover the mouse pointer over your device in Client Status ...

Page 78: ...te the cookies and files in your web browser For Internet Explorer follow these steps 1 Launch Internet Explorer then click Tools Internet Options 2 In the General tab under Browsing history click Delete select Temporary Internet files and website files and Cookies and website data then click Delete NOTES The commands for deleting cookies and files vary with web browsers Disable proxy server setti...

Page 79: ... closer to the wireless client Try to adjust antennas of the router to the best direction as described in section 1 4 Positioning your router DHCP server has been disabled 1 Launch the web GUI Go to General Network Map Clients and search for the device that you want to connect to the router 2 If you cannot find the device in the Network Map go to Advanced Settings LAN DHCP Server Basic Config list...

Page 80: ...l Channel If you are using a wireless LAN adapter check if the wireless channel in use conforms to the channels available in your country area If not adjust the channel channel bandwidth and wireless mode If you still cannot connect to the router wirelessly you can reset your router to factory default settings In the router GUI click Administration Restore Initialize Save Upload and click Restore ...

Page 81: ...bleshooting The device has been blocked via the Parental Control function Go to General AiProtection Parental Control and see if the device is in the list If the device is listed under Client Name remove the device using the Delete button or adjust the Time Management Settings If there is still no Internet access try to reboot your computer and verify the network s IP address and gateway address C...

Page 82: ...unt and password are both admin How to restore the system to its default settings Go to Administration Restore Save Upload Setting and click Restore The following are the factory default settings User Name admin Password admin Enable DHCP Yes if WAN cable is plugged in IP address 192 168 50 1 Domain Name Blank Subnet Mask 255 255 255 0 DNS Server 1 router asus com DNS Server 2 Blank SSID 2 4GHz AS...

Page 83: ...your host computer and network clients A Disable the proxy server if enabled Windows 1 Click Start Internet Explorer to launch the browser 2 Click Tools Internet options Connections tab LAN settings 3 From the Local Area Network LAN Settings screen untick Use a proxy server for your LAN 4 Click OK when done ...

Page 84: ...P Proxy andWeb Proxy HTTP 3 Click Apply Now when done NOTE Refer to your browser s help feature for details on disabling the proxy server B Set theTCP IP settings to automatically obtain an IP address Windows 1 Click Start Control Panel Network and Sharing Center then click the network connection to display its status window ...

Page 85: ...Protocol Version 4 TCP IPv4 or Internet ProtocolVersion 6 TCP IPv6 then click Properties 4 To obtain the IPv4 IP settings automatically tick Obtain an IP address automatically To obtain the IPv6 IP settings automatically tick Obtain an IPv6 address automatically 5 Click OK when done ...

Page 86: ...ne NOTE Refer to your operating system s help and support feature for details on configuring your computer s TCP IP settings C Disable the dial up connection if enabled Windows 1 Click Start Internet Explorer to launch the browser 2 Click Tools Internet options Connections tab 3 Tick Never dial a connection 4 Click OK when done NOTE Refer to your browser s help feature for details on disabling the...

Page 87: ...im copies of this license document but changing it is not allowed Preamble The licenses for most software are designed to take away your freedom to share and change it By contrast the GNU General Public License is intended to guarantee your freedom to share and change free software to make sure the software is free for all its users This General Public License applies to most of the Free Software ...

Page 88: ... copyright the software and 2 offer you this license which gives you legal permission to copy distribute and or modify the software Also for each author s protection and ours we want to make certain that everyone understands that there is no warranty for this free software If the software is modified by someone else and passed on we want its recipients to know that what they have is not the origin...

Page 89: ... constitute a work based on the Program independent of having been made by running the Program Whether that is true depends on what the Program does 1 You may copy and distribute verbatim copies of the Program s source code as you receive it in any medium provided that you conspicuously and appropriately publish on each copy an appropriate copyright notice and disclaimer of warranty keep intact al...

Page 90: ...derived from the Program and can be reasonably considered independent and separate works in themselves then this License and its terms do not apply to those sections when you distribute them as separate works But when you distribute the same sections as part of a whole which is a work based on the Program the distribution of the whole must be on the terms of this License whose permissions for othe...

Page 91: ...rm of the work for making modifications to it For an executable work complete source code means all the source code for all modules it contains plus any associated interface definition files plus the scripts used to control compilation and installation of the executable However as a special exception the source code distributed need not include anything that is normally distributed in either sourc...

Page 92: ...y further restrictions on the recipients exercise of the rights granted herein You are not responsible for enforcing compliance by third parties to this License 7 If as a consequence of a court judgment or allegation of patent infringement or for any other reason not limited to patent issues conditions are imposed on you whether by court order agreement or otherwise that contradict the conditions ...

Page 93: ...lder who places the Program under this License may add an explicit geographical distribution limitation excluding those countries so that distribution is permitted only in or among countries not thus excluded In such case this License incorporates the limitation as if written in the body of this License 9 The Free Software Foundation may publish revised and or new versions of the General Public Li...

Page 94: ...TO THE IMPLIED WARRANTIES OF MERCHANTABILITY AND FITNESS FOR A PARTICULAR PURPOSE THE ENTIRE RISK AS TO THE QUALITY AND PERFORMANCE OF THE PROGRAM IS WITHYOU SHOULD THE PROGRAM PROVE DEFECTIVE YOU ASSUME THE COST OF ALL NECESSARY SERVICING REPAIR OR CORRECTION 12 IN NO EVENT UNLESS REQUIRED BY APPLICABLE LAW OR AGREED TO IN WRITING WILL ANY COPYRIGHT HOLDER OR ANY OTHER PARTY WHO MAY MODIFY AND OR...

Page 95: ...95 Service and Support Visit our multi language website at https www asus com support ...

Reviews: