


6-4
Chapter 6: RAID Configuration
6.2 Intel
®
Rapid Storage Technology enterprise SATA
Option ROM Utility
The Intel
®
Rapid Storage Technology enterprise SATA Option ROM utility allows you to
create RAID 0, RAID 1, RAID 10 (RAID 1+0), and RAID 5 set from Serial ATA hard disk
drives that are connected to the Serial ATA connectors supported by the Southbridge.
The navigation keys at the bottom of the screen allow you to move through the menus
and select the menu options.
The RAID BIOS setup screens shown in this section are for reference only and may not
exactly match the items on your screen.
To launch the Intel
®
Rapid Storage Technology enterprise SATA Option ROM utility:
1.
Turn on the system.
2.
During POST, press <Ctrl>+<I> to display the utility main menu.
Before you proceed, ensure that you have installed the Serial ATA hard disk drives, and
have set the correct SATA mode in the BIOS setup.
[ESC]-Exit
[ENTER]-Select Menu
[ ]-Select
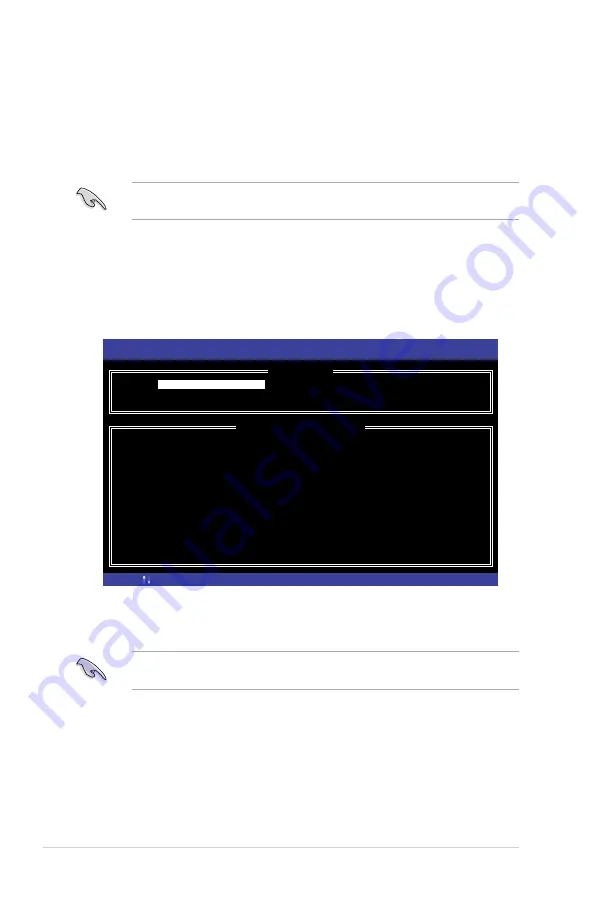
Intel(R) Rapid Storage Technology enterprise - SATA Option ROM - 3.6.0.1023
Copyright(C) 2003-12 Intel Corporation. All Rights Reserved.
[
MAIN MENU
]
[
DISK/VOLUME INFORMATION
]
RAID Volumes:
None defined.
Physical Disks:
ID Drive Model Serial # Size Type/Status(Vol ID)
0 ST3300656SS HWAS0000991753TR 279.3GB
Non-RAID Disk
1 ST3300656SS 37VN00009846RAJ1 279.3GB
Non-RAID Disk
2 ST3300656SS 397600009846UEDY 279.3GB
Non-RAID Disk
3 ST3300656SS GWC50000991756G6 279.3GB
Non-RAID Disk
3. Reset Disks to Non-RAID
4. Exit
1. Create RAID Volume
2. Delete RAID Volume
Summary of Contents for RS300-E10 Series
Page 1: ...1U Rackmount Server RS300 E10 PS4 RS300 E10 RS4 User Guide ...
Page 10: ...x ...
Page 55: ...3 5 ASUS RS300 E10 Series 3 2 Rail kit dimensions 589mm 43 6mm 900mm 43 6mm ...
Page 56: ...Chapter 3 Installation Options 3 6 ...
Page 58: ...Chapter 4 Motherboard Information 4 2 4 1 Motherboard layout ...
Page 80: ...Chapter 4 Motherboard Information 4 24 ...
Page 126: ...5 46 Chapter 5 BIOS Setup ...
Page 144: ...6 18 Chapter 6 RAID Configuration ...
Page 151: ...ASUS RS300 E10 Series 7 7 5 Follow the onscreen instructions to complete the installation ...
Page 152: ...7 8 Chapter 7 Driver Installation ...