background image

10

GR6

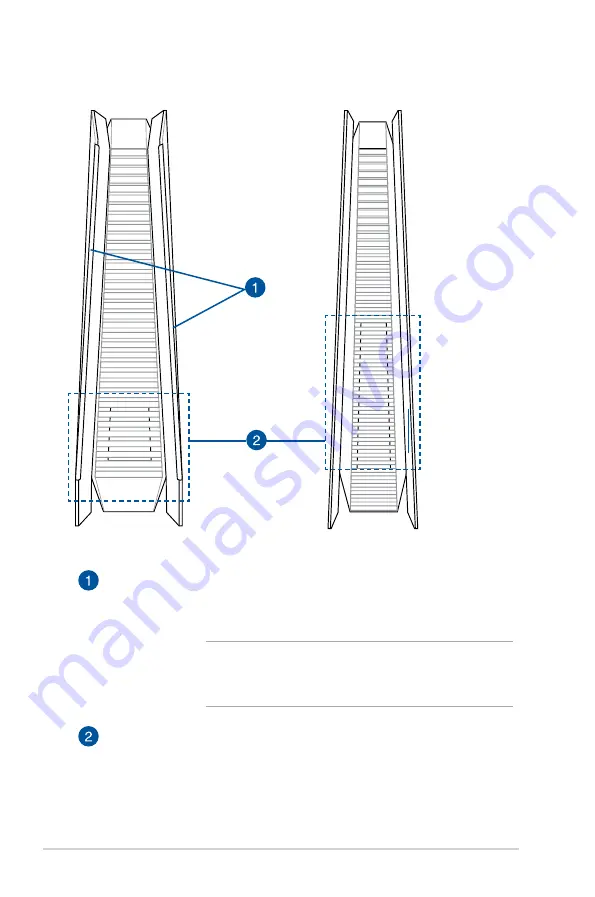
Bottom view

Air vents

The air vents allow cool air to enter your ROG GR6 chassis 

and expel hot air out.

IMPORTANT!

 For optimum heat dissipation and air 

ventilation, ensure that the air vents are free from 

obstructions.

Rubber feet

The rubber feet help prevent the ROG GR6 from slipping 

thus providing more stability when the ROG GR6 is in a 

stand-up position. 

Top view

Summary of Contents for ROG GR6

Page 1: ...ROG GR6 User Guide REPUBLIC OF GAMERS ...

Page 2: ...A COMMITMENT BY ASUS ASUS ASSUMES NO RESPONSIBILITY OR LIABILITY FOR ANY ERRORS OR INACCURACIES THAT MAY APPEAR IN THIS MANUAL INCLUDING THE PRODUCTS AND SOFTWARE DESCRIBED IN IT Copyright 2016 ASUSTeK COMPUTER INC All Rights Reserved LIMITATION OF LIABILITY Circumstances may arise where because of a default on ASUS part or other liability you are entitled to recover damages from ASUS In each such...

Page 3: ...ting started 16 Positioning your ROG GR6 16 Connecting the AC power adapter 17 Connecting a display panel 19 Connecting the keyboard or mouse 20 Turning on your ROG GR6 21 Using the Steam Big Picture Launcher 22 Recovering your system 23 Resetting your PC 23 Removing everything and reinstalling Windows 25 Turning off your ROG GR6 26 Putting your ROG GR6 to sleep 26 Entering the BIOS Setup 26 Quick...

Page 4: ... Upgrading your ROG GR6 Upgrading memory modules 30 Installing a 2 5 inch storage drive 35 Appendix Safety information 42 Setting up your system 42 Care during use 43 Regulatory notices 44 ASUS contact information 50 ...

Page 5: ...OG GR6 Appendix This section includes notices and safety statements of your ROG GR6 Conventions used in this manual To highlight key information in this manual some texts are presented as follows IMPORTANT This message contains vital information that must be followed to complete a task NOTE This message contains additional information and tips that can help complete tasks WARNING This message cont...

Page 6: ...ANT Bring the warranty card to the ASUS Service Center for replacement of the defective components if the device or its components fail or malfunction during normal and proper use within the warranty period Your ROG GR6 package contains the following items ROG GR6 Power cable Technical documentations AC power adapter set of screws ...

Page 7: ...1 Getting to know your ROG GR6 ...

Page 8: ...8 GR6 Features Front panel ...

Page 9: ... headphones Microphone The built in microphone can be used for video conferencing voice narrations or simple audio recording USB 2 0 port with USB charger feature The USB Universal Serial Bus port is compatible with USB 2 0 or USB 1 1 devices such as keyboards pointing devices flash disk drives external HDDs speakers cameras and printers The USB 2 0 port with the icon comes with a USB Charger feat...

Page 10: ...sis and expel hot air out IMPORTANT For optimum heat dissipation and air ventilation ensure that the air vents are free from obstructions Rubber feet The rubber feet help prevent the ROG GR6 from slipping thus providing more stability when the ROG GR6 is in a stand up position Top view ...

Page 11: ...rnal storage drives Audio Input Jack This 1 8 inch stereo input jack can be used to connect a stereo audio source to the ROG GR6 This feature is used mainly to add audio to multimedia applications Audio Output Jack This stereo audio jack is used to connect the system s audio out signal to amplified speakers ...

Page 12: ...o an amplifier or your TV HDMI port This port is for the HDMI High Definition Multimedia Interface connector and is HDCP compliant for HD DVD Blu ray and other protected content playback DisplayPort port Use this port to connect your ROG GR6 to a DisplayPort external display LAN port The 8 pin RJ 45 LAN port supports a standard Ethernet cable for connection to a local network USB 3 0 port The USB ...

Page 13: ...nt damage to the PC always use the bundled power adapter WARNING The power adapter may become warm to hot when in use Do not cover the adapter and keep it away from your body Cover lock latch Kensington security slot The cover lock latch fastens the side cover on your ROG GR6 The Kensington security slot allows you to secure your ROG GR6 using Kensington security products ...

Page 14: ......

Page 15: ...2 Using your ROG GR6 ...

Page 16: ... GR6 can be positioned standing up or lying down When positioning your ROG GR6 ensure that the rubber studs or the rubber feet are in contact with the flat and stable surface of your table or desk Standing up Lying down Location of rubber studs rubber feet ...

Page 17: ...pter to your ROG GR6 A Connect the AC power cord to the AC DC adapter B Plug the AC power cord into a 100V 240V power source C Connect the DC power connector into your ROG GR6 s power DC input port NOTE The power adapter may vary in appearance depending on your region ...

Page 18: ...power adapter and cable that came with your ROG GR6 Use a grounded wall socket while using your ROG GR6 The socket outlet must be easily accessible and near your ROG GR6 To disconnect your ROG GR6 from its main power supply unplug your ROG GR6 from the power socket ...

Page 19: ...ojector to your ROG GR6 that has the following connectors HDMI connector DisplayPort connector To connect a display panel to your ROG GR6 Connect a display cable either to the HDMI or DisplayPort port Connecting display via HDMI port Connecting display via DisplayPort port ...

Page 20: ...rd and mouse to your ROG GR6 You can also connect a USB dongle for a wireless keyboard and mouse set To connect a keyboard and mouse to your ROG GR6 Connect the USB cable from your keyboard and mouse to any of the USB 2 0 3 0 ports of your ROG GR6 Connecting a USB keyboard or mouse ...

Page 21: ...GR6 21 Turning on your ROG GR6 Press the power button to turn on your ROG GR6 ...

Page 22: ...cher to access Steam Big Picture mode Power off state Sleep state Hibernate state Windows operating system NOTE While using the Steam Big Picture Launcher the Steam software may automatically update to ensure the best user experience Once the update is complete this function will return to normal For models without bundled operating system please install the Steam utility from the support DVD to e...

Page 23: ... to its factory default settings IMPORTANT Back up all your data before using this option To reset your PC 1 Press F9 during bootup IMPORTANT To go through POST follow any of the ways described in the Quickly enter the BIOS section 2 From the screen click Troubleshoot 3 Select Reset your PC 4 Click Next 5 Select Only the drive where the Windows is installed 6 Select Just remove my files 7 Click Re...

Page 24: ...e you proceed ensure that you back up all your important data To create a USB recovery drive 1 Launch the Control Panel from the All Apps screen 2 From the Control Panel s System and Security click Action Center 3 Click Recovery Create a recovery drive 4 Click Next 5 SelecttheUSBstoragedevicewhereyouwanttocopytherecovery files 6 Click Next 7 Click Create Wait for the process to complete 8 When don...

Page 25: ...ing your ROG GR6 to its original factory settings can be done using the Remove everything and reinstall option in PC Settings Refer to the steps below to use this option IMPORTANT Back up all your data before using this option NOTE This process may take a while to complete To get started go to Settings Update security Reset this PC Get started and choose an option ...

Page 26: ...em hardware settings that are needed for system startup in the ROG GR6 In normal circumstances the default BIOS settings apply to most conditions to ensure optimal performance Do not change the default BIOS settings except in the following circumstances An error message appears on the screen during the system bootup and requests you to run the BIOS Setup You have installed a new system component t...

Page 27: ... turn your ROG GR6 back on and then press F2 or Del during POST When your ROG GR6 is off press the power button to turn on your ROG GR6 Press F2 or Del during POST NOTE POST Power On Self Test is a series of software controlled diagnostic tests that run when you turn on your PC ...

Page 28: ...28 GR6 ...

Page 29: ...3 Upgrading your ROG GR6 ...

Page 30: ... 204 pin SO DIMM to the ROG GR6 s DIMM slots NOTE Refer to http www asus com for the list of compatible DIMMs To install or upgrade the memory modules 1 Turn off your ROG GR6 2 Disconnect all cables and peripherals 3 Place the ROG GR6 on its side on a stable and flat surface 4 Move down the latch at the rear panel to unlock the side cover NOTE Before you remove the side cover ensure that the UNLOC...

Page 31: ...GR6 31 5 Slide the side cover towards the rear to detach it from the chassis and then gently lift to remove it from the chassis 6 Pry open the SO DIMM slot cover ...

Page 32: ...ips on each side to release the memory module B Carefully remove the memory module C Repeat steps A and B to remove the other memory module NOTE Use the same model and speed when replacing memory modules Remove the upper memory module first if you wish to replace the lower memory module ...

Page 33: ...Always install on the lower slot first when installing one or two modules To install a new memory module Align and insert the memory module into the slot A and then press it down B until it is securely seated in place 10 Replace the SO DIMM slot cover Ensure that it is fitted firmly back into its place ...

Page 34: ...34 GR6 11 Replace the side cover and then slide it towards the front of ROG GR6 to re attach 12 Press the latch upward to securely fasten the side cover to the chassis ...

Page 35: ... capacity To install a 2 5 inch HDD or SSD 1 Turn off your ROG GR6 2 Disconnect all cables and peripherals 3 Place the ROG GR6 on its side on a stable and flat surface 4 Press down the latch at the rear panel to unlock the side cover NOTE Before you remove the side cover ensure that the UNLOCK label on the latch is visible ...

Page 36: ... secure the 2 5 inch HDD SSD extension bay 7 Using the flap pull the extension bay to remove it from the chassis flap 5 Slide the side cover towards the rear to detach it from the chassis and then gently lift to remove it from the chassis ...

Page 37: ...lace the 2 5 inch HDD SSD into the extension bay as shown Ensure that screw holes on the 2 5 inch HDD SSD match the screw holes on the extension bay 2 5 inch HDD SSD 2 5 inch extension bay HDD SSD screw holes extension bay screw holes 10 Secure the 2 5 inch HDD SSD to the extension bay with the bundled set of screws ...

Page 38: ...ay with four screws 2 5 inch HDD SSD and extension bay assembly Drive bay SATA connector HDD SSD SATA connector 11 Carefully place the 2 5 inch HDD SSD and extension bay assembly into the drive bay and then slide it towards the SATA connector ...

Page 39: ...GR6 39 13 Replace the side cover and then slide it towards the front of ROG GR6 to re attach 14 Move the latch upward to securely fasten the side cover to the chassis ...

Page 40: ...40 GR6 ...

Page 41: ...Appendix ...

Page 42: ...tem Do not use this product near water or a heated source Set up the system on a stable surface Openings on the chassis are for ventilation Do not block or cover these openings Make sure you leave plenty of space around the system for ventilation Never insert objects of any kind into the ventilation openings Use this product in environments with ambient temperatures between 0 C and 35 C If you use...

Page 43: ...on cell battery should not be placed in municipal waste Check local technical support services for product recycling Care during use Do not walk on the power cord or allow anything to rest on it Do not spill water or any other liquids on your system When the system is turned off a small amount of electrical current still flows Always unplug the power cord from the power outlets before cleaning the...

Page 44: ...d to insulate the device except on the areas where the I O ports are located Federal Communications Commission Statement This device complies with Part 15 of the FCC Rules Operation is subject to the following two conditions This device may not cause harmful interference and This device must accept any interference received including interference that may cause undesired operation This equipment h...

Page 45: ...ons and the antenna s used for this transmitter must be installed to provide a separation distance of at least 20 cm from all persons and must not be co located or operating in conjunction with any other antenna or transmitter End users and installers must be provide with antenna installation instructions and transmitter operating conditions for satisfying RF exposure compliance Declaration of Con...

Page 46: ...5 2483 5 MHz band Use outdoors on public property is not permitted In the departments listed below for the entire 2 4 GHz band Maximum authorized power indoors is 100mW Maximum authorized power outdoors is 10mW Departments in which the use of the 2400 2483 5 MHz band is permitted with an EIRP of less than 100mW indoors and less than 10mW outdoors 01 Ain 02 Aisne 03 Allier 05 Hautes Alpes 08 Ardenn...

Page 47: ...artment of Communications This class B digital apparatus complies with Canadian ICES 003 IC Radiation Exposure Statement for Canada This equipment complies with IC radiation exposure limits set forth for an uncontrolled environment To maintain compliance with IC RF exposure compliance requirements please avoid direct contact to the transmitting antenna during transmitting End users must follow the...

Page 48: ... CE marking for devices with wireless LAN Bluetooth This equipment complies with the requirements of Directive 1999 5 EC of the European Parliament and Commission from 9 March 1999 governing Radio and Telecommunications Equipment and mutual recognition of conformity Wireless Operation Channel for Different Domains N America 2 412 2 462 GHz Ch01 through CH11 Japan 2 412 2 484 GHz Ch01 through Ch14 ...

Page 49: ...d the power management feature is enabled by default The monitor and computer are automatically set to sleep after 10 and 30 minutes of user inactivity To wake your computer click the mouse or press any key on the keyboard Please visit http www energystar gov powermanagement for detail information on power management and its benefits to the environment In addition please visit http www energystar ...

Page 50: ...Fax 86 21 5866 8722 ext 9101 Online support http qr asus com techserv ASUS COMPUTER INTERNATIONAL America Address 800 Corporate Way Fremont CA 94539 USA Telephone 1 510 739 3777 Fax 1 510 608 4555 Web site http www asus com us Technical Support Support fax 1 812 284 0883 Telephone 1 812 282 2787 Online support http qr asus com techserv ASUS COMPUTER GmbH Germany and Austria Address Harkort Str 21 ...

Page 51: ...04 EN 301 908 2 V6 2 1 2013 10 EN 301 908 13 V6 2 1 2014 02 EN 301 893 V1 7 1 2012 06 EN 300 330 2 V1 5 1 2010 02 EN 50360 2001 A1 2012 EN 62479 2010 EN 62311 2008 EN 301 489 1 V1 9 2 2011 09 EN 301 489 3 V1 6 1 2013 12 EN 301 489 4 V2 1 1 2013 12 EN 301 489 7 V1 3 1 2005 11 EN 301 489 9 V1 4 1 2007 11 EN 301 489 17 V2 2 1 2012 09 EN 301 489 24 V1 5 1 2010 09 EN 301 357 2 V1 4 1 2008 11 EN 302 291...

Page 52: ... specifications FCC Part 15 Subpart B Unintentional Radiators Supplementary Information This device complies with part 15 of the FCC Rules Operation is subject to the following two conditions 1 This device may not cause harmful interference and 2 this device must accept any interference received including interference that may cause undesired operation Representative Person s Name Steve Chang Pres...

Reviews: