background image

1-2

Chapter 1: Product introduction

1.2 

Motherboard overview

1.2.1 

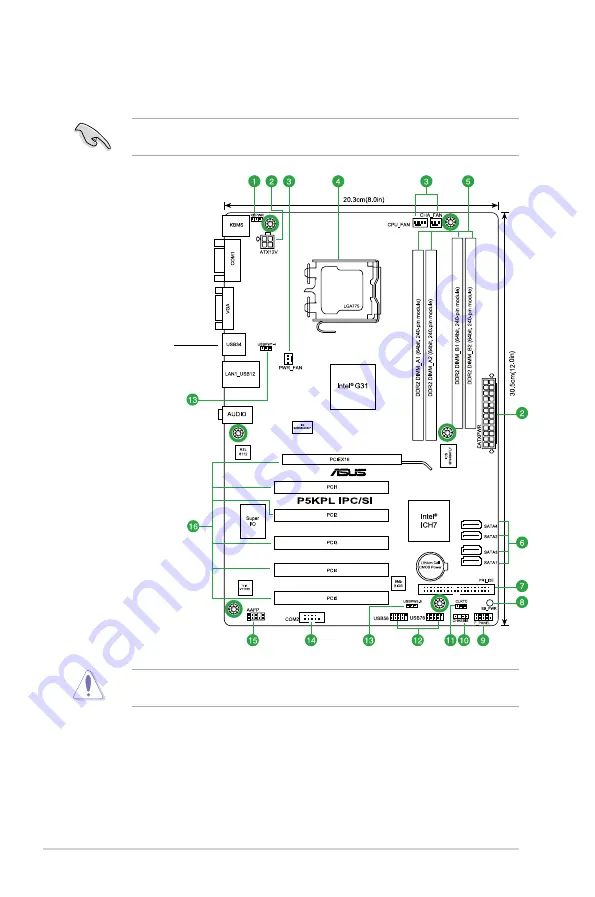
Motherboard layout

Place six screws into the holes indicated by circles to secure the motherboard to the 

chassis. DO NOT overtighten the screws! Doing so can damage the motherboard.

Ensure that you install the motherboard into the chassis in the correct orientation. The edge 

with external ports goes to the rear part of the chassis.

Place this side towards 

the rear of the chassis.

Summary of Contents for P5KPL IPC SI

Page 1: ...Motherboard P5KPL IPC SI ...

Page 2: ...RCHANTABILITY OR FITNESS FOR A PARTICULAR PURPOSE IN NO EVENT SHALL ASUS ITS DIRECTORS OFFICERS EMPLOYEES OR AGENTS BE LIABLE FOR ANY INDIRECT SPECIAL INCIDENTAL OR CONSEQUENTIAL DAMAGES INCLUDING DAMAGES FOR LOSS OF PROFITS LOSS OF BUSINESS LOSS OF USE OR DATA INTERRUPTION OF BUSINESS AND THE LIKE EVEN IF ASUS HAS BEEN ADVISED OF THE POSSIBILITY OF SUCH DAMAGES ARISING FROM ANY DEFECT OR ERROR IN...

Page 3: ...1 Installing an expansion card 1 8 1 5 2 Configuring an expansion card 1 8 1 5 3 PCI slots 1 8 1 5 4 PCI Express x16 slot 1 8 1 6 Jumpers 1 9 1 7 Connectors 1 11 1 7 1 Rear panel connectors 1 11 1 7 2 Internal connectors 1 12 1 8 Software support 1 17 1 8 1 Installing an operating system 1 17 1 8 2 Support CD information 1 17 Chapter 2 BIOS information 2 1 Managing and updating your BIOS 2 1 2 1 1...

Page 4: ... 2 4 4 Onboard Devices Configuration 2 9 2 4 5 PCI PnP 2 9 2 5 Power menu 2 10 2 5 1 Suspend Mode 2 10 2 5 2 ACPI 2 0 Support 2 10 2 5 3 ACPI APIC Support 2 10 2 5 4 APM Configuration 2 11 2 5 5 Hardware Monitor 2 11 2 6 Boot menu 2 12 2 6 1 Boot Device Priority 2 12 2 6 2 Boot Settings Configuration 2 12 2 6 3 Security 2 13 2 7 Tools menu 2 14 2 7 1 ASUS EZ Flash 2 2 14 2 7 2 AI NET 2 2 14 2 8 Ex...

Page 5: ... from that to which the receiver is connected Consult the dealer or an experienced radio TV technician for help Canadian Department of Communications Statement This digital apparatus does not exceed the Class B limits for radio noise emissions from digital apparatus set out in the Radio Interference Regulations of the Canadian Department of Communications This class B digital apparatus complies wi...

Page 6: ...er Operation safety Before installing the motherboard and adding devices on it carefully read all the manuals that came with the package Before using the product make sure all cables are correctly connected and the power cables are not damaged If you detect any damage contact your dealer immediately To avoid short circuits keep paper clips screws and staples away from connectors slots sockets and ...

Page 7: ...e note of the following symbols used throughout this manual DANGER WARNING Information to prevent injury to yourself when trying to complete a task CAUTION Information to prevent damage to the components when trying to complete a task NOTE Tips and additional information to help you complete a task IMPORTANT Instructions that you MUST follow to complete a task Typography Bold text Indicates a menu...

Page 8: ...uffered non ECC 800 667 MHz DDR2 memory modules Supports up to 4GB system memory Refer to www asus com or this user manual for the Memory QVL Qualified Vendors Lists When you install a total memory of 4GB capacity or more Windows 32 bit operating system may only recognize less than 3GB We recommend a maximum of 3GB system memory if you are using a Windows 32 bit operating system Expansion slots 1 ...

Page 9: ...udio connector 1 x IDE connector 4 x SATA connectors 1 x System panel connector 1 x CPU fan connector 1 x Chassis fan connector 1 x Power fan connector 1 x Chassis intrusion connector 1 x COM connector 1 x 24 pin EATX power connector 1 x 4 pin ATX 12V power connector BIOS features 8Mb Flash ROM AMI BIOS PnP DMI v2 0 WfM 2 0 ACPI v2 0a SM BIOS v2 5 Support CD Contents Drivers ASUS PC Probe II ASUS ...

Page 10: ...tistatic pad or in the bag that came with the component Before you install or remove any component ensure that the ATX power supply is switched off or the power cord is detached from the power supply Failure to do so may cause severe damage to the motherboard peripherals or components Onboard LED The motherboard comes with a standby power LED that lights up to indicate that the system is ON in sle...

Page 11: ...icated by circles to secure the motherboard to the chassis DO NOT overtighten the screws Doing so can damage the motherboard Ensure that you install the motherboard into the chassis in the correct orientation The edge with external ports goes to the rear part of the chassis Place this side towards the rear of the chassis ...

Page 12: ...rect CPU installation removal or misplacement loss incorrect removal of the PnP cap The motherboard supports Intel LGA775 processors with the Intel Enhanced Intel SpeedStep Technology EIST and Hyper Threading Technology 1 2 2 Layout contents Connectors Jumpers Slots LED Page Connectors Jumpers Slots LED Page 1 Keyboard power 3 pin KBPWR 1 10 9 System panel connector 10 1 pin F_PANEL 1 16 2 ATX pow...

Page 13: ... configuration you may install two double sided DIMMs OR install four single sided DIMMs Due to the memory address limitation on 32 bit Windows OS when you install 4GB or more memory on the motherboard the actual usable memory for the OS can be about 3GB or less For effective use of memory we recommend that you do any of the following Use a maximum of 3GB system memory if you are using a 32 bit Wi...

Page 14: ...ron 512MB PSC AL6E8E63J 6E1 SS 5 A3R12E3JFF717B9A00 PSC 1024MB PSC AL7E8F73C 6E1 SS 5 A3R1GE3CFF734MAA0J PSC 1024MB PSC AL6E8E63J 6E1 DS 5 A3R12E3JFF717B9A01 PSC 2048MB PSC AL8E8F73C 6E1 DS 5 A3R1GE3CFF733MAA00 PSC 1024MB Super Talent T667UB1GV DS 5 PG 64M8 800 0750 Super Talent 1024MB Transcend JM667QLU 1G SS 5 TQ243PCF8T0838 Transced 1024MB Transcend JM667QLJ 1G DS 5 E5108AJBG 6E E Elpida 2048MB...

Page 15: ...2GB6400DC DS 5 Heat Sink Package GEIL 1024MB GEIL GX22GB6400UDC DS 4 Heat Sink Package GEIL 2048MB GEIL GB24GB6400C4DC DS 4 GL2L128M88BA25AB GEIL 2048MB GEIL GB24GB6400C5DC DS 5 GL2L128M88BA25AB GEIL 2048MB GEIL GB28GB6400C4QC DS 4 GL2L128M88BA25AB GEIL 2048MB GEIL GB28GB6400C5QC DS 5 GL2L128M88BA25AB GEIL 2048MB GEIL GE24GB800C4DC DS 4 Heat Sink Package GEIL 2048MB GEIL GE24GB800C5DC DS 5 Heat Si...

Page 16: ...NT SLZ2128M8 JGE DS N A DDRII1208 GE 8115 ASINT 1024MB Century 28V0H8 DS 5 HY5PS12821CFP S5 Hynix 1024MB Elixir M2Y1G64TU88D5B AC 0828 GS SS N A N2TU16800E AC Elixir 1024MB ELIXIR M2Y1G64TU8HB0B 25C DS 5 N2TU 51280BE 25C802006Z1DV ELIXIR 2048MB Elixir M2Y2G64TU8HD5B AC 0826 SG DS N A N2TUG80DE AC Elixir 1024MB Kingtiger 1GB DIMM PC2 6400 DS N A HY5PS12821C FP S5 Hynix 2048MB Kingtiger 2GB DIMM PC2...

Page 17: ...s firmly until the card is completely seated on the slot 5 Secure the card to the chassis with the screw you removed earlier 6 Replace the system cover 1 5 2 Configuring an expansion card After installing the expansion card configure it by adjusting the software settings 1 Turn on the system and change the necessary BIOS settings if any See Chapter 2 for information on BIOS setup 2 Assign an IRQ t...

Page 18: ...he jumper cap from pins 1 2 default to pins 2 3 Keep the cap on pins 2 3 for about 5 10 seconds then move the cap back to pins 1 2 3 Plug the power cord and turn ON the computer 4 Hold down the Del key during the boot process and enter BIOS setup to re enter data 1 6 Jumpers 1 Clear RTC RAM 3 pin CLRTC This jumper allows you to clear the Real Time Clock RTC RAM in CMOS You can clear the CMOS memor...

Page 19: ...e up from S3 and S4 sleep modes no power to CPU DRAM in slow refresh power supply in reduced power mode 2 Keyboard power 3 pin KBPWR This jumper allows you to enable or disable the keyboard wake up feature When you set this jumper to pins 2 3 5VSB you can wake up the computer by pressing a key on the keyboard the default is the Space Bar This feature requires an ATX power supply that can supply at...

Page 20: ...port pink This port connects a microphone Refer to the audio configuration table below for the function of the audio ports in 2 4 or 6 channel configuration Audio 2 4 or 6 channel configuration Port Headset 2 channel 4 channel 6 channel Light Blue Line In Rear Speaker Out Rear Speaker Out Lime Line Out Front Speaker Out Front Speaker Out Pink Mic In Mic In Bass Center LAN port SPEED LED ACT LINK L...

Page 21: ...eature DO NOT forget to connect the fan cables to the fan connectors Insufficient air flow inside the system may damage the motherboard components These are not jumpers DO NOT place jumper caps on the fan connectors 2 USB connectors 10 1 pin USB56 USB78 These connectors are for USB 2 0 ports Connect the USB module cable to any of these connectors then install the module to a slot opening at the ba...

Page 22: ...ect Master Black Slave Gray Master Master Black or gray Slave Slave Pin 20 on the IDE connector is removed to match the covered hole on the Ultra DMA cable connector This prevents incorrect insertion when you connect the IDE cable Use the 80 conductor IDE cable for Ultra DMA 100 66 33 IDE devices If any device jumper is set as Cable Select ensure that all other device jumpers have the same setting...

Page 23: ...you use a PSU with a higher power output when configuring a system with more power consuming devices or when you intend to install additional devices The system may become unstable or may not boot up if the power is inadequate 6 Chassis intrusion connector 4 1 pin CHASSIS This connector is for a chassis mounted intrusion detection sensor or switch Connect one end of the chassis intrusion sensor or...

Page 24: ...audio standard Connect one end of the front panel audio I O module cable to this connector We recommend that you connect a high definition front panel audio module to this connector to avail of the motherboard s high definition audio capability If you want to connect a high definition front panel audio module to this connector set the Front Panel Support Type item in the BIOS setup to HD Audio If ...

Page 25: ... pin connector is for the HDD Activity LED Connect the HDD Activity LED cable to this connector The IDE LED lights up or flashes when data is read from or written to the HDD ATX power button soft off button 2 pin PWRBTN This connector is for the system power button Pressing the power button turns the system on or puts the system in sleep or soft off mode depending on the BIOS settings Pressing the...

Page 26: ...information The Support CD that comes with the motherboard package contains the drivers software applications and utilities that you can install to avail all motherboard features If Autorun is NOT enabled in your computer browse the contents of the Support CD to locate the file ASSETUP EXE from the BIN folder Double click the ASSETUP EXE to run the CD Click an item to install Click an icon to disp...

Page 27: ... list select any of the updating process Updating from the Internet a Select Update BIOS from the Internet then click Next b Select the ASUS FTP site nearest you to avoid network traffic or click Auto Select then click Next c From the FTP site select the BIOS version that you wish to download then click Next 2 1 1 ASUS Update utility The ASUS Update is a utility that allows you to manage save and ...

Page 28: ...h between drives until the correct BIOS file is found 2 When the correct BIOS file is found EZ Flash 2 performs the BIOS update process and automatically reboots the system when done The ASUS Update utility is capable of updating itself through the Internet Always update the utility to avail all its features Updating from a BIOS file a Select Update BIOS from a file then click Next b Locate the BI...

Page 29: ...ive or USB port 3 The utility displays the following message and automatically checks the support CD or USB flash disk for the BIOS file When found the utility reads the BIOS file and starts erasing the corrupted BIOS file Bad BIOS checksum Starting BIOS recovery Checking for USB Device USB Device found Reading file P5KPLIPC ROM Completed Start Erasing Only a USB flash disk wit h FAT 32 16 format ...

Page 30: ...mes unstable after changing any BIOS settings load the default settings to ensure system compatibility and stability Select the Load Setups Default item under the Exit Menu See section 2 8 Exit Menu The BIOS setup screens shown in this section are for reference purposes only and may not exactly match what you see on your screen Visit the ASUS website at www asus com to download the latest BIOS fil...

Page 31: ...vice is either a ZIP LS 120 or MO drive Configuration options Not Installed Auto CDROM ARMD This item does not appear when you select the SATA 1 2 3 4 devices LBA Large Mode Auto Enables or disables the LBA mode Setting to Auto enables the LBA mode if the device supports this mode and if the device was not previously formatted with LBA mode disabled Configuration options Disabled Auto Block Multi ...

Page 32: ...onfiguration options Disabled Compatible Enhanced Enhanced Mode Support On S ATA Set Serial ATA Parallel ATA or both as native mode Configuration options S ATA S ATA P ATA P ATA IDE Detect Time Out Sec 35 Selects the time out value for detecting ATA ATAPI devices Configuration options 0 5 10 15 20 25 30 35 2 3 5 System Information This menu gives you an overview of the general system specification...

Page 33: ... only appear when a USB storage device is plugged USB Mass Storage Device Configuration USB Mass Storage Reset Delay 20 Sec Allows you to set the maximum time that the BIOS waits for the USB storage device to initialize Configuration options 10 Sec 20 Sec 30 Sec 40 Sec Emulation Type Auto Allows you to select the emulation type Configuration options Auto Floppy Forced FDD Hard Disk CDROM 2 4 2 CPU...

Page 34: ...u do not want to use the EIST Configuration options Enabled Disabled 2 4 3 Chipset The Chipset menu allows you to change the advanced chipset settings Select an item then press Enter to display the submenu North Bridge Configuration Memory Remap Feature Enabled Allows you to enabled or disable the remapping of the overlapped PCI memory above the total physical memory Enable this option only when y...

Page 35: ...ices Configuration Onboard LAN Enabled Allows you to enable or disable the onboard LAN controller Configuration options Enabled Disabled OnBoard LAN Boot ROM Disabled Allows you to enable or disable the boot ROM in the onboard LAN controller This item appears only when the Onboard LAN item is set to Enabled Configuration options Disabled Enabled Serial Port1 Address 3F8 IRQ4 Allows you to select t...

Page 36: ...ic IRQ is free for use of PCI PnP devices When set to Reserved the IRQ is reserved for legacy ISA devices Configuration options PCI Device Reserved Suspend Mode Auto ACPI 2 0 Support Disabled ACPI APIC Support Enabled APM Configuration Hardware Monitor BIOS SETUP UTILITY Main Advanced Power Boot Tools Exit Select the ACPI state used for System Suspend 2 5 Power menu The Power menu items allow you ...

Page 37: ...tems RTC Alarm Date RTC Alarm Hour RTC Alarm Minute and RTC Alarm Second appear with set values Configuration options Disabled Enabled Power On By PS 2 Keyboard Disabled Allows you to use specific keys on the keyboard to turn on the system This feature requires an ATX power supply that provides at least 1A on the 5VSB lead Configuration options Disabled Space Bar Ctrl Esc Power Key Any Key Power O...

Page 38: ...g to decrease the time needed to boot the system When set to Disabled BIOS performs all the POST items Configuration options Disabled Enabled Full Screen Logo Enabled This allows you to enable or disable the full screen logo display feature Configuration options Disabled Enabled Boot Settings Boot Device Priority Boot Settings Configuration Security Specifies the Boot Device Priority sequence A vi...

Page 39: ...d appears If you forget your BIOS password you can clear it by erasing the CMOS Real Time Clock RTC RAM See section 1 6 Jumpers for information on how to erase the RTC RAM After you have set a supervisor password the other items appear to allow you to change other security settings User Access Level Full Access This item allows you to select the access restriction to the Setup items Configuration ...

Page 40: ...or discard your changes to the BIOS items Pressing Esc does not immediately exit this menu Select one of the options from this menu or F10 from the legend bar to exit Exit system setup after saving the changes F10 key can be used for this operation Select Screen Select Item Enter Go to Sub screen F1 General Help F10 Save and Exit ESC Exit Exit Options Exit Save Changes Exit Discard Changes Discard...

Reviews: