background image

6

ASUS FlexSave User Guide

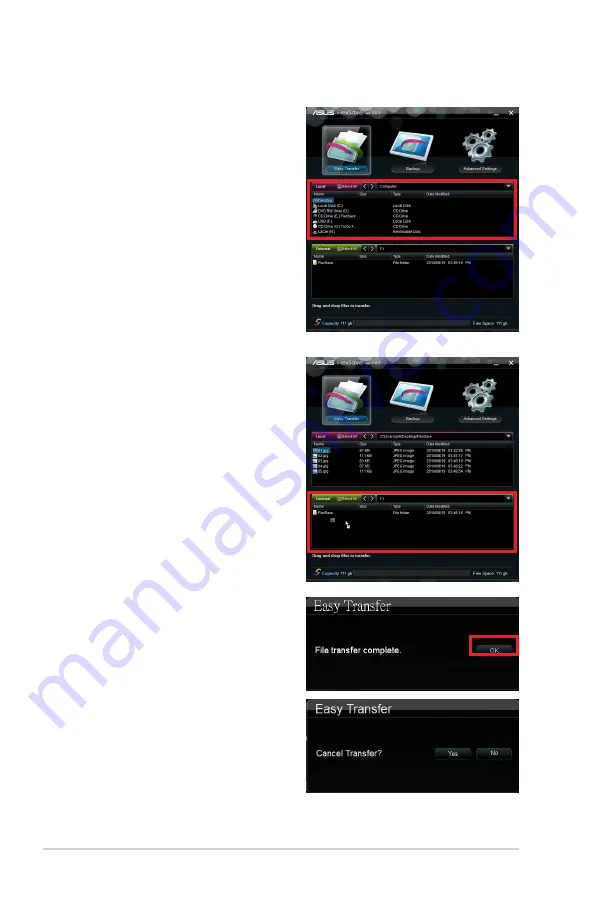
Easy Transfer

1. 

Connect the external hard drive to the 

USB port and launch FlexSave. The 

application will be minimized to the 

system tray. Double-click the FlexSave 

icon to open the FlexSave main screen.

2. 

The Easy Transfer screen will be 

displayed once FlexSave is launched.

3. 

Locate the file(s) you would like to 

backup in the 

Local

 field.

4. 

Click and drag the file(s) you would like 

to backup to the 

External

 field. The 

file(s) will start to transfer.

5. 

File transfer complete

 dialog box 

appears after file transfer completes. 

Click 

OK

.

6. 

You may click 

Cancel

 to stop the 

transfer at anytime. Click 

Yes

 to confirm 

cancellation or 

No

 to continue file 

transfer. An 

Easy Transfer cancelled


dialog box appears if you cancel file 

transfer. Click 

OK

 to return to the 

FlexSave main screen.

Summary of Contents for FlexSave

Page 1: ...E6155 FlexSave User Guide ...

Page 2: ...Save Start 4 Introduction on the FlexSave software and user interface 5 Overview 5 Easy Transfer 6 Backup 7 Exit FlexSave 10 Minimize FlexSave to system tray or taskbar 10 Configuring FlexSave 11 Configure username and password for logging in 12 Log in and password query 12 ...

Page 3: ...or transfer a previous version of the Software after you have received a media replacement or an upgraded version as a replacement to a prior version Limitation of Liability To the maximum extent permitted by applicable law in no event shall FNet or its suppliers be liable for any special incidental indirect or consequential damages whatsoever including without limitation damages for loss of busin...

Page 4: ...el on the software package Enter the serial number and click OK to complete software activation A hidden folder named FlexSave will be created on the external hard drive after FlexSave activation and used for the data storage of FlexSave configuration and backup If the external hard disk is formatted or the hidden folder is deleted you will lose the FlexSave backup data and the FlexSave configurat...

Page 5: ...elds The upper field shows the main functions of FlexSave The Easy Transfer function will be shown after starting FlexSave The middle field shows different configuration and operation options if you switch among the FlexSave functions The lower field shows the free space of external storage devices in real time Easy Transfer Backup Advanced ...

Page 6: ...3 Locate the file s you would like to backup in the Local field 4 Click and drag the file s you would like to backup to the External field The file s will start to transfer 5 A File transfer complete dialog box appears after file transfer completes Click OK 6 You may click Cancel to stop the transfer at anytime Click Yes to confirm cancellation or No to continue file transfer An Easy Transfer canc...

Page 7: ...Windows Recycle Bin Backup Two sub functions are included in Backup Backup Plan and Restore For Backup Plan you can further choose between Manual backup and Scheduled backup Backup Plan manual 1 Connect the external hard drive to the USB port and launch FlexSave The application will be minimized to the system tray Double click the FlexSave icon to enlarge the FlexSave main screen 2 Select Backup o...

Page 8: ...Scheduled skip to step 11 6 If you choose Manual in step 5 click Backup below to start file backup 7 You may cancel or pause file backup 8 If you pause file backup click Continue to continue the backup plan 9 To stop file backup click Cancel A confirmation box appears Click Yes to cancel file backup or click No to continue file backup 10 A Backup complete dialog box appears after file backup compl...

Page 9: ...ave assigned other folders to backup afterward please click Backup again to save the change Backup Restore 1 If you have completed a backup plan you can run Restore under the Backup function 2 Click Restore under the Backup function then all backup history will be listed including the name and the date of the backup plans 3 Click the triangle in front of the backup plan to expand the folder and th...

Page 10: ... the FlexSave icon on the taskbar and click Close window to exit FlexSave 2 Or right click the FlexSave icon on the system tray and click Exit to exit FlexSave Minimize FlexSave to system tray or taskbar Minimize FlexSave to system tray Click on the top right corner of the FlexSave window to minimize FlexSave to the system tray Minimize FlexSave to taskbar Click on the top right corner of the Flex...

Page 11: ...he assigned folder You have to create a backup plan before using Hotkey Backup or only the system partition can be assigned You have to configure Hotkey Backup again if you use the external hard drive on other computers 1 Click Advanced Settings on the FlexSave main screen 2 Select General under Advanced Settings 3 Select a folder to backup under Hotkey button configuration The folders here are th...

Page 12: ...inished click Apply Log in and password query Log in If a username and password is set you are required to enter the username and password every time you use FlexSave If no password is set simply enter you user name and click Login If the password is not correctly entered FlexSave will not function User name and password query 1 Click Query in the log in screen to inquire your username and passwor...

Page 13: ...e software version appears after clicking software information Click Check to check software updates with the default web browser Technical Support 1 Click Advanced Settings after starting FlexSave 2 Click Software information under Advanced Settings 3 Click Visit ASUS in the Technical Support field for software manual and technical support with the default web browser ...

Page 14: ...www asus com ...

Reviews: