background image

English

English

ASUS CM1740

5

English

English

After launching the application, the AI Manager icon appears in the Windows

®

 taskbar.

Right-click this icon to switch between the quick bar and the main window, and to launch the 

AI Manager either from the quick bar or taskbar.

ASUS AI Manager

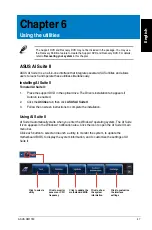
ASUS AI Manager is a utility which gives you quick and easy access to frequently-used 

applications.

Installing AI Manager

To install AI Manager:

1. 

Place the support DVD in the optical drive. If Autorun is enabled, the Drivers installation  

wizard appears.

If Autorun is disabled, double-click the 

setup.exe

 file from the ASUS AI Manager folder in 

the support DVD. 

Click the 

Utilities

 tab, then click 

ASUS AI Manager

.

Follow the onscreen instructions to complete the installation.

Launching AI Manager

To launch the AI Manager from the Windows

®

 desktop, click 

Start > All Programs > ASUS > 

AI Manager > AI Manager 1.xx.xx

. The AI Manager quick bar appears on the desktop.

AI Manager quick bar

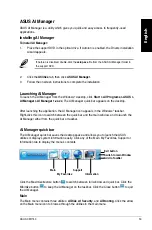
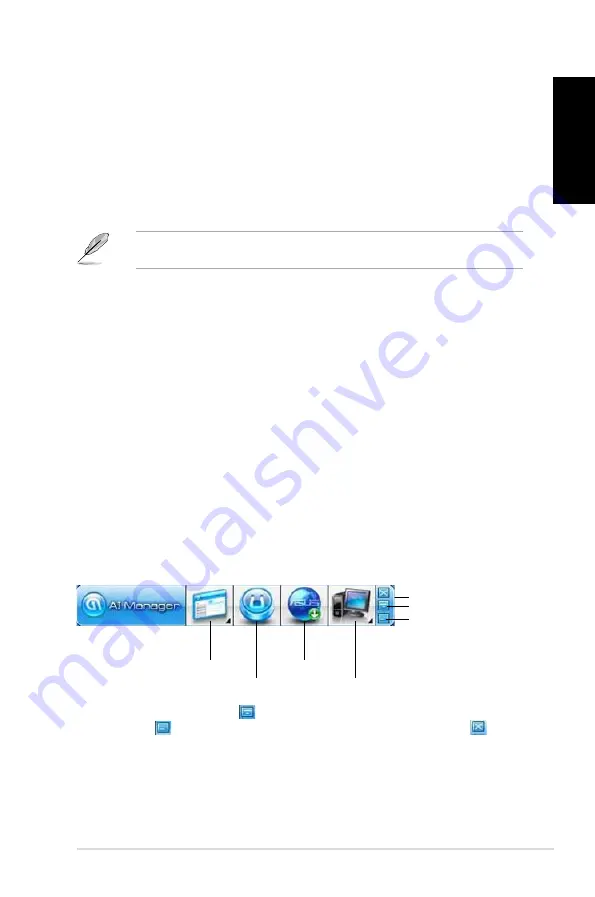
The AI Manager quick bar saves the desktop space and allows you to launch the ASUS 

utilities or display system information easily. Click any of the Main, My Favorites, Support or 

Information tab to display the menu’s contents.

Click the Maximize/restore button 

 to switch between full window and quick bar. Click the 

Minimize button 

 to keep the AI Manager on the taskbar. Click the Close button   to quit 

the AI Manager.

Main

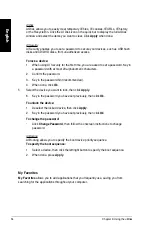
The Main menu contains three utilities: 

AI Disk

AI Security

, and 

AI


Booting

. Click the arrow 

on the Main menu icon to browse through the utilities in the main menu.

Main

My Favorites

Support

Information

Exit button

Switch to main Window

Add to ToolBar

Summary of Contents for Essentio CM1740

Page 1: ...ASUS Essentio Desktop PC CM1740 User Manual ...

Page 2: ...FOR A PARTICULAR PURPOSE IN NO EVENT SHALL ASUS ITS DIRECTORS OFFICERS EMPLOYEES OR AGENTS BE LIABLE FOR ANY INDIRECT SPECIAL INCIDENTAL OR CONSEQUENTIAL DAMAGES INCLUDING DAMAGES FOR LOSS OF PROFITS LOSS OF BUSINESS LOSS OF USE OR DATA INTERRUPTION OF BUSINESS AND THE LIKE EVEN IF ASUS HAS BEEN ADVISED OF THE POSSIBILITY OF SUCH DAMAGES ARISING FROM ANY DEFECT OR ERROR IN THIS MANUAL OR PRODUCT S...

Page 3: ...lders 22 Restoring your system settings 24 Protecting your computer 25 Getting Windows Help and Support 26 Chapter 3 Connecting devices to your computer Connecting a USB storage device 27 Connecting microphone and speakers 28 Connecting multiple external displays 31 Connecting an HDTV 33 Chapter 4 Using your computer Proper posture when using your Desktop PC 35 Using the memory card reader 36 Usin...

Page 4: ...English English Contents Chapter 6 Using the utilities ASUS AI Suite II 47 ASUS AI Manager 53 Nero 9 56 Recovering your system 57 Chapter 7 Troubleshooting Troubleshooting 59 ASUS contact information 66 ...

Page 5: ...gital device pursuant to Part 15 of the FCC Rules These limits are designed to provide reasonable protection against harmful interference in a residential installation This equipment generates uses and can radiate radio frequency energy and if not installed and used in accordance with manufacturer s instructions may cause harmful interference to radio communications However there is no guarantee t...

Page 6: ...right protection technology that is protected by method claims of certain U S patents and other intellectual property rights owned by Macrovision Corporation and other rights owners Use of this copyright protection technology must be authorized by Macrovision Corporation and is intended for home and other limited viewing uses only unless otherwise authorized by Macrovision Corporation Reverse engi...

Page 7: ...s Battery safety warning DO NOT throw the battery in fire DO NOT short circuit the contacts DO NOT disassemble the battery Use this product in environments with ambient temperatures between 0 C 32 F and 35 C 95 F DO NOT cover the vents on the Desktop PC to prevent the system from getting overheated DO NOT use damaged power cords accessories or other peripherals To prevent electrical shock hazard d...

Page 8: ... NOTE Tips and additional information to help you complete a task IMPORTANT Instructions that you MUST follow to complete a task Where to find more information Refer to the following sources for additional information and for product and software updates ASUS websites The ASUS website provides updated information on ASUS hardware and software products Refer to the ASUS website www asus com ASUS Lo...

Page 9: ...ted items above are for reference only Actual product specifications may vary with different models ASUS Essentio Desktop PC Keyboard x1 Mouse x1 Installation Guide Power cord x1 Installation Guide x1 Warranty card x1 Nero 9 burning software DVD x1 Support DVD optional x1 Recovery DVD optional x1 Antenna optional x2 ...

Page 10: ...10 English ...

Page 11: ...ry with different models Welcome Thank you for purchasing the ASUS Essentio CM1740 Desktop PC The ASUS Essentio CM1740 Desktop PC provides cutting edge performance uncompromised reliability and user centric utilities All these values are encapsulated in a stunningly futuristic and stylish system casing Read the ASUS Warranty Card before setting up your ASUS Desktop PC 1 5 2 3 4 7 6 ...

Page 12: ...drive eject button Press this button to eject the optical disk drive tray 5 Secure Digital MultiMediaCard slot Insert a Secure Digital MultiMediaCard card into this slot Memory Stick Memory Stick Pro card slot Insert a Memory Stick Memory Stick Pro card into this slot Extreme Digital card slot Insert an Extreme Digital card into this slot 6 Power button Press this button to turn on your computer 7...

Page 13: ...her protected content 9 VGA port This port is for VGA compatible devices such as a VGA monitor 10 USB 3 0 ports These Universal Serial Bus 3 0 USB 3 0 ports connect to USB 3 0 devices such as a mouse printer scanner camera PDA and others DO NOT connect a keyboard mouse to any USB 3 0 port when installing Windows operating system Due to USB 3 0 controller limitation USB 3 0 devices can only be used...

Page 14: ...e Speaker Out port gray This port connects to the side speakers in an 8 channel audio configuration 15 Microphone port pink This port connects to a microphone 16 Line Out port lime This port connects to a headphone or speaker In a 4 6 or 8 channel configuration the function of this port becomes Front Speaker Out 17 Center Subwoofer port orange This port connects to the center subwoofer speakers 18...

Page 15: ...ternal monitor Using the ASUS Graphics Card on selected models only Connect your monitor to the display output port on the discrete ASUS Graphics Card To connect an external monitor using the ASUS Graphics Card 1 Connect a monitor to a display output port on the ASUS Graphics Card 2 Plug the monitor to a power source DVI HDMI DVI HDMI The display output ports on the ASUS Graphics Card may vary wit...

Page 16: ...onitors to your computer refer to Connecting multiple external monitors in Chapter 3 of this user manual for details Using the onboard display output ports Connect your monitor to the onboard display output port To connect an external monitor using the onboard display output ports 1 Connect a VGA monitor to the VGA port or a DVI D monitor to the DVI D port or an HDMI monitor to the HDMI port on th...

Page 17: ...mouse Connect a USB keyboard and a USB mouse to the USB ports on the rear panel of your computer Connecting the power cord Connect one end of the power cord to the power connector on the rear panel of your computer and the other end to a power source DVI HDMI DVI HDMI ...

Page 18: ...omputer Turning your computer ON To turn your computer ON 1 Turn your monitor ON 2 Press the power button on your computer Turning your computer OFF To turn your computer OFF 1 Close all running applications 2 Click on the Windows desktop 3 Click to shut down the operating system Power button 3 Wait until the operating system loads automatically ...

Page 19: ...y in uniques names for the user name and computer name then click Next 5 Key in the necessary information to set up your password then click Next You may also click Next to skip this step without entering any information 6 Carefully read the license terms Tick I accept the license terms and click Next 7 Select Use recommended settings or Install important updates only to set up the security settin...

Page 20: ...ut Windows 7 Using the Getting Started item The Getting Started item on the Start menu contains information about some basic tasks such as personalizing Windows adding new users and transferring files to help you to familiarize yourself with using Windows 7 To use the Getting Started item 1 From the Windows taskbar click the Start icon to launch the Start menu 2 Select Getting Started The list of ...

Page 21: ...n select Unpin from this list Pinning programs on the Start menu or taskbar To pin programs on the Start menu or taskbar 1 From the Windows taskbar click the Start icon to launch the Start menu 2 Right click the item that you want to pin on the Start menu or taskbar 3 Select Pin to Taskbar or Pin to Start menu You may also right click on the icon of a running program on the taskbar then select Pin...

Page 22: ... to open it For more details refer to the section Using Windows Action Center in this chapter Customizing icons and notifications You may choose to display or hide the icons and notifications on the taskbar or on the notification area To customize icons and notifications 1 From the notification area click on the arrow icon 2 Click Customize 3 From the dropdown list select the behaviors for the ico...

Page 23: ...er to select how you want to view the file folder You may also right click anywhere on the View pane click View and select the view type that you want Arranging your files To arrange your files 1 Launch Windows Explorer 2 From the Arrange by field click to display the dropdown list 3 Select your preferred arrangement type Sorting your files To sort your files 1 Launch Windows Explorer 2 Right clic...

Page 24: ...me choose as your backup mode Restoring your system settings The Windows System Restore feature creates a restore point where the computer s system settings are stored at certain time and date It allows you to restore or undo changes to your computer s system settings without affecting your personal data To restore your system 1 Close all running applications 2 Click All Programs Accessories Syste...

Page 25: ...task that you want to do Using Windows Update Windows Update allows you to check and install the latest updates to enhance the security and performance of your computer Launching Windows Update To launch Windows Update 1 From the Windows taskbar click the Start icon to launch the Start menu 2 Select All Programs Windows Update 3 From the Windows Update screen click the task that you want to do Set...

Page 26: ...ter from virus It is purchased separately You have a 30 day trial period after activating it To activate Trend Micro Internet Security 1 Run the Trend Micro Internet Security application 2 Carefully read the license terms Click Agree Activate 3 Input your e mail address and select your location Click Next 4 Click Finish to complete the activation Getting Windows Help and Support Windows Help and S...

Page 27: ...es to your computer Connecting a USB storage device This desktop PC provides USB 2 0 1 1 ports on both the front and rear panels and USB3 0 ports on the rear panel The USB ports allow you to connect USB devices such as storage devices To connect a USB storage device Insert the USB storage device to your computer DVI HDMI Front panel Rear panel DO NOT remove a USB storage device when data transfer ...

Page 28: ... speakers This desktop PC comes with microphone ports and speaker ports on both the front and rear panels The audio I O ports located on the rear panel allow you to connect 2 channel 4 channel 6 channel and 8 channel stereo speakers Connecting Headphone and Mic Connecting 2 channel Speakers ...

Page 29: ...English ASUS CM1740 29 English Connecting 4 channel Speakers Connecting 6 channel Speakers ...

Page 30: ...30 Chapter 3 Connecting devices to your computer English English Connecting 8 channel Speakers ...

Page 31: ...sion to enlarge your Windows desktop To set up multiple displays 1 Turn off your computer 2 Connect the two monitors to your computer and connect the power cords to the monitors Refer to Setting up your computer section in Chapter 1 for details on how to connect a monitor to your computer When a graphics card is installed in your computer connect the monitors on the output ports of the graphics ca...

Page 32: ...your desktop space Show desktop only on 1 2 Select this option to show desktop only on monitor 1 or monitor 2 Remove this display Select this options to remove the selected display 6 Click Apply or OK Then click Keep Changes on the confirmation message 3 Turn on your computer 4 Do any of the following to open the Screen Resolution setting screen Click Control Panel Appearance and Personalization D...

Page 33: ...onnect a High Definition TV HDTV to the HDMI port of your computer You need an HDMI cable to connect the HDTV and the computer The HDMI cable is purchased separately To get the best display performance ensure that your HDMI cable is less than 15 meters ...

Page 34: ...34 Chapter 3 Connecting devices to your computer English ...

Page 35: ...air to make sure that your knees are slightly higher than your hips to relax the backs of your thighs If necessary use a footrest to raise the level of your knees Adjust the back of your chair so that the base of your spine is firmly supported and angled slightly backward Sit upright with your knees elbows and hips at an approximately 90º angle when you are at the PC Place the monitor directly in ...

Page 36: ...system allows you to read from and write to different memory card drives To use the memory card 1 Insert the memory card into the card slot 2 Select a program from the AutoPlay window to access your files If AutoPlay is NOT enabled in your computer click Windows 7 Start button on the taskbar click Computer and then double click the memory card icon to access the data on it Each card slot has its o...

Page 37: ...ram from the AutoPlay window to access your files Removing an optical disc To remove an optical disc 1 While the system is on do either of the following to eject the tray Press the eject button below the drive bay cover Right click the CD DVD drive icon on the Computer screen and then click Eject 2 Remove the disc from the disc tray If AutoPlay is NOT enabled in your computer click Windows 7 Start...

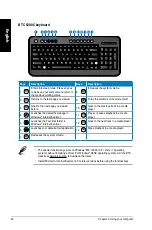
Page 38: ...Press Fn F9 to play or pause playback in Windows Media Player 4 Increases picture size in Windows Photo Viewer 15 Press Fn F10 to stop playback in Windows Media Player 5 Functions with keys F1 F12 16 Press Fn F11 to go to the previous track in Windows Media Player 6 Press Fn F1 to launch Microsoft Word 17 Press Fn F12 to go to the next track in Windows Media Player 7 Press Fn F2 to launch Microsof...

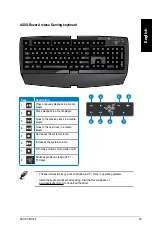
Page 39: ... media player 4 Goes to the next track in a media player 5 Decreases the system volume 6 Increases the system volume 7 Turns the volume s mute mode on off 8 Switches profiles working with F1 F10 keys 1 3 2 5 6 4 8 7 The special function keys work on Windows XP Vista 7 operating systems Install the keyboard driver before using Visit the Razer website at www razersupport com to download the driver ...

Page 40: ...eep mode Press any key to wake up your computer and return to the previous working status 8 Increases the system volume 2 Returns to the last page you viewed 9 Turns the volume s mute mode on off 3 Goes to the next page you viewed before 10 Goes to the previous track in a media player 4 Launches the default homepage in Windows Internet Explorer 11 Plays or pauses playback in a media player 5 Launc...

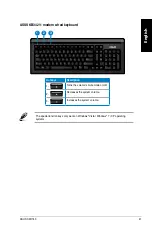
Page 41: ...eys Description 1 Turns the volume s mute mode on off 2 Decreases the system volume 3 Increases the system volume ASUS KB34211 modern wired keyboard 1 2 3 The special function keys only work on Windows Vista Windows 7 XP operating systems ...

Page 42: ...42 Chapter 4 Using your computer English ...

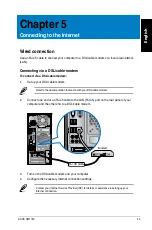
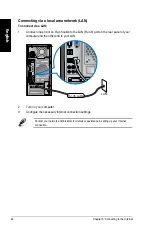
Page 43: ... network LAN Modem RJ 45 cable DVI HDMI DVI HDMI 2 Connect one end of an RJ 45 cable to the LAN RJ 45 port on the rear panel of your computer and the other end to a DSL cable modem Refer to the documentation that came with your DSL cable modem 3 Turn on the DSL cable modem and your computer 4 Configure the necessary Internet connection settings Contact your Internet Service Provider ISP for detail...

Page 44: ...t one end of an RJ 45 cable to the LAN RJ 45 port on the rear panel of your computer and the other end to your LAN DVI HDMI RJ 45 cable LAN DVI HDMI 2 Turn on your computer 3 Configure the necessary Internet connection settings Contact your network administrator for details or assistance in setting up your Internet connection ...

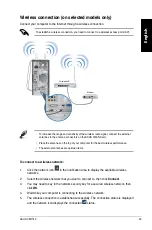
Page 45: ...ablish a wireless connection you need to connect to a wireless access point AP Wireless AP Modem DVI HDMI DVI HDMI To connect to a wireless network 1 Click the network icon in the notification area to display the available wireless networks 2 Select the wireless network that you want to connect to then click Connect 3 You may need to key in the network security key for a secured wireless network t...

Page 46: ...46 Chapter 5 Connecting to the Internet English ...

Page 47: ...rs or CPU frequency Click to update the motherboard BIOS Click to show the system information Click to customize the interface settings Using AI Suite II AI Suite II automatically starts when you enter the Windows operating system The AI Suite II icon appears in the Windows notification area Click the icon to open the AI Suite II main menu bar Click each button to select and launch a utility to mo...

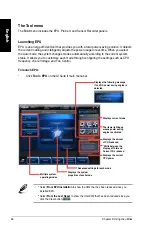
Page 48: ... the AI Suite II main menu bar Select From EPU Installation to show the CO2 that has been reduced since you installed EPU Select From the Last Reset to show the total CO2 that has been reduced since you click the Clear button Shifts between the display of Total and Current CO2 reduced Displays the system properties of each mode Displays the following message if no VGA power saving engine is detect...

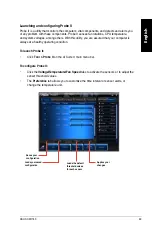
Page 49: ...ured that your computer is always at a healthy operating condition To launch Probe II Click Tool Probe II on the AI Suite II main menu bar To configure Probe II Click the Voltage Temperature Fan Speed tabs to activate the sensors or to adjust the sensor threshold values The Preference tab allows you to customize the time interval of sensor alerts or change the temperature unit Loads the default th...

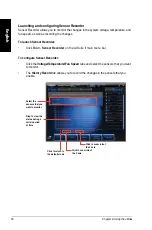
Page 50: ...l Sensor Recorder on the AI Suite II main menu bar To configure Sensor Recorder Click the Voltage Temperature Fan Speed tabs and select the sensors that you want to monitor The History Record tab allows you to record the changes in the sensors that you enable Select the sensors that you want to monitor Click to zoom in out the Y axis Click to zoom in out the X axis Click to return to the default m...

Page 51: ... The ASUS Update utility allows you to u pdate the BIOS directly from the Internet download the latest BIOS file from the Internet update the BIOS from an updated BIOS file save the current BIOS file or view the BIOS version information Updating the BIOS through the Internet To update the BIOS through the Internet 1 From the ASUS Update screen select Update BIOS from file then click Next 2 Select ...

Page 52: ... The System Information screen displays the information about the motherboard CPU and memory slots Click the MB tab to see the details on the motherboard manufacturer product name version and BIOS Click the CPU tab to see the details on the processor and the Cache Click the SPD tab and then select the memory slot to see the details on the memory module installed on the corresponding slot The Setti...

Page 53: ...nstructions to complete the installation Launching AI Manager To launch the AI Manager from the Windows desktop click Start All Programs ASUS AI Manager AI Manager 1 xx xx The AI Manager quick bar appears on the desktop AI Manager quick bar The AI Manager quick bar saves the desktop space and allows you to launch the ASUS utilities or display system information easily Click any of the Main My Favo...

Page 54: ... 2 Confirm the password 3 Key in the password hint recommended 4 When done click Ok 5 Select the device you want to lock then click Apply 6 Key in the password you have set previously then click Ok To unlock the device 1 Deselect the locked device then click Apply 2 Key in the password you have set previously then click Ok To change the password Click Change Password then follow the onscreen instr...

Page 55: ...e application icon to launch delete or rename the selected application You can also double click to launch the selected application Support Click any links on the Support window to go to the ASUS website technical support website download support website or contact information Information Click the tab on the Information window to see the detailed information about your system motherboard CPU BIOS...

Page 56: ...ro 9 Essentials 4 Select the language you want to use for Installation Wizard Click Next 5 Click Next to continue 6 Tick I accept the License Conditions When done click Next 7 Select Typical then click Next 8 Tick Yes I want to help by sending anonymous application data to Nero then click Next 9 When done click Exit Burning files To burn files 1 From the main menu click Data Burning Add 2 Select t...

Page 57: ...ECOVERY The Recovery Partition is created at the factory and cannot be restored if deleted Take your Desktop PC to an authorized ASUS service center if you have problems with the recovery process Using the Recovery Partition 1 Press F9 during bootup 2 Press Enter to select Windows Setup EMS Enabled 3 Select one of the following recovery options System Recovery This feature allows you to restore th...

Page 58: ...al drive Your Desktop PC needs to be powered ON 2 Restart the Desktop PC and press F8 on bootup and select the optical drive may be labeled as CD DVD and press Enter to boot from the Recovery DVD 3 Select OK to start to restore the image 4 Select OK to confirm the system recovery Restoring will overwrite your hard drive Ensure to back up all your important data before the system recovery 5 Follow ...

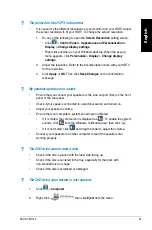
Page 59: ... not responding then click End Task If the keyboard is not responding Press and hold the Power button on the top of your chassis until the computer shuts down Then press the Power button to turn it on I cannot connect to a wireless nestwork using the ASUS WLAN Card on selected models only Ensure that you enter the correct network security key for the wireless network you want to connect to Connect...

Page 60: ...function works only under Windows When a graphics card is installed on your computer ensure that you connect the monitors to the output port on the graphics card Check if the multiple displays settings are correct Refer to section Connecting multiple external displays in Chapter 3 for details My computer cannot detect my USB storage device The first time you connect your USB storage device to your...

Page 61: ...no sound Ensure that you connect your speakers to the Line out port lime on the front panel or the rear panel Check if your speak is connected to a electrical source and turned on Adjust your speakers volume Ensure that your computer s system sounds are not Muted If it is muted the volume icon is displayed as To enable the system sounds click from the Windows notification area then click If it is ...

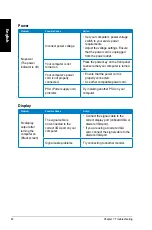
Page 62: ... on Your computer s power cord is not properly connected Ensure that the power cord is properly connected Use other compatible power cord PSU Power supply unit problems Try installing another PSU on your computer Display Problem Possible Cause Action No display output after turning the computer on Black screen The signal cable is not connected to the correct VGA port on your computer Connect the s...

Page 63: ...our Internet Service Provider ISP for the correct LAN settings Problems caused by the anti virus software Close the anti virus software Driver problems Reinstall the LAN driver Audio Problem Possible Cause Action No Audio Speaker or headphone is connected to the wrong port Refer to your computer s user manual for the correct port Disconnect and reconnect the speaker to your computer Speaker or hea...

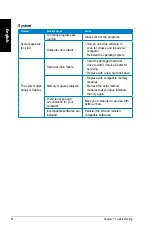
Page 64: ... The system often hangs or freezes Hard disk drive failure Send the damaged hard disk drive to ASUS Service Center for servicing Replace with a new hard disk drive Memory module problems Replace with compatible memory modules Remove the extra memory modules that you have installed then try again There is not enough air ventilation for your computer Move your computer to an area with better air flo...

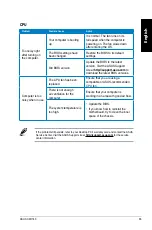
Page 65: ...t asus com to download the latest BIOS versions Computer is too noisy when in use The CPU fan has been replaced Ensure that you are using a compatible or ASUS recommended CPU fan There is not enough air ventilation for the computer Ensure that your computer is working in an area with good air flow The system temperature is too high Update the BIOS If you know how to reinstall the motherboard try t...

Page 66: ...787 Support fax 1 812 284 0883 Online support support asus com ASUS COMPUTER GmbH Germany and Austria Address Harkort Str 21 23 D 40880 Ratingen Germany Fax 49 2102 959911 Web site www asus de Online contact www asus de sales Technical Support Telephone Component 49 1805 010923 Telephone System Notebook Eee LCD 49 1805 010920 Support Fax 49 2102 9599 11 Online support support asus com EUR 0 14 min...

Page 67: ...ASUS Essentio Desktop PC CM1740 Manuale Utente ...

Page 68: ...UN PARTICOLARE SCOPO IN NESSUN CASO ASUS I SUOI DIRIGENTI FUNZIONARI IMPIEGATI O DISTRIBUTORI SONO RESPONSABILI PER QUALSIASI DANNO INDIRETTO PARTICOLARE ACCIDENTALE O CONSEGUENTE COMPRESI DANNI DERIVANTI DA PERDITA DI PROFITTO PERDITA DI CONTRATTI PERDITA D USO O DI DATI INTERRUZIONE DELL ATTIVITA E SIMILI ANCHE SE ASUS E STATA AVVISATA DELLA POSSIBILITA CHE TALI DANNI SI POSSANO VERIFICARE IN SE...

Page 69: ...to disponibili se previsti nonchè le spese e gli altri termini relativi all assistenza e al supporto se previsti verranno specificati nella documentazione destinata al cliente fornita a corredo con il Prodotto E responsabilità dell utente prima ancora di richiedere l assistenza effettuare il backup dei contenuti presenti sul Prodotto inclusi i dati archiviati o il software installato nel prodotto ...

Page 70: ...a di furto o in ogni altra situazione che lo renda inutilizzabile anche la possibilità di utilizzare il prodotto OEM viene compromessa Chiunque acquisti unitamente al prodotto un software OEM è tenuto ad osservare i termini e le condizioni del contratto di licenza tra il proprietario del software e l utente finale denominato EULA End User Licence Agreement visualizzato a video durante la fase di i...

Page 71: ...e e cartelle 90 Ripristino del sistema 92 Protezione del computer 93 Supporto Windows 94 Capitolo 3 Connessione di dispositivi al computer Connessione di un dispositivo di archiviazione USB 95 Connessione di microfono e altoparlanti 96 Connessioni multischermo 99 Connessione di uno schermo ad alta definizione 101 Capitolo 4 Utilizzo del computer Posizione corretta durante l uso del Desktop PC 103 ...

Page 72: ...mmario Capitolo 6 Descrizione delle Utilità ASUS AI Suite II 115 ASUS AI Manager 121 Nero 9 124 Ripristino del sistema 125 Capitolo 7 Analisi e risoluzione dei problemi Analisi e risoluzione dei problemi 127 Contatti ASUS 134 ...

Page 73: ... residenziali Questo apparecchio genera usa e può emettere energia in radiofrequenza e se non viene installato e utilizzato come indicato dal manuale d uso può provocare interferenze dannose alle comunicazioni radio Non è tuttavia possibile garantire che non si verifichino interferenze in casi particolari Se questo apparecchio causa interferenze dannose alla ricezione di programmi radiofonici e te...

Page 74: ...dell antenna e per il funzionamento del trasmettitore Dichiarazione del Ministero delle Comunicazioni Canadese Questo apparecchio digitale non supera i limiti di Classe B per le emissioni di disturbi radio per apparecchiature digitali stabiliti nel regolamento sulle interferenze radio del ministero delle comunicazioni canadese Questo apparecchio digitale di classe B è conforme alle normative canad...

Page 75: ...zza della batteria NON gettare la batteria nel fuoco NON creare corto circuiti fra i contatti NON disassemblare la batteria Utilizzare il prodotto in ambienti a temperatura compresa fra 0 C 32 F e 35 C 95 F NON coprire i fori per la ventilazione del Desktop PC per evitare il surriscaldamento del sistema NON utilizzare cavi di alimentazione accessori o periferiche malfunzionanti o difettose Per evi...

Page 76: ...azioni aggiuntive per il completamento di un operazione IMPORTANTE Istruzioni da seguire OBBLIGATORIAMENTE per portare a termine un operazione Approfondimenti Per approfondimenti e aggiornamenti sui prodotti e software ASUS consultare le seguenti fonti di informazione Sito internet ASUS Il sito internet ASUS fornisce informazioni aggiornate su hardware e software dei prodotti ASUS Consultare il si...

Page 77: ...da all installazione x1 Garanzia x1 DVD con Software di Masterizz Nero 9 x1 DVD di Supporto opzionale DVD di Ripristino opzionale Antenna opzionale x2 In caso di articoli danneggiati o mancanti contattare il rivenditore Le illustrazioni degli articoli sono puramente indicative Le specifiche del prodotto potrebbero variare in base al modello ...

Page 78: ...78 Italiano ...

Page 79: ...orazione del telaio variano in base al modello Benvenuti Grazie per aver acquistato ASUS Essentio CM1740 Desktop PC ASUS Essentio CM1740 Desktop PC offre prestazioni d avanguardia straordinaria affidabilità e utilità a misura di utente racchiuse in un modello dal design moderno e funzionale Prima di installare ASUS Desktop PC leggere il contenuto della Garania ASUS 1 5 2 3 4 7 6 ...

Page 80: ... espulsione dell unità ottica Pulsante per espellere il vassoio dell unità ottica 5 Slot per schede Secure Digital MultiMediaCard slot Slot per l inserimento di schede Secure Digital MultiMediaCard Slot per schede Memory Stick Memory Stick Pro Slot per l inserimento di schede Memory Stick Memory Stick Pro Slot per schede Extreme Digital Slot per l inserimento di schede Extreme Digital 6 Pulsante d...

Page 81: ...lta definizione Blu ray e altro contenuto protetto 9 Porta VGA Porta per la connessione di dispositivi compatibili VGA quali monitor VGA 10 Porte USB 3 0 Le porte USB 3 0 Universal Serial Bus 3 0 permettono di collegare dispositivi USB 3 0 come mouse stampanti scanner fotocamere e PDA 11 Porte USB 2 0 Le porte USB 2 0 Universal Serial Bus 2 0 permettono di collegare dispositivi USB 2 0 come mouse ...

Page 82: ...a altoparlanti laterali grigio Porta per la connessione di altoparlanti laterali in una configurazione audio a 8 canali 14 Porta microfono rosa Porta per la connessione del microfono 15 Porta Line Out lime Porta per la connessione di cuffie o altoparlante In una configurazione audio a 4 6 o 8 canali la funzione di questa porta diventa quella di uscita altoparlanti frontali 16 Porta Centrale Subwoo...

Page 83: ...one di un monitor esterno Utilizzo della scheda grafica ASUS su modelli selezionati Collegare il monitor all uscita video della scheda grafica ASUS Per collegare un monitor esterno mediante la scheda grafica ASUS 1 Collegare un monitor all uscita video sulla scheda grafica ASUS 2 Collegare il monitor alla sorgente di alimentazione Le uscite video della scheda grafica ASUS potrebbero variare in bas...

Page 84: ...I D alla porta DVI D oppure un monitor HDMI alla porta HDMI sul pannello posteriore del computer 2 Collegare il monitor ad una sorgente di alimentazione Se il computer è provvisto di una scheda grafica ASUS la scheda grafica è impostata nel BIOS come dispositivo di visualizzazione primario Pertanto collegare il monitor all uscita video sulla scheda grafica Per i dettagli sulle modalità di connessi...

Page 85: ...iera e un mouse USB alle porte USB sul pannello posteriore del computer Connessione del cavo di alimentazione Collegare un estremità del cavo di alimentazione al connettore dell alimentazione sul pannello posteriore del computer e l altra estremità ad una sorgente di alimentazione DVI HDMI DVI HDMI ...

Page 86: ...pulsante di accensione sul computer Come spegnere il computer Per spegnere il computer 1 Chiudere tutte le applicazion in esecuzione 2 Cliccare sul desktop di Windows 3 Cliccare per arrestare il sistema Pulsante di accensione 4 Attendere il termine del caricamento automatico del sistema Come accendere e spegnere il computer Questa sezione indica come accendere spegnere il computer ...

Page 87: ...e e computer name Cliccare Next 5 Inserire le informazioni necessarie per impostare la password quindi cliccare Next E inoltre possibile cliccare Next per ignorare questo passaggio senza inserire alcuna informazione 6 Leggere attentamente i termini e le condizioni del contratto di licenza Selezionare I accept the license terms e cliccare Next 7 Selezionare Use recommended settings oppure Install i...

Page 88: ...indows aggiungere nuovi utenti e trasferire file che facilitano la familiarizzazione con il sistema operativo Windows 7 Per utilizzare Getting Started 1 Dalla barra delle applicazioni di Windows cliccare sull icona Start per avviare il menu Start 2 Selezionare Getting Started Appare l elenco delle applicazioni disponibili 3 Selezionare l applicazione da avviare Barra delle applicazioni La barra de...

Page 89: ...ogrammi sul menu Start o sulla barra delle applicazioni Per aggiungere programmi sul menu Start o sulla barra delle applicazioni 1 Dalla barra delle applicazioni di Windows cliccare sull icona Start per avviare il menu Start 2 Cliccare sull elemento da aggiungere al menu Start o alla barra delle applicazioni 3 Selezionare Pin to Taskbar oppure Pin to Start menu E anche possibile cliccare sull icon...

Page 90: ... da aprire Per approfondimenti consultare la sezione su Windows Action Center in questo capitolo Personalizzazione di icone e notifiche E possibile scegliere di visualizzare o nascondere le icone e i messaggi di notifica sulla barra delle applicazioni o in area di notifica Per personalizzare icone e notifiche 1 Dall area di notifica cliccare sul icona con la freccia 2 Cliccare Customize 3 Dall ele...

Page 91: ...il cursore per selezionare la modalità di visualizzazione di file e cartelle In alternativa cliccare su un punto qualunque del pannello di visualizzazione cliccare View e selezionare il tipo di visualizzazione Disposizione file Per disporre i file 1 Avviare Windows Explorer 2 Dal campo Arrange by cliccare per visualizzare l elenco a discesa 3 Selezionare la modalità preferita Ordine dei file Per o...

Page 92: ...ndows choose recommended oppure Let me choose as your backup mode Ripristino del sistema La funzione Windows System Restore crea un punto di ripristino dove salvare le impostazioni del sistema del computer in una certa data e ora e permette di ripristinare o annullare le modifiche alle impostazioni del sistema lasciando inalterati i dati personali Per ripristinare il sistema 1 Chiudere tutte le ap...

Page 93: ...dows Update Windows Update permette di controllare e installare gli aggiornamenti più recenti per aumentare la protezione e le prestazioni del computer Avvio di Windows Update Per avviare Windows Update 1 Dalla barra delle applicazioni di Windows cliccare sull icona Start per aprire il menu corrispondente 2 Selezionare All Programs Windows Update 3 Dalla schermata Windows Update selezionare l oper...

Page 94: ...durata di 60 giorni dalla data di attivazione il software deve essere acquistato separatamente Per attivare Trend Micro Internet Security 1 Eseguire l applicazione Trend Micro Internet Security 2 Leggere attentamente i termini e le condizioni di icenza Cliccare Agree Activate 3 Inserire l indirizzo di posta elettronica e selezionare la locazione Cliccare Next 4 Per completare l attivazione cliccar...

Page 95: ...i archiviazione USB Sia nel pannello frontale che in quello posteriore questo desktop PC è dotato di porte USB 2 0 1 1 mentre sul pannello posteriore si trovano porte USB3 0 per la connessione di dispositivi USB come i dispositivi di archiviazione Per connettere un dispositivo di archiviazione USB Procedere come indicato dalle figure sottostanti NON rimuovere un dispositivo di archiviazione USB du...

Page 96: ...Questo desktop PC è dotato di porte per il microfono e gli altoparlanti sia nel pannello frontale che nel pannello posteriore Le porte audio I O situate nel pannello posteriore consentono di collegare gli altoparlanti stereo a 2 4 6 e 8 canali Connessione di cuffie e microfono Connessione altoparlanti a 2 canali ...

Page 97: ...Italiano ASUS CM1740 97 Italiano Connessione altoparlanti a 4 canali Connessione altoparlanti a 6 canali ...

Page 98: ...98 Capitolo 3 Connessione di dispositivi al computer Italiano Italiano Connessione altoparlanti a 8 canali ...

Page 99: ... di più monitor è possibile impostare le modalità di visualizzazione Il monitor aggiuntivo può essere utilizzato per duplicare l immagine dello schermo principale o come estensione del desktop di Windows Per impostare la configurazione multischermo 1 Spegnere il computer 2 Collegare i due monitor al computer e i cavi di alimentazione ai monitor Consultare la sezione Installazione del computer del ...

Page 100: ...sktop Show desktop only on 1 2 Selezionare questa opzione per visualizzare il desktop soltanto sul monitor 1 o sul monitor 2 Remove this display Selezionare questa opzione per rimuovere il monitor selezionato 6 Cliccare Apply oppure OK quindi premere Keep Changes al messaggio di conferma 3 Accendere il computer 4 Per visualizzare la schermata per le impostazioni Screen Resolution procedere in uno ...

Page 101: ...a definizione Collegare uno schermo ad alta definizione HDTV alla porta HDMI del computer Per collegare l HDTV al computer è necessario un cavo HDMI da acquistare separatamente Per prestazioni ottimali assicurarsi che il cavo HDMI sia di lunghezza inferiore ai 15 metri ...

Page 102: ...102 Capitolo 3 Connessione di dispositivi al computer Italiano ...

Page 103: ...te superiore rispetto ai fianchi per poter meglio rilassare le gambe Se necessario utilizzare un appoggiapiedi per alzare il livello delle ginocchia Regolare lo schienale della sedia in modo che la base della spina dorsale sia saldamente appoggiata e leggermente inclinata indietro Stare seduti in posizione eretta con le ginocchia i gomiti e i fianchi in posizione ortogonale rispetto al PC Porre il...

Page 104: ...e sicura dell hardware e del supporto situata nell area di notifica di Windows così da prevenire la perdita dei dati Per utilizzare una scheda di memoria 1 Inserire la scheda di memoria nell apposito slot 2 Selezionare un programma di accesso ai file dalla finestra AutoPlay Se nel computer NON è attivata la funzioneAutoPlay cliccare sul pulsante Start di Windows 7 sulla barra delle applicazioni se...

Page 105: ...finestra AutoPlay Rimozione di un disco ottico Per rimuovere un disco ottico 1 Quando il sistema è acceso espellere il vassoio in uno dei seguenti modi Premere il pulsante di espulsioone situato sotto la copertura del vano dell unità ottica Cliccare sull icona del disco CD DVD sulla schermata Risorse del Computer quindi cliccare Rimuovi 2 Rimuovere il disco dal vassoio Se nel computer NON è attiva...

Page 106: ...ndows Photo Viewer 14 Premere Fn F9 per avviare o sospendere Windows Media Player 4 Ingrandisce le immagini in Windows Photo Viewer 15 Premere Fn F10 per interrompere l esecuzione di Windows Media Player 5 Funziona con i tasti F1 F12 16 Premere Fn F11 per passare alla traccia precedente in Windows Media Player 6 Premere Fn F1 per avviare Microsoft Word 17 Premere Fn F12 per passare alla traccia su...

Page 107: ...stiera per il gaming ASUS Razer Arctosa 1 3 2 5 6 4 8 7 Tasto Descrizione 1 Esegue o sospende la riproduzione file in un lettore multimediale 2 Interrompe la riproduzione file in un lettore multimediale 3 Passa alla traccia precedente di un file in un lettore multimediale 4 Passa alla traccia successiva di un file in un lettore multimediale 5 Riduce il volume del sistema 6 Aumenta il volume del si...

Page 108: ... tasto qualunque per riattivare il computer e ripristinare lo stato operativo precedente 8 Aumenta il volume del sistema 2 Ritorna alla pagina precedente visualizzata per ultima 9 Attiva disattiva l audio 3 Va alla pagina successiva visualizzata per ultima 10 Ritorna alla pagina precedente in un lettore multimediale 4 Avvia la homepage predefinita in Windows Internet Explorer 11 Esegue o sospende ...

Page 109: ...key Descrizione 1 Attiva disattiva l audio 2 Riduce il volume del sistema 3 Aumenta il volume del sistema Tastiera via cavo ASUS KB34211 1 2 3 I tasti funzione speciali funzionano soltanto con i sistemi operativi Windows Vista Windows 7 XP ...

Page 110: ...110 Capitolo 4 Utilizzo del computer Italiano ...

Page 111: ... cavo DSL o alla rete locale LAN 2 Collegare un estremità di un cavo RJ 45 alla porta LAN RJ 45 sul pannello posteriore del computer e l altra estremità a un modem via cavo DSL Consultare la documentazione fornita con il modem 3 Accendere il modem via cavo DSL e il computer 4 Configurare le impostazioni di connessione a internet Per ulteriori informazioni o assistenza nella connessione a internet ...

Page 112: ... un cavo RJ 45 alla porta LAN RJ 45 sul pannello posteriore del computer e l altra estremità alla presa LAN 2 Accendere il computer 3 Configurare le impostazioni di connessione a internet Contattare l amministratore di rete per ulteriori informazioni o per assistenza nell installazione della connessione a internet DVI HDMI RJ 45 cable LAN DVI HDMI ...

Page 113: ... rete wireless 5 La connessione wireless è stata stabilita E visualizzato lo stato della connessione e l icona di rete Connessione wireless su modelli selezionati Collegare il computer a Internet via connessione wireless Per stabilire una connessione wireless è necessario un punto di accesso wireless AP Per aumentare la copertura e la sensibilità del segnale radio wireless collegare le antenne est...

Page 114: ...114 Chapter 5 Connecting to the Internet Italiano ...

Page 115: ...U Aggiornamento BIOS scheda madre Visualizzazione informazioni del sistema Personalizzazione impostazioni interfaccia AI Suite II AI Suite II si avvia automaticamente quando si accede ad un sistema operativo Windows e in area di notifica appare l icona corrispondente Cliccare sull icona per aprire la barra del menu principale di AI Suite II Premere sui vari pulsanti per selezionare ed avviare un u...

Page 116: ... Suite II Selezionare From EPU Installation per visualizzare la quantità di CO2 che è stata ridotta dall installazione dell utilità EPU Selezionare From the Last Reset per visualizzare la quantità complessiva di CO2 che è stata ridotta da quando è stato premuto il pulsante Cambio visualizzazione del valore totale o parziale della riduzione di emissioni di CO2 Proprietà del sistema per ciascuna mod...

Page 117: ...e condizioni operative Per avviare Probe II Cliccare Tool Probe II sulla barra del menu principale di AI Suite II Per configurare Probe II Cliccare sulle schede Voltage Temperature Fan Speed per attivare i rispettivi sensori o regolare i valori soglia dei sensori La scheda Preference consente di personalizzare l intervallo di tempo dei segnali di avvertimento dei sensori o di modificare l unità di...

Page 118: ...er Cliccare Tool Sensor Recorder sulla barra del menu principale di AI Suite II Per configurare Sensor Recorder Cliccare sulle schede Voltage Temperature Fan Speed e selezionare i sensori da monitorare La scheda History Record permette di registrare le variazioni dei sensori attivati Selezionare i sensori da monitorare Zoom in out dell asse Y Zoom in out dell asse X Ritorno alla modalità predefini...

Page 119: ...vo Windows L utilità ASUS Update permette di effettuare l aggiornamento del BIOS direttamente da internet scaricare da internet i file BIOS più recenti aggiornare il BIOS da un file BIOS aggiornato salvare il file BIOS o visualizzare le informazioni sulla versione del BIOS Aggiornamento del BIOS via Internet Per aggiornare il BIOS via Internet 1 Dalla schermata ASUS Update selezionare Update BIOS ...

Page 120: ...ne System Information mostra le informazioni su scheda madre CPU e slot di memoria Cliccare sulla scheda MB per visualizzare i dettagli su produttore nome del prodotto versione e BIOS della scheda madre Cliccare sulla scheda CPU per visualizzare i dettagli sul processore e la Cache Cliccare sulla scheda SPD quindi selezionare uno slot di memoria per visualizzare i dettagli sui moduli di memoria in...

Page 121: ...ruzioni sulla schermo per completare l installazione Avvio di AI Manager Per avviare AI Manager dal desktop di Windows cliccare Start All Programs ASUS AI Manager AI Manager 1 xx xx Sul desktop appare la barra di accesso rapido AI Manager Barra di accesso rapido di AI Manager La barra di accesso rapido di AI Manager salva spazio sul desktop per avviare facilmente le utilità ASUS o visualizzare inf...

Page 122: ...erici 2 Confermare la password 3 Digitare il suggerimento per la password consigliato 4 Premere OK 5 Selezionare il dispositivo da bloccare e cliccare Apply 6 Inserire la password impostata in precedenza e premere OK Per sbloccare un dispositivo 1 De selezionare la casella del dispositivo bloccato e cliccare Apply 2 Inserire la password quindi premere Ok Per modificare la password Cliccare Change ...

Page 123: ...zione del menu My Favorites cliccare sull icona corrispondente Cliccare due volte per avviare l applicazione selezionata Supporto Cliccare sui collegamenti della finestra Support per accedere al sito ufficiale di ASUS e del supporto tecnico per operazioni di download e informazioni sui contatti ASUS nel mondo Informazioni Cliccare sulla scheda della finestra Information per visualizzare informazio...

Page 124: ...3 Dal menu principale cliccare Nero 9 Essentials 4 Selezionare la lingua per il programma di installazione guidata Cliccare Next 5 Cliccare Next per continuare 6 Selezionare I accept the License Conditions Al termine cliccare Next 7 Selezionare Typical quindi cliccare Next 8 Selezionare Yes I want to help by sending anonymous application data to Nero e cliccare Next 9 Al termine cliccare Exit Mast...

Page 125: ...RY La Partizione Recovery è stata creata dal fabbricante e se eliminata non può essere più ripristinata dall utente In caso di problemi durante il processo di ripristino portare il Desktop PC presso un centro di assistenza autorizzato ASUS Utilizzo della Partizione di Ripristino 1 Premere F9 in fase di caricamento iniziale 2 Premere Enter per selezionare Windows Setup EMS Enabled 3 Selezionare una...

Page 126: ...ktop PC deve essere ACCESO 2 Riavviare il Desktop PC e premere F8 al momento del caricamento selezionare l unità ottica forse denominata CD DVD e premere Enter per avviare dal DVD di Ripristino 3 Selezionare OK per avviare il ripristino dell immagine 4 Selezionare OK per confermare il ripristino del sistema Il ripristino del sistema sovrascrive tutti i dati contenuti nel disco rigido Prima di avvi...

Page 127: ...non risponde e cliccare End Task Se la tastiera non risponde premere e tenere premuto il pulsante di accensione sulla parte superiore del telaio sino a quando il computer non si spegne Premere di nuovo il pulsante di accensione per riaccenderlo Impossibile stabilire la connessione con una rete wireless utilizzando la scheda WLAN ASUS su modelli selezionati Assicurarsi di aver inserito la chiave di...

Page 128: ...io schermo è operativa soltanto con un sistema operatvo Windows Quando si installa una scheda grafica nel computer assicurarsi di aver collegato i monitor all uscita video sulla scheda grafica Controllarecheleimpostazionimultischermosianocorrette Perapprofondimenti consultare la sezione Connessioni multischermo nel capitolo 3 Il computer non rileva il disposititvo di archiviazione USB La prima vol...

Page 129: ... alcun suono Assicurarsi di aver collegato gli altoparlanti alla porta Line out port lime sul pannello frontale o posteriore Controllare che gli altoparlanti siano collegati ad una sorgente di alimentazione e siano accesi Regolare il volume degli altoparlanti Assicurarsi che l audio del sistema non sia stato disattivato Se è stato disattivato l icona visualizzata per il volume è Per attivare l aud...

Page 130: ...d assicurarsi che il computer sia acceso Cavo di alimentazione non correttamente collegato Assicurarsi che il cavo di alimentazione sia correttamente collegato Utilizzare un cavo di alimentazione compatibile Problemi all unità di alimentazione Provare ad installare un altra unità di alimentazione Visualizzazione Problema Possibile Causa Azione Nessuna immagine sullo schemro dopo aver acceso il com...

Page 131: ... per le corrette impostazioni LAN Problemi causati da software anti virus Chiudere il software anti virus Problemi di driver Reinstallare il driver LAN Audio Problema Possibile Causa Azione Audio assente Gli altoparlanti o le cuffie sono collegati alla porta sbagliata Consultare il manuale utente del computer per individuare la porta corretta Disconnettere e riconnettere gli altoparlanti al comput...

Page 132: ...sistema operativo Il sistema spesso non risponde Problemi al disco rigido Inviare il disco rigido danneggiato ad un centro autorizzato ASUS per assistenza Installare un nuovo disco rigido Problemi ai moduli di memoria Sostituire i moduli di memoria Rimuovere eventuali moduli di memoria aggiuntivi installati in precedenza e riprovare Ventilazione insufficiente Spostare il computer dove la ventilazi...

Page 133: ...upport asus com per scaricare la versione più recente Il computer in funzione è troppo rumoroso Sostituzione della ventola della CPU Assicurarsi di utilizzare una ventola per CPU compatibile o consigliata da ASUS Ventilazione del computer insufficiente Spostare il computer in una zona dove la ventilazione è migliore Temperatura del sistema troppo alta Aggiornare il BIOS Se si sa come reinstallare ...

Page 134: ...x Supporto 1 812 284 0883 Supporto Online support asus com ASUSTeK ITALY S r l Italia Indirizzo Strada Statale Padana Superiore 28 20063 Cernusco sul Naviglio MI Supporto Tecnico Telefono Notebook Eee 199 400 089 Telefono Altri Prodotti 199 400 059 Sito web www asus it Per chiamare da reti fisse Telecom Italia e Colt il costo è di 0 12 euro al minuto iva inclusa e la durata massima della telefonat...

Page 135: ...PC de Secretária ASUS Essentio CM1740 Manual do Utilizador ...

Page 136: ...LGUMA PODE A ASUS SEUS DIRECTORES OFICIAIS EMPREGADOS OU AGENTES SER RESPONSABILIZADA POR QUAISQUER DANOS INDIRECTOS ESPECIAIS ACIDENTAIS OU CONSEQUENTES INCLUINDO DANOS PELA PERDA DE LUCROS PERDA DE NEGÓCIO PERDA DE UTILIZAÇÃO OU DE DADOS INTERRUPÇÃO DA ACTIVIDADE ETC MESMO QUE A ASUS TENHA SIDO ALERTADA PARA A POSSIBILIDADE DE OCORRÊNCIA DE TAIS DANOS RESULTANTES DE QUALQUER DEFEITO OU ERRO NEST...

Page 137: ...us ficheiros e pastas 156 Restaurar o seu sistema 158 Proteger o seu computador 159 Obter Ajuda e Suporte do Windows 160 Capítulo 3 Ligar dispositivos ao computador Ligar um dispositivo de armazenamento USB 161 Ligar um microfone e altifalantes 162 Ligar vários monitores externos 165 Ligar uma TV HD 167 Capítulo 4 Utilizar o computador Postura adequada ao utilizar o seu PC de Secretária 169 Utiliz...

Page 138: ...8 Português Português Índice Capítulo 6 Utilizar os utilitários ASUS AI Suite II 181 ASUS AI Manager 187 Nero 9 190 Recuperar o seu sistema 191 Capítulo 7 Resolução de problemas Resolução de problemas 193 ...

Page 139: ...om os limites estipulados para um dispositivo digital de Classe B segundo o Artigo 15º das Normas da FCC Estes limites foram concebidos para proporcionar uma protecção razoável contra interferências prejudiciais numa instalação doméstica Este equipamento gera usa e pode irradiar energia de radiofrequência e se não instalado e usado de acordo com as instruções do fabricante pode causar interferênci...

Page 140: ...dio do Departamento de Comunicações do Canadá Este equipamento digital de classe B está em conformidade com a norma canadiana ICES 003 Aviso de Produto da Macrovision Corporation Este produto incorpora tecnologia protegida por direitos de autor ao abrigo de patentes dos E U A e outros direitos de propriedade intelectual detidos pela Macrovision Corporation e outros detentores de direitos A utiliza...

Page 141: ...e NÃO utilize o modem durante tempestades eléctricas Aviso de segurança para a bateria NÃO atire a bateria para o fogo NÃO provoque curto circuito nos contactos NÃO desmonte a bateria Utilize este equipamento em ambientes com temperaturas entre 0 C 32 F e 35 C 95 F NÃO tape os orifícios de ventilação do PC de Secretária para evitar o sobreaquecimento do sistema NÃO utilize cabos de alimentação ace...

Page 142: ...adicionais que ajudam a realizar uma tarefa IMPORTANTE Instruções que DEVE seguir para realizar uma tarefa Onde encontrar mais informações Consulte as seguintes fontes para obter informações adicionais e actualizações do produto e do software Web site da ASUS O Web site da ASUS oferece informações actualizadas acerca dos produtos de hardware e software da ASUS Consulte o Web site da ASUS www asus ...

Page 143: ...vem apenas como referência As especificações reais do produto poderão variar de acordo com os diferentes modelos PC de Secretária ASUS Essentio Teclado x1 Rato x1 Installation Guide Cabo de alimentação x1 Guia de instalação x1 Certificado de garantia x1 DVD de software de gravação Nero 9 x1 DVD de Suporte opcional x1 DVD de Recuperação opcional x1 Antena opcional x 2 ...

Page 144: ...144 Português ...

Page 145: ...rdo com os diferentes modelos Bem vindo Obrigado por ter adquirido o PC de Secretária ASUS Essentio CM1740 O PC de Secretária ASUS Essentio CM1740 oferece desempenho de última geração extrema fiabilidade e utilitários centrados no utilizador Todos estes valores estão condensados numa caixa atraente e futurista Leia o Certificado de Garantia da ASUS antes de utilizar o seu PC de Secretária da ASUS ...

Page 146: ...o óptico Prima este botão para ejectar o tabuleiro da unidade de disco óptico 5 Ranhura para cartões Secure Digital MultiMediaCard Insira um cartão Secure Digital MultiMediaCard nesta ranhura Ranhura para cartões Memory Stick Memory Stick Pro Insira um cartão Memory Stick Memory Stick Pro neste ranhura Ranhura para cartões Extreme Digital Insira um cartão Extreme Digital nesta ranhura 6 Power butt...

Page 147: ...lu ray e outros conteúdo protegidos 9 Porta VGA Esta porta destina se à ligação de dispositivos compatíveis com VGA como por exemplo um monitor VGA 10 Portas USB 3 0 Estas portas de Barramento de Série Universal 3 0 USB 3 0 ligam a dispositivos USB 3 0 como ratos impressoras scanners câmaras PDA e outros 11 Portas USB 2 0 Estas portas de Barramento de Série Universal 2 0 USB 2 0 ligam a dispositiv...

Page 148: ...aterais cinzento Esta porta liga aos altifalantes laterais numa configuração de áudio de 8 canais 15 Porta de microfone rosa Esta porta liga a um microfone 16 Porta saída de linha verde lima Esta porta liga a auscultadores ou altifalantes Numa configuração de áudio de 4 6 ou 8 canais esta porta actua como Saída de Altifalantes Frontais 17 Porta de altifalante central subwoofer laranja Esta portas ...

Page 149: ... Utilizando a Placa Gráfica ASUS apenas em alguns modelos Ligue o seu monitor à porta de saída de monitor na Placa Gráfica ASUS dedicada Para ligar um monitor externo utilizando a Placa Gráfica ASUS 1 Ligue um monitor à porta de saída de monitor na Placa Gráfica ASUS 2 Ligue o monitor a uma fonte de alimentação As portas de saída de monitor da Placa Gráfica ASUS poderão variar de acordo com os dif...

Page 150: ...tores externos ao seu computador consulte a secção Ligar vários monitores externos no Capítulo 3 deste manual para obter mais detalhes Utilizando as portas de saída de monitor incorporadas Ligue o seu monitor à porta de saída de monitor incorporada Para ligar um monitor externo utilizando as portas de saída de monitor incorporadas 1 Ligue um monitor VGA à porta VGA ou um monitor DVI D à porta DVI ...

Page 151: ...o USB e um rato USB às portas USB existentes no painel traseiro do computador Ligar o cabo de alimentação Ligue uma extremidade do cabo de alimentação ao conector de alimentação existente no painel traseiro do computador e a outra extremidade a uma fonte de alimentação DVI HDMI DVI HDMI ...

Page 152: ... Para ligar o computador 1 Prima o interruptor de alimentação 2 Prima o botão de alimentação no computador Desligar o computador Para desligar o computador 1 Feche todas as aplicações em execução 2 Clique em no ambiente de trabalho do Windows 3 Clique em para encerrar o sistema operativo Botão de alimentação 3 Aguarde que o sistema operativo carregue automaticamente ...

Page 153: ...m Seguinte 5 Introduza as informações necessárias para definir a sua palavra passe e depois clique em Seguinte Poderá também clicar em Seguinte para ignorar este passo sem introduzir quaisquer informações 6 Leia atentamente os termos de licenciamento Marque a opção Aceito os termos de licenciamento e clique em Seguinte 7 Seleccione Utilizar definições recomendadas ou Instalar apenas actualizações ...

Page 154: ... item Introdução O item Introdução no menu Iniciar contém informações acerca de algumas tarefas básicas como personalizar o Windows adicionar novos utilizadores e transferir ficheiros para o ajudar a familiarizar se com o Windows 7 Para utilizar o item Introdução 1 Na barra de tarefas do Windows clique no ícone Iniciar para aceder ao menu Iniciar 2 Seleccione Introdução Será apresentada a lista de...

Page 155: ...leccione Remover desta lista Afixar programas no menu Iniciar ou na barra de tarefas Para afixar programas no menu Iniciar ou na barra de tarefas 1 Na barra de tarefas do Windows clique no ícone Iniciar para aceder ao menu Iniciar 2 Clique com o botão direito no item que deseja afixar no menu Iniciar ou na barra de tarefas 3 Seleccione Afixar na Barra de Tarefas ou Afixar no Menu Iniciar Poderá ta...

Page 156: ...ir Para mais detalhes consulte a secção Utilizar o Centro de Acção do Windows neste capítulo Personalizar ícones e notificações Pode optar por mostrar ou ocultar os ícones e notificações na barra de tarefas ou na área de notificação Para personalizar ícones e notificações 1 Na área de notificação clique no ícone da seta 2 Clique em Personalizar 3 Na lista pendente seleccione os comportamentos para...

Page 157: ...Poderá também clicar com o botão direito do rato no painel de Vista clicar em Ver e seleccionar o tipo de vista que deseja Dispor os seus ficheiros Para dispor os seus ficheiros 1 Abra o Explorador do Windows 2 Clique no campo Dispor por para exibir a lista pendente 3 Seleccione o tipo de disposição preferida Ordenar os seus ficheiros Para ordenar os seus ficheiros 1 Abra o Explorador do Windows 2...

Page 158: ...idir recomendado ou Deixar me escolher como o seu modo de cópia de segurança Restaurar o seu sistema A funcionalidade de Restauro do Sistema do Windows cria um ponto de restauro onde as definições do sistema do computador são armazenadas numa determinada data e hora Permite lhe restaurar ou anular alterações efectuadas às definições do sistema do computador sem afectar os seus dados pessoais Para ...

Page 159: ...dows Update permite lhe procurar e instalar as actualizações mais recentes para melhorar a segurança e o desempenho do seu computador Abrir o Windows Update Para abrir o Windows Update 1 Na barra de tarefas do Windows clique no ícone Iniciar para aceder ao menu Iniciar 2 Seleccione Todos os Programas Windows Update 3 No ecrã do Windows Update clique na tarefa que deseja executar Configurar uma con...

Page 160: ...ra ataques de vírus informáticos É adquirido separadamente Após a activação o programa oferece um período de avaliação de 60 dias Para activar o Trend Micro Internet Security 1 Execute a aplicação Trend Micro Internet Security 2 Leia atentamente os termos de licenciamento Clique em Concordar e Activar 3 Introduza o seu endereço de e mail e seleccione a sua localização Clique em Seguinte 4 Clique e...

Page 161: ...um dispositivo de armazenamento USB Este PC de secretária possui portas USB 2 0 1 1 nos painéis frontal e traseiro e portas USB 3 0 no painel traseiro As portas USB permitem ligar dispositivos USB como por exemplo dispositivos de armazenamento Para ligar um dispositivo de armazenamento USB Insira o dispositivo de armazenamento USB no seu computador Painel frontal Painel traseiro NÃO remova um disp...

Page 162: ...antes Este PC de secretária está equipado com portas de microfone e portas de altifalantes nos painéis frontal e traseiro As portas de E S de áudio localizadas no painel traseiro permitem ligar altifalantes estéreo de 2 4 6 e 8 canais Ligar auscultadores e microfone Ligar altifalantes de 2 canais ...

Page 163: ...40 163 Português Ligar altifalantes de 4 canais Ligar altifalantes de 6 canais ENTRADAS DE ÁUDIO ENTRADAS DE ÁUDIO Traseiro Frontal ENTRADAS DE ÁUDIO ENTRADAS DE ÁUDIO ENTRADAS DE ÁUDIO Traseiro Frontal Central Subwoofer ...

Page 164: ...164 Capítulo 3 Ligar dispositivos ao computador Português Português Ligar altifalantes de 8 canais Traseiro Frontal ENTRADAS DE ÁUDIO ENTRADAS DE ÁUDIO Lateral Central Subwoofer ...

Page 165: ...aumentar o ambiente de trabalho do Windows Para configurar vários monitores 1 Desligue o seu computador 2 Ligue os dois monitores ao computador e ligue os cabos de alimentação aos monitores Consulte a secção Instalar o computador no Capítulo 1 para obter detalhes acerca da ligação de um monitor ao seu computador Quando estiver instalada uma placa gráfica no computador ligue os monitores às portas ...

Page 166: ...one esta opção para mostrar o ambiente de trabalho apenas no monitor 1 ou no monitor 2 Remover este ecrã Seleccione esta opção para remover o monitor seleccionado 6 Clique em Aplicar ou em OK Em seguida clique em Manter alterações na mensagem de confirmação 3 Ligue o seu computador 4 Execute uma das seguintes acções para abrir o ecrã de definição da Resolução de ecrã Clique em Painel de controlo A...

Page 167: ...ma TV de Alta Definição TV HD à porta HDMI do seu computador Precisará de um cabo HDMI para ligar a TV HD ao computador O cabo HDMI é adquirido separadamente Para obter o melhor desempenho do monitor utilize um cabo HDMI com um comprimento inferior a 15 metros ...

Page 168: ...168 Capítulo 3 Ligar dispositivos ao computador Português ...

Page 169: ...uperior à anca para relaxar a parte posterior das coxas Se necessário utilize um apoio para os pés para elevar o nível dos joelhos Ajuste as costas da cadeira de forma a que a base da sua coluna esteja firmemente apoiada e ligeiramente inclinada para trás Quando utilizar o PC sente se correctamente com os joelhos cotovelos e anca num ângulo aproximado de 90º Coloque o monitor directamente à sua fr...

Page 170: ...do seu sistema permite lhe ler e escrever em diferentes cartões de memória Para utilizar o cartão de memória 1 Insira o cartão de memória na ranhura para cartões de memória 2 Seleccione um programa a partir da janela de Reprodução Automática para aceder aos seus ficheiros Se a Reprodução Automática NÃO estiver activada no seu computador clique no botão Iniciar do Windows 7 na barra de tarefas cliq...

Page 171: ...ara aceder aos seus ficheiros Remover um disco óptico Para remover um disco óptico 1 Com o sistema ligado execute uma das seguintes acções para ejectar o tabuleiro Prima o botão de ejecção abaixo da tampa do compartimento da unidade Clique com o botão direito no ícone da unidade de CD DVD no ecrã Computador e depois clique em Ejectar 2 Remova o disco do tabuleiro da unidade Se a Reprodução Automát...

Page 172: ... Visualizador de Fotografias do Windows 14 Prima Fn F9 para reproduzir ou colocar em pausa no Windows Media Player 4 Aumenta o tamanho da imagem no Visualizador de Fotografias do Windows 15 Prima Fn F10 para parar a reprodução no Windows Media Player 5 Funções com as teclas F1 a F12 16 Prima Fn F11 para voltar à faixa anterior no Windows Media Player 6 Prima Fn F1 para abrir o Microsoft Word 17 Pr...

Page 173: ...site o Web site da Razer em www razersupport com para transferir o controlador Teclas Descrição 1 Reproduz ou coloca em pausa a reprodução num leitor multimédia 2 Pára a reprodução num leitor multimédia 3 Volta à faixa anterior num leitor multimédia 4 Volta à faixa anterior num leitor multimédia 5 Diminui o volume do sistema 6 Aumenta o volume do sistema 7 Liga desliga o som do sistema 8 Muda de p...

Page 174: ...ão 1 Coloca o computador no modo de suspensão Prima qualquer tecla para activar o computador e voltar ao estado de funcionamento anterior 8 Aumenta o volume do sistema 2 Volta à última página visitada 9 Liga desliga o som do sistema 3 Avança para a página seguinte visitada anteriormente 10 Volta à faixa anterior num leitor multimédia 4 Abre a página inicial predefinida no Windows Internet Explorer...

Page 175: ...erno com fios ASUS KB34211 1 2 3 As teclas de função especial apenas funcionam nos sistemas operativos Windows Vista Windows 7 XP Teclas de atalho Descrição 1 Liga desliga o som do sistema 2 Diminui o volume do sistema 3 Aumenta o volume do sistema ...

Page 176: ...176 Capítulo 4 Utilizar o computador Português ...

Page 177: ...gue uma extremidade de um cabo RJ 45 à porta LAN RJ 45 no painel traseiro do seu computador e a outra extremidade a um modem por cabo DSL Consulte a documentação fornecida com o modem por cabo DSL 3 Ligue o modem por cabo DSL e o computador 4 Configure as definições necessárias de ligação à Internet Contacte o seu Fornecedor de Serviços de Internet ISP para obter detalhes ou ajuda para a configura...

Page 178: ...abo RJ 45 à porta LAN RJ 45 no painel traseiro do seu computador e a outra extremidade à sua LAN 2 Ligue o seu computador 3 Configure as definições necessárias de ligação à Internet Contacte o seu administrador de rede para obter detalhes ou ajuda para a configuração da sua ligação à Internet DVI HDMI RJ 45 cable LAN DVI HDMI Cablu RJ 45 Cabo RJ 45 ...

Page 179: ...abelecer uma ligação sem fios é necessário ligar a um ponto de acesso sem fios AP Para ligar a uma rede sem fios 1 Clique no ícone de rede na área de notificação para exibir as redes sem fios disponíveis 2 Seleccione a rede sem fios à qual pretende ligar e depois clique em Ligar 3 Poderá ser necessário introduzir a chave de segurança da rede para redes sem fios protegidas depois clique em OK 4 Agu...

Page 180: ...180 Capítulo 5 Ligar à Internet Português ...
Page 181: ...res ou a frequência da CPU Clique para actualizar o BIOS da placa principal Clique para mostrar as informações do sistema Clique para personalizar as definições da interface Utilizar o ASUS AI Suite II O AI Suite II é iniciado automaticamente durante o arranque do sistema operativo SO Windows O ícone do AI Suite II é exibido na área de notificação do Windows Clique no ícone para abrir a barra de m...

Page 182: ... clicando em Ferramentas EPU na barra de menu principal do AI Suite II Seleccione A partir da instalação da EPU para mostrar o CO2 que foi reduzido desde a instalação da EPU Seleccione A partir do último reinício para mostrar o total de CO2 que foi reduzido desde que clicou no botão Limpar Alterna entre a exibição da quantidade Total e Actual de CO2 reduzido Exibe as propriedades do sistema de cad...

Page 183: ... funcionamento Iniciar o Probe II Depois de instalar o AI Suite II a partir do DVD de suporte inicie o Probe II clicando em Ferramentas Probe II na barra de menu principal do AI Suite II Configurar o Probe II Clique nos separadores Tensão Temperatura Velocidade da ventoinha para activar os sensores ou para ajustar os valores limite do sensor O separador Preferências permite lhe personalizar o inte...

Page 184: ... na barra de menu principal do AI Suite II para iniciar o PC Probe Configurar o Registo do sensor Clique nos separadores Tensão Temperatura Velocidade da ventoinha e seleccione os sensores que pretende monitorizar O separador Registo do histórico permite lhe registar as alterações nos sensores activados Seleccione os sensores que pretende monitorizar Clique para aumentar diminuir o zoom no eixo Y ...

Page 185: ...nte a partir da Internet transferir o ficheiro de BIOS mais recente a partir da Internet actualizar o BIOS a partir de um ficheiro de BIOS actualizado guardar o ficheiro de BIOS actual ou visualizar as informações da versão do BIOS Actualizar o BIOS através da Internet Para actualizar o BIOS através da Internet 1 A partir do ecrã ASUS Update seleccione Actualizar BIOS a partir da Internet e em seg...

Page 186: ...ecção Informações do sistema exibe informações acerca da placa principal CPU e ranhuras de memória Clique no separador MB para ver os detalhes acerca do fabricante nome do produto versão e BIOS da placa principal Clique no separador CPU para ver os detalhes acerca do processador e da Cache Clique no separador SPD e depois seleccione a ranhura de memória para ver os detalhes acerca do módulo de mem...

Page 187: ...uções no ecrã para concluir a instalação Iniciar o ASUS AI Manager Para iniciar o AI Manager a partir do ambiente de trabalho do Windows clique em Iniciar Todos os Programas ASUS AI Manager AI Manager 1 xx xx A barra de acesso rápido do AI Manager será exibida no ambiente de trabalho Barra de acesso rápido do AI Manager A barra de acesso rápido do AI Manager ocupa um espaço muito reduzido no ambie...

Page 188: ...se 3 Introduza uma sugestão para a palavra passe recomendado 4 Quando terminar clique em Ok 5 Seleccione o dispositivo que pretende bloquear e clique em Aplicar 6 Introduza a palavra passe que definiu previamente e clique em Ok Para desbloquear o dispositivo 1 Remova a selecção do dispositivo bloqueado e clique em Aplicar 2 Introduza a palavra passe que definiu previamente e clique em Ok Para alte...

Page 189: ...no ícone da aplicação para iniciar eliminar ou mudar o nome da aplicação seleccionada Pode também clicar duas vezes para iniciar a aplicação seleccionada Suporte Clique nas ligações na janela Suporte para visitar o Web site da ASUS o Web site de apoio técnico o Web site de apoio a transferências ou as informações de contacto Informações Clique no separador na janela Informações para ver informaçõe...

Page 190: ... o idioma que pretende utilizar durante o Assistente de instalação Clique em Seguinte 5 Clique em Seguinte para continuar 6 Marque a caixa Aceito as condições da licença Quando terminar clique em Seguinte 7 Seleccione Típica e clique em Seguinte 8 Marque a caixa Sim pretendo ajudar enviando dados da aplicação anonimamente para a Nero e clique em Seguinte 9 Quando terminar clique em Sair Gravar fic...

Page 191: ...ação é criada na fábrica e não pode ser restaurada se for eliminada Leve o seu PC de Secretária a um centro de assistência autorizado da ASUS caso tenha problemas com o processo de recuperação Utilizar a Partição de Recuperação 1 Prima F9 durante o arranque 2 Prima Enter para seleccionar Configuração do Windows EMS Activado 3 Escolha uma das seguintes opções de recuperação Recuperação do sistema E...

Page 192: ...Secretária e prima F8 durante o arranque para seleccionar a unidade óptica esta poderá ter o nome de CD DVD e prima Enter para arrancar a partir do DVD de Recuperação 3 Seleccione OK para começar a restaurar a imagem 4 Seleccione OK para confirmar a recuperação do sistema O restauro irá apagar e substituir os dados do seu disco rígido Faça cópias de segurança de todos os seus dados importantes ant...

Page 193: ...r tarefa Se o teclado não estiver a responder Mantenha premido o botão de energia na parte superior do chassis até que o computador desligue Em seguida prima o botão de energia para ligar o computador Não consigo ligar a uma rede sem fios utilizando a Placa WLAN da ASUS apenas em alguns modelos Certifique se de que introduziu a chave de rede correcta para a rede sem fios à qual deseja ligar Ligue ...

Page 194: ... apenas no Windows Quando estiver instalada uma placa gráfica no computador certifique se de que liga os monitores à porta de saída da placa gráfica Verifique se as definições dos vários monitores estão correctas Consulte a secção Ligar vários monitores externos no Capítulo 3 para obter mais detalhes O meu computador não detecta o meu dispositivo de armazenamento USB Na primeira vez que ligar o se...

Page 195: ...ltifalantes estão ligados à porta de saída de Linha verde lima no painel frontal ou no painel traseiro Verifique se os altifalantes estão ligados a uma fonte de alimentação Ajuste o volume dos altifalantes Certifique se de que os sons do computador não se encontram desactivados Se os sons estiverem desactivados o ícone de volume será apresentado como Para activar os sons do sistema clique em na ár...

Page 196: ... cabo de alimentação do seu computador não está correctamente ligado Certifique se de que o cabo de alimentação está correctamente ligado Utilize outro cabo de alimentação compatível Problemas com a PSU Fonte de alimentação Tente instalar outra PSU no seu computador Visualização Problema Causa possível Acção Nenhuma imagem exibida após ligar o computador ecrã vazio O cabo de sinal não está ligado ...

Page 197: ... Serviços de Internet ISP para saber as definições de LAN correctas Problemas causados pelo software antivírus Feche o software antivírus Problemas com o controlador Reinstale o controlador de LAN Áudio Problema Causa possível Acção Sem áudio Os altifalantes ou auscultadores estão ligados à porta incorrecta Consulte o manual do utilizador do computador para saber qual a porta correcta Desligue e v...

Page 198: ...ativo O sistema pára ou bloqueia frequentemente Falha na unidade de disco rígido Envie o disco rígido para o Centro de Assistência da ASUS para que seja reparado Substitua por uma nova unidade de disco rígido Problemas com os módulos de memória Substitua por módulos de memória compatíveis Remova os módulos de memória adicionais que tenha instalado e tente novamente Não existe ventilação suficiente...

Page 199: ...locidade depois de entrar no SO As definições do BIOS foram alteradas Restaure os valores predefinidos das definições do BIOS Versão do BIOS antiga Actualize o BIOS para a versão mais recente Visite o site de Suporte da ASUS em http support asus com para transferir a versão do BIOS mais recente O computador é demasiado ruidoso durante a utilização O dissipador da CPU foi substituído Certifique se ...

Page 200: ...cia técnica Telefone 1 888 6783688 Fax da assistência 1 812 284 0883 Assistência online support asus com ASUS COMPUTER GmbH Alemanha Áustria Endereço Harkort Str 21 23 D 40880 Ratingen Germany Fax 49 2102 959911 Web site www asus de Fax da assistênciat www asus de sales Assistência técnica Telefone Component 49 1805 010923 Fax da assistência 49 2102 9599 11 Assistência online support asus com 0 14...

Reviews: