background image

10

Deutsch

Deutsch

Deutsch

Deutsch

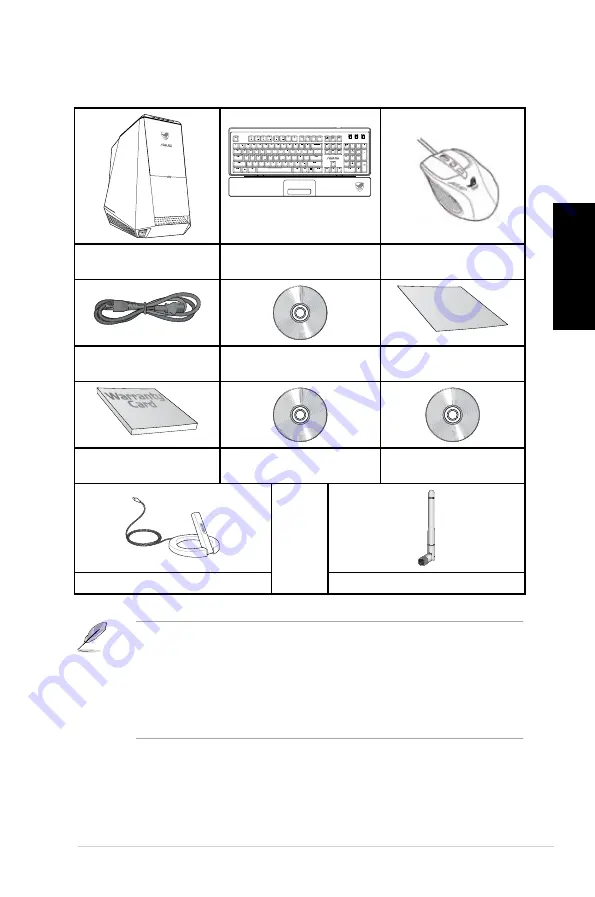
Verpackungsinhalt

•  Sollten o.g. Artikel beschädigt oder nicht vorhanden sein, wenden Sie sich bitte an Ihren 

Händler.

•  Die oberhalb illustrierten Artikel sind nur als eine Referenz gedacht. Die tatsächlichen 

Produktspezifikationen können sich je nach Modell unterscheiden.

•  Für Details zur Verwendung der mitgelieferten Tastatur und Maus, beziehen Sie sich auf 

die Abschnitte 

Verwenden.der.ASUS.ROG.Spieltastatur

 und 

Verwenden.der.ASUS.

GX900


Spielmaus

.

ASUS Essentio Desktop 

PC

ASUS ROG U9N Gaming 

Tastaturpaket x1

ASUS GX900 Gaming 

Mauspaket x1

Installation Guide

Netzkabel x1

Nero 9 Burning Software 

DVD x1

Installationshilfe x1

Garantiekarte x1

Support-DVD x1

Wiederherstellungs-DVD 

x1 (optional)

ODER

1 WLAN-Ringantenne

1x Antenne (optional)

Summary of Contents for Essentio CG8580

Page 1: ...English 1 Deutsch 95 Français 189 Italiano 283 Español 379 Nederlands 473 Português 567 Index ...

Page 2: ......

Page 3: ...ASUS Essentio Desktop PC CG8580 User Manual ...

Page 4: ...FOR A PARTICULAR PURPOSE IN NO EVENT SHALL ASUS ITS DIRECTORS OFFICERS EMPLOYEES OR AGENTS BE LIABLE FOR ANY INDIRECT SPECIAL INCIDENTAL OR CONSEQUENTIAL DAMAGES INCLUDING DAMAGES FOR LOSS OF PROFITS LOSS OF BUSINESS LOSS OF USE OR DATA INTERRUPTION OF BUSINESS AND THE LIKE EVEN IF ASUS HAS BEEN ADVISED OF THE POSSIBILITY OF SUCH DAMAGES ARISING FROM ANY DEFECT OR ERROR IN THIS MANUAL OR PRODUCT S...

Page 5: ...storing your system settings 26 Protecting your computer 27 Getting Windows Help and Support 28 Chapter 3 Connecting devices to your computer Connecting a USB storage device 29 Connecting microphone and speakers 30 Connecting multiple external displays 33 Connecting an HDTV 35 Chapter 4 Using your computer Proper posture when using your Desktop PC 37 Using the memory card reader 38 Using the optic...

Page 6: ...6 Using the utilities ASUS AI Suite II 53 ASUS AI Manager 63 Nero 9 68 Recovering your system 73 Introduction to Intel 2012 Desktop responsiveness technologies 75 Chapter 7 Troubleshooting Troubleshooting 87 ASUS contact information 94 ...

Page 7: ...adiate radio frequency energy and if not installed and used in accordance with manufacturer s instructions may cause harmful interference to radio communications However there is no guarantee that interference will not occur in a particular installation If this equipment does cause harmful interference to radio or television reception which can be determined by turning the equipment off and on the...

Page 8: ...t protection technology that is protected by method claims of certain U S patents and other intellectual property rights owned by Macrovision Corporation and other rights owners Use of this copyright protection technology must be authorized by Macrovision Corporation and is intended for home and other limited viewing uses only unless otherwise authorized by Macrovision Corporation Reverse engineer...

Page 9: ...s Battery safety warning DO NOT throw the battery in fire DO NOT short circuit the contacts DO NOT disassemble the battery Use this product in environments with ambient temperatures between 0 C 32 F and 35 C 95 F DO NOT cover the vents on the Desktop PC to prevent the system from getting overheated DO NOT use damaged power cords accessories or other peripherals To prevent electrical shock hazard d...

Page 10: ... NOTE Tips and additional information to help you complete a task IMPORTANT Instructions that you MUST follow to complete a task Where to find more information Refer to the following sources for additional information and for product and software updates ASUS websites The ASUS website provides updated information on ASUS hardware and software products Refer to the ASUS website www asus com ASUS Lo...

Page 11: ...1 Recovery DVD x1 optional OR Wi Fi Ring moving antenna x1 Antenna x1 optional Package contents If any of the above items is damaged or missing contact your retailer The illustrated items above are for reference only Actual product specifications may vary with different models For details on using the bundled gaming keyboard and mouse refer to sections Using the ASUS ROG Gaming Keyboard and Using ...

Page 12: ...10 English ...

Page 13: ... different models Welcome Thank you for purchasing the ASUS Essentio CG8580 Desktop PC The ASUS Essentio CG8580 Desktop PC provides cutting edge performance uncompromised reliability and user centric utilities All these values are encapsulated in a stunningly futuristic and stylish system casing Read the ASUS Warranty Card before setting up your ASUS Desktop PC 1 2 3 4 5 7 8 10 9 11 12 6 ...

Page 14: ...p profile of your computer 9 USB 3 0 ports These Universal Serial Bus 3 0 USB 3 0 ports connect to USB 3 0 devices such as a mouse printer scanner camera PDA and others 10 USB 2 0 ports These Universal Serial Bus 2 0 USB 2 0 ports connect to USB 2 0 devices such as a mouse printer scanner camera PDA and others 11 Microphone port This port connects to a microphone 12 Headphone port This port connec...

Page 15: ...Windows 8 DO NOT connect a keyboard mouse to any USB 3 0 port when installing Windows operating system Due to USB 3 0 controller limitation USB 3 0 devices can only be used under Windows OS environment and after the USB 3 0 driver installation USB 3 0 devices can only be used as data storage only We strongly recommend that you connect USB 3 0 devices to USB 3 0 ports for faster and better performa...

Page 16: ...nnects to the center subwoofer speakers 10 Microphone port pink This port connects to a microphone 11 Line Out port lime This port connects to a headphone or speaker In a 4 6 or 8 channel configuration the function of this port becomes Front Speaker Out 12 Line In port light blue This port connects to a tape CD DVD player or other audio sources Audio 2 4 6 or 8 channel configuration Port Headset 2...

Page 17: ...nts allow air ventilation 14 Power switch Switch to turn ON OFF the power supply to your computer 15 Power connector input rated 100 120 200 240Vac 60 50Hz 10 5A Plug the power cord to this connector 16 PS 2 Keyboard Mouse combo port This port is for a PS 2 keyboard or mouse 17 Optical S PDIF_OUT port This port connects to an external audio output device via an optical S PDIF cable 18 HDMI port Th...

Page 18: ...an external monitor Using the ASUS Graphics Card on selected models only Connect your monitor to the display output port on the discrete ASUS Graphics Card To connect an external monitor using the ASUS Graphics Card 1 Connect a monitor to a display output port on the ASUS Graphics Card 2 Plug the monitor to a power source The display output ports on the ASUS Graphics Card may vary with different m...

Page 19: ...mputer refer to Connecting multiple external monitors in Chapter 3 of this user manual for details Using the onboard display output ports Connect your monitor to the onboard display output port To connect an external monitor using the onboard display output ports 1 Connect a VGA monitor to the VGA port or a DVI D monitor to the DVI D port or an HDMI monitor to the HDMI port on the rear panel of yo...

Page 20: ... panel of your computer and the other end to a power source USB3 0 UASP USB KB MS USB3 0 UASP USB KB MS USB3 0 UASP USB KB MS The pre installed setup utility for the bundled ASUS GX900 Gaming Mouse can be accessed only when connecting the mouse to your computer before starting Windows 7 for the first time Otherwise you will have to manually install the setup utility from the bundled Support DVD Re...

Page 21: ... ON To turn your computer ON 1 Turn your monitor ON 2 Turn the power switch ON then press the power button on your computer Turning your computer OFF To turn your computer OFF 1 Close all running applications 2 Click on the Windows desktop 3 Click to shut down the operating system 3 Wait until the operating system loads automatically Power button USB3 0 UASP USB KB MS ...

Page 22: ...20 Chapter 1 Getting started English ...

Page 23: ...y in uniques names for the user name and computer name then click Next 5 Key in the necessary information to set up your password then click Next You may also click Next to skip this step without entering any information 6 Carefully read the license terms Tick I accept the license terms and click Next 7 Select Use recommended settings or Install important updates only to set up the security settin...

Page 24: ...ut Windows 7 Using the Getting Started item The Getting Started item on the Start menu contains information about some basic tasks such as personalizing Windows adding new users and transferring files to help you to familiarize yourself with using Windows 7 To use the Getting Started item 1 From the Windows taskbar click the Start icon to launch the Start menu 2 Select Getting Started The list of ...

Page 25: ...n select Unpin from this list Pinning programs on the Start menu or taskbar To pin programs on the Start menu or taskbar 1 From the Windows taskbar click the Start icon to launch the Start menu 2 Right click the item that you want to pin on the Start menu or taskbar 3 Select Pin to Taskbar or Pin to Start menu You may also right click on the icon of a running program on the taskbar then select Pin...

Page 26: ... to open it For more details refer to the section Using Windows Action Center in this chapter Customizing icons and notifications You may choose to display or hide the icons and notifications on the taskbar or on the notification area To customize icons and notifications 1 From the notification area click on the arrow icon 2 Click Customize 3 From the dropdown list select the behaviors for the ico...

Page 27: ...er to select how you want to view the file folder You may also right click anywhere on the View pane click View and select the view type that you want Arranging your files To arrange your files 1 Launch Windows Explorer 2 From the Arrange by field click to display the dropdown list 3 Select your preferred arrangement type Sorting your files To sort your files 1 Launch Windows Explorer 2 Right clic...

Page 28: ...me choose as your backup mode Restoring your system settings The Windows System Restore feature creates a restore point where the computer s system settings are stored at certain time and date It allows you to restore or undo changes to your computer s system settings without affecting your personal data To restore your system 1 Close all running applications 2 Click All Programs Accessories Syste...

Page 29: ...task that you want to do Using Windows Update Windows Update allows you to check and install the latest updates to enhance the security and performance of your computer Launching Windows Update To launch Windows Update 1 From the Windows taskbar click the Start icon to launch the Start menu 2 Select All Programs Windows Update 3 From the Windows Update screen click the task that you want to do Set...

Page 30: ...ter from virus It is purchased separately You have a 30 day trial period after activating it To activate Trend Micro Internet Security 1 Run the Trend Micro Internet Security application 2 Carefully read the license terms Click Agree Activate 3 Input your e mail address and select your location Click Next 4 Click Finish to complete the activation Getting Windows Help and Support Windows Help and S...

Page 31: ...your computer Chapter 3 Connecting devices to your computer Connecting a USB storage device This desktop PC provides USB 2 0 1 1 and USB 3 0 ports on both the front and rear panels These USB ports allow you to connect USB devices such as storage devices To connect a USB storage device Insert the USB storage device to your computer DO NOT remove a USB storage device when data transfer is in progres...

Page 32: ... speakers This desktop PC comes with microphone ports and speaker ports on both the front and rear panels The audio I O ports located on the rear panel allow you to connect 2 channel 4 channel 6 channel and 8 channel stereo speakers Connecting Headphone and Mic Connecting 2 channel Speakers ...

Page 33: ...English ASUS CG8580 31 English Connecting 4 channel Speakers Connecting 6 channel Speakers ...

Page 34: ...32 Chapter 3 Connecting devices to your computer English English Connecting 8 channel Speakers ...

Page 35: ...sion to enlarge your Windows desktop To set up multiple displays 1 Turn off your computer 2 Connect the two monitors to your computer and connect the power cords to the monitors Refer to Setting up your computer section in Chapter 1 for details on how to connect a monitor to your computer When a graphics card is installed in your computer connect the monitors on the output ports of the graphics ca...

Page 36: ...your desktop space Show desktop only on 1 2 Select this option to show desktop only on monitor 1 or monitor 2 Remove this display Select this options to remove the selected display 6 Click Apply or OK Then click Keep Changes on the confirmation message 3 Turn on your computer 4 Do any of the following to open the Screen Resolution setting screen Click Control Panel Appearance and Personalization D...

Page 37: ...onnect a High Definition TV HDTV to the HDMI port of your computer You need an HDMI cable to connect the HDTV and the computer The HDMI cable is purchased separately To get the best display performance ensure that your HDMI cable is less than 15 meters ...

Page 38: ...36 Chapter 3 Connecting devices to your computer English ...

Page 39: ...air to make sure that your knees are slightly higher than your hips to relax the backs of your thighs If necessary use a footrest to raise the level of your knees Adjust the back of your chair so that the base of your spine is firmly supported and angled slightly backward Sit upright with your knees elbows and hips at an approximately 90º angle when you are at the PC Place the monitor directly in ...

Page 40: ... system allows you to read from and write to different memory card drives To use the memory card 1 Insert the memory card into the card slot 2 Select a program from the AutoPlay window to access your files If AutoPlay is NOT enabled in your computer click Windows 7 Start button on the taskbar click Computer and then double click the memory card icon to access the data on it Each card slot has its ...

Page 41: ...5 Select a program from the AutoPlay window to access your files Removing an optical disc To remove an optical disc 1 While the system is on do either of the following to eject the tray Press the eject button below the drive bay cover Right click the CD DVD drive icon on the Computer screen and then click Eject 2 Remove the disc from the disc tray If AutoPlay is NOT enabled in your computer click ...

Page 42: ...board Use the bundled PS 2 to USB adaptor to connect your gaming keyboard to your computer s USB 2 0 port 1 Align and insert the wrist pad into the gaming keyboard s wrist pad slots A Using both thumbs push down the wrist pad until it snaps in place B Check the section Package contents for the package contents of the ASUS ROG U9N Gaming Keyboard Restart your computer Windows automatically installs...

Page 43: ...g Mouse comes with a left button a right button a scroll wheel two side buttons a DPI button and a specially designed Profile Switch button Keys Description Keys Description 1 Left button 7 GX900 logo 2 Right button 8 IE Forward button 3 Scroll wheel 9 IE Backward button 4 DPI switch 10 Mouse feet 5 Profile switch button Profile indicator 11 Mouse feet and Twin Eye Laser sensor 6 LED DPI indicator...

Page 44: ...ting Windows 7 for the first time the program automatically detected the mouse and can be accessed directly Otherwise you will have to manually install the setup utility from the bundled Support DVD To install the program from Support DVD place the support DVD into the optical drive and follow the onscreen instructions to launch the program If Autorun is NOT enabled in your computer browse the con...

Page 45: ...ious settings 6 Click to display the different profile color indicators and their status 7 Click to load the saved profile to your mouse 8 Click to save the current profile settings to your hard disk drive 9 Click to reset all the mouse settings to the factory default settings 10 Click to save the settings you have made 11 Click to save the settings you have made and exit the program Each profile ...

Page 46: ...profile icon 4 Select the function for each button action from the drop down list Refer to the table below for more details Functions Description L Button Left mouse button function R Button Right mouse button function M Button Middle mouse button function IE Backward IE Backward button function If selected press the button to go back to the previous page IE Forward IE Forward button function If s...

Page 47: ...nly works for Microsoft Office applications under the Windows 7 Vista operating systems Rapid Fire mouse Press the button to do a rapid fire in a click to attack game which is the same as triple clicking the left mouse button Rapid Fire key Press the button to do a rapid fire in a game using the spacebar to attack which is the same as pressing the keyboard s spacebar thrice Web Browser Press the b...

Page 48: ...or mouse actions Stop Click to stop recording the keystrokes and or mouse actions Clear Click to clear all saved instructions Move up down Click to move up down the selected instruction Instruction cycle time When Timing is unchecked all the actions delay time will be the value you chose from the drop down list Loop Sets the macro to run at a click and stop when clicked again Fire Sets the macro t...

Page 49: ...ctions Stop Click to stop recording the keystrokes and or mouse actions Clear Click to clear all saved instructions Move up down Click to move up down the selected instruction Instruction cycle time When Timing is unchecked all the actions delay time will be the value you chose from the drop down list Loop Sets the script to run at a click and stop when clicked again Fire Sets the script to run on...

Page 50: ...48 Chapter 4 Using your computer English ...

Page 51: ...etwork LAN 2 Connect one end of an RJ 45 cable to the LAN RJ 45 port on the rear panel of your computer and the other end to a DSL cable modem Refer to the documentation that came with your DSL cable modem 3 Turn on the DSL cable modem and your computer 4 Configure the necessary Internet connection settings Contact your Internet Service Provider ISP for details or assistance in setting up your Int...

Page 52: ...one end of an RJ 45 cable to the LAN RJ 45 port on the rear panel of your computer and the other end to your LAN 2 Turn on your computer 3 Configure the necessary Internet connection settings Contact your network administrator for details or assistance in setting up your Internet connection USB3 0 UASP USB KB MS RJ 45 cable LAN ...

Page 53: ...er to the Internet through a wireless connection To establish a wireless connection you need to connect to a wireless access point AP USB3 0 UASP USB KB MS USB KB MS Wireless AP Modem USB3 0 UASP USB KB MS Wireless AP Modem To establish a wireless connection use either of the following method OR ...

Page 54: ...ecured wireless network then click OK 4 Wait while your computer is connecting to the wireless network 5 The wireless connection is established successfully The connection status is displayed and the network icon displays the connected status To increase the range and sensitivity of the wireless radio signal connect the external antennas to the antenna connectors on the ASUS WLAN Card Place the an...

Page 55: ...date the motherboard BIOS to display the system information and to customize the settings of AI Suite II The Support DVD and Recovery DVD may not be included in the package You may use the Recovery Partition feature to create the Support DVD and Recovery DVD For details refer to Recovering your system in this chapter Click to select a utility Click to monitor sensors or CPU frequency Click to upda...

Page 56: ...ngs To launch System Level up click Tool System Level Up on the AI Suite II menu bar In setting the function assign the hot keys for the system level up profile exchange You can adjust the hot key settings manually See figure below for details Adjust the System Level Up via two methods BIOS In the BIOS Setup program click AI Tweaker System Level Up and select your desired option OC Button Press th...

Page 57: ...ured that your computer is always at a healthy operating condition To launch Probe II Click Tool Probe II on the AI Suite II main menu bar To configure Probe II Click the Voltage Temperature Fan Speed tabs to activate the sensors or to adjust the sensor threshold values The Preference tab allows you to customize the time interval of sensor alerts or change the temperature unit Loads the default th...

Page 58: ...l Sensor Recorder on the AI Suite II main menu bar To configure Sensor Recorder Click the Voltage Temperature Fan Speed tabs and select the sensors that you want to monitor The History Record tab allows you to record the changes in the sensors that you enable Select the sensors that you want to monitor Click to zoom in out the Y axis Click to zoom in out the X axis Click to return to the default m...

Page 59: ...tarts when your PC is in S0 State Ai Charger helps charge the connected USB devices even when your PC is in S3 S4 S5 States after it starts in S0 State Check your USB device manufacturer if it fully supports the BC 1 1 function The actual charging speed may vary with your USB device s conditions Ensure to remove and reconnect your USB device after enabling or disabling Ai Charger to ensure normal ...

Page 60: ...Click Monitor Sensor on the AI Suite II main menu bar Launching CPU Frequency The CPU Frequency panel displays the current CPU frequency and CPU usage To launch CPU frequency Click Monitor CPU Frequency on the AI Suite II main menu bar Sensor panel CPU Frequency panel Resident in the right pane system information area The Monitor menu The Monitor menu includes the Sensor and CPU Frequency panels ...

Page 61: ...u allows you to update the motherboard BIOS and the BIOS boot logo with the ASUS designed update utilities ASUS Update The ASUS Update is a utility that allows you to manage save and update the motherboard BIOS in Windows OS The ASUS Update utility allows you to u pdate the BIOS directly from the Internet download the latest BIOS file from the Internet update the BIOS from an updated BIOS file sav...

Page 62: ...t logo which is the image appearing on screen during the Power On Self Tests POST Otherwise click No 5 Follow the onscreen instructions to complete the update process 2 Locate the BIOS file from the Open window click Open and click Next 3 Click Yes if you want to change the boot logo which is the image appearing on screen during the Power On Self Tests POST Otherwise click No 4 Follow the onscreen...

Page 63: ...motherboard CPU and memory slots Click the MB tab to see the details on the motherboard manufacturer product name version and BIOS Click the CPU tab to see the details on the processor and the Cache Click the Memory tab and then select the memory slot to see the details on the memory module installed on the corresponding slot ...

Page 64: ...elect the application that you want to enable Bar allows you to modify the bar setting Skin allows you to customize the interface s contrast brightness saturation hue and gamma Click the Disk tab and then select each disk to see the details on it The Support screen The Support screen displays the information about the ASUS website technical support website download support website or contact ...

Page 65: ...he main window and to launch the AI Manager either from the quick bar or taskbar ASUS AI Manager ASUS AI Manager is a utility which gives you quick and easy access to frequently used applications Launching AI Manager To launch the AI Manager from the Windows desktop click Start All Programs ASUS AI Manager AI Manager 1 xx xx The AI Manager quick bar appears on the desktop ...

Page 66: ...p the AI Manager on the taskbar Click the Close button to quit the AI Manager Main The Main menu contains three utilities AI Disk AI Security and AI Booting Click the arrow on the Main menu icon to browse through the utilities in the main menu AI Disk AI Disk allows you to easily clear temporary IE files IE cookies IE URLs IE history or the Recycle Bin Click the AI Disk icon on the quick bar to di...

Page 67: ...a password with at most 20 alphanumeric characters 2 Confirm the password 3 Key in the password hint recommended 4 When done click Ok 5 Select the device you want to lock then click Apply 6 Key in the password you have set previously then click Ok To unlock the device 1 Deselect the locked device then click Apply 2 Key in the password you have set previously then click Ok To change the password Cl...

Page 68: ...es My Favorites allows you to add applications that you frequently use saving you from searching for the applications throughout your computer To add an application 1 Click Add then locate the application you want to add to My Favorites 2 Click Open on the file location window The application is added to My Favorites list Right click on the application icon to launch delete or rename the selected ...

Page 69: ...pport window to go to the ASUS website technical support website download support website or contact information Information Click the tab on the Information window to see the detailed information about your system motherboard CPU BIOS installed device s and memory ...

Page 70: ...ate different kinds of data Installing Nero 9 To install Nero 9 1 Insert the Nero 9 DVD into your optical drive 2 If Autorun is enabled the main menu appears automatically If Autorun is disabled double click the SeupX exe file from the main directory of your Nero 9 DVD 3 From the main menu click Nero 9 Essentials ...

Page 71: ...English ASUS CG8580 69 English 4 Select the language you want to use for Installation Wizard Click Next 5 Click Next to continue 6 Tick I accept the License Conditions When done click Next ...

Page 72: ...70 Chapter 6 Using the utilities English English 7 Select Typical then click Next 8 Tick Yes I want to help by sending anonymous application data to Nero then click Next 9 When done click Exit ...

Page 73: ...English ASUS CG8580 71 English Burning files To burn files 1 From the main menu click Data Burning Add 2 Select the files that you want to burn When done click Add ...

Page 74: ...apter 6 Using the utilities English English 3 After selecting files that you want to burn click Burn to burn the files to a disc For more details about using Nero 9 refer to the Nero website at www nero com ...

Page 75: ...ECOVERY The Recovery Partition is created at the factory and cannot be restored if deleted Take your Desktop PC to an authorized ASUS service center if you have problems with the recovery process Using the Recovery Partition 1 Press F9 during bootup 2 Press Enter to select Windows Setup EMS Enabled 3 Select one of the following recovery options System Recovery This feature allows you to restore th...

Page 76: ...ptical drive Your Desktop PC needs to be powered ON 2 Restart the Desktop PC and press F8 on bootup and select the optical drive may be labeled as CD DVD and press Enter to boot from the Recovery DVD 3 Select OK to start to restore the image 4 Select OK to confirm the system recovery Restoring will overwrite your hard drive Ensure to back up all your important data before the system recovery 5 Fol...

Page 77: ...moothly for the Intel 2012 Desktop responsiveness you must meet the following requirements 1 CPU Intel 3rd 2nd generation Core Processor family 2 OS Windows 7 operating systems 3 SSD One dedicated SSD Solid State Disk to support Intel Smart Response and Intel Rapid Start Technology is necessary Refer to the SSD Capacity Requirements table for the information of SSD size partition capacity and syst...

Page 78: ...ponse Intel Rapid Start and Intel Smart Connect Separate 20GB and 2GB partition SSD size 22GB Separate 20GB and 4GB partition SSD size 24GB Separate 20GB and 8GB partition SSD size 28GB The SSD used for Intel Rapid Start and Intel Smart Response is not allowed for creating RAID Due to OS behavior Intel Rapid Start Technology works inefficiently with over 4G system memory under Windows 7 32 bit ope...

Page 79: ...mode in BIOS setup is necessary Installing Intel Smart Response Technology Place the support DVD to the optical drive The Drivers installation tab appears if your computer has enabled the Autorun feature Click the Drivers tab then click Intel Rapid Storage Technology Driver software Follow the onscreen instructions to complete the installation Using the Intel Smart Response Technology Click Accele...

Page 80: ...tart Technology Intel Rapid Start Technology allows you to quickly resume your computer from sleeping mode Saving your computer s system memory to the configured SSD provides a faster wake up response time but keeps the energy in a low profile Before applying Intel Rapid Start Technology go to Advanced Mode Advanced PCH Configuration in BIOS item and enable Intel Rapid Start Technology Ensure to f...

Page 81: ... 5 Key in the required partition size and must be equal to the system DRAM memory 1GB 1024MB Click Shrink Go to Start Control Panel System and Security System and check the DRAM size information The unallocated volume is allocated to the selected disk If your SSD is smaller than 64GB and is set to Full disk capacity caching option for Intel Smart Response you can not see any volume in the Disk Man...

Page 82: ...e create partition primary and press Enter 10 After creating a primary partition type detail disk and press Enter to view the details of the partitioned disk 11 Select the RAW volume which has the same size as the shrinked volume type select volume x x number and press Enter to store the Intel Rapid Start partition The value x refers to a disk number where you want to create the store partition Th...

Page 83: ...Enabling and disabling the Intel Rapid Start Technology under the OS Install the Intel Rapid Start Technology first from your support DVD in order to launch the Intel Rapid Start Manager After creating the partition launch the Intel Rapid Start Manager to enable or disable the Intel Rapid Start Technology Click the Show hidden icons arrow from the right side of the task bar and click Intel Rapid S...

Page 84: ...me recovery type select disk x x number and press Enter 1 4 The value x refers to a disk number where you want to delete the store partition 2 Tick On in the Status field to enable the function and click Save Click to enable or disable battery saving mode This function only applies to notebooks Select and click to enable or disable the function Click to enable or disable the timer When enabled mov...

Page 85: ...lete partition override and press Enter The diskpart utility deletes the selected partition 7 In the desktop click Start right click Computer and click Manage 8 In the Computer Management window click Disk Management right click the shrinked new volume and select Extend Volume 9 As the Extend Volume Wizard appears click Next The value x refers to a disk number where you want to delete the store pa...

Page 86: ...ed and activated the Intel Smart Connect Technology periodically wakes up the system from sleeping mode performs user state gathering and initiates re entry to sleeping mode to wake up after a set time interval Intel Smart Connect Technology supports Windows Live Mail Microsoft Outlook and Seesmic applications It is necessary to enable the items of the PCH Configuration in the BIOS before applying...

Page 87: ... that the internet is in connection when enabling the Intel Smart Connect Technology Click Start All Programs Intel Intel Smart Connect Technology In the Basic tab click Enable Updating When enabled the Advanced tab is available for advanced function settings 1 Click to enable or disable the function When the scroll bar is activated adjust the waking up time period for Internet data update Click t...

Page 88: ... the Advanced tab To reset to defaults click Reset All to Defaults 4 In the Advanced tab set up the schedule during low power usage time period for power saving This setting only applies to the assigned time period 5 In the Help tab click About to view the feature s version Click Topics to learn more about the Intel Smart Connect Technology and its configuration ...

Page 89: ... not responding then click End Task If the keyboard is not responding Press and hold the Power button on the top of your chassis until the computer shuts down Then press the Power button to turn it on I cannot connect to a wireless nestwork using the ASUS WLAN Card on selected models only Ensure that you enter the correct network security key for the wireless network you want to connect to Connect...

Page 90: ...function works only under Windows When a graphics card is installed on your computer ensure that you connect the monitors to the output port on the graphics card Check if the multiple displays settings are correct Refer to section Connecting multiple external displays in Chapter 3 for details My computer cannot detect my USB storage device The first time you connect your USB storage device to your...

Page 91: ...no sound Ensure that you connect your speakers to the Line out port lime on the front panel or the rear panel Check if your speak is connected to a electrical source and turned on Adjust your speakers volume Ensure that your computer s system sounds are not Muted If it is muted the volume icon is displayed as To enable the system sounds click from the Windows notification area then click If it is ...

Page 92: ...s turned on Your computer s power cord is not properly connected Ensure that the power cord is properly connected Use other compatible power cord PSU Power supply unit problems Please call our Call Center for repair Display Problem Possible Cause Action No display output after turning the computer on Black screen The signal cable is not connected to the correct VGA port on your computer Connect th...

Page 93: ...our Internet Service Provider ISP for the correct LAN settings Problems caused by the anti virus software Close the anti virus software Driver problems Reinstall the LAN driver Audio Problem Possible Cause Action No Audio Speaker or headphone is connected to the wrong port Refer to your computer s user manual for the correct port Disconnect and reconnect the speaker to your computer Speaker or hea...

Page 94: ... The system often hangs or freezes Hard disk drive failure Send the damaged hard disk drive to ASUS Service Center for servicing Replace with a new hard disk drive Memory module problems Replace with compatible memory modules Remove the extra memory modules that you have installed then try again There is not enough air ventilation for your computer Move your computer to an area with better air flo...

Page 95: ...t asus com to download the latest BIOS versions Computer is too noisy when in use The CPU fan has been replaced Ensure that you are using a compatible or ASUS recommended CPU fan There is not enough air ventilation for the computer Ensure that your computer is working in an area with good air flow The system temperature is too high Update the BIOS If you know how to reinstall the motherboard try t...

Page 96: ...787 Support fax 1 812 284 0883 Online support support asus com ASUS COMPUTER GmbH Germany and Austria Address Harkort Str 21 23 D 40880 Ratingen Germany Fax 49 2102 959911 Web site www asus de Online contact www asus de sales Technical Support Telephone Component 49 1805 010923 Telephone System Notebook Eee LCD 49 1805 010920 Support Fax 49 2102 9599 11 Online support support asus com EUR 0 14 min...

Page 97: ...ASUS Essentio Desktop PC CG8580 Benutzerhandbuch ...

Page 98: ...EIT FÜR EINEN BESTIMMTEN ZWECK ZUR VERFÜGUNG UNTER KEINEN UMSTÄNDEN HAFTET ASUS SEINE DIREKTOREN VORSTANDSMITGLIEDER MITARBEITER ODER AGENTEN FÜR INDIREKTE BESONDERE ZUFÄLLIGE ODER SICH ERGEBENDE SCHÄDEN EINSCHLIESSLICH SCHÄDEN AUF GRUND VON PROFITVERLUST GESCHÄFTSVERLUST BEDIENUNGSAUSFALL ODER DATENVERLUST GESCHÄFTSUNTERBRECHUNG UND ÄHNLICHEM AUCH WENN ASUS VON DER WAHRSCHEINLICHKEIT DERARTIGER S...

Page 99: ...rstellen 120 Computer schützen 121 Windows Hilfe und Support 122 Kapitel 3 Anschließen von Geräten an Ihren Computer Anschließen eines USB Datenträgers 123 Anschließen von Mikrofon und Lautsprechern 124 Anschließen von mehreren externen Anzeigegeräten 127 Anschließen eines HDTV 129 Kapitel 4 Computer verwenden Richtige Sitzhaltung beim verwenden des Desktop PCs 131 Speicherkartenleser verwenden 13...

Page 100: ... der Hilfsprogramme ASUS AI Suite II 147 ASUS AI Manager 157 Nero 9 162 Systemwiederherstellung 167 Einführung in die Intel 2012 Desktop Responsiveness Technologie 169 Kapitel 7 Problembehandlung Problembehandlung 181 ASUS Kontaktinformationen 188 ...

Page 101: ...und verwendet Hochfrequenzenergie und kann wenn es nicht gemäß den Anweisungen des Herstellers installiert und bedient wird den Radio und Fernsehempfang empfindlich stören Es wird jedoch nicht garantiert dass bei einer bestimmten Installation keine Interferenzen auftreten Wenn das Gerät den Radio oder Fernsehempfang empfindlich stört was sich durch Aus und Einschalten des Geräts feststellen lässt ...

Page 102: ...ieser Kopierschutztechnologie muss von Macrovision Corporation genehmigt werden und ist wenn nicht anderweitig von der Macrovision Corporation genehmigt nur für private oder eingeschränkte Vorführungszwecke vorgesehen Reverse Engineering oder Demontage ist verboten Warnung Lithium Ionen Akkus CAUTION Danger of explosion if battery is incorrectly replaced Replace only with the same or equivalent ty...

Page 103: ...oder Feuchtigkeit Kein Modembetrieb während eines elektrischen Sturms Akku Sicherheitswarnung Batterie nicht in offenes Feuer werfen Kontakte nicht kurzschließen Den Akku nicht auseinandernehmen Dieses Produkt in Umgebungstemperaturen zwischen 0 C 32 F und 35 C 95 F verwenden Die Lufteinlässe des Desktop PCs nicht abdecken um eine Überhitzung des Systems zu vermeiden Keine beschädigten Stromkabel ...

Page 104: ...d zusätzliche Informationen zur Erleichterung bei der Ausführung einer Aufgabe WICHTIG Anweisungen die Sie beim Ausführen einer Aufgabe befolgen müssen Weitere Informationsquellen An den folgenden Quellen finden Sie weitere Informationen und Produkt sowie Software Updates ASUS Webseiten ASUS Webseiten enthalten weltweit aktualisierte Informationen über ASUS Hardware und Softwareprodukte Beziehen S...

Page 105: ...erscheiden Für Details zur Verwendung der mitgelieferten Tastatur und Maus beziehen Sie sich auf die Abschnitte Verwenden der ASUS ROG Spieltastatur und Verwenden der ASUS GX900 Spielmaus ASUS Essentio Desktop PC ASUS ROG U9N Gaming Tastaturpaket x1 ASUS GX900 Gaming Mauspaket x1 Installation Guide Netzkabel x1 Nero 9 Burning Software DVD x1 Installationshilfe x1 Garantiekarte x1 Support DVD x1 Wi...

Page 106: ...104 Deutsch ...

Page 107: ...llkommen Vielen Dank für den Kauf eines ASUS Essentio CG8580 Desktop PCs Der ASUS Essentio CG8580 Desktop PC liefert topaktuelle Leistung unvergleichliche Zuverlässigkeit und benutzerorientierte Anwendungen All diese Eigenschaften wurden in diesem verblüffend futuristischen und eleganten Systemgehäuse vereint Lesen Sie die ASUS Garantiekarte sorgfältig durch bevor Sie Ihren ASUS Desktop PC in Betr...

Page 108: ...sst das System Level Up Übertaktungs Profil Ihres Computers an 9 USB 3 0 Anschlüsse Diese Universal Serial Bus 3 0 USB 3 0 Anschlüsse nehmen USB 3 0 Geräte wie Maus Drucker Kamera PDA und andere Geräte auf Bei der Installation eines Windows Betriebssystems verbinden Sie KEINE Tastatur Maus mit den USB 3 0 Anschlüssen Der Beschränkungen des USB 3 0 Controllers wegen können USB 3 0 Geräte nur unter ...

Page 109: ...SB 3 0 Anschlüssen Der Beschränkungen des USB 3 0 Controllers wegen können USB 3 0 Geräte nur unter Windows und nur nach der Installation eines USB 3 0 Treibers verwendet werden USB 3 0 Geräte können nur als Datenspeicher verwendet werden Wir empfehlen Ihnen für eine schnellere Datenübertragung und bessere Leistung alle USB 3 0 Geräte mit den USB 3 0 Anschlüssen zu verbinden 2 USB 2 0 Anschlüsse D...

Page 110: ...SP Modus Der untere Port unterstützt USB BIOS Flashback 7 Seitenlautsprecherausgang grau Dieser Anschluss verbindet in einer 8 Kanal Audiokonfiguration mit den Seitenlautsprechern 8 Hinterer Lautsprecherausgang schwarz Dieser Anschluss verbindet in einer 4 Kanal 6 Kanal oder 8 Kanal Audiokonfiguration mit den hinteren Lautsprechern 9 Mitte Subwoofer Anschluss orange Dieser Anschluss verbindet mit ...

Page 111: ... Aus 15 Stromanschluss Nennleistung 100 120 200 240Vac 60 50Hz 10 5A Verbinden Sie das Netzkabel mit diesem Anschluss 16 PS 2 Kombianschluss für Tastatur Maus lila grün Für den Anschluss einer PS2 Maus oder Tastatur 17 Optischer S PDIF Ausgang Dieser Anschluss verbindet über ein optisches S PDIF Kabel mit externen Audiogeräten 18 HDMI Anschluss Dies ist High Definition Multimedia Interface HDMI An...

Page 112: ...n Monitors ASUS Grafikkarte verwenden nur bei bestimmten Modellen Verbinden Sie den Monitor mit dem Anzeigeausgang der aufgesetzten ASUS Grafikkarte So verbinden Sie einen externen Monitor mit der ASUS Grafikkarte 1 Verbinden Sie einen Monitor mit dem Anzeigeausgang der ASUS Grafikkarte 2 Schließen Sie den Monitor an die Stromversorgung an Die Anzeigeausgänge der ASUS Grafikkarten können sich je n...

Page 113: ...n HDMI Monitor mit dem HDMI Anschluss auf der Rückseite Ihres Computers 2 Schließen Sie den Monitor an die Stromversorgung an Falls Ihr Computer mit einer ASUS Grafikkarte ausgestattet wurde ist die Grafikkarte in BIOS als primäres Anzeigegerät eingestellt Verbinden Sie den Monitor deshalb mit dem Anzeigeausgang der ASUS Grafikkarte Um mehrere externe Monitore mit dem Computer zu verbinden beziehe...

Page 114: ... Ihres Computers und das andere Ende mit der Steckdose USB3 0 UASP USB KB MS USB3 0 UASP USB KB MS USB3 0 UASP USB KB MS Das vorinstallierte Einrichtungsdienstprogramm für die mitgelieferte Gaming Maus GX900 von ASUS ist nur zugänglich wenn die Maus vor dem ersten Start von Windows 7 an Ihren Computer angeschlossen wird Andernfalls müssen Sie das Einrichtungsdienstprogramm manuell von der mitgelie...

Page 115: ...chalten Sie den Monitor ein 2 Schalten Sie den Stromschalter ein und drücken Sie die Einschalttaste Ihres Computers Computer ausschalten So schalten Sie den Computer aus 1 Schließen Sie alle laufenden Anwendungen 2 Klicken Sie im Windows Desktop auf 3 Klicken Sie auf Herunterfahren um das Betriebssystem herunterzufahren 4 Warten Sie bis das Betriebssystem automatisch hochlädt Einschalttaste USB3 0...

Page 116: ...114 Kapitel 1 Erste Schritte Deutsch ...

Page 117: ...ationen ein um Ihr Kennwort einzurichten und klicken Sie auf Weiter Next Sie können auch auf Weiter Next klicken und diesen Schritt ohne ein Kennwort einzugeben zu überspringen 6 Lesen Sie sorgfältig die Lizenzbedingungen License terms Wählen Sie Ich akzeptiere die Lizenzbedingungen I accept the license terms und klicken Sie auf Weiter Next 7 Wählen Sie zwischen Empfohlene Einstellungen verwenden ...

Page 118: ...g Started verwenden Das im Startmenü aufgelistete Element Erste Schritte Getting Started enthält Informationen über allgemeine Aufgaben wie das Personalisieren von Windows Hinzufügen neuer Benutzer und Dateitransfer um Sie mit der Benutzeroberfläche von Windows 7 vertraut zu machen So verwenden Sie das Element Erste Schritte 1 Klicken Sie in der Windows Taskleiste auf das Startsymbol um das Startm...

Page 119: ...r Liste lösen Unpin from this list Programme an Startmenü oder Taskleiste anheften So heften Sie Programme ans Startmenü oder Taskleiste an 1 Klicken Sie in der Windows Taskleiste auf das Startsymbol um das Startmenü zu laden 2 Klicken Sie mit der rechten Maustatste auf das Gewünschte Element 3 Wählen Sie An Taskleiste anheften Pin to Taskbar oder An Startmenü anheften Pin to Start menu Sie können...

Page 120: ...tere Details beziehen Sie sich auf den Abschnitt Windows Wartungscenter verwenden in diesem Kapitel Symbole und Benachrichtigungen anpassen Sie können die Symbole und Benachrichtungen in der Taskleiste oder im Infobereich wahlweise ein oder ausblenden So passen Sie Symbole und Benachrichtungen an 1 Klicken Sie im Infobreich auf das Pfeilsymbol 2 Klicken Sie auf Anpassen Customize 3 Wählen Sie in d...

Page 121: ...ners anzupassen Sie können auch mit der rechten Maustaste den Ansichtsbereich irgendwo anklicken Ansicht View wählen und die gewünschte Ansichtsart bestimmen Dateien ordnen So ordnen Sie Dateien 1 Öffnen Sie Windows Explorer 2 Klicken Sie im Feld Anordnen Arrange by um die Dropdownliste anzuzeigen 3 Wählen Sie die gewünschte Anordnungsart Dateien sortieren So sortieren Sie Dateien 1 Öffnen Sie Win...

Page 122: ...ndows choose recommended oder Auswahl durch Benutzer Let me choose für Ihren Backup System wiederherstellen Die Funktion Windows Systemwiederherstellung legt einen Wiederherstellungspunkt an in dem die Systemeinstellungen des Computers an einem Zeitpunkt Datum gespeichert werden Dies erlaubt Ihnen die Wiederherstellung oder das Rückgängigmachen von Änderungen Ihres Computersystems ohne dass Ihre p...

Page 123: ...bt Ihnen den Abruf und Installation der neuesten Updates um die Sicherheit und Leistung Ihres Computers zu verbessern Windows Update ausführen So führen Sie Windows Update aus 1 Klicken Sie in der Windows Taskleiste auf das Startsymbol um das Startmenü zu laden 2 Wählen Sie Alle Programme All Programs Windows Update 3 Klicken Sie im Windows Update Fenster auf die Aufgabe die Sie ausführen möchten ...

Page 124: ...e Version erwerben nachdem die Probezeit abgelaufen ist So aktivieren Sie Trend Micro Internet Security 1 Führen Sie die Anwendung Trend Micro Internet Security aus 2 Lesen Sie sorgfältig die Lizenzbedingungen License terms Klicken Sie auf Zustimmen Aktivieren Agree Activate 3 Geben Sie Ihre E Mail Adresse und Ihren Standort ein Klicken Sie auf Weiter Next 4 Klicken Sie auf Fertigstellen Finish um...

Page 125: ... USB Datenträger 1 Klicken Sie im Windows Infobereich Ihres Computers auf und dann auf USB2 0 Flahslaufwerk auswerfen Eject USB2 0 FlashDisk oder USB3 0 Flahslaufwerk auswerfen Eject USB3 0 FlashDisk falls Sie einen USB3 0 Datenträger verwenden Der Name variiert je nach USB Datenträgermodell 2 Wenn die Nachricht Hardware kann jetzt entfernt werden Safe to Remove Hardware eingeblendet wird entferne...

Page 126: ...rn Dieser Desktop PC enthält Mikrofon und Lautsprecheranschlüsse auf der Vorder sowie Rückseite Die auf der Rückseite gelegenen Audio E A Anschlüsse ermöglichen Ihnen den Anschluss von 2 Kanal 4 Kanal 6 Kanal and 8 Kanal Stereolautsprechern Anschluss von Kopfhörern und Mikrofon Anschluss von 2 Kanal Lautsprechern ...

Page 127: ...Deutsch ASUS CG8580 125 Deutsch Anschluss von 4 Kanal Lautsprechern Anschluss von 6 Kanal Lautsprechern ...

Page 128: ...126 Kapitel 3 Anschließen von Geräten an Ihren Computer Deutsch Deutsch Anschluss von 8 Kanal Lautsprechern ...

Page 129: ... Ihres Windows Desktops verwenden So richten Sie mehrere Anzeigegeräte ein 1 Schalten Sie den Computer aus 2 Verbinden Sie die zwei Monitore mit Ihrem Computer sowie die Netzteile mit den Monitoren Beziehen Sie sich auf den Abschnitt Einrichten Ihres Computer in Kapitel 1 für Details zum Verbinden eines Monitors mit Ihrem Computer Wenn eine Grafikkarte auf Ihren Computer installiert wurde verbinde...

Page 130: ...ropdownliste Mehrere Anzeigen Multiple displays den gewünschten Anzeigemodus Diese Anzeigen duplizieren Duplicate these displays Treffen Sie diese Auswahl um den zusätzlichen Monitor als einen Duplikat Ihres Hauptmonitors zu verwenden Diese Anzeigen erweitern Extend these displays Treffen Sie diese Auswahl um den zusätzlichen Monitor als eine Erweiterung Ihres Hauptmonitors zu verwenden Dies vergr...

Page 131: ... ein High Definition TV HDTV mit dem HDMI Anschluss Ihres Computers Sie benötigen ein HDMI Kabel um ein HDTV mit dem Computer zu verbinden Das HDMI Kabel muss separat erworben werden Um die beste Anzeigeleistung zu erhalten sollte das HDMI Kabel kürzer als 15 Meter sein ...

Page 132: ...130 Kapitel 3 Anschließen von Geräten an Ihren Computer Deutsch ...

Page 133: ...enkel zu entspannen Verwenden Sie falls erforderlich eine Fussablage um Ihre Knie anzuheben Stellen Sie die Rücklehne Ihres Stuhls ein so dass die Unterseite Ihres Rückgrats fest abgestützt und etwas nach hinten gewinkelt wird Sitzen Sie aufrecht so dass Ihre Knie Ellbogen und Hüften beim Sitzen vor dem PC in etwa einen 90º Winkel bilden Stellen Sie den Monitor direkt vor Ihnen auf und passen die ...

Page 134: ...cherkarte entfernen So verwenden Sie eine Speicherkarte 1 Stecken Sie eine Speicherkarte in den Kartensteckplatz 2 Wählen Sie im AutoPlay Fenster ein Programm um auf die Dateien zuzugreifen Falls AutoPlay auf Ihren Computer NICHT aktiviert ist klicken Sie in der Taskleiste von Windows 7 auf die Start Taste klicken Sie auf Arbeitsplatz Computer und doppelklicken Sie das Speicherkartensymbol um auf ...

Page 135: ...f die Dateien zuzugreifen Optischen Datenträger entfernen So entfernen Sie einen optischen Datenträger 1 Folgen Sie einer der folgenden Vorgehensweisen um das Laufwerksfach auszuwerfen Drücken Sie unten am Laufwerk auf die Auswurfstaste Klicken Sie im Fenster Arbeitsplatz Computer mit rechten Maustaste auf das Laufwerkssymbol und wählen Sie Auswerfen Eject 2 Entfernen Sie den Datenträger aus dem L...

Page 136: ...tur einrichten 1 Verwenden Sie den mitgelieferten PS 2 zu USB Adapter um die Spieltastatur mit einem USB 2 0 Anschluss Ihres Computers zu verbinden 2 Richten Sie die Handauflage für die Spieltastatur an deren Handauflageöffnungen aus und stecken Sie die Handauflage hinein A Drücken Sie die Handauflage mit beiden Daumen nach unten bis diese in die Tastatur einrastet B Verwenden der ASUS ROG U9N Spi...

Page 137: ...eschreibung Tasten Beschreibung 1 Linke Taste 7 GX900 Logo 2 Rechte Taste 8 Internet Explorer Weiter Taste 3 Scroll Rad 9 Internet Explorer Zurück Taste 4 DPI Umschalter 10 Mausfüße 5 Profilumschalter Profilanzeige 11 Twin Eye Lasersensor 6 DPI LED Anzeige 12 Gewichte 5 x 4 5g Blöcke Um das Mausgewicht anzupassen können Sie Gewichtblöcke hinzufügen entfernen ASUS GX900 Spielmaus ist mit Linken Rec...

Page 138: ...omputer anschließen erkennt das Programm die Maus automatisch und kann direkt darauf zugreifen Andernfalls müssen Sie das Einrichtungsdienstprogramm manuell von der mitgelieferten Support DVD installieren Legen Sie die Support DVD zur Installation des Programmes von der DVD in das optische Laufwerk ein befolgen Sie zum Ausführen des Programmes die Bildschirmanweisungen Falls Autorun deaktiviert is...

Page 139: ...chenden DPI Stufe 5 Tastenkonfiguration auf die gespeicherten Einstellungen zurücksetzen 6 Profilfarbanzeigen und deren Status 7 Gespeichertes Profil importieren 8 Ein Profil auf einen Datenträger exportieren 9 Alle Einstellungen zurücksetzen 10 Einstellungen speichern 11 Vorgenommenen Einstellungen speichern und Programm beenden Jedes Profil hat zwei DPI Stufen Falls Sie DPI Stufe 1 verwenden leu...

Page 140: ...ion aus der Dropdown Liste Für weitere Details beziehen Sie sich auf die nachfolgende Tabelle Funktionen Beschreibung L Taste Als linke Maustaste R Taste Als rechte Maustaste M Taste Als mittlere Maustaste IE Zurück Internet Explorer Zurück Taste Sie können diese Taste drücken um zurück zur vorherigen Seite zu gelangen IE Weiter Internet Explorer Weiter Taste Sie können diese Taste drücken um vor ...

Page 141: ...llte Profile 1 2 3 verwenden Rad links rechts Nach Links Rechts scrollen Diese Funktion funktioniert nur bei Microsoft Office Anwendungen unter Windows 7 Vista Dauerfeuer Maus Dauerfeuer in einem Spiel ausführen wie ein dreifacher Klick auf die linke Maustaste Dauerfeuer Taste Dauerfeuer in einem Spiel ausführen wie ein dreifacher Klick auf die Tastaturleertaste Webbrowser Standard Webbrowser öffn...

Page 142: ...aktionen zu starten Stopp Klicken um die Aufnahme zu stoppen Löschen Klicken um alle gespeicherten Anweisungen zu löschen Nach oben unten Klicken um die gewählte Anweisung zu verschieben Anweisungs dauer Wenn Timing nicht markiert ist wird die in der Drop Down Liste gewählte Verzögerungszeit angewendet Wiederholung Makro startet bei einem Klick und stoppt beim nächsten Klick Feuer Makro wird bei e...

Page 143: ...u starten Stopp Klicken um die Aufnahme zu stoppen Löschen Klicken um alle gespeicherten Anweisungen zu löschen Nach oben unten Klicken um die gewählte Anweisung zu verschieben Anweisungs dauer Wenn Timing nicht markiert ist wird die in der Drop Down Liste gewählte Verzögerungszeit angewendet Wiederholung Skript startet bei einem Klick und stoppt beim nächsten Klick Feuer Skript wird bei einem Kli...

Page 144: ...142 Kapitel 4 Computer verwenden Deutsch ...

Page 145: ...erbinden Sie ein Ende des RJ 45 Kabels mit dem LAN RJ 45 Anschluss auf der Rückseite Ihres Computers und das andere Ende mit dem DSL Kabelmodem Beziehen Sie sich auf die Dokumentation die mit Ihrem DSL Kabelmodem geliefert wurde 3 Schalten sie den DSL Kabelmodem und Ihren Computer ein 4 Konfigurieren Sie die nötigen Einstellungen für die Internetverbindung Für Details und Hilfestellung zur Einrich...

Page 146: ...RJ 45 Anschluss auf der Rückseite Ihres Computers und das andere Ende mit dem Internet LAN 2 Schalten sie den Computer ein 3 Konfigurieren Sie die nötigen Einstellungen für die Internetverbindung Für Details und Hilfestellung zur Einrichtung einer Internetverbindung wenden Sie sich an Ihren Internetdienstanbieter ISP Netzwerkadministrator USB3 0 UASP USB KB MS RJ 45 cable LAN RJ 45 Kabel ...

Page 147: ...htlosverbindung mit dem Internet Um eine Drahtlosverbindung herzustellen müssen Sie sich mit einem drahtlosen Zugriffspunkt AP verbinden USB3 0 UASP USB KB MS USB KB MS Wireless AP Modem USB3 0 UASP USB KB MS Wireless AP Modem Zum Aufbau einer kabellosen Verbindung stehen Ihnen folgende Möglichkeiten zur Verfügung ODER ...

Page 148: ...htlosnetzwerk 1 Klicken Sie im Infobereich auf das Netzwerksymbol um verfügbare Drahtlosnetzwerke anzuzeigen 2 Wählen Sie ein Drahtlosnetzwerk mit dem Sie sich verbinden möchten und klicken Sie auf Verbinden Connect 3 Sie müssen evtl einen Sicherheitsschlüssel für eine verschlüsselte Drahtlosverbindung eingeben klicken Sie dann auf OK 4 Warten Sie während Ihr Computer sich mit dem Drahtlosnetzwerk...

Page 149: ... um das jew Programm zu starten das System zu überwachen oder das BIOS zu aktualisieren Systeminformationen anzuzeigen und die Einstellungen von AI Suite II anzupassen Die Support DVD und die Wiederherstellungs DVD sind möglicherweise nicht im Lieferumfang enthalten Sie können diese selbst erstellen brennen Weitere Details finden Sie in System wiederherstellen Anwendung auswählen Überwachung der S...

Page 150: ...Menu enthält System Level Up Probe II Sensor Recorder und Ai Charger Sie können System Level Up über folgende zwei Vorgehensweisen anpassen BIOS Klicken sie in BIOS Setupprogramm auf AI Tweaker System Level Up und passen sie die gewünschten Einstellungen an OC Taste Drücken Sie oben links auf Ihrem Computer die OC Taste In den Einstellungen können Sie manuell Hot Keys Schnellzugriffstasten festleg...

Page 151: ... für Ihren Computer garantiert So starten Sie Probe II Klicken Sie in der AI Suite II Hauptmenüleiste auf Tool Extras Probe II Probe II konfigurieren Klicken Sie auf Voltage Spannung Temperature Temperatur Fan Speed Lüftergeschwindigkeit um die Sensoren zu aktivieren oder deren Grenzwerte anzupassen Preference Bevorzugte Einstellungen ermöglicht die Anpassung des Zeitintervalls für Sensorwarnungen...

Page 152: ...e in der AI Suite II Hauptmenüleiste auf Tool Extras Sensor Recorder Sensor Recorder konfigurieren Klicken Sie auf Voltage Spannung Temperature Temperatur Fan Speed Lüftergeschwindigkeit und wählen Sie die Sensoren die überwacht werden sollen History Record Verlauf ermöglicht die Verlaufsaufzeichnung der aktivierten Sensoren Sensorauswahl für die Überwachung Auf der Y Achse vergrößern verkleinern ...

Page 153: ...rei Mal übertreffen Ai Charger ist nur an USB 3 0 Ports verfügbar und startet wenn sich Ihr PC im S0 Zustand befindet Ai Charger hilft beim Aufladen angeschlossener USB Geräte selbst wenn sich Ihr PC nach Start im S0 Zustand im S3 S4 S5 Zustand befindet Prüfen Sie ob Ihr USB Geräthersteller die BC 1 1 Funktion voll unterstützt Die aktuelle Aufladegeschwindigkeit kann sich je nach USB Gerätkonfigur...

Page 154: ...Suite II Hauptmenüleiste auf Monitor Sensor CPU Frequency CPU Frequenz CPU Frequency CPU Frequenz zeigt die aktuelle CPU Frequenz und CPU Auslastung an So starten Sie CPU Frequency Klicken Sie in der AI Suite II Hauptmenüleiste auf Monitor CPU Frequency Sensorbereich CPU Frequenzbereich Im rechten Arbeitsbereich Systeminfobereich Monitor Überwachung Die Auswahl Monitor Überwachung enthält die Bere...

Page 155: ...runtergeladen werden soll und klicken Sie dann auf Next Weiter Falls keine aktualisierte Version gefunden wurde wird eine entsprechende Nachricht eingeblendet Update Aktualisierung Die Auswahl Update Aktualisierung ermöglicht Ihnen mit Hilfe der hauseigenen ASUS Anwendungen die Aktualisierung des Motherboard BIOS und des BIOS Bootlogos vorzunehmen ASUS Update Das Programm ASUS Update gestattet Ihn...

Page 156: ...inende Bild ändern möchten klicken Sie auf Yes Ja Ansonsten klicken Sie auf No Nein um fortzufahren 4 Folgen Sie dann den Bildschirmanwei sungen um den Aktualisierungspro zess abzuschließen 4 Falls Sie das Boot Logo bzw das während des Power On Self Tests POST erscheinende Bild ändern möchten klicken Sie auf Yes Ja Ansonsten klicken Sie auf No Nein um fortzufahren 5 Folgen Sie dann den Bildschirma...

Page 157: ...B um weitere Details über den Motherboard Hersteller den Produktnamen die Version und das BIOS anzuzeigen Klicken Sie auf die Auswahl CPU um weitere Details über den Prozessor und die Cache anzuzeigen Klicken Sie auf die Auswahl Memory Arbeitsspeicher und wählen Sie einen Speichersteckplatz um weitere Details über den auf dem entsprechenden Steckplatz installierten Speichermodul anzuzeigen ...

Page 158: ...Anwendungen die aktiviert werden sollen Ermöglicht die Einstellung der Leiste Hauptmenü Ermöglicht die Anpassung von Kontrast Helligkeit Sättigung Farbton und Gamma in der Benutzeroberfläche Klicken Sie auf die Auswahl Disk und wählen Sie eine Disk um weitere Details dafür anzuzeigen Support In Support wrden Informatiuonen über die ASUS Webseite die technische Hilfe Webseite die Download Webseite ...

Page 159: ... aus der Schnellstart oder der Taskleiste aus zu starten ASUS AI Manager ASUS AI Manager ist ein Hilfsprogramm welches Ihnen schnellen Zugriff auf oft verwendete Anwendungen ermöglicht AI Manager starten Um AI Manager vom Windows Desktop zu starten klicken Sie auf Start Alle Programme All Programs ASUS AI Manager AI Manager 1 xx xx Die AI Manager Schnellstartleiste erscheint auf dem Desktop Deutsc...

Page 160: ...oder Papierkorb Klicken Sie in der Schnellstartleiste auf das Symbol AI Disk um das Hauptfenster des AI Disk anzuzeigen und die Elemente die Sie löschen möchten auszuwählen Klicken Sie wenn soweit auf Übernehmen Apply Erweitern oder wiederherstellen AI Manager Schnellstartleiste Die AI Manager Schnellstartleiste hält Ihren Desktopplatz frei und ermöglicht das einfache Starten von Hilfsprogrammen o...

Page 161: ...Sie einen Kennworthinweis ein empfohlen 4 Klicken Sie wenn soweit auf OK 5 Wählen Sie das zu sperrende Gerät und klicken Sie dann auf Übernehmen Apply 6 Geben Sie das zuvor eingerichtete Kennwort ein und klicken Sie auf OK So entsperren Sie ein Gerät 1 Wählen Sie die Auswahl für das gesperrte Gerät auf und klicken Sie auf Übernehmen Apply 2 Geben Sie das zuvor eingerichtete Kennwort ein und klicke...

Page 162: ...fügen um diese schneller zu finden So fügen Sie eine Anwendung hinzu 1 Klicken Sie auf Hinzufügen Add und wählen Sie dann die Anwendung die Sie zu Meine Favoriten My Favorites hinzufügen wollen 2 Klicken Sie im Auswahlfenster auf Öffnen Open Die Anwendung wird zu Meine Favoriten My Favorites hinzugefügt Klicken Sie mit der rechten Maustaste auf das Anwendungssymbol um die entsprechende Anwendung z...

Page 163: ... Unterstützung Download Webseite zu gelangen oder die Kontaktinformationen abzurufen Information Klicken Sie im Fenster Information auf eine Auswahl um weitere Informationen Ihres Systems Motherboards CPU BIOS Arbeitsspeichers und der installierten Geräte anzuzeigen Deutsch ASUS CG8580 161 Deutsch ...

Page 164: ...stallieren Sie Nero 9 1 Legen Sie die Nero 9 DVD in das optisches Laufwerk ein 2 Falls Autorun aktiviert ist erscheint automatisch das Hauptmenü Falls Autorun deaktiviert ist doppelklicken Sie die Datei SeupX exe im Hauptverzeichnis Ihrer Nero 9 DVD 3 Klicken Sie im Hauptmenü auf Nero 9 Essentials 162 Kapitel 6 Verwenden der Hilfsprogramme Deutsch Deutsch ...

Page 165: ...tallationsassistenten Klicken Sie auf Weiter Next 5 Klicken Sie auf Weiter Next um fortzufahren 6 Wählen Sie Ich akzeptiere die Lizenzbedingungen I accept the License Conditions Wenn soweit klicken Sie auf Weiter Next Deutsch ASUS CG8580 163 Deutsch ...

Page 166: ... 8 Wählen Sie Ja ich möchte Anwendungsdaten anonym an Nero senden Yes I want to help by sending anonymous application data to Nero und klicken Sie Weiter Next 9 Wenn abgeschlossen klicken Sie auf Beenden Exit 164 Kapitel 6 Verwenden der Hilfsprogramme Deutsch Deutsch ...

Page 167: ...o brennen Sie Dateien 1 Klicken Sie im Hauptmenü auf Daten brennen Data Burning Hinzufügen Add 2 Wählen Sie die Dateien die Sie brennen möchten Wenn soweit klicken Sie auf Hinzufügen Add Deutsch ASUS CG8580 165 Deutsch ...

Page 168: ...et haben klicken Sie auf Brennen Burn um die Dateien auf einen Datenträger zu brennen Für weitere Details zur Verwendung von Nero 9 beziehen Sie sich auf die Nero Webseite unter www nero com 166 Kapitel 6 Verwenden der Hilfsprogramme Deutsch Deutsch ...

Page 169: ...werkseitig erstellt und kann wenn vom Benutzer gelöscht NICHT wieder hergestellt werden Bringen Sie Ihr Desktop PC zum ASUS Kundendienst wenn Sie mit der Wiederherstellung Probleme haben Verwenden der Wiederherstellungspartition 1 Drücken Sie während des Starvorgangs F9 2 Drücken Sie die Eingabetaste um Windows Setup EMS Enabled zu wählen 3 Wählen Sie eine der folgenden Wiederherstellungsoptionen ...

Page 170: ...d wählen Sie das optische Laufwerk eventuell als CD DVD bezeichnet Drücken Sie die Eingabetaste um von der Wiederherstellungs DVD zu booten 3 Wählen Sie OK um die Wiederherstellung des Abbild Image zu starten 4 Wählen Sie OK um die Systemwiederherstellung zu bestätigen Die Wiederherstellung überschreibt alle Daten in Ihrer Festplatte Vergewissern Sie sich dass Sie wichtige Daten gesichert haben be...

Page 171: ...it der Intel 2012 Desktop Responsiveness Technologie funktioniert muss es folgende Voraussetzungen erfüllen 1 CPU Intel Core Prozessor der 2 3 Generation 2 OS Windows 7 3 SSD Eine eigene SSD Halbleiterfestplatte zur Unterstützung von Intel Smart Response und Intel Rapid Start Technology Informationen zu SSD Größe Partitionsgröße und Systemspeichervoraussetzungen entnehmen Sie bitte der Tabelle SSD...

Page 172: ...l Smart Connect Separate 20 GB und 2 GB Partitionen SSD Größe 22 GB Separate 20 GB und 4 GB Partitionen SSD Größe 24 GB Separate 20 GB und 8 GB Partitionen SSD Größe 28 GB Die für Intel Rapid Start und Intel Smart Response eingesetzte SSD kann nicht zur RAID Erstellung genutzt werden Aufgrund von Einschränkungen durch das Betriebssystem arbeitet die Intel Rapid Start Technology unter Windows 7 32 ...

Page 173: ... das optische Laufwerk Das Drivers installation Register Treiberinstallation Register erscheint sofern die automatische Ausführung von Datenträgern aktiv ist Klicken Sie auf das Drivers Register Treiber Register klicken Sie dann auf Intel Rapid Storage Technology Driver software Intel Rapid Storage Technology Treibersoftware Führen Sie die Installation mit den Anweisungen auf dem Bildschirm aus In...

Page 174: ...kapazität vom System nach wie vor als regulärer Speicherplatz angesprochen werden Intel Rapid Start Technology Mit Intel Rapid Start Technology können Sie Ihren Computer schnell aus dem Schlafmodus aufwecken Das Speichern Ihres Systemspeicherinhalts auf eine konfigurierte SSD sichert eine schnelle Aufweckzeit und hält gleichzeitig den Stromverbrauch gering Bevor Sie die Intel Rapid Start Technolog...

Page 175: ... erforderliche Partitionsgröße ein Diese muss der des System DRAM Speichers 1GB 1024MB entsprechen Klicken Sie dann auf Shrink Gehen Sie zu Start Systemsteuerung System und Sicherheit System und überprüfen Sie die Informationen der DRAM Größe Das nicht zugewiesene Laufwerk wird der ausgewählten Disk zugewiesen Wenn Ihre SSD kleiner als 64GB und für die Intel Smart Response Option Full disk capacit...

Page 176: ...und drücken Sie auf die Eingabetaste 10 Nach der Erstellung der primären Partition geben Sie detail disk ein und drücken auf die Eingabetaste um die Details der partitionierten Disk anzuzeigen 11 Wählen Sie das RAW Laufwerk welches die gleiche Größe wie das verkleinerte Laufwerk besitzt und geben Sie select volume x x Nummer Drücken Sie auf die Eingabetaste um die Intel Rapid Start Partition zu sp...

Page 177: ...Start Technology führen Intel Rapid Start Technology im Betriebssystem aktivieren deaktivieren Installieren Sie die Intel Rapid Start Technology zuerst von der Support DVD um den Intel Rapid Start Manager starten zu können Nach der Erstellung der Partition starten Sie den Intel Rapid Start Manager um die Intel Rapid Start Technology zu aktivieren deaktivieren Klicken Sie auf Show hidden icons auf ...

Page 178: ...isk x x Nummer ein und drücken Sie dann auf die Eingabetaste Der Wert x bezieht sich auf die Disk Nummer in welcher Sie die Partition löschen wollen 2 Markieren Sie im Statusfeld On um die Funktion zu aktivieren und klicken Sie dann auf Save Hier klicken um den Akkusparmodus zu aktivieren deak tivieren Dieses Ele ment erscheint nur bei Notebook PCs Zum aktivieren deaktivieren der Funktion markiere...

Page 179: ...e ein und drücken Sie dann auf die Eingabetaste Das Programm löscht nun die ausgewählte Partition 7 Klicken Sie auf dem Desktop auf Start rechtsklicken Sie auf Computer und klicken Sie dann auf Verwalten 8 Im Fenster der Computerverwaltung klicken Sie nun auf Diskverwaltung rechtsklicken dann auf das verkleinerte neue Laufwerk und wählen Extend Volume 9 Wenn der Erweiterungsassistent erscheint kli...

Page 180: ...hr System regelmäßig aus dem Ruhezustand auf sammelt Informationen zum Nutzungsstatus und versetzt das System nach einer vorgegebenen Zeit wieder in den Ruhezustand Die Intel Smart Connect Technology unterstützt Windows Live Mail Microsoft Outlook und Seesmic Anwendungen Bevor die Intel Smart Connect Technology genutzt werden kann muss die PCH Konfiguration im BIOS entsprechend eingerichtet werden...

Page 181: ...Technology eine Internetverbindung zur Verfügung steht Klicken Sie auf Start Alle Programme Intel Intel Smart Connect Technology Klicken Sie im Basic Register Basis Register auf Enable Updating Aktualisier ung aktivieren Nach der Aktivierung können Sie erweiterte Funktionseinstellungen im Advanced Register Erweitert Register vornehmen 1 Zum Ein und Ausschalten der Funktion anklicken Wenn der Schie...

Page 182: ...iederherstellen der Standardvorgaben klicken Sie auf Reset All to Defaults Alles auf Standardwerte rücksetzen 4 Im Advanced Register Erweitert Register legen Sie den Zeitraum fest innerhalb dessen besonders wenig Strom verbraucht werden soll Diese Einstellung gilt nur für den zugewiesenen Zeitraum 5 Im Help Register Hilfe Register können Sie sich unter About Info Versionsinformationen anschauen Un...

Page 183: ...cht reagierende Programm und klicken Sie auf Task beenden End Task Falls die Tastatur nicht reagiert drücken und halten Sie die Einschalttaste bis der Computer sich ausschaltet Drücken Sie erneut auf die Einschalttaste um ihn wieder zu starten Ich kann mich mit der ASUS WLAN Karte nicht mit dem Drahtlos Netzwerk verbinden nur bei bestimmten Modellen Stellen Sie sicher dass Sie für das gewünschte N...

Page 184: ...e auf Ihrem Computer installiert ist sollten die Monitore mit den Ausgängen der Grafikkarte verbunden sein Prüfen Sie ob die Einstellungen für mehrere Anzeigegeräte korrekt sind Für Details beziehen Sie sich auf den Abschnitt Anschließen von mehreren externen Anzeigegeräten in Kapital 3 Mein Computer kann meinen USB Datenträger nicht erkennen Beim ersten Verbinden eines USB Datenträgers mit Ihrem ...

Page 185: ...s die Lautsprecher mit dem Line Out Anschluss Hellgrün auf der Vorderseite oder Rückseite verbunden sind Prüfen Sie ob die Lautsprecher an die Stromversorgung angeschlossen und eingeschalten sind Passen Sie die Lautstärke Ihrer Lautsprecher an Stellen Sie sicher dass die Lautstärke des Systems nicht stummgeschaltet ist Falls stummgeschaltet erscheint das Lautstärkesymbol als Um Lautstärke zu aktiv...

Page 186: ...tig angeschlossen Stellen sie sicher dass das Stromkabel sachgemäß angeschlossen ist Verwenden Sie ein anderes passendes Stromkabel Probleme mit dem Netzteil PSU Power supply unit Bitte wenden Sie sich zur Reparatur an unser Callcenter Anzeige Problem Mögliche Ursachen Maßnahmen Keine Anzeige nachdem der Computer eingeschaltet wurde Schwarzes Bildschirm Das Signalkabel ist nicht mit dem richtigen ...

Page 187: ...ng Durch Antivirus Software verursachte Probleme Schließen Sie die Antivirus Software Probleme mit Treibern Reinstallieren Sie die LAN Treiber Audio Problem Mögliche Ursachen Maßnahmen Kein Audio Lautsprecher oder Kopfhörer sind nicht richtig angeschlossen Beziehen Sie sich für die richtigen Anschlusspositionen auf das Benutzerhandbuch Trennen und Verbinden Sie den Lautsprecher mit Ihrem Computer ...

Page 188: ...riebsausfall des Festplattenlaufwerks Senden Sie das beschädigte Festplattenlaufwerk zur reparatur an den ASUS Kundendienst Ersetzen Sie es durch ein neues Festplattenlaufwerk Probleme mit Speichermodulen Ersetzen Sie diese mit passenden kompatiblen Speichermodulen Entfernen Sie die nachträglich eingebauten Speichermodule und versuchen Sie es erneut Der Luftstrom zur Kühlung Ihres Computers ist un...

Page 189: ...e BIOS Version herunterzuladen Hoher Geräusch pegel beim Com puterbetrieb Der CPU Lüfter wurde ersetzt Stellen Sie sicher dass Sie einen kompatiblen oder von ASUS empfohlenen CPU Lüfter verwenden Der Luftstrom zur Kühlung Ihres Computers ist unzureichend Stellen Sie den Computer an einem Platz mit besserer Luftzirkulation auf Systemtemperatur ist zu hoch Aktualisieren Sie das BIOS Falls Sie mit de...

Page 190: ...tzung Telefon 1 812 282 2787 Support Fax 1 812 284 0883 Online Support support asus com ASUS COMPUTER GmbH Deutschland und Österrreich Adresse Harkort Str 21 23 D 40880 Ratingen Germany Fax 49 2102 959911 Webseite www asus de Online Kontakt www asus de sales Technische Unterstützung Telefon Komponenten 49 1805 010923 Telefon System Notebook Eee LCD 49 1805 010920 Support Fax 49 2102 9599 11 Online...

Page 191: ...Ordinateur de bureau ASUS Essentio CG8580 Manuel de l utilisateur ...

Page 192: ...LIER EN AUCUN CAS ASUS SES DIRECTEURS CADRES EMPLOYES OU AGENTS NE POURRONT ÊTRE TENUS POUR RESPONSABLES POUR TOUT DOMMAGE INDIRECT SPECIAL SECONDAIRE OU CONSECUTIF INCLUANT LES DOMMAGES POUR PERTE DE PROFIT PERTE DE COMMERCE PERTE D UTILISATION DE DONNEES INTERRUPTION DE COMMERCE ET EVENEMENTS SEMBLABLES MEME SI ASUS A ETE INFORME DE LA POSSIBILITE DE TELS DOMMAGES PROVENANT DE TOUT DEFAUT OU ERR...

Page 193: ...r le système 214 Protéger votre ordinateur 215 Centre d Aide et support Windows 216 Chapitre 3 Connecter des périphériques Connecter un périphérique de stockage USB 217 Connecter un microphone ou un système de haut parleurs 218 Connecter plusieurs périphériques d affichage 221 Connecter un téléviseur HD 223 Chapitre 4 Utiliser votre ordinateur Posture recommandée lors de l utilisation de l ordinat...

Page 194: ...tre 6 Utiliser les utilitaires ASUS AI Suite II 241 ASUS AI Manager 251 Nero 9 256 Restaurer le système 261 Introduction aux technologies pour processeurs de bureau Intel 2012 263 Chapitre 7 Dépannage Dépannage 275 Informations de contact ASUS 282 ...

Page 195: ...ut irradier de l énergie à fréquence radio et si non installé et utilisé selon les instructions du fabricant peut causer une interférence nocive aux communications radio Cependant il n est pas exclu qu une interférence se produise lors d une installation particulière Si cet équipement cause une interférence nuisible au signal radio ou télévisé ce qui peut être déterminé par l arrêt puis le réamorç...

Page 196: ... d exposition aux radiofréquences Rapport du Département Canadien des Communications Cet appareil numérique ne dépasse pas les limites de classe B en terme d émissions de nuisances sonore par radio par des appareils numériques et ce conformément aux régulations d interférence par radio établies par le département canadien des communications Cet appareil numérique de la classe B est conforme à la n...

Page 197: ...age Avertissement de sécurité concernant la batterie NE PAS jeter au feu NE PAS court circuiter les contacts NE PAS désassembler la batterie Utilisez ce produit dans des environnements dont la température ambiante est comprise entre 0 C 32 F et 35 C 95 F NE PAS bloquer les ouvertures destinées à la ventilation de l ordinateur pour éviter que celui ci ne surchauffe NE PAS utiliser un cordon d alime...

Page 198: ...additionnelles destinées à certaines situations spécifiques IMPORTANT Instructions que vous devez suivre pour terminer une tâche Où trouver plus d informations Consultez les sources suivantes pour plus d informations ou pour la mise à jour du produit et ou des logiciels Sites Web ASUS Le site Web ASUS offre des informations à jour sur le matériel ASUS et sur les logiciels afférents Reportez vous a...

Page 199: ...ls sur le clavier et la souris de jeu consultez les sections Utiliser le clavier de jeu ASUS ROG et Utiliser la souris de jeu ASUS GX900 Ordinateur de bureau ASUS Essentio Clavier de jeu ASUS ROG U9N x1 Souris de jeu ASUS GX900 x1 Installation Guide Cordon d alimentation x1 Logiciel de gravure de DVD Nero 9 x1 Guide d installation x1 Carte de garantie x1 DVD de support x1 DVD de restauration x1 op...

Page 200: ...198 Français ...

Page 201: ...abilité sans faille et des utilitaires variés et conviviaux Le tout dans un boîtier au style futuriste et stylisé Faire connaissance avec votre ordinateur Panneau avant Les illustrations sont uniquement données à titre indicatif Les ports et leur emplacement ainsi que la couleur du châssis peuvent varier en fonction des modèles Lisez la carte de garantie ASUS avant de configurer votre ordinateur d...

Page 202: ...on d overclocking System Level Up 9 Ports USB 3 0 Ces ports USB Universal Serial Bus 3 0 permettent de connecter des périphériques disposant de ports USB 3 0 souris imprimante PDA appareil photo 10 Ports USB 2 0 Ces ports USB Universal Serial Bus 2 0 permettent de connecter des périphériques disposant de ports USB 2 0 souris imprimante PDA appareil photo 11 Port microphone Ce port permet de connec...

Page 203: ...iques USB 3 0 ne peuvent être utilisés que sous environnement Windows et après l installation du pilote USB 3 0 Les ports USB 3 0 ne sont pris en charge que sous Windows 7 ou versions ultérieures Le standard UASP n est compatible qu avec Windows 8 Les périphériques USB 3 0 ne peuvent être utilisés que comme dispositifs de stockage des données Il est fortement recommandé de connecter vos périphériq...

Page 204: ... haut parleur En configuration audio 4 6 ou 8 canaux ce port se connecte aux haut parleurs avants d un système d enceintes 12 Port d entrée audio bleu clair Ce port permet de connecter un lecteur CD DVD ou toute autre source audio Configurations audio 2 4 6 et 8 canaux Port Casque 2 canaux 4 canaux 6 canaux 8 canaux Bleu clair Entrée audio Entrée audio Entrée audio Entrée audio Vert Sortie audio S...

Page 205: ...extension Port réseau LED VITESSE LED ACT LIEN 14 Interrupteur d alimentation Déplacez cet interrupteur pour alimenter ou non l ordinateur en courant électrique 15 Connecteur d alimentation tension nominale 100 120 200 240Vca 60 50Hz 10 5A Branchez le cordon d alimentation sur ce connecteur 16 Prise combo souris clavier PS 2 Ce port est destiné à un clavier ou une souris PS 2 17 Port de sortie S P...

Page 206: ...n d alimentation Connecter un moniteur externe Utiliser la carte graphique ASUS disponible sur une sélection de modèles Pour connecter un moniteur externe à la carte graphique ASUS 1 Connectez votre moniteur à l un des ports d affichage de la carte graphique ASUS 2 Connectez le moniteur à une source d alimentation Les ports d affichage de la carte graphique ASUS peuvent varier en fonction des modè...

Page 207: ...rs moniteurs à votre ordinateur consultez la section Connecter plusieurs périphériques d affichage du Chapitre 3 de ce manuel pour plus de détails Utiliser les ports d affichage de la carte mère Pour connecter un moniteur externe à l un des ports d affichage de la carte mère 1 Connectez un moniteur VGA au port VGA ou un moniteur DVI D au port DVI D ou un moniteur HDMI au port HDMI localisé à l arr...

Page 208: ...itué à l arrière de votre ordinateur et l autre extrémité à une prise électrique USB3 0 UASP USB KB MS USB3 0 UASP USB KB MS USB3 0 UASP USB KB MS L utilitaire de configuration pour souris ASUS GX900 ne s exécute que si la souris est connectée à l ordinateur avant de démarrer Windows 7 pour la première fois L utilitaire est toutefois disponible sur le DVD de support accompagnant votre ordinateur C...

Page 209: ...terrupteur d alimentation sur la position I 2 Appuyez sur le bouton d alimentation pour mettre en route l ordinateur Éteindre votre ordinateur Pour éteindre votre ordinateur 1 Fermez toutes les applications en cours d exécution 2 Cliquez sur dans le Bureau de Windows 3 Cliquez sur pour fermer le système d exploitation 3 Patientez le temps que le système d exploitation se charge automatiquement Bou...

Page 210: ...208 Chapitre 1 Démarrer Français ...

Page 211: ...et nom de l ordinateur Cliquez sur Suivant 5 Entrez les informations nécessaires à la configuration du mot de passe puis cliquez sur Suivant Vous pouvez aussi cliquer sur Suivant pour ignorer cette étape 6 Lisez attentivement les termes du contrat de licence Cochez J accepte les termes du contrat de licence puis cliquez sur Suivant 7 Sélectionnez Utiliser les paramètres recommandés ou Installer un...

Page 212: ...alité Mise en route du menu Démarrer contient des informations sur les tâches de base comme la personnalisation de Windows l ajout de nouveaux utilisateurs et le transfert de fichiers pour vous aider à vous familiariser avec Windows 7 Pour utiliser la fonctionnalité Mise en route 1 Dans la barre des tâches de Windows cliquez sur l icône Démarrer pour ouvrir le menu Démarrer 2 Sélectionnez Mise en ...

Page 213: ...tte liste Épingler des programmes au menu Démarrer ou à la barre des tâches Pour épingler des programmes au menu Démarrer ou à la barre des tâches 1 Dans la barre des tâches de Windows cliquez sur l icône Démarrer pour ouvrir le menu Démarrer 2 Faites un clic droit sur l élément à épingler au menu Démarrer ou à la barre des tâches 3 Sélectionnez Épingler à la barre des tâches ou Épingler au menu D...

Page 214: ...rtez vous à la section Utiliser le Centre de maintenance Windows de ce chapitre Personnaliser les icônes et les notifications Vous pouvez choisir d afficher ou de masquer les icônes et les notifications de la barre des tâches ou de la zone de notification Pour personnaliser les icônes et les notifications 1 Dans la zone de notification cliquez sur l icône 2 Cliquez sur Personnaliser 3 Dans le menu...

Page 215: ...d affichage à utiliser Vous pouvez aussi cliquer n importe où sur le volet d affichage cliquer sur Affichage et sélectionner le type d affichage désiré Organiser vos fichiers Pour organiser vos fichiers 1 Lancez Windows Explorer 2 Dans le champ Organiser par cliquez pour afficher le menu déroulant 3 Sélectionnez le type d organisation désiré Trier vos fichiers Pour trier vos fichiers 1 Lancez Wind...

Page 216: ... date et heure Cette fonction vous permet de restaurer ou annuler les modifications apportées au système sans que ce la n affecte vos données personnelles Pour restaurer votre système 1 Fermez toutes les applications en cours d exécution 2 Cliquez sur Tous les programmes Accessoires Outils système Restauration du système 3 Suivez les instructions apparaissant à l écran pour terminer le processus d...

Page 217: ...Windows Update Windows Update vous permet de vérifier et installer les dernières mises à jour pour améliorer la sécurité et les performances de votre ordinateur Lancer Windows Update Pour ouvrir Windows Update 1 Dans la barre des tâches de Windows cliquez sur l icône Démarrer pour ouvrir le menu Démarrer 2 Sélectionnez Tous les rogrammes Windows Update 3 À partir de l écran de Windows Update sélec...

Page 218: ... essai de 60 jours avant que le logiciel n expire L achat d une clé de licence est nécessaire une fois la période d essai terminée Pour activer Trend Micro Internet Security 1 Exécutez l application Trend Micro Internet Security 2 Lisez attentivement les termes de la licence Cliquez sur Agree Activate 3 Entrez votre adresse e mail et sélectionnez votre emplacement géographique Cliquez sur Suivant ...

Page 219: ...ériphérique de stockage USB lorsque des données sont en cours de transfert Le faire peut causer la perte de données ou endommager le périphérique de stockage USB Connecter un périphérique de stockage USB Cet ordinateur de bureau dispose de ports USB 2 0 1 1 et USB 3 0 sur les panneaux avant et arrière Les ports USB vous permettent de connecter des périphériques USB tels que des dispositifs de stoc...

Page 220: ...Cet ordinateur de bureau intègre un port micro et plusieurs ports audio localisés sur le panneau avant et arrière Les ports audio situés à l arrière de l ordinateur permettent de configurer un système de haut parleurs à 2 4 6 ou 8 canaux Connecter un casque audio ou un micro Connecter un système de haut parleurs 2 0 ...

Page 221: ...Français ASUS CG8580 219 Français Connecter un système de haut parleurs 4 1 Connecter un système de haut parleurs 6 1 ...

Page 222: ...220 Chapitre 3 Connecter des périphériques Français Français Connecter un système de haut parleurs 8 1 ...

Page 223: ...s Pour configurer plusieurs affichages 1 Éteignez votre ordinateur 2 Connectez les deux moniteurs à l ordinateur et les cordons d alimentation aux moniteurs Voir section Configurer votre ordinateur du chapitre 1 pour plus de détails sur la connexion d un moniteur à votre ordinateur Lorsqu une carte graphique est installée sur votre ordinateur connectez les moniteurs sur les ports de sortie intégré...

Page 224: ...r 1 2 sélectionnez cette option pour n afficher le contenu que sur l un des deux moniteurs Supprimer cet affichage sélectionnez cette option pour supprimer l affichage sélectionné 6 Cliquez sur Appliquer ou OK puis cliquez sur Conserver les modifications à l apparition du message de confirmation 3 Allumez votre ordinateur 4 Suivez l une des méthodes suivantes pour ouvrir l écran Résolution d écran...

Page 225: ...n téléviseur Haute Définition HDTV par le biais du port HDMI Vous devez faire l achat d un câble HDMI pour connecter un téléviseur HD à votre ordinateur Le câble HDMi est vendu séparément Pour obtenir une qualité d image optimale utilisez un câble HDMI d une longueur inférieure à 15 mètres ...

Page 226: ...224 Chapitre 3 Connecter des périphériques Français ...

Page 227: ...Si nécessaire utilisez un repose pied pour surélever le niveau de vos genoux Ajustez le dossier de votre chaise de telle sorte que la base de votre colonne vertébral soit fermement supportée et légèrement inclinée vers l arrière Maintenez vous droit avec vos genoux coudes et hanches à un angle approximatif de 90º lorsque vous faites face à votre ordinateur Placez le moniteur directement en face de...

Page 228: ... carte mémoire 1 Soulevez le capot situé en façade 2 Insérez la carte dans la fente appropriée à votre format de carte mémoire 3 Sélectionnez l action à effectuer lors de l apparition de la fenêtre d Exécution automatique pour accéder à vos fichiers Si l Exécution automatique n est pas activée sur votre ordinateur cliquez d abord sur le bouton Démarrer de la barre des tâches de Windows 7 puis sur ...

Page 229: ... de la fenêtre d Exécution automatique pour accéder à vos fichiers Retirer un disque optique Pour retirer un disque optique 1 Lorsque votre ordinateur est allumé effectuez l une des actions suivantes pour ouvrir le plateau du lecteur optique Appuyez sur le bouton d éjection Faites un clic droit sur l icône du lecteur CD DVD de l écran Ordinateur puis cliquez sur Éjecter 2 Retirez le disque du plat...

Page 230: ...ptateur PS 2 vers USB fourni pour connecter le clavier à l un des ports USB 2 0 de votre ordinateur 1 Alignez et insérez le repose poignets sur les slots du clavier A À l aide de vos deux pouces poussez le repose poignets jusqu à ce qu il soit bien sécurisé au clavier B Consultez la section Contenu de la boîte pour visualiser le contenu de la boîte du clavier de jeu ASUS ROG U9N Redémarrez l ordin...

Page 231: ...n bouton droit un bouton gauche une molette de défilement deux boutons latéraux un bouton DPI ainsi qu un interrupteur de sélection de profil Touche Description Touche Description 1 Bouton gauche 7 Logo GX900 2 Bouton droite 8 Bouton Suivant pour IE 3 Molette de défilement 9 Bouton Retour pour IE 4 Interrupteur DPI 10 Patins de la souris 5 Indicateur bouton de sélection de profil 11 Capteur laser ...

Page 232: ... avant de démarrer Windows 7 pour la première fois Celui ci est toutefois disponible sur le DVD de support accompagnant votre ordinateur Pour installer le programme de configuration à partir du DVD de support placez ce dernier dans le lectuer optique puis suivez les instructions apparaissant à l écran Si l Exécution automatique n est pas activée sur votre ordinateur parcourez le contenu du DVD de ...

Page 233: ...es enregistrés des boutons 6 Cliquez pour afficher la signification de différentes couleur du sélecteur de profil 7 Cliquez pour charger un profil précédemment enregistré 8 Cliquez pour enregistrer les paramètres sous forme de profil sur votre disque dur 9 Cliquez pour réinitialiser les paramètres par défaut de la souris 10 Cliquez pour enregistrer les modifications apportées 11 Cliquez pour enreg...

Page 234: ...ne fonction à chaque bouton action à partir du menu déroulant Voir le tableau ci dessous pour plus de détails Éléments Descriptions Bouton G Le bouton émulera un clic gauche de la souris Bouton D Le bouton émulera un clic droit de la souris Bouton C Le bouton émulera un clic central de la souris Retour IE Le bouton émulera le bouton Retour d Internet Explorer Appuyez pour retourner à la page précé...

Page 235: ...ec les applications Microsoft Office sous Windows 7 Vista Rafale souris Permet d effectuer un tir en rafale dans un jeu où le clic de la souris est utilisé pour tirer Cette action est identique à un triple clic gauche rapide de la souris Rafale touche Permet d effectuer un tir en rafale dans un jeu où la barre d espace du clavier est utilisés pour tirer Cette action est identique à une triple frap...

Page 236: ... l enregistrement des frappes au clavier et ou clics de souris Effacer Cliquez pour effacer le jeu d instructions enregistré Monter descendre Cliquez pour faire monter ou descendre l instruction sélectionnée Durée de cycle des instructions Lorsque l option Minutage est décochée le délai d attente des actions sera sélectionnable dans le menu déroulant Exécution en boucle Permet d activer désactiver...

Page 237: ...trement des frappes au clavier et ou clics de souris Effacer Cliquez pour effacer le jeu d instructions enregistré Monter descendre Cliquez pour faire monter ou descendre l instruction sélectionnée Durée de cycle des instructions Lorsque l option Minutage est décochée le délai d attente des actions sera sélectionnable dans le menu déroulant Exécution en boucle Permet d activer désactiver la macro ...

Page 238: ...236 Chapitre 4 Utiliser votre ordinateur Français ...

Page 239: ...ADSL ou à un réseau local 2 Connectez une extrémité du câble RJ 45 au port réseau RJ 45 situé à l arrière de votre ordinateur et l autre extrémité à un modem câble ADSL Pour plus de détails reportez vous à la documentation accompagnant votre modem câble ADSL 3 Allumez le modem câble ADSL et votre ordinateur 4 Configurez les paramètres de connexion Internet appropriés Contactez votre FAI Fournisseu...

Page 240: ...une extrémité du câble RJ 45 au port réseau RJ 45 situé à l arrière de votre ordinateur et l autre extrémité au hub réseau de votre réseau local 2 Allumez votre ordinateur 3 Configurez les paramètres de connexion Internet appropriés Contactez votre administrateur réseau pour toute assistance ou détails sur la configuration de votre connexion Internet Réseau local Câble RJ 45 ...

Page 241: ...otre ordinateur à Internet par le biais d une connexion réseau sans fil Pour établir une connexion sans fil vous devez connecter l ordinateur à un point d accès sans fil Point d accès sans fil Modem USB3 0 UASP USB KB MS Wireless AP Modem OU Point d accès sans fil Modem Utilisez l une des méthodes suivantes pour établir une connexion sans fil ...

Page 242: ...nnecter l ordinateur à un réseau sans fil 1 Cliquez sur l icône réseau de la zone de notification pour afficher une liste des réseaux sans fil disponibles 2 Sélectionnez le réseau sans fil auquel vous souhaitez établir une connexion puis cliquez sur Connecter 3 Il se peut qu il vous soit demandé d entrer une clé de sécurité réseau Si c est le cas entrez la clé appropriée puis cliquez sur OK 4 Pati...

Page 243: ...ur le BIOS de la carte mère afficher les informations relatives au système ou personnaliser les paramètres d AI Suite II Le DVD de support et le DVD de restauration peuvent ne pas être inclus dans la boîte de votre ordinateur Vous pouvez utiliser la partition de restauration pour créer un DVD de support et de restauration Pour plus de détails référez vous à la section Restaurer le système de ce ch...

Page 244: ... Probe II Sensor Recorder et Ai Charger Pour configurer cette fonction assignez les raccourcis clavier à chaque profil d utilisation Vous pouvez définir vos propres raccourcis clavier Voir l illustration ci dessous pour plus de détails Vous pouvez dès lors utiliser System Level Up via l une des deux méthodes suivantes BIOS Dans le programme de configuration du BIOS cliquez sur AI Tweaker System Le...

Page 245: ...nne dans des conditions d opération saines Pour exécuter Probe II Cliquez sur Tool Outils Probe II à partir de la barre des menus d AI Suite II Pour configurer Probe II Cliquez sur les onglets Voltage Temperature Fan Speed Voltage Température Vitesse des ventilateurs pour activer les sondes ou ajuster les valeurs seuil des sondes Cliquez sur l onglet Preference Préférences pour personnaliser certa...

Page 246: ...ensor Recorder à partir de la barre des menus d AI Suite II Pour configurer Sensor Recorder Cliquez sur l onglet Voltage Temperature Fan Speed et sélectionnez les éléments à surveiller L onglet History Record Historique permet d enregistrer les informations obtenues par les sondes de surveillances activées Sélectionnez les sondes de surveillance à activer Cliquez pour faire un zoom avant arrière s...

Page 247: ...en état S0 Ai Charger permet de recharger les périphériques USB connectés même lorsque l ordinateur est en mode veille S3 S4 S5 après avoir démarré le rechargement en mode S0 Consultez la documentation accompagnant votre périphérique mobile pour vérifier s il supporte le standard BC 1 1 La vitesse de chargement varie en fonction des périphériques USB Assurez vous de retirer puis de reconnecter vot...

Page 248: ...te II pour afficher ce panneau CPU Frequency Fréquence du CPU Le panneau CPU Frequency affiche la fréquence et l usage actuel du CPU Pour ouvrir le panneau de surveillance de la fréquence du CPU Cliquez sur Monitor Surveillance CPU Frequency Fréquence du CPU à partir de la barre des menus d AI Suite II pour afficher ce panneau Menu de surveillance Le menu Monitor Surveillance permet de visionner l...

Page 249: ...ise à jour du BIOS à partir d un fichier BIOS sauvegarde du fichier BIOS actuel visualisation des informations de version du BIOS Mise à jour du BIOS Mise à jour à partir d Internet 1 Dans la liste des options sélectionnez Update BIOS from Internet Mettre à jour le BIOS depuis Internet et cliquez sur Next Suivant 2 Sélectionnez le site FTP ASUS le plus proche Cochez les deux options disponibles po...

Page 250: ... à jour à partir d un fichier BIOS 1 Dans la liste des options sélectionnez Update BIOS from file Mettre à jour le BIOS à partir d un fichier BIOS puis cliquez sur Next Suivant 2 Cliquez sur Browse Parcourir pour localiser le fichier du BIOS puis cliquez sur Next Suivant 3 Cliquez sur Yes Oui pour modifier le logo de démarrage du BIOS soit l image apparaissant lors du POST Power On Self Tests Cliq...

Page 251: ... mémoire Cliquez sur l onglet MB Carte mère pour afficher les détails sur la fabricant de la carte mère le nom du produit la version et le BIOS Cliquez sur l onglet CPU Processeur pour visualiser les informations relatives au processeur et à la mémoire cache Cliquez sur l onglet Memory Mémoire puis sélectionnez un module mémoire pour afficher les détails sur ce module mémoire ...

Page 252: ...r personnaliser les options de la barre des menus Application Permet de sélectionner l application à activer Bar Barre Permet de modifier les paramètres de la barre Skin Apparence Permet de personnaliser le contraste la luminosité la saturation la teinte et la correction gamma de l interface Menu d assistance Le menu Support Assistance affiche des informations concernant les divers sites Web d ASU...

Page 253: ...lancement rapide et la fenêtre principale et démarrer AI Manager ASUS AI Manager ASUS AI Manager est un utilitaire offrant un accès rapide et aisé aux applications les plus fréquemment utilisées Lancer AI Manager Pour démarrer AI Manager depuis le Bureau de Windows cliquez sur Démarrer Tous les programmes ASUS AI Manager 1 xx xx AI Manager La barre de lancement rapide d AI Manager apparaît sur le ...

Page 254: ...er sur la barre des tâches Cliquez sur le bouton Fermer pour fermer AI Manager Menu principal Le menu Principal intègre cinq utilitaires AI Disk AI Security et AI Boosting Cliquez sur les flèches du menu Principal pour faire défiler les utilitaires AI Disk AI Disk permet d effacer les fichiers temporaires les cookies les URL et l historique de Internet Explorer ou de vider la corbeille Cliquez sur...

Page 255: ...ctères alphanumériques 2 Confirmez le mot de passe 3 Saisissez un indice de mot de passe recommandé 4 Une fois terminé cliquez sur Ok 5 Sélectionnez le périphérique à verrouiller puis appuyez sur Appliquer 6 Entrez le mot de passe précédemment saisi puis cliquez sur Ok Pour déverrouiller un périphérique 1 Décochez la case du périphérique à déverrouiller puis cliquez sur Appliquer 2 Entrez le mot d...

Page 256: ...is vous permet d ajouter à la liste de vos favoris les applications que vous utilisez le plus fréquemment afin d en faciliter l accès Pour ajouter une application 1 Cliquez sur Ajouter puis localisez l application à ajouter à la liste de vos favoris 2 Cliquez sur Ouvrir dans la fenêtre d ouverture de fichier L application est ajoutée à la liste Mes favoris Faites un clic droit sur l icône de l app...

Page 257: ...es Web d ASUS site Web international site Web d assistance en ligne site de téléchargement et informations de contact Informations Cliquez sur l un des onglets de la fenêtre Informations pour afficher des informations détaillées sur votre ordinateur système carte mère CPU BIOS périphériques installés et modules mémoire ...

Page 258: ...9 Pour installer Nero 9 1 Insérez le DVD de Nero 9 DVD dans votre lecteur optique 2 Si l Exécution automatique est activée le menu principal apparaît automatiquement à l écran Si l Exécution automatique est désactivée sur votre ordinateur localisez le fichier SeupX exe contenu dans le répertoire principal du DVD de Nero 9 3 Dans le menu principal cliquez sur Nero 9 Essentials ...

Page 259: ...57 Français 4 Sélectionnez la langue de l assistant d installation Cliquez sur Suivant 5 Cliquez sur Suivant pour continuer 6 Cochez la case J accepte les conditions du contrat de licence Une fois terminé cliquez sur Suivant ...

Page 260: ...ilities Français Français 7 Sélectionnez Normale puis cliquez sur Suivant 8 Cochez la case Oui je veux aider en envoyant des données d applications anonymes à Nero puis cliquez sur Suivant 9 Une fois terminé cliquez sur Quitter ...

Page 261: ...ASUS CG8580 259 Français Graver des fichiers Pour graver des fichiers 1 À partir du menu principal cliquez sur Gravure de données Ajouter 2 Sélectionnez les fichiers à graver Une fois terminé cliquez sur Ajouter ...

Page 262: ... Français Français 3 Après avoir sélectionné les fichiers à graver cliquez sur Graver pour lancer la gravure des fichiers sur un disque Pour plus de détails sur l utilisation de Nero 9 référez vous au site Web de Nero sur www nero com ...

Page 263: ...ition de restauration a été créée à l usine et ne peut être restaurée par l utilisateur si elle est effacée Apportez votre PC portable à un service après vente agréé par ASUS si vous rencontrez des problèmes lors de la procédure de restauration Utiliser la partition de restauration 1 Appuyez sur F9 pendant le démarrage 2 Appuyez sur Entrée pour sélectionner Windows Setup EMS Enabled 3 Sélectionnez...

Page 264: ...ON 2 Redémarrez l ordinateur et appuyez sur Echap au démarrage puis sélectionnez le lecteur optique apparaît normalement comme CD DVD grâce au curseur Appuyez ensuite sur Entrée pour démarrer à partir du DVD de Restauration 3 Sélectionnez OK pour lancer la restauration de l image 4 Sélectionnez OK pour lancer la restauration du système La restauration supprimera les données de votre disque dur Ass...

Page 265: ...re suivants 1 Processeur Processeur de la famille Intel Core de 2ème 3ème génération 2 Système d exploitation Windows 7 3 SSD Un disque SSD Solid State Disk pour la prise en charge des technologies Intel Smart Response et Intel Rapid Start Reportez vous au tableau Configuration de disque SSD requise pour vérifier les critères de disque SSD requis en matière de taille capacité de partitionnage et m...

Page 266: ...ions de 20Go et 2Go taille de disque SSD 22Go Partitions de 20Go et 4Go taille de disque SSD 24Go Partitions de 20Go et 8Go taille de disque SSD 28Go Le disque SSD utilisé pour les technologies Intel Rapid Start et Intel Smart Response ne peut pas être utiliser pour créer un volume RAID En raison de certaines limitations du système d exploitation la technologie Intel Rapid Start fonctionne de mani...

Page 267: ...z l élément SATA Mode du BIOS sur RAID Mode Installer la technologie Intel Smart Response 1 Placez le DVD de support dans votre lecteur optique L onglet d installation des pilotes apparaît si l Exécution automatique a été activée sur votre ordinateur 2 Dans l onglet des pilotes cliquez sur Intel Rapid Storage Technology Driver 3 Suivez les instructions apparaissant à l écran pour terminer l instal...

Page 268: ...t de sortir rapidement le système du mode veille La sauvegarde de la mémoire système de l ordinateur sur un disque dur SSD offre un délai de réponse plus rapide tout en minimisant la consommation d énergie Avant d utiliser la technologie Intel Rapid Start allez dans l interface avancée du BIOS puis sélectionnez Advanced PCH Configuration et activez l élément Intel Rapid Start Technology Assurez vo...

Page 269: ...la mémoire DRAM installée 1Go 1024Mo puis cliquez sur Réduire Allez dans Démarrer Panneau de configuration Système et sécurité Sys tème et vérifiez les informa tions relatives au montant de mémoire DRAM installée Le volume non alloué est attri bué au disque sélectionné Si la taille de votre disque SSD est inférieure à 64Go et qu il est configuré pour utiliser l option de capacité de stockage total...

Page 270: ...e 9 Tapez create partition primary puis appuyez sur Entrée 10 Après avoir créé une partition primaire tapez detail disk puis appuyez sur Entrée pour afficher les détails du disque partitionné 11 Sélectionnez le volume brut disposant de la même taille que le volume réduit tapez select volume x x valeur numérique puis appuyez sur Entrée pour stocker la partition Intel Rapid Start La valeur x se réfè...

Page 271: ...activer la technologie Intel Rapid Start sous le système d exploitation Installez la technologie Intel Rapid Start à partir du DVD de support afin de pouvoir utiliser le gestionnaire Intel Rapid Start Une fois la partition créée démarrez le gestionnaire Intel Rapid Start pour activer ou désac tiver la technologie Intel Rapid Start 1 Cliquez sur la flèche située dans la zone de notification puis cl...

Page 272: ...olume tapez select disk x x valeur numérique puis appuyez sur Entrée 1 4 La valeur x se réfère au numéro de disque stockant la partition 2 Cochez l option On Activer du champ Status État pour activer la fonction puis cliquez sur Save Enregistrer Active ou désactive le mode d économie d énergie Cette fonction ne s applique qu aux ordinateurs portables Active ou désactive la fonction Active ou désac...

Page 273: ... puis appuyez sur Entrée La partition sélectionnée est supprimée 7 Dans le Bureau cliquez sur Démarrer faites un clic droit sur Ordinateur puis cliquez sur Gérer 8 Dans la fenêtre de gestion de l ordinateur cliquez sur Gestion des disques faites un clic droit sur le volume réduit puis sélection nez Étendre le volume 9 L assistant d extension de volume apparaît Cliquez sur Suivant La valeur x se ré...

Page 274: ...technologie Intel Smart Connect sort périodiquement le système du mode veille pour mettre à jour vos applications avant de le rebasculer automati quement en veille La technologie Intel Smart Connect prend en charge les applications Windows Live Mail Microsoft Outlook et Seesmic Il est nécesssaire d activer une option de l élément PCH Configuration du BIOS avant d utiliser la technologie Intel Smar...

Page 275: ...e d accès n est requis Vérifiez que votre connexion Internet est active lors de l activation de la technologie Intel Smart Connect Cliquez sur Démarrer Tous les programmes Intel Intel Smart Connect Technology Dans l onglet Basic Général cliquez sur Enable Updating Activer les mises à jour L onglet Advanced Avancé est alors disponible 1 Activation Désactivation des mises à jour Réglage de la fréque...

Page 276: ... Cliquez sur Reset All to Defaults Restaurer les valeurs par défaut pour rétablir les paramètres de configuration par défaut 4 Dans l onglet Advanced Avancé planifiez les ho raires de mise à jour Ce réglage n est applicable qu à a période définie 5 Dans l onglet Help Aide cliquez sur About À propos pour afficher la version du logiciel Cliquez sur Topics Ru briques d aide pour obtenir plus d inform...

Page 277: ...let Applications 3 Sélectionnez le programme à fermer puis cliquez sur Fin de tâche Si le clavier est défaillant maintenez enfoncé le bouton d alimentation du châssis jusqu à ce que l ordinateur s éteigne Puis appuyez de nouveau sur le bouton d alimentation pour le rallumer Je ne peux pas me connecter à un réseau sans fil via une carte réseau sans fil ASUS disponible sur une sélection de modèles A...

Page 278: ...e sous Windows Si votre ordinateur intègre une carte graphique assurez vous que votre moniteur est correctement connecté au port de sortie vidéo de la carte Vérifiez les paramètres d affichage Voir section Connecter plusieurs périphériques d affichage du Chapitre 3 pour plus de détails L ordinateur ne détecte pas le périphérique de stockage USB externe Lors de la première connexion de votre périph...

Page 279: ...eurs n émet pas de son Assurez vous d avoir connecté votre système de haut parleurs au port de sortie audio vert situé en façade ou à l arrière du châssis Vérifiez votre système de haut parleurs est connecté à une source d alimentation et allumé Ajustez le volume de votre système de haut parleurs Assurez vous que le son de votre ordinateur n a pas été désactivé Si le son a été désactivé l icône de...

Page 280: ...é Assurez vous que le cordon d alimentation est correctement raccordé Utilisez un autre cordon d alimentation Dysfonctionnement du bloc d alimentation Contactez le service après vente d ASUS Affichage Problème Raison possible Action Aucun affichage après la mise en route de l ordinateur écran noir Le câble de signal vidéo n est pas connecté au port d affichage approprié de votre ordinateur Connect...

Page 281: ...appropriés Problème causé par un logiciel anti virus Fermez le logiciel anti virus Problème de pilote logiciel Réinstallez le pilote réseau Audio Problème Raison possible Action Pas de son Le système de haut parleurs ou le casque audio est connecté au mauvais port audio Reportez vous au manuel d utilisation de l ordinateur pour localiser l emplacement de chaque port audio Déconnectez puis reconnec...

Page 282: ... d exploitation Le système se bloque fréquemment Dysfonctionnement du disque dur Envoyez le disque dur endommagé au service après vente d ASUS Remplacez le disque dur défectueux Problème causé par les modules mémoire Remplacez les modules mémoire incompatibles Enlevez les modules mémoire additionnels installés Ventilation du système insuffisante Déplacez votre ordinateur dans un endroit offrant un...

Page 283: ...télécharger la dernière version du BIOS Système trop bruyant lors de son utilisation Le ventilateur du processeur à été remplacé Assurez vous d utiliser un ventilateur de CPU compatible ou recommandé par ASUS Ventilation insuffisante Déplacez votre ordinateur dans un endroit offrant une meilleure circulation de l air La température du système est trop élevée Mettez le BIOS à jour Si vous savez com...

Page 284: ...0 739 3777 Fax 1 510 608 4555 Site Web usa asus com Support technique Téléphone 1 812 282 2787 Support fax 1 812 284 0883 Support en ligne support asus com ASUS France SARL Adresse 10 Allée de Bienvenue 93160 Noisy Le Grand France Téléphone 33 0 1 49 32 96 50 Site Web www france asus com Support technique Téléphone 33 0 8 21 23 27 87 Fax 33 0 1 49 32 96 99 Support en ligne support asus com Fabrica...

Page 285: ...ASUS Essentio Desktop PC CG8580 Manuale Utente ...

Page 286: ...UN PARTICOLARE SCOPO IN NESSUN CASO ASUS I SUOI DIRIGENTI FUNZIONARI IMPIEGATI O DISTRIBUTORI SONO RESPONSABILI PER QUALSIASI DANNO INDIRETTO PARTICOLARE ACCIDENTALE O CONSEGUENTE COMPRESI DANNI DERIVANTI DA PERDITA DI PROFITTO PERDITA DI CONTRATTI PERDITA D USO O DI DATI INTERRUZIONE DELL ATTIVITA E SIMILI ANCHE SE ASUS E STATA AVVISATA DELLA POSSIBILITA CHE TALI DANNI SI POSSANO VERIFICARE IN SE...

Page 287: ...orto disponibili se previsti nonchè le spese e gli altri termini relativi all assistenza e al supporto se previsti verranno specificati nella documentazione destinata al cliente fornita a corredo del Prodotto E responsabilità dell utente prima ancora di richiedere l assistenza effettuare il backup dei contenuti presenti sul Prodotto inclusi i dati archiviati o il software installato nel prodotto A...

Page 288: ...a di furto o in ogni altra situazione che lo renda inutilizzabile anche la possibilità di utilizzare il prodotto OEM viene compromessa Chiunque acquisti unitamente al prodotto un software OEM è tenuto ad osservare i termini e le condizioni del contratto di licenza tra il proprietario del software e l utente finale denominato EULA End User Licence Agreement visualizzato a video durante la fase di i...

Page 289: ...telle 308 Ripristino del sistema 310 Protezione del computer 311 Supporto Windows 312 Capitolo 3 Connessione di dispositivi al computer Connessione di un dispositivo di archiviazione USB 313 Connessione di microfono e altoparlanti 314 Connessioni multischermo 317 Connessione di uno schermo ad alta definizione 319 Capitolo 4 Utilizzo del computer Posizione corretta durante l uso del Desktop PC 321 ...

Page 290: ...delle Utilità ASUS AI Suite II 337 ASUS AI Manager 347 Nero 9 352 Ripristino del sistema 357 Introduzione alle nuove tecnologie per processori Intel 359 Capitolo 7 Analisi e risoluzione dei problemi Analisi e risoluzione dei problemi 371 Contatti ASUS 378 ...

Page 291: ... la conformità ai limiti stabiliti per i dispositivi digitali di Classe B come indicato dalla parte 15 delle Norme FCC Questi limiti sono stati definiti per offrire una ragionevole protezione contro interferenze dannose quando l apparecchio viene usato in ambienti residenziali Questo apparecchio genera usa e può emettere energia in radiofrequenza e se non viene installato e utilizzato come indicat...

Page 292: ...lle interferenze radio del ministero delle comunicazioni canadese Questo apparecchio digitale di classe B è conforme alle normative canadesi ICES 003 Nota sul Prodotto di Macrovision Corporation Questo prodotto contiene tecnologia protetta dai diritti d autore grazie ai diritti di alcuni brevetti degli U S A ed altri diritti di proprietà in possesso di Macrovision Corporation e di altri proprietar...

Page 293: ...ezza della batteria NON gettare la batteria nel fuoco NON creare corto circuiti fra i contatti NON disassemblare la batteria Utilizzare il prodotto in ambienti a temperatura compresa fra 0 C 32 F e 35 C 95 F NON coprire i fori per la ventilazione del Desktop PC per evitare il surriscaldamento del sistema NON utilizzare cavi di alimentazione accessori o periferiche malfunzionanti o difettose Per ev...

Page 294: ...mazioni aggiuntive per il completamento di un operazione IMPORTANTE istruzioni da seguire OBBLIGATORIAMENTE per portare a termine un operazione Approfondimenti Per approfondimenti e aggiornamenti sui prodotti e software ASUS consultare le seguenti fonti di informazione Sito internet ASUS Il sito internet ASUS fornisce informazioni aggiornate su hardware e software dei prodotti ASUS Consultare il s...

Page 295: ...ilizzo della tastiera e del mouse per il gaming consultare la sezione Tastiera per il Gaming ASUS ROG U9N e ASUS GX900 Gaming Mouse ASUS Essentio Desktop PC Tastiera per il Gaming ASUS ROG U9N x1 Mouse per il Gaming ASUS GX900 x1 Installation Guide Cavo di alimentazione x1 DVD con Software di Masterizzazione Nero 9 x1 Guida all installazione x1 Garanzia x1 DVD di Supporto x1 DVD di Ripristino x1 o...

Page 296: ...294 Italiano ...

Page 297: ...e del telaio variano in base al modello Benvenuti Grazie per aver acquistato ASUS Essentio CG8580 Desktop PC ASUS Essentio CG8580 Desktop PC offre prestazioni d avanguardia straordinaria affidabilità e utilità a misura di utente racchiuse in un modello dal design moderno e funzionale Prima di installare ASUS Desktop PC leggere il contenuto della Garanzia ASUS 1 2 3 4 5 7 8 10 9 11 12 6 ...

Page 298: ...ystem Level Up del computer 9 Porte USB 3 0 Le porte USB 3 0 Universal Serial Bus 3 0 permettono di collegare dispositivi USB 3 0 come mouse stampanti scanner fotocamere PDA e altro 10 Porte USB 2 0 Le porte USB 2 0 Universal Serial Bus 2 0 permettono di collegare dispositivi USB 2 0 come mouse stampanti scanner fotocamere PDA e altro 11 Porta microfono Porta per la connessione del microfono 12 Po...

Page 299: ...te USB 3 0 durante l installazione del sistema operativo Windows A causa delle limitazioni del controller USB 3 0 i dispositivi USB 3 0 possono essere utilizzati soltanto in ambiente Windows dopo l installazione del driver USB 3 0 I dispositivI USB 3 0 possono essere utilizzati unicamente per archiviazione dati Per ottimizzare le prestazioni collegare i dispositivi USB 3 0 alle porte USB 3 0 2 Por...

Page 300: ...tro contenuto protetto 6 Porte USB 3 0 con supporto modalità UASP della funzione ASUS USB 3 0 Boost La porta sul lato esterno supporta USB BIOS Flashback 7 Uscita altoparlanti laterali grigio Porta per la connessione di altoparlanti laterali in una configurazione audio a 8 canali 8 Uscita altoparlanti posteriori nero Porta per la connessione di altoparlanti posteriori in una configurazione audio a...

Page 301: ... espansione Rimuovere la staffa quando si installa una scheda di espansione Porta LAN LED VELOC LED ATT CONN 14 Interruttore di accensione Fornisce interrompe l alimentazione del computer 15 Connettore di alimentazione Valori nominali di alimentazione 100 120 200 240Vac 60 50Hz 10 5A Connettore per l inserimento del cavo di alimentazione 16 Porta combo Mouse Tastiera PS 2 Porta per la connessione ...

Page 302: ...r Connessione di un monitor esterno Utilizzo della scheda grafica ASUS su modelli selezionati Collegare il monitor all uscita video della scheda grafica ASUS Per collegare un monitor esterno mediante la scheda grafica ASUS 1 Collegare un monitor all uscita video sulla scheda grafica ASUS 2 Collegare il monitor alla sorgente di alimentazione Le uscite video della scheda grafica ASUS potrebbero vari...

Page 303: ...ppure un monitor HDMI alla porta HDMI sul pannello posteriore del computer 2 Collegare il monitor ad una sorgente di alimentazione Se il computer è provvisto di una scheda grafica ASUS la scheda grafica è impostata nel BIOS come dispositivo di visualizzazione primario Pertanto collegare il monitor all uscita video sulla scheda grafica Per i dettagli sulle modalità di connessione di più di un monit...

Page 304: ... pannello posteriore del computer e l altra estremità ad una sorgente di alimentazione USB3 0 UASP USB KB MS USB3 0 UASP USB KB MS USB3 0 UASP USB KB MS E possibile accedere all utilità di configurazione pre installata per ASUS GX900 Gaming Mouse soltanto quando si collega il mouse al computer prima di avviare Windows 7 per la prima volta In alternativa è possibile installare manualmente l utilità...

Page 305: ... spegnere il computer Per spegnere il computer 1 Chiudere tutte le applicazion in esecuzione 2 Cliccare sul desktop di Windows 3 Cliccare per arrestare il sistema Pulsante di accensione 3 Attendere il termine del caricamento automatico del sistema Come accendere e spegnere il computer Questa sezione indica come accendere spegnere il computer USB3 0 UASP USB KB MS ...

Page 306: ...304 Capitolo 1 Informazioni Preliminari Italiano ...

Page 307: ...e e computer name Cliccare Next 5 Inserire le informazioni necessarie per impostare la password quindi cliccare Next E inoltre possibile cliccare Next per ignorare questo passaggio senza inserire alcuna informazione 6 Leggere attentamente i termini e le condizioni del contratto di licenza Selezionare I accept the license terms e cliccare Next 7 Selezionare Use recommended settings oppure Install i...

Page 308: ...indows aggiungere nuovi utenti e trasferire file che facilitano la familiarizzazione con il sistema operativo Windows 7 Per utilizzare Getting Started 1 Dalla barra delle applicazioni di Windows cliccare sull icona Start per avviare il menu Start 2 Selezionare Getting Started Appare l elenco delle applicazioni disponibili 3 Selezionare l applicazione da avviare Barra delle applicazioni La barra de...

Page 309: ...rogrammi sul menu Start o sulla barra delle applicazioni Per aggiungere programmi sul menu Start o sulla barra delle applicazioni 1 Dalla barra delle applicazioni di Windows cliccare sull icona Start per avviare il menu Start 2 Cliccare sull elemento da aggiungere al menu Start o alla barra delle applicazioni 3 Selezionare Pin to Taskbar oppure Pin to Start menu E anche possibile cliccare sull ico...

Page 310: ...o da aprire Per approfondimenti consultare la sezione su Windows Action Center in questo capitolo Personalizzazione di icone e notifiche E possibile scegliere di visualizzare o nascondere le icone e i messaggi di notifica sulla barra delle applicazioni o in area di notifica Per personalizzare icone e notifiche 1 Dall area di notifica cliccare sul icona con la freccia 2 Cliccare Customize 3 Dall el...

Page 311: ... il cursore per selezionare la modalità di visualizzazione di file e cartelle In alternativa cliccare su un punto qualunque del pannello di visualizzazione cliccare View e selezionare il tipo di visualizzazione Disposizione file Per disporre i file 1 Avviare Windows Explorer 2 Dal campo Arrange by cliccare per visualizzare l elenco a discesa 3 Selezionare la modalità preferita Ordine dei file Per ...

Page 312: ...indows choose recommended oppure Let me choose as your backup mode Ripristino del sistema La funzione Windows System Restore crea un punto di ripristino dove salvare le impostazioni del sistema del computer in una certa data e ora e permette di ripristinare o annullare le modifiche alle impostazioni del sistema lasciando inalterati i dati personali Per ripristinare il sistema 1 Chiudere tutte le a...

Page 313: ...ndows Update Windows Update permette di controllare e installare gli aggiornamenti più recenti per aumentare la protezione e le prestazioni del computer Avvio di Windows Update Per avviare Windows Update 1 Dalla barra delle applicazioni di Windows cliccare sull icona Start per aprire il menu corrispondente 2 Selezionare All Programs Windows Update 3 Dalla schermata Windows Update selezionare l ope...

Page 314: ...durata di 60 giorni dalla data di attivazione il software deve essere acquistato separatamente Per attivare Trend Micro Internet Security 1 Eseguire l applicazione Trend Micro Internet Security 2 Leggere attentamente i termini e le condizioni di icenza Cliccare Agree Activate 3 Inserire l indirizzo di posta elettronica e selezionare la locazione Cliccare Next 4 Per completare l attivazione cliccar...

Page 315: ...dispositivi al computer Connessione di un dispositivo di archiviazione USB Sia nel pannello frontale che in quello posteriore questo desktop PC è dotato di porte USB 2 0 1 1 e USB 3 0 per la connessione di dispositivi USB come i dispositivi di archiviazione Per connettere un dispositivo di archiviazione USB Procedere come indicato dalle figure sottostanti NON rimuovere un dispositivo di archiviazi...

Page 316: ...Questo desktop PC è dotato di porte per il microfono e gli altoparlanti sia nel pannello frontale che nel pannello posteriore Le porte audio I O situate nel pannello posteriore consentono di collegare gli altoparlanti stereo a 2 4 6 e 8 canali Connessione di cuffie e microfono Connessione altoparlanti a 2 canali ...

Page 317: ...Italiano ASUS CG8580 315 Italiano Connessione altoparlanti a 4 canali Connessione altoparlanti a 6 canali ...

Page 318: ...316 Capitolo 3 Connessione di dispositivi al computer Italiano Italiano Connessione altoparlanti a 8 canali ...

Page 319: ... di più monitor è possibile impostare le modalità di visualizzazione Il monitor aggiuntivo può essere utilizzato per duplicare l immagine dello schermo principale o come estensione del desktop di Windows Per impostare la configurazione multischermo 1 Spegnere il computer 2 Collegare i due monitor al computer e i cavi di alimentazione ai monitor Consultare la sezione Installazione del computer del ...

Page 320: ...sktop Show desktop only on 1 2 Selezionare questa opzione per visualizzare il desktop soltanto sul monitor 1 o sul monitor 2 Remove this display Selezionare questa opzione per rimuovere il monitor selezionato 6 Cliccare Apply oppure OK quindi premere Keep Changes al messaggio di conferma 3 Accendere il computer 4 Per visualizzare la schermata per le impostazioni Screen Resolution procedere in uno ...

Page 321: ...a definizione Collegare uno schermo ad alta definizione HDTV alla porta HDMI del computer Per collegare l HDTV al computer è necessario un cavo HDMI da acquistare separatamente Per prestazioni ottimali assicurarsi che il cavo HDMI sia di lunghezza inferiore ai 15 metri ...

Page 322: ...320 Capitolo 3 Connessione di dispositivi al computer Italiano ...

Page 323: ...te superiore rispetto ai fianchi per poter meglio rilassare le gambe Se necessario utilizzare un appoggiapiedi per alzare il livello delle ginocchia Regolare lo schienale della sedia in modo che la base della spina dorsale sia saldamente appoggiata e leggermente inclinata indietro Stare seduti in posizione eretta con le ginocchia i gomiti e i fianchi in posizione ortogonale rispetto al PC Porre il...

Page 324: ...ne sicura dell hardware e del supporto situata nell area di notifica di Windows così da prevenire la perdita dei dati Per utilizzare una scheda di memoria 1 Inserire la scheda di memoria nell apposito slot 2 Selezionare un programma di accesso ai file dalla finestra AutoPlay Se nel computer NON è attivata la funzioneAutoPlay cliccare sul pulsante Start di Windows 7 sulla barra delle applicazioni s...

Page 325: ...programma dalla finestra AutoPlay Rimozione di un disco ottico Per rimuovere un disco ottico 1 Quando il sistema è acceso espellere il vassoio in uno dei seguenti modi Premere il pulsante di espulsioone situato sotto la copertura del vano dell unità ottica Cliccare sull icona del disco CD DVD sulla schermata Risorse del Computer quindi cliccare Rimuovi 2 Rimuovere il disco dal vassoio Se nel compu...

Page 326: ...legare la tastiera ad una porta USB 2 0 del computer 1 Allineare e inserire l appoggiapolsi negli appositi slot della tastiera A Utilizzando entrambi i pollici spingere verso il basso l appoggiapolsi sino a quando non scatta in posizione B Controllare la sezione Contenuto della Confezione per un elenco dettagliato degli articoli della confezione della tastiera per il gaming ASUS ROG U9N Riavviare ...

Page 327: ...tro un tasto destro una rotellina di scorrimento due tasti laterali un tasto dedicato DPI ed uno speciale pulsante per il cambio di profilo Tasto Descrizione Tasto Descrizione 1 Tasto sinistro 7 Logo GX900 2 Tasto destro 8 Tasto IE Avanti 3 Rotellina di scorrimento 9 Tasto IE Indietro 4 Push Pull DPI switch 10 Piedini del Mouse 5 Tasto cambio profilo profilo indicatore 11 Piedini del Mouse e Senso...

Page 328: ...i avviare Windows 7 per la prima volta il programma rileva automaticamente il mouse In alternativa è possibile installare manualmente l utilità dal DVD di supporto in dotazione Per installare il programma dal DVD di Supporto inserire il disco nell unità ottica e seguire le istruzioni sullo schermo per avviare il programma Se nel computer NON è attivata la funzione di esecuzione automatica sfogliar...

Page 329: ...ti sugli ultimi valori salvati 6 Cliccare per visualizzare le descrizioni dei colori degli indicatori dei diversi profili 7 Cliccare per caricare un profilo salvato nel mouse 8 Cliccare per salvare le attuali impostazioni profilo nel disco rigido 9 Cliccare per riportare tutte le impostazioni del mouse sui valori predefiniti 10 Cliccare per salvare le impostazioni effettuate 11 Cliccare per salvar...

Page 330: ...r ciascun tasto azione dall elenco a discesa Per i dettagli consultare la tabella sottostante Funzioni Descrizioni Tasto sinistro Funziona da tasto di sinistra del mouse Tasto destro Funziona da tasto di destra del mouse Tasto centrale Funziona da tasto di centro del mouse IE Indietro Funziona da tasto Indietro di IE Dopo aver operato la selezione premere questo tasto per tornare alla pagina prece...

Page 331: ... rotellina inclinata Rapid Fire mouse Tasto per fare fuoco rapido in un gioco di attacco a clic Equivale a cliccare tre volte il tasto di sinistra del mouse Rapid Fire tasto Tasto per fare fuoco rapido in un gioco di attacco in cui si utilizza la barra spaziatrice Equivale a cliccare tre volte la barra spaziatrice Web Browser Tasto per avviare il browser web predefinito E mail Tasto per avviare l ...

Page 332: ...zioni del mouse Interrompi Cliccare per terminare la registrazione della pressione e rilascio dei tasti e o delle azioni del mouse Cancella Cliccare per cancellare tutte le istruzioni salvate Sposta su giù Cliccare per spostare su giù l istruzione selezionata Imposta azione ritardata Quando Timing è deselezionato il ritardo di tutte le azioni sarà il valore scelto dall elenco a discesa Loop Impost...

Page 333: ...use Interrompi Cliccare per terminare la registrazione delle azioni della tastiera e o del mouse Cancella Cliccare per cancellare tutte le istruzioni salvate Sposta su giù Cliccare per spostare su giù l istruzione selezionata Imposta azione ritardata Quando Timing è deselezionato il ritardo di tutte le azioni sarà il valore scelto dall elenco a discesa Loop Imposta lo script da eseguire a un clic ...

Page 334: ...332 Capitolo 4 Utilizzo del computer Italiano ...

Page 335: ...avo DSL o alla rete locale LAN 2 Collegare un estremità di un cavo RJ 45 alla porta LAN RJ 45 sul pannello posteriore del computer e l altra estremità a un modem via cavo DSL Consultare la documentazione fornita con il modem 3 Accendere il modem via cavo DSL e il computer 4 Configurare le impostazioni di connessione a internet Per ulteriori informazioni o assistenza nella connessione a internet co...

Page 336: ... di un cavo RJ 45 alla porta LAN RJ 45 sul pannello posteriore del computer e l altra estremità alla presa LAN 2 Accendere il computer 3 Configurare le impostazioni di connessione a internet Contattare l amministratore di rete per ulteriori informazioni o per assistenza nell installazione della connessione a internet USB3 0 UASP USB KB MS RJ 45 cable LAN ...

Page 337: ...P USB KB MS Wireless AP Modem Per stabilire una connessione wireless applicare uno dei seguenti metodi OPPURE Connessione wireless su modelli selezionati Collegare il computer a Internet via connessione wireless Per stabilire una connessione wireless è necessario un punto di accesso wireless AP ...

Page 338: ...rne sono opzionali Per la connessione con una rete wireless 1 Cliccare sull icona di rete in area di notifica per visualizzare le reti wireless disponibili 2 Selezionare la rete wireless a cui conettersi quindi cliccare Connect 3 Potrebbe essere necessario digitare la chiave di protezione di rete per la sicurezza della rete quindi cliccare OK 4 Attendere che il computer stabilisca la connessione d...

Page 339: ...heda madre visualizzare le informazioni del sistema e personalizzare le impostazioni AI Suite II Il DVD di Supporto e il DVD di Ripristino potrebbero non essere compresi nella confezione Utilizzare la funzione della partizione di ripristino per creare il DVD di Supporto e il DVD di Ripristino Per approfondimenti consultare la sezione Ripristino del Sistema in questo capitolo Le applicazioni del me...

Page 340: ...System Level up cliccare Tool System Level Up sulla barra menu AI Suite II Durante l impostazione della funzione assegnare i tasti rapidi per il cambio di profilo System Level Up E possibile effettuare la regolazione manuale Per approfondimenti consultare la figura sottostante Regolare System Level Up nei seguenti modi BIOS Nel programma di configurazione del BIOS cliccare AI Tweaker System Level ...

Page 341: ...e condizioni operative Per avviare Probe II Cliccare Tool Probe II sulla barra del menu principale di AI Suite II Per configurare Probe II Cliccare sulle schede Voltage Temperature Fan Speed per attivare i rispettivi sensori o regolare i valori soglia dei sensori La scheda Preference consente di personalizzare l intervallo di tempo dei segnali di avvertimento dei sensori o di modificare l unità di...

Page 342: ...er Cliccare Tool Sensor Recorder sulla barra del menu principale di AI Suite II Per configurare Sensor Recorder Cliccare sulle schede Voltage Temperature Fan Speed e selezionare i sensori da monitorare La scheda History Record permette di registrare le variazioni dei sensori attivati Selezionare i sensori da monitorare Zoom in out dell asse Y Zoom in out dell asse X Ritorno alla modalità predefini...

Page 343: ... acceso Ai Charger consente di ricaricare i dispositivi USB connessi anche quando il PC entra in fase di sospensione S3 S4 S5 successivamente alla fase di avvio Controllare il produttore del dispositivo USB per verificare se supporta la funzione BC 1 1 La velocità di ricarica dipende dalle condizioni del dispositivo USB Dopo aver attivato o disattivato Ai Charger assicurarsi di rimuovere e ricolle...

Page 344: ...pale di AI Suite II Avvio di CPU Frequency Il pannello CPU Frequency mostra la frequenza e l utilizzo della CPU Per avviare CPU frequency Cliccare Monitor CPU Frequency sulla barra del menu principale di AI Suite II Il Menu Monitor La sezione Monitor illustra le caratteristiche deI pannello dei sensori e con la frequenza della CPU Pannello Sensori Pannello Frequenza CPU Il pannello dei sensori si ...

Page 345: ...nare il BIOS della scheda madre e il logo di avvio del BIOS grazie alle utilità di aggiornamento ASUS ASUS Update ASUS Update è un utilità per gestire salvare e aggiornare il BIOS della scheda madre nel sistema operativo Windows L utilità ASUS Update permette di effettuare l aggiornamento del BIOS direttamente da internet scaricare da internet i file BIOS più recenti aggiornare il BIOS da un file ...

Page 346: ...pen e poi Next 3 E possibile decidere se modificare il logo di avvio del BIOS Cliccare Yes per modificare il logo di avvio oppure No per continuare 4 Seguire le istruzioni sullo schermo per completare l aggiornamento 4 E possibile decidere se modificare il logo di avvio del BIOS rappresentato dall immagine che appare sullo schermo in fase di POST Power On Self Tests Cliccare Yes per modificare il ...

Page 347: ...emoria Cliccare sulla scheda MB per visualizzare i dettagli su produttore nome del prodotto versione e BIOS della scheda madre Cliccare sulla scheda CPU per visualizzare i dettagli sul processore e la Cache Cliccare sulla scheda SPD quindi selezionare uno slot di memoria per visualizzare i dettagli sui moduli di memoria installati su tale slot ...

Page 348: ...e l applicazione da attivare Bar permette di modificare le impostazioni della barra Skin offre la possibilità di personalizzare contrasto luminosità saturazione tinta e gamma dell interfaccia Cliccare sulla scheda Disk e selezionare il disco di cui visualizzare i dettagli Supporto tecnico La pagina Support mostra le informazioni relative al sito ufficiale di ASUS e del supporto tecnico su come eff...

Page 349: ...di accesso rapido alla finestra principale da cui avviare AI Manager ASUS AI Manager ASUSAI Manager è un utilità che consente di accedere in modo facile e rapido alle applicazioni di uso frequente Avvio di AI Manager Per avviare AI Manager dal desktop di Windows cliccare Start Tutti i Programmi ASUS AI Manager AI Manager 1 xx xx Sul desktop appare la barra di accesso rapido AI Manager ...

Page 350: ...cazioni Cliccare per chiudere AI Manager Menu Principale Il menu principale contiene le seguenti tre utilità AI Disk AI Security e AI Booting Cliccare sulla freccia dell icona del menu principale per sfogliare le utilità al suo interno AI Disk AI Disk permette di cancellare con facilità file temporanei IE cookie IE URL IE cronologia IE e di svuotare il cestino Cliccare sull icona AI Disk della bar...

Page 351: ...mposta da max 20 caratteri alfanumerici 2 Confermare la password 3 Digitare il suggerimento per la password consigliato 4 Premere OK 5 Selezionare il dispositivo da bloccare e cliccare Apply 6 Inserire la password impostata in precedenza e premere OK Per sbloccare un dispositivo 1 De selezionare la casella del dispositivo bloccato e cliccare Apply 2 Inserire la password quindi premere OK Per modif...

Page 352: ...remere Apply I Miei Preferiti My Favorites consente di aggiungere applicazioni di uso frequente evitando di doverle così cercare nel computer Per aggiungere un applicazione 1 Cliccare Add e selezionare l applicazione da aggiungere a My Favorites 2 Cliccare Open sulla finestra del file e l applicazione viene aggiunta all elenco My Favorites Per aprire eliminare o rinominare un applicazione del menu...

Page 353: ...accedere al sito ufficiale di ASUS e del supporto tecnico per operazioni di download e informazioni sui contatti ASUS nel mondo Informazioni Cliccare sulla scheda della finestra Information per visualizzare informazioni dettagliate su sistema scheda madre CPU BIOS dispositivi installati e memoria ...

Page 354: ...ti Installazione di Nero 9 Per installare Nero 9 1 Inserire il DVD di Nero 9 nell unità ottica 2 Se è attivata la funzione di esecuzione automatica viene visualizzato il menu principale Se è disattivata la funzione di esecuzione automatica cliccare due volte sul file SeupX exe dalla directory principale del DVD di Nero 9 3 Dal menu principale cliccare Nero 9 Essentials ...

Page 355: ...o ASUS CG8580 353 Italiano 4 Selezionare la lingua per il programma di installazione guidata Cliccare Next 5 Cliccare Next per continuare 6 Selezionare I accept the License Conditions Al termine cliccare Next ...

Page 356: ...o 6 Descrizione delle Utilità Italiano Italiano 7 Selezionare Typical quindi cliccare Next 8 Selezionare Yes I want to help by sending anonymous application data to Nero e cliccare Next 9 Al termine cliccare Exit ...

Page 357: ...Italiano ASUS CG8580 355 Italiano Masterizzazione file Per masterizzare file 1 Dal menu principale cliccare Data Burning Add 2 Selezionare i file da masterizzare Al termine cliccare Add ...

Page 358: ...6 Capitolo 6 Descrizione delle Utilità Italiano Italiano 3 Al termine della selezione cliccare Burn per avviare il processo Per approfondimenti su Nero 9 consultare il sito Nero all indirizzo www nero com ...

Page 359: ...RY La Partizione Recovery è stata creata dal fabbricante e se eliminata non può essere più ripristinata dall utente In caso di problemi durante il processo di ripristino portare il Desktop PC presso un centro di assistenza autorizzato ASUS Utilizzo della Partizione di Ripristino 1 Premere F9 in fase di caricamento iniziale 2 Premere Enter per selezionare Windows Setup EMS Enabled 3 Selezionare una...

Page 360: ...l Desktop PC deve essere ACCESO 2 Riavviare il Desktop PC e premere F8 al momento del caricamento selezionare l unità ottica forse denominata CD DVD e premere Enter per avviare dal DVD di Ripristino 3 Selezionare OK per avviare il ripristino dell immagine 4 Selezionare OK per confermare il ripristino del sistema Il ripristino del sistema sovrascrive tutti i dati contenuti nel disco rigido Prima di...

Page 361: ...equisiti 1 CPU Famiglia Processori Intel Core di 2a 3a generazione 2 OS Windows 7 3 SSD Un SSD dedicato Solid State Disk per supportare Intel Smart Response e Intel Rapid Start Technology Consultare la tabella Capacità Partizioni SSD per informazioni sulle dimensioni dell SSD la capacità delle partizioni e i requisiti della memoria di sistema 4 HDD Almeno un disco rigido Hard Disk Drive per il dri...

Page 362: ...e partizioni 20GB 2GB SSD 22GB Due partizioni 20GB 4GB SSD 24GB Due partizioni 20GB 8GB SSD 28GB L SSD dedicato a Intel Rapid Start e Intel Smart Response non può essere utilizzato per le configurazioni RAID A causa delle caratteristiche del sistema operativo quando la memoria del sistema installata su Windows 7 a 32 bit è superiore a 4G le prestazioni di Intel Rapid Start Technology sono piuttost...

Page 363: ...S su RAID mode nella configurazione del BIOS Installazione di Intel Smart Response Technology Inserire il DVD di supporto nell unità ottica Se nel computer non è attivata la funzione di esecuzione automatica appare la scheda di installazione dei driver Cliccare sulla scheda Drivers quindi fare clic sul software Intel Rapid Storage Technology Driver Seguire le istruzioni sullo schermo per completar...

Page 364: ...gy consente di riattivare rapidamente il computer dalla modalità sospensione Il salvataggio della memoria del sistema del computer nell SSD configurato in precedenza velocizza i tempi di riattivazione pur mantenendo ridotto il consumo di energia Prima di applicare Intel Rapid Start Technology selezionare Advanced Mode Advanced PCH Configuration alla voce BIOS quindi attivare Intel Rapid Start Tech...

Page 365: ...re 5 Impostare le dimensioni della partizione in modo che siano equivalenti alla memoria DRAM del sistema 1GB 1024MB Premere Shrink Selezionare Start Control Panel System and Security System e impostare le dimensioni DRAM Il volume non allocato viene così allocato nel disco selezionato Se l SSD è di dimensioni inferiori a 64GB ed è impostato sull opzione caching Full disk capacity per Intel Smart ...

Page 366: ...reate partition primary quindi premere Enter 10 Dopo aver creato la partizine primaria digitare detail disk e premere Enter per visualizzare i dettagli del disco partitionato 11 Selezionare il volume RAW delle stesse dimensioni del volume compresso digitare select volume x x numero e premere Enter per salvare la partizione Intel Rapid Start Il valore x si riferisce al numero che identifica il disc...

Page 367: ...e disattivazione di Intel Rapid Start Technology dal sistema operativo Installare Intel Rapid Start Technology dal DVD di supporto in modo da avviare Intel Rapid Start Manager Dopo aver creato la partizione avviare Intel Rapid Start Manager per attivare disattivare Intel Rapid Start Technology Cliccare sulla freccia Show hidden icons sul lato destro della barra delle applicazioni quindi cliccare s...

Page 368: ... volume digitare select disk x x numero quindi premere Enter Il valore x si riferisce al numero che identifica il disco dove creare la partizione dati 2 Selezionare On nel campo Status per attivare la funzione quindi premere Save Select and click to enable or disable the function Salva impostazioni Annulla impostazioni Cliccare qui per attivare disattivare la modalità di risparmio di energia Attiv...

Page 369: ... override and press Enter The diskpart utility deletes the selected partition 7 Sul desktop cliccare Start Computer Manage 8 Nella finestra Computer Management selezionare Disk Management cliccare sul nuovo volume compresso e selezionare Extend Volume 9 Quando appare la schermata della procedura guidata Extend Volume Wizard premere Next Il valore x si riferisce al numero che identifica il disco do...

Page 370: ...tel Smart Connect Technology riattiva periodicamente il sistema dalla modalità sospensione per farlo rientrare in modalità sospensione e riattivarlo dopo un determinato intervallo di tempo Intel Smart Connect Technology supporta applicazioni quali Windows Live Mail Microsoft Outlook e Seesmic Prima di applicare Intel Smart Connect Technology è necessario attivare le voci di PCH Configuration nel B...

Page 371: ...aua la connessione a internet 1 Selezionare Start All Programs Intel Intel Smart Connect Technology 2 Nella scheda Basic premere Enable Updating Dopo aver attivato questa funzione è possibile accedere alla scheda Advanced per procedere con le impostazioni avanzate Pulsante di attivazione disattivazione funzione Quando è attivata la barra di scorrimento regolare l intervallo di tempo prima della ri...

Page 372: ...one nella scheda Advanced Per ripristinare le impostazioni predefinite premere Reset All to Defaults 4 Sulla scheda Advanced impostare l orario di utilizzo della modalità a risparmio di energia 5 Sulla scheda Help cliccare su About per visualizzare la versione della funzione Selezionare Topics per approfondimenti su Intel Smart Connect Technology e la rispettiva configurazione ...

Page 373: ...non risponde e cliccare End Task Se la tastiera non risponde premere e tenere premuto il pulsante di accensione sulla parte superiore del telaio sino a quando il computer non si spegne Premere di nuovo il pulsante di accensione per riaccenderlo Impossibile stabilire la connessione con una rete wireless utilizzando la scheda WLAN ASUS su modelli selezionati Assicurarsi di aver inserito la chiave di...

Page 374: ...io schermo è operativa soltanto con un sistema operatvo Windows Quando si installa una scheda grafica nel computer assicurarsi di aver collegato i monitor all uscita video sulla scheda grafica Controllarecheleimpostazionimultischermosianocorrette Perapprofondimenti consultare la sezione Connessioni multischermo nel capitolo 3 Il computer non rileva il disposititvo di archiviazione USB La prima vol...

Page 375: ... alcun suono Assicurarsi di aver collegato gli altoparlanti alla porta Line out port lime sul pannello frontale o posteriore Controllare che gli altoparlanti siano collegati ad una sorgente di alimentazione e siano accesi Regolare il volume degli altoparlanti Assicurarsi che l audio del sistema non sia stato disattivato Se è stato disattivato l icona visualizzata per il volume è Per attivare l aud...

Page 376: ...e di accensione sul pannello frontale ed assicurarsi che il computer sia acceso Cavo di alimentazione non correttamente collegato Assicurarsi che il cavo di alimentazione sia correttamente collegato Utilizzare un cavo di alimentazione compatibile Problemi all unità di alimentazione Chiamare il centro di assistenza per la riparazione Visualizzazione Problema Possibile Causa Azione Nessuna immagine ...

Page 377: ... per le corrette impostazioni LAN Problemi causati da software anti virus Chiudere il software anti virus Problemi di driver Reinstallare il driver LAN Audio Problema Possibile Causa Azione Audio assente Gli altoparlanti o le cuffie sono collegati alla porta sbagliata Consultare il manuale utente del computer per individuare la porta corretta Disconnettere e riconnettere gli altoparlanti al comput...

Page 378: ...sistema operativo Il sistema spesso non risponde Problemi al disco rigido Inviare il disco rigido danneggiato ad un centro autorizzato ASUS per assistenza Installare un nuovo disco rigido Problemi ai moduli di memoria Sostituire i moduli di memoria Rimuovere eventuali moduli di memoria aggiuntivi installati in precedenza e riprovare Ventilazione insufficiente Spostare il computer dove la ventilazi...

Page 379: ...upport asus com per scaricare la versione più recente Il computer in funzione è troppo rumoroso Sostituzione della ventola della CPU Assicurarsi di utilizzare una ventola per CPU compatibile o consigliata da ASUS Ventilazione del computer insufficiente Spostare il computer in una zona dove la ventilazione è migliore Temperatura del sistema troppo alta Aggiornare il BIOS Se si sa come reinstallare ...

Page 380: ...x Supporto 1 812 284 0883 Supporto Online support asus com ASUSTeK ITALY S r l Italia Indirizzo Strada Statale Padana Superiore 28 20063 Cernusco sul Naviglio MI Supporto Tecnico Telefono Notebook Eee 199 400 089 Telefono Altri Prodotti 199 400 059 Sito web www asus it Per chiamare da reti fisse Telecom Italia e Colt il costo è di 0 12 euro al minuto iva inclusa e la durata massima della telefonat...

Page 381: ...Equipo de sobremesa ASUS Essentio CG8580 Manual del usuario ...

Page 382: ...RESPONSABLES EMPLEADOS O AGENTES SERÁN RESPONSABLES DE NINGÚN DAÑO INDIRECTO ESPECIAL ACCIDENTAL O CONSECUENTE INCLUIDOS AQUÉLLOS DERIVADOS DE PÉRDIDAS DE BENEFICIOS PÉRDIDAS DE OPORTUNIDADES COMERCIALES IMPOSIBILIDAD DE USAR EL EQUIPO PÉRDIDAS DE DATOS INTERRUPCIONES DE LA ACTIVIDAD COMERCIAL Y OTROS PERJUICIOS DE CARÁCTER SIMILAR AÚN CUANDO ASUS HAYA SIDO ADVERTIDA DE LA POSIBILIDAD DE QUE TALES...

Page 383: ... equipo 405 Uso de la función Help and Support Ayuda y soporte técnico de Windows 406 Capítulo 3 Conexión de dispositivos al equipo Conexión de un dispositivo de almacenamiento USB 407 Conexión de un micrófono y unos auriculares 408 Conexión de varias pantallas externas 411 Conexión de un televisor HDTV 413 Capítulo 4 Uso del equipo Postura correcta durante el uso del PC de sobremesa 415 Uso del l...

Page 384: ...6 Uso de las utilidades ASUS AI Suite II 431 ASUS AI Manager 441 Nero 9 446 Recuperación del sistema 451 Introducción a las tecnologías de receptividad Intel 2012 Desktop 453 Capítulo 7 Resolución de problemas Resolución de problemas 465 ...

Page 385: ...deseado Este equipo ha sido probado y se ha determinado que no excede los límites establecidos para un dispositivo digital de Clase B de acuerdo con el Apartado 15 de la normativa FCC Tales límites han sido diseñados para proporcionar un nivel de protección razonable contra interferencias perjudiciales en una instalación residencial Este equipo genera usa y puede irradiar energía de radiofrecuenci...

Page 386: ...tas patentes de los EE UU y otros derechos de propiedad intelectual en posesión de Macrovision Corporation y otros titulares legales El uso de esta tecnología de protección de los derechos de autor debe ser autorizado por Macrovision Corporation y está destinado a la restricción de la visualización en entornos domésticos y otros de carácter limitado a menos que Macrovision Corporation autorice lo ...

Page 387: ...eguridad acerca de la batería NO elimine la batería arrojándola al fuego NO cortocircuite los contactos de la batería NO desmonte la batería Use este producto en entornos sometidos a una temperatura ambiente comprendida entre 0 C 32 F y 35 C 95 F NO cubra los orificios de ventilación del equipo de sobremesa para evitar que el sistema se caliente en exceso NO use cables de alimentación accesorios o...

Page 388: ...información complementaria que facilitan al usuario la realización de una tarea IMPORTANTE Instrucciones que SE DEBEN respetar al llevar a cabo una tarea Más información Consulte las siguientes fuentes si desea obtener más información o mantenerse al día en cuanto a las actualizaciones del producto y el software Sitios web de ASUS El sitio web de ASUS contiene la información más reciente acerca de...

Page 389: ... Antena circular móvil Wi Fi x1 Antena opcional x1 Contenido del paquete Si alguno de los artículos anteriores falta o se encuentra dañado póngase en contacto con su distribuidor Las ilustraciones de los artículos anteriores deben interpretarse únicamente como referencia Las especificaciones del producto real podrían variar en función del modelo Para obtener detalles sobre el uso del teclado y rat...

Page 390: ...388 Español ...

Page 391: ...ertos y su ubicación así como el color del chasis podrían variar en función del modelo Bienvenido Gracias por adquirir un equipo de sobremesa ASUS Essentio CG8580 El equipo de sobremesa ASUS Essentio CG8580 desarrolla un elevado rendimiento proporciona la máxima fiabilidad sin compromisos y permite al usuario disfrutar como centro de un útil entorno Todas estas características se concentran en el ...

Page 392: ...o 9 Puertos USB 3 0 Estos puertos de Bus serie universal 3 0 USB 3 0 admiten la conexión de dispositivos USB 3 0 como ratones impresoras escáneres cámaras y PDAs entre otros NO conecte un teclado ratón a un puerto USB 3 0 sin instalar antes un sistema operativo Windows Debido a las limitaciones que presenta el controlador USB 3 0 los dispositivos USB 3 0 sólo se pueden usar en sistemas operativos ...

Page 393: ...nte con Windows 8 NO conecte un teclado ratón a un puerto USB 3 0 sin instalar antes un sistema operativo Windows Debido a las limitaciones que presenta el controlador USB 3 0 los dispositivos USB 3 0 sólo se pueden usar en sistemas operativos Windows y después de instalar el controlador USB 3 0 Los dispositivos USB 3 0 sólo se pueden usar como almacenes de datos Se recomienda encarecidamente cone...

Page 394: ...10 Puerto de micrófono rosa Este puerto permite conectar un micrófono 11 Puerto de salida de línea lima Este puerto permite conectar unos auriculares o un juego de altavoces En una configuración de 4 6 u 8 canales este puerto se convierte en salida de altavoz frontal 12 Puerto de entrada de línea azul claro Este puerto permite conectar un reproductor de cinta CD o DVD o una fuente de audio de otro...

Page 395: ... permite establecer una conexión Gigabit con una red de área local LAN a través de un hub de red Indicador LED de actividad enlace Indicador LED de velocidad Estado Descripción Estado Descripción Apagado Sin enlace Apagado Conexión de 10 Mbps NARANJA Con enlace NARANJA Conexión de 100 Mbps INTERMITENTE Transmisión de datos VERDE Conexión de 1 Gbps Puerto LAN INDICADOR LED SPEED VELOCIDAD INDICADOR...

Page 396: ...de la tarjeta gráfica ASUS disponible sólo en determinados modelos Conecte el monitor al puerto de salida de pantalla de la tarjeta de gráficos discretos ASUS Para conectar un monitor externo a través de la tarjeta gráfica ASUS 1 Conecte un monitor a uno de los puertos de salida de pantalla de la tarjeta gráfica ASUS 2 Conecte el monitor a una fuente de alimentación Los puertos de salida de pantal...

Page 397: ...o consulte el apartado Conexión de varios monitores externos en el Capítulo 3 de este manual Uso de los puertos de salida de pantalla integrados en la placa Conecte el monitor al puerto de salida de pantalla integrado en la placa Para conectar un monitor externo a través de un puerto de salida de pantalla integrado en la placa 1 Conecte un monitor VGA al puerto VGA un monitor DVI D al puerto DVI D...

Page 398: ...posterior del equipo y el otro extremo a una fuente de alimentación USB3 0 UASP USB KB MS USB3 0 UASP USB KB MS USB3 0 UASP USB KB MS Solamente se puede acceder a la utilidad de configuración preinstalada del ratón para juegos ASUS GX900 si conecta este a su PC antes de iniciar Windows 7 por primera vez De lo contrario tendrá que instalar manualmente la utilidad de configuración desde el DVD de so...

Page 399: ... monitor 2 Coloque el conmutador de alimentación en la posición de ENCENDIDO y a continuación presione el botón de alimentación para encender el equipo Apagado del equipo Para apagar el equipo 1 Cierre todas las aplicaciones en ejecución 2 En el escritorio de Windows haga clic en 3 Haga clic en para cerrar el sistema operativo 3 Espere mientras el sistema se carga automáticamente Botón de encendid...

Page 400: ...398 Capítulo 1 Primeros pasos Español ...

Page 401: ...lic en Next Siguiente 5 Introduzca la información necesaria para establecer su contraseña y haga clic en Next Siguiente O bien puede hacer clic en Next Siguiente para omitir este paso sin introducir información 6 Lea detenidamente los términos de la licencia Active la casilla de verificación I accept the license terms Acepto los términos de licencia y haga clic en Next Siguiente 7 Seleccione la op...

Page 402: ... iniciales El componente Getting Started Tareas iniciales del menú Start Inicio contiene información acerca de ciertas tareas básicas que le ayudarán a familiarizarse con el uso de Windows 7 como la personalización de Windows la agregación de nuevos usuarios y la transferencia de archivos Para usar el componente Getting Started Tareas iniciales 1 En la barra de tareas de Windows haga clic en el ic...

Page 403: ...del ratón en un icono 2 En la Jump List Lista de acceso rápido haga clic con el botón secundario del ratón en el componente que desee quitar de la Jump List Lista de acceso rápido y a continuación seleccione la opción Unpin from this list Desanclar de esta lista Anclaje de programas al menú Start Inicio o a la barra de tareas Para anclar un programa al menú Start Inicio o a la barra de tareas 1 En...

Page 404: ...desea obtener más información consulte el apartado Uso del panel Action Center Centro de actividades de Windows en este capítulo Personalización de iconos y notificaciones Puede optar por mostrar u ocultar determinados iconos y notificaciones en la barra de tareas o el área de notificación Para personalizar los iconos y notificaciones 1 En el área de notificación haga clic en el icono con forma de...

Page 405: ...l icono View Vista 4 En el menú View Vista desplace el control deslizante para seleccionar un modo de visualización de archivos y carpetas Organización de archivos Para organizar los archivos 1 Inicie el Explorador de Windows 2 En el campo Arrange by Organizar por haga clic para abrir la lista desplegable 3 Seleccione el tipo de organización que prefiera Ordenación de archivos Para ordenar los arc...

Page 406: ...ndario del ratón en cualquier punto del panel View Vista y a continuación seleccionar las opciones New Nuevo Folder Carpeta Restauración del sistema La función System Restore Restaurar sistema de Windows crea puntos de restauración siempre que la configuración del sistema cambia y los vincula a una fecha y una hora De este modo facilita la restauración o reversión de los cambios aplicados a la con...

Page 407: ... este capítulo Uso de Windows Update Windows Update permite buscar e instalar las actualizaciones más recientes con objeto de mejorar la seguridad y el rendimiento del equipo Inicio de Windows Update Para iniciar Windows Update 1 En la barra de tareas de Windows haga clic en el icono Start Inicio para abrir el menú Start Inicio 2 Seleccione All Programs Todos los programas Windows Update 3 En la p...

Page 408: ... de prueba de 60 días tras la activación Para activar el software Internet Security de Trend Micro 1 Ejecute la aplicación Internet Security de Trend Micro 2 Lea detenidamente los términos de la licencia Haga clic en Agree Activate Aceptar y activar 3 Introduzca su dirección de correo electrónico y seleccione su ubicación Haga clic en Next Siguiente 4 Haga clic en Finish Finalizar para finalizar l...

Page 409: ...l hardware quite el dispositivo de almacenamiento USB del equipo Panel frontal Panel posterior NO quite un dispositivo de almacenamiento USB durante una transferencia de datos Si lo hace podrían producirse pérdidas de datos y el dispositivo de almacenamiento USB podría resultar dañado Conexión de un dispositivo de almacenamiento USB Este equipo de sobremesa cuenta con puertos USB 2 0 1 1 tanto en ...

Page 410: ...sa cuenta con puertos de micrófono y auriculares tanto en el panel frontal como en el posterior Los puertos de E S de audio situados en el panel posterior permiten conectar sistemas de altavoces estéreo de 2 4 6 y 8 canales Conexión de unos auriculares y un micrófono Conexión de un sistema de altavoces de 2 canales ENTRADAS DE AUDIO ...

Page 411: ... de un sistema de altavoces de 4 canales Conexión de un sistema de altavoces de 6 canales ENTRADAS DE AUDIO ENTRADAS DE AUDIO Posterior Frontal ENTRADAS DE AUDIO Posterior Frontal ENTRADAS DE AUDIO ENTRADAS DE AUDIO Altavoz central subwoofer ...

Page 412: ...410 Capítulo 3 Conexión de dispositivos al equipo Español Español Conexión de un sistema de altavoces de 8 canales ENTRADAS DE AUDIO Posterior Frontal Altavoz central subwoofer ENTRADAS DE AUDIO Lateral ...

Page 413: ...uede usar el monitor complementario como duplicado de la pantalla principal o como extensión para ampliar el espacio del escritorio de Windows Para configurar varias pantallas 1 Apague el equipo 2 Conecte los dos monitores al equipo y a continuación conecte los cables de alimentación a los monitores Consulte el apartado Instalación del equipo en el Capítulo 1 si desea obtener más información acerc...

Page 414: ...ólo en el monitor 1 o en el monitor 2 Remove this display Quitar esta pantalla Seleccione esta opción si desea quitar la pantalla seleccionada 6 Haga clic en Apply Aplicar o en OK Aceptar A continuación haga clic en Keep Changes Conservar cambios en el mensaje de confirmación 3 Encienda el equipo 4 Lleve a cabo cualquiera de las acciones descritas a continuación para abrir la pantalla de configura...

Page 415: ... HDTV al equipo El cable HDMI debe adquirirse por separado A fin de garantizar la máxima calidad de imagen asegúrese de que la longitud del cable HDMI sea inferior a 15 metros Conexión de un televisor HDTV El equipo admite la conexión de un televisor de alta definición HDTV al puerto HDMI ...

Page 416: ...414 Capítulo 3 Conexión de dispositivos al equipo Español ...

Page 417: ... rodillas queden a una altura ligeramente superior a la de las caderas para que la parte posterior de los muslos permanezca relajada Si es necesario use un reposapiés para elevar la altura de las rodillas Ajuste el respaldo de la silla de modo que la base de la columna quede apoyada firmemente e inclinada ligeramente hacia atrás Siéntese derecho con las rodillas los codos y las caderas formando un...

Page 418: ... en una ranura 3 Cuando haya terminado haga clic con el botón secundario del ratón en el icono de la unidad de tarjeta de memoria en la pantalla Computer Equipo y a continuación haga clic en Eject Expulsar quite la tarjeta a continuación No quite una tarjeta durante una operación de lectura copia formato o eliminación de los datos contenidos en ella de lo contrario los datos podrían perderse Use l...

Page 419: ...n de un disco óptico Para extraer un disco óptico 1 Con el sistema encendido lleve a cabo cualquiera de las siguientes acciones para expulsar la bandeja Pulse el botón de expulsión situado bajo el embellecedor de la bahía de unidad Haga clic con el botón secundario del ratón en el icono de la unidad de CD DVD en la pantalla Computer Equipo y a continuación haga clic en Eject Expulsar 2 Extraiga el...

Page 420: ...teclado para juegos al puerto USB 2 0 del equipo 1 Alinee e inserte la almohadilla para la muñeca en las ranuras del teclado para juegos diseñadas para tal fin A Mediante los dos dedos pulgares empuje hacia abajo la almohadilla para la muñeca hasta que quede encajada en su lugar B Consulte la sección Contenido del paquete para saber los artículos contenidos en el paquete del teclado para juegos AS...

Page 421: ...ón izquierdo un botón derecho una rueda de desplazamiento dos botones laterales un botón PPP y un botón de cambio de perfil con un diseño especial Teclas Descripción Teclas Descripción 1 Botón izquierdo 7 Logotipo de GX900 2 Botón derecho 8 Botón Adelante de IE 3 Rueda de desplazamiento 9 Botón Atrás de IE 4 Conmutador de resolución de PPP 10 Pies del ratón 5 Botón de cambio de perfil Indicador de...

Page 422: ... vez el programa detecta automáticamente dicho ratón para que se pueda acceder directamente a él De lo contrario tendrá que instalar manualmente la utilidad de configuración desde el DVD de soporte incluido Para instalar el DVD de soporte coloque dicho DVD en la unidad óptica y siga las instrucciones que aparecen en la pantalla para iniciar el programa Si la función de ejecución automática NO está...

Page 423: ... clic para mostrar los diferentes indicadores de color de perfil y sus estados 7 Haga clic para cargar el perfil guardado en el ratón 8 Haga clic para guardar la configuración del perfil actual en la unidad de disco duro 9 Haga clic para restablecer la configuración predeterminada de fábrica del ratón 10 Haga clic para guardar la configuración realizada 11 Haga clic para guardar la configuración r...

Page 424: ...ión para cada botón y acción en la lista desplegable Consulte la tabla siguiente para obtener más detalles Funciones Descripción Botón L izquierdo Función de botón izquierdo del ratón Botón R derecho Botón de botón derecho del ratón Botón M central Función de botón central del ratón Atrás en IE Función de botón Atrás de IE Si se selecciona presione el botón para retroceder a la página anterior Ade...

Page 425: ...ealizar un disparo rápido en juegos de ataque lo equivale a hacer clic tres veces con el botón izquierdo del ratón Disparo rápido tecla Presione el botón para realizar un disparo rápido en un juego utilizando la barra espaciado hora para atacar lo que equivale a presionar tres veces la barra espaciadora del teclado Explorador Web Presione el botón para iniciar el explorador Web predeterminado Corr...

Page 426: ...nes y o acciones del ratón Clear Desactivar Haga clic para borrar todas las instrucciones guardadas Move up down Subir Bajar Haga clic para subir o bajar la instrucción seleccionada Instruction cycle time Tiempo de ciclo de instrucción Cuando la casilla Timing Temporización está desactivada el tiempo de retardo de todas las acciones será el valor elegido en la lista desplegable Loop Bucle Establec...

Page 427: ... o acciones del ratón Clear Desactivar Haga clic para borrar todas las instrucciones guardadas Move up down Subir Bajar Haga clic para subir o bajar la instrucción seleccionada Instruction cycle time Tiempo de ciclo de instrucción Cuando la casilla Timing Temporización está desactivada el tiempo de retardo de todas las acciones será el valor elegido en la lista desplegable Loop Bucle Establece el ...

Page 428: ...426 Capítulo 4 Uso del equipo Español ...

Page 429: ... extremo del cable RJ 45 al puerto LAN RJ 45 situado en el panel posterior del equipo y el otro extremo a un módem DSL por cable Consulte la documentación que incluye el módem DSL por cable 3 Encienda el módem DSL por cable y el equipo 4 Configure los parámetros necesarios para establecer una conexión a Internet Póngase en contacto con su proveedor de servicios de Internet ISP si desea obtener inf...

Page 430: ...cal LAN Para establecer una conexión a través de una red LAN 1 Conecte un extremo de un cable RJ 45 al puerto LAN RJ 45 situado en el panel posterior del equipo y el otro extremo a la red LAN Póngase en contacto con el administrador de la red si desea obtener más información o asistencia acerca de la configuración de la conexión a Internet USB3 0 UASP USB KB MS RJ 45 cable LAN Cable RJ 45 ...

Page 431: ... a Internet a través de una conexión inalámbrica To establish a wireless connection you need to connect to a wireless access point AP USB3 0 UASP USB KB MS USB KB MS Wireless AP Modem USB3 0 UASP USB KB MS Wireless AP Modem Para establecer una conexión inalámbrica emplee alguno de los siguientes métodos O BIEN ...

Page 432: ...a de una red inalámbrica segura y a continuación hacer clic en OK Aceptar 4 Espere a que el equipo se conecte a la red inalámbrica 5 La conexión inalámbrica se establecerá correctamente Se mostrará el estado de la conexión y el icono de red indicar al estado de conectado Para aumentar el alcance y la sensibilidad de la señal de radio inalámbrica conecte las antenas externas a los conectores de ant...

Page 433: ...l sistema o personalizar la configuración de AI Suite II Puede que el paquete no incluya los DVDs de soporte y recuperación No obstante el sistema le permitirá grabarlos personalmente si lo desea Consulte el apartado Recuperación del sistema si desea obtener más información Haga clic para consultar el estado de los sensores o la frecuencia de la CPU Haga clic para actualizar el BIOS de la placa ba...

Page 434: ...haga clic en Tool Herramientas System Level Up Subir de nivel el sistema en la barra de menús AI Suite II En la configuración de la función asigne las teclas de acceso directo para intercambiar el perfil para subir de nivel sistema Puede ajustar la configuración de las teclas directas manualmente Consulte la sección siguiente para obtener más detalles Puede ajustar la opción System Level Up Subir ...

Page 435: ...a vez instalada la interfaz AI Suite II desde el DVD de soporte inicie Probe II haciendo clic en Tool Herramientas Probe II en la barra de menús principal de AI Suite II Configuración de Probe II Haga clic en las pestañas Voltage Voltaje Temperature Temperatura Fan Speed Velocidad del ventilador para ajustar los valores de umbral del sensor correspondiente La pestaña Preference Preferencias permit...

Page 436: ...para iniciar PC Probe Configuración de Sensor Recorder Haga clic en las pestañas Voltage Voltaje Temperature Temperatura Fan Speed Velocidad del ventilador y seleccione los sensores cuyos valores desee consultar La pestaña History Record Registro histórico permite registrar los cambios que tienen lugar en los sensores habilitados Seleccione los sensores que desee consultar Haga clic para acercar a...

Page 437: ...ar dispositivos USB incluso cuando su PC se encuentra en los estados S3 S4 o S5 después de iniciarse en el estado S0 Consulte al fabricante de su dispositivo USB para comprobar si este es totalmente compatible con la función BC 1 1 La velocidad de carga real puede variar en función de las condiciones del dispositivo USB Asegúrese de quitar y volver a conectar el dispositivo USB después de habilita...

Page 438: ...ura de la CPU o los voltajes Haga clic en Monitor Sensor en la barra de menús principal de AI Suite II para abrir el panel Sensor Frecuencia de la CPU El panel CPU Frequency Frecuencia de la CPU muestra la frecuencia actual de la CPU y su nivel de uso Haga clic en Monitor CPU Frequency Frecuencia de la CPU en la barra de menús principal de AI Suite II para abrir el panel CPU Frequency Frecuencia d...

Page 439: ...e descargar Haga clic en Next Siguiente Si no se detecta ninguna versión posterior a la instalada se mostrará la pantalla representada en la ilustración de la derecha Actualización La sección Update Actualización permite actualizar el BIOS de la placa base y el logotipo de arranque del BIOS a través de las utilidades de actualización diseña das por ASUS ASUS Update Actualización de ASUS ASUS Updat...

Page 440: ...ext Siguiente 3 Si lo desea puede cambiar el logotipo de arranque del BIOS Haga clic en Yes Sí si desea cambiar el logotipo de arranque o en No para continuar 4 Siga las instrucciones que aparecerán en la pantalla para llevar a cabo el proceso de actualización 4 Si lo desea puede cambiar el logotipo de arranque del BIOS dicho logotipo es la imagen que se muestra en la pantalla durante las pruebas ...

Page 441: ...Placa base si desea ver los datos correspondientes al fabricante de la placa base el nombre del producto la versión y el BIOS Haga clic en la pestaña CPU si desea ver los datos correspondientes al procesador y la memoria Caché Haga clic en la pestaña SPD Detección de presencia serie y seleccione una ranura de memoria si desea ver los datos correspondientes al módulo de memoria instalado en la ranu...

Page 442: ...a Bar Barra permite modificar la configuración de la barra La pestaña Skin Máscara permite personalizar el contraste el brillo la saturación el matiz y el valor gamma de la interfaz Haga clic en la ficha Disk Disco y a continuación seleccione cada disco para ver detalles sobre ellos Pantalla Support Soporte técnico La pantalla Support Soporte técnico muestra información acerca del sitio Web de ASU...

Page 443: ...pal e iniciar AI Manager desde la barra rápida o la barra de tareas ASUS AI Manager ASUS AI Manager es una utilidad que facilita el acceso a las aplicaciones de uso más frecuente de forma rápida y sencilla Inicio de AI Manager Para iniciar AI Manager desde el escritorio de Windows haga clic en Start Inicio All Programs Todos los programas ASUS AI Manager AI Manager 1 xx xx La barra rápida de AI Ma...

Page 444: ... la barra de tareas Haga clic en el botón Close Cerrar para salir de AI Manager Principal El menú Main Principal contiene tres utilidades AI Disk AI Security y AI Booting Haga clic en la flecha que contiene el icono del menú Main Principal para explorar las utilidades del menú principal AI Disk AI Disk facilita la eliminación de los archivos temporales las cookies las URLs y el historial de IE así...

Page 445: ... 3 Introduzca un indicio de contraseña recomendado 4 Cuando haya terminado haga clic en Ok Aceptar 5 Seleccione el dispositivo que desee bloquear y haga clic en Apply Aplicar 6 Introduzca la contraseña que estableció anteriormente y haga clic en Ok Aceptar Para desbloquear el dispositivo 1 Desactive la casilla de verificación correspondiente al dispositivo bloqueado y haga clic en Apply Aplicar 2 ...

Page 446: ...icar Mis favoritos My Favorites Mis favoritos permite reunir aplicaciones de uso frecuente con objeto de evitar la necesidad de buscarlas en el equipo Para agregar una aplicación 1 Haga clic en Add Agregar y busque la aplicación que desee agregar a My Favorites Mis favoritos 2 Haga clic en Open Abrir en la ventana de búsqueda de archivos La aplicación se agregará a la lista My Favorites Mis favori...

Page 447: ...sitio web el sitio web de asistencia técnica el sitio web de descargas de soporte o la información de contacto de ASUS Información Haga clic en alguna de las pestañas de la ventana Information Información si desea ver información detallada acerca del sistema la placa base la CPU el BIOS los dispositivos instalados y la memoria ...

Page 448: ...ra instalar Nero 9 1 Inserte el DVD de Nero 9 en la unidad óptica 2 Si la función Autorun Ejecución automática está habilitada el menú principal aparecerá automáticamente Si la función Autorun Ejecución automática está deshabilitada acceda al directorio principal del DVD de Nero 9 y haga doble clic en el archivo SeupX exe 3 En el menú principal haga clic en Nero 9 Essentials ...

Page 449: ...el asistente Installation Wizard Asistente para instalación Haga clic en Next Siguiente 5 Haga clic en Next Siguiente para continuar 6 Active la casilla de verificación I accept the License Conditions Acepto las condiciones de la licencia Cuando haya terminado haga clic en Next Siguiente ...

Page 450: ...pica y haga clic en Next Siguiente 8 Active la casilla de verificación Yes I want to help by sending anonymous application data to Nero Sí deseo colaborar enviando a Nero datos anónimos acerca de la aplicación y haga clic en Next Siguiente 9 Cuando haya terminado haga clic en Exit Salir ...

Page 451: ...49 Español Grabación de archivos Para grabar archivos 1 En el menú principal haga clic en Data Burning Grabación de datos Add Agregar 2 Seleccione los archivos que desee grabar Cuando haya terminado haga clic en Add Agregar ...

Page 452: ...des Español Español 3 Una vez seleccionados los archivos que desee grabar haga clic en Burn Grabar para grabar los archivos en un disco Si desea obtener más información acerca del uso de Nero 9 visite el sitio web de Nero www nero com ...

Page 453: ...un centro de asistencia técnica autorizado por ASUS con el PC de sobremesa si experimenta algún problema relacionado con el proceso de recuperación Uso de la partición de recuperación 1 Pulse F9 durante la secuencia de arranque 2 Pulse Enter Entrar para seleccionar la opción Windows Setup EMS Enabled Instalación de Windows EMS habilitada 3 Seleccione una de las siguientes opciones de recuperación ...

Page 454: ...ontinuación seleccione la unidad óptica puede que se llame CD DVD y pulse Enter Entrar para arrancar desde el DVD de recuperación 3 Haga clic en OK Aceptar para iniciar la restauración de la imagen 4 Haga clic en OK Aceptar para confirmar la recuperación del sistema El proceso de restauración causará la eliminación de todos los datos almacenados en el disco duro Asegúrese de crear una copia de seg...

Page 455: ...e la tercera y segunda generación Intel 2 Sistema operativo Sistema operativo Windows 7 3 Disco de estado sólido Se necesita un disco de estado sólido dedicado SSD Solid State Disk para admitir Intel Smart Response y Intel Rapid Start Technology Consulte la tabla Requisitos de capacidad del disco de estado sólido para obtener información sobre el tamaño del disco de estado sólido la capacidad para...

Page 456: ...tart e Intel Smart Connect Particiones de 20 GB y 2 GB independientes tamaño del disco de estado sólido 22 GB Particiones de 20 GB y 4 GB independientes tamaño del disco de estado sólido 24 GB Particiones de 20 GB y 8 GB independien tes tamaño del disco de estado sólido 28 GB El disco estado sólido utilizado para Intel Rapid Start e Intel Smart Response no se permite para crear RAID Debido al comp...

Page 457: ...tica Aparecerá la ficha de instalación de controladores si el equipo tiene habilitada la función de ejecución automática Haga clic en la ficha Drivers Controladores y a continuación haga clic en el software Intel Rapid Storage Technology Driver Controlador de Intel Rapid Storage Technology Siga las instrucciones que aparezcan en la pantalla para completar la instalación Utilizar Intel Smart Respon...

Page 458: ...de seguir siendo identificada por el sistema para almacenamiento normal Intel Rapid Start Technology Intel Rapid Start Technology permite sacar rápidamente al equipo del modo de suspensión Guardar la memoria del sistema del equipo en la unidad estado sólido configurada proporciona un tiempo de respuesta de reactivación más rápido pero mantiene la energía en un perfil bajo Antes de aplicar Intel Ra...

Page 459: ...a el tamaño de partición requerido que debe ser igual a la memoria DRAM del sistema 1 GB 1024 MB Haga clic en Reducir Vaya a Inicio Panel de control Sistema y seguridad Sistema y compruebe la información del tamaño de la memoria DRAM El volumen no asignado se asigna al disco seleccionado Si la unidad estado sólido tiene menos de 64 GB y está establecida en la opción de caché Capacidad de disco com...

Page 460: ...create partition primary y presione Enter 10 Después de crear una partición primaria escriba detail disk y presione Enter para ver los detalles del disco con particiones 11 Seleccione el volumen RAW que tiene el mismo tamaño que el volumen reducido escriba select volume x x número y presione Enter para almacenar la partición Intel Rapid Start El valor x se refiere a un número de disco donde desea ...

Page 461: ... Rapid Start Technology el sistema operativo En primer lugar instale Intel Rapid Start Technology desde el DVD de soporte para iniciar Intel Rapid Start Manager Después de crear la partición inicie Intel Rapid Start Manager para habilitar o deshabilitar Intel Rapid Start Technology Haga clic en la flecha Mostrar iconos ocultos situada en el lado derecho de la barra de herrami entas y haga clic en ...

Page 462: ...efiere a un número de disco donde desea eliminar la partición de almacenamiento 2 Seleccione Activado en el campo Estado para habilitar la función y haga clic en Guardar Haga clic para habilitar o deshabilitar el modo de ahorro de batería Esta función solo se aplica a equipos portátiles Seleccionar y hacer clic para habilitar o deshabilitar la función Haga clic para habilitar o deshabilitar el tem...

Page 463: ...eliminará la partición seleccionada 7 En el escritorio haga clic en Inicio haga clic con el botón secundario en Equipo y por último haga clic en Administrar 8 En la ventana Administración del equipo haga clic en Administración de discos haga clic con el botón secundario en el nuevo volumen reducido y seleccione Extender volumen 9 Aparecerá el Asistente para extender volúmenes Haga clic en Siguient...

Page 464: ...va periódica mente el sistema sacándolo del modo de suspensión recopila información del estado del usuario inicia la reentrada en el modo de suspensión para reactivarse después de un intervalo de tiempo establecido Intel Smart Connect Technology admite las aplicaciones Windows Live Mail Microsoft Outlook y Seesmic Es necesario habilitar estos elementos de la configuración PCH en el BIOS antes de a...

Page 465: ...c en Start Inicio All Programs Todos los programas Intel Intel Smart Connect Technology En la ficha Basic Básico haga clic en Enable Updating Habilitar actual ización Cuando se habilite la ficha Advanced Opciones avanzadas pas ará a estar disponible para realizar configuraciones avanzadas de funciones 1 Hacer clic para habilitar o deshabilitar la función Cuando la barra de desplazamiento está acti...

Page 466: ...nados haga clic en Reset All to Defaults Restablecer los valores predeterminados para todo 4 En la ficha Advanced Opciones avanzadas configure la programación durante el período de tiempo de uso de baja energía para ahorrar energía Esta configuración solamente se aplica al período de tiempo asignado 5 En la ficha Help Ayuda haga clic en About Acerca de para ver la versión de la función Haga clic e...

Page 467: ...s 3 Seleccione el programa que no responda y haga clic en End Task Finalizar tarea Si el teclado no responde mantenga pulsado el botón de encendido situado en la parte superior del chasis hasta que el equipo se apague Pulse de nuevo el botón de encendido a continuación para encender el equipo No puedo conectarme a una red inalámbrica empleando la tarjeta WLAN ASUS disponible sólo en determinados m...

Page 468: ...la dual sólo funciona con Windows Si el equipo cuenta con una tarjeta gráfica instalada asegúrese de conectar los monitores a los puertos de salida de la tarjeta gráfica Compruebe si la configuración para el uso de varias pantallas es correcta Consulte el apartado Conexión de varias pantallas externas en el Capítulo 3 si desea obtener más información El equipo no detecta un dispositivo de almacena...

Page 469: ...lic en Keep Changes Conservar cambios en el mensaje de confirmación Los altavoces no reproducen sonido Asegúrese de conectar los altavoces al puerto de salida de línea de color lima situado en el panel frontal o el panel posterior Compruebe que los altavoces se encuentren conectados a una fuente de alimentación eléctrica y encendidos Ajuste el volumen de los altavoces Asegúrese de no haber desacti...

Page 470: ... Asegúrese de que el cable de alimentación se encuentre conectado correctamente Use otro cable de alimentación compatible Existe un problema relacionado con la fuente de alimentación PSU Llame a nuestro Centro de Atención para cualquier reparación Pantalla Problema Posible causa Acción La pantalla no muestra ninguna imagen permanece en color negro después de encender el equipo El cable de transmis...

Page 471: ...d LAN correcta que deba aplicar Existe un problema relacionado con el uso del software antivirus Cierre el software antivirus Existe un problema relacionado con el controlador Vuelva a instalar el controlador de red LAN Audio Problema Posible causa Acción El equipo no reproduce sonidos Los altavoces o auriculares no están conectados al puerto correcto Consulte el manual del usuario del equipo para...

Page 472: ...l disco duro ha sufrido un error Envíe el disco duro dañado a un Centro de asistencia técnica autorizado por ASUS y solicite su reparación Sustituya el disco duro por otro nuevo Existe un problema relacionado con los módulos de memoria Sustituya los módulos de memoria por otros compatibles Retire los módulos de memoria complementarios que haya instalado y compruebe si el problema persiste El equip...

Page 473: ...o el equipo carga el SO La configuración del BIOS se ha modificado Restaure la configuración del BIOS a sus valores predeterminados La versión del BIOS no es la más reciente Actualice el BIOS a la versión más reciente Visite el sitio web de soporte de ASUS a través de la dirección http support asus com si desea descargar la versión más reciente del BIOS El equipo genera demasiado ruido durante el ...

Page 474: ... 812 282 2787 Asistencia fax 1 812 284 0883 Contacto en línea support asus com ASUS COMPUTER GmbH Alemania y Austria Domicilio de la compañía Harkort Str 21 23 D 40880 Ratingen Germany Asistencia fax 49 2102 959911 Dirección web www asus de Contacto en línea www asus de sales Asistencia técnica Teléfono de componentes 49 1805 010923 Asistencia fax 49 2102 9599 11 Asistencia en línea support asus c...

Page 475: ...ASUS Essentio Desktop PC CG8580 Gebruikershandleiding ...

Page 476: ...IKTHEID VOOR EEN BEPAALD DOEL IN GEEN GEVAL ZAL ASUS HAAR DIRECTEURS FUNCTIONARISSEN WERKNEMERS OF AGENTEN AANSPRAKELIJK ZIJN VOOR ENIGE INDIRECTE SPECIALE INCIDENTELE OF GEVOLGSCHADE INCLUSIEF SCHADE DOOR WINSTDERVING VERLIES VAN HANDEL VERLIES VAN GEBRUIK OF GEGEVENS ONDERBREKING VAN HANDEL EN DERGELIJKE ZELFS ALS ASUS OP DE HOOGTE WERD GEBRACHT VAN DE MOGELIJKHEID VAN DERGELIJKE SCHADE DIE VOOR...

Page 477: ...w systeem herstellen 498 Uw computer beschermen 499 Hulp en ondersteuning voor Windows krijgen 500 Hoofdstuk 3 Apparaten op uw computer aansluiten Een USB opslagapparaat aansluiten 501 Microfoon en luidsprekers aansluiten 502 Meerdere externe schermen aansluiten 505 Een HDTV aansluiten 507 Hoofdstuk 4 Uw computer gebruiken Juiste houding bij het gebruik van uw Desktop PC 509 De geheugenkaartlezer ...

Page 478: ...oofdstuk 6 De hulpprogramma s gebruiken ASUS AI Suite II 525 ASUS AI Manager 535 Nero 9 540 Uw systeem herstellen 545 Kennismaking met de Intel 2012 Desktop responsiviteitstechnologieën 547 Hoofdstuk 7 Problemen oplossen Problemen oplossen 559 ...

Page 479: ...n wanneer niet volgens de instructies van de fabrikant geïnstalleerd en gebruikt kan het schadelijke storingen aan radiocommunicatie veroorzaken Er bestaat echter geen garantie dat bij een bepaalde installatie zich geen storing zal voordoen Als dit apparaat schadelijke storing aan radio of televisie ontvangst veroorzaakt wat kan worden vastgesteld door het apparaat aan en uit te schakelen wordt de...

Page 480: ... die door claimmethodes van bepaalde Amerikaanse octrooien en andere intellectuele eigendomsrechten wordt beschermd die eigendom zijn van Macrovision Corporation en andere rechtmatige eigenaren Gebruik van deze copyright beschermende technologie moet door Macrovision Corporation worden geauthoriseerd en is alleen voor gebruik thuis en andere beperkt kijken bestemd tenzij anders toegestemd door Mac...

Page 481: ... tijdens onweer gebruiken Waarschuwing ter beveiliging van de batterij NIET de batterij in vuur werpen NIET de contacten kortsluiten NIET de batterij uit elkaar halen Gebruik dit product in omgevingen met omgevingstemperaturen tussen 0 C 32 F en 35 C 95 F NIET de ventilatieopeningen van de Desktop PC afdekken om oververhitting van het systeem te voorkomen NIET beschadigde stroomkabels accessoires ...

Page 482: ... te voeren OPMERKING tips en aanvullende informatie om u te helpen bij het voltooien van uw taak BELANGRIJK Instructies die u MOET volgen om een taak te voltooien Waar meer informatie te vinden Raadpleeg de volgende bronnen voor aanvullende informatie en voor updates van het product en de software ASUS websites De ASUS website biedt bijgewerkte informatie over ASUS hardware en softwareproducten Ra...

Page 483: ...r informatie over het gebruik van het bijgeleverde gametoetsenbord en de gamemuis vindt u in de hoofdstukken Het ASUS ROG gametoetsenbord gebruiken en De ASUS GX900 gamemuis gebruiken ASUS Essentio Desktop PC ASUS ROG U9N gametoetsenbordpakket x1 ASUS GX900 gamemuispakket x1 Installation Guide Power cord x1 Nero 9 brandsoftware dvd x 1 Installatiehandleiding x1 Warranty card x1 Ondersteuning voor ...

Page 484: ...482 Nederlands ...

Page 485: ...llen anders zijn Welkom Dank u voor de aankoop van de ASUS Essentio CG8580 Desktop PC De ASUS Essentio CG8580 Desktop PC biedt ultramoderne prestaties ongecomprimeerde betrouwbaarheid en op gebruikers gerichte hulpprogramma s Al deze waarden worden in een prachtige futuristische en stijlvolle systeembehuizing ingesloten Lees de ASUS garantiekaart voordat u uw ASUS Desktop PC opstelt 1 2 3 4 5 7 8 ...

Page 486: ...le seriële bus 3 0 USB 3 0 poorten sluit USB 3 0 apparatuur aan zoals een muis printer scanner camera PDA en anderen 10 USB 2 0 poorten Deze universele seriële bus 2 0 USB 2 0 poorten sluit USB 2 0 apparatuur aan zoals een muis printer scanner camera PDA en anderen 11 Microfoonpoort rose Op deze poort kan een microfoon worden aangesloten 12 Koptelefoonpoort limoen Op deze poort kan een koptelefoon...

Page 487: ... van het Windows besturingsysteem GEEN toetsenbord muis op een USB 3 0 poort aansluiten Wegens beperkingen van de USB 3 0 controller kunnen USB 3 0 apparaten alleen in een omgeving van een Windows besturingsysteem en na installatie van het USB 3 0 stuurprogramma worden gebruikt USB 3 0 apparaten kunnen alleen voor gegevensopslag worden gebruikt Wij raden u ten zeerste aan dat u de USB 3 0 apparate...

Page 488: ...USB 3 0 Boost UASP modus De poort onderaan ondersteunt USB BIOS flashback 7 Poort luidspreker zijkant Uit grijs Deze poort wordt in een audio configuratie van 8 kanalen met de luidsprekers aan de zijkant verbonden 8 Poort achterste luidspreker Uit zwart Deze poort wordt in een audio configuratie van 4 6 en 8 kanalen met de luidsprekers aan de achterkant verbonden 9 Poort Centrum Subwoofer oranje D...

Page 489: ...aar uw computer AAN UIT 15 Voedingsconnector Ingangsvermogen 100 120 200 240Vac 60 50Hz 10 5A Steek in deze connector de stroomkabel 16 PS 2 toetsenbord Muis Combo poort Op deze poort kan ene PS 2 toetsenbord of muis worden aangesloten 17 Optische S PDIF_OUT poort Op deze poort wordt via een optische S PDIF kabel een extern audio uitvoerapparaat aangesloten 18 HDMI poort Deze poort is voor een Hig...

Page 490: ...grafische kaart alleen op geselecteerde modellen Verbind uw monitor via de display uitvoerpoort met de discrete ASUS grafische kaart Ga als volgt te werk om met een ASUS grafische kaart een externe monitor te verbinden 1 Verbind uw monitor via een display uitvoerpoort met de discrete ASUS grafische kaart 2 Steek de stekker van de monitor in een stopcontact De display uitvoerpoorten op de ASUS graf...

Page 491: ... op de DVI D poort of een HDMI monitor op de HDMI poort 2 Steek de stekker van de monitor in een stopcontact Als uw computer met een ASUS grafische kaart komt wordt de grafische kaart in de BIOS als het primaire display apparaat ingesteld Sluit uw monitor vervolgens aan op een display uitvoerpoort op de grafische kaart aan Raadpleeg Meerdere externe monitors aansluiten in Hoofdstuk 3 van deze gebr...

Page 492: ...computer en het andere uiteinde van een voedingsbron USB3 0 UASP USB KB MS USB3 0 UASP USB KB MS USB3 0 UASP USB KB MS Het vooraf geïnstalleerde hulpprogramma voor het installeren van de bijgeleverde ASUS GX900 gamemuis is alleen toegankelijk wanneer u de muis aansluit op uw computer voordat u Windows 7 voor de eerste keer opstart Anders zult u het hulpprogramma handmatig moeten installeren vanaf ...

Page 493: ...omputer AAN te schakelen 1 Schakel uw monitor AAN 2 Zet de voedingsschakelaar AAN en druk vervolgens op de voedingsknop op uw computer Uw computer UIT schakelen Ga als volgt te werk om uw computer UIT te schakelen 1 Sluit alle werkende applicaties 2 Klik op het Windows bureaublad 3 Klik op om het besturingssysteem te sluiten 3 Wacht tot het besturingsysteem automatisch wordt geladen Aan uit knop U...

Page 494: ...492 Hoofdstuk 1 Aan de slag Nederlands ...

Page 495: ...m Klik op Next Volgende 5 Typ de nodige informatie om uw wachtwoord in te stellen en klik daarna op Next Volgende U mag ook op Next Volgende klikken om zonder enige informatie in te voeren deze stap over te slaan 6 Lees aandachtig de licentievoorwaarden Vink I accept the license terms Ik accepteer de licentievoorwaarden aan en klik op Next Volgende 7 Selecteer Use recommended settings Aanbevolen i...

Page 496: ...item Getting Started Om te beginnen op het startmenu bevat enkele basistaken zoals Windows verpersoonlijken nieuwe gebruikers toevoegen bestanden overdragen Hiermee wordt u geholpen om bekend te raken met het gebruik van Windows 7 Ga als volgt te werk om het item Om te beginnen te gebruiken 1 Klik op de Windows takenbalk op de pictogram Start om het startmenu te lanceren 2 Selecteer Getting Starte...

Page 497: ...kenbalk vastpinnen Ga als volgt te werk om programma s op het startmenu of de takenbalk vast te pinnen 1 Klik op de Windows takenbalk op de pictogram Start om het startmenu te lanceren 2 Klik met de rechtermuisknop op het item dat u op het startmenu of de takenbalk wilt vastpinnen 3 Selecteer Pin to Taskbar Aan takenbalk vastpinnen of Pin to Start menu Aan startmenu vastpinnen U kunt ook met de re...

Page 498: ... dit hoofdstuk de paragraaf Windows Actiecentrum gebruiken voor meer details Pictogrammen en notificaties aanpassen U kunt ervoor kiezen om op de takenbalk of in het notificatiegebied de pictogrammen en notificaties weer te geven of te verbergen Ga als volgt te werk om pictogrammen en notificaties aan te passen 1 Klik vanuit het notificatiegebied op de pictogram met de pijl 2 Klik op Customize Aan...

Page 499: ...rgavescherm met de rechtermuisknop klikken Klik op View Weergave en selecteer het type weergave die u wilt Uw bestanden rangschikken Ga als volgt te werk om uw bestanden te rangschikken 1 Lanceer Windows Verkenner 2 Klik vanuit het veld Arrange by Rangschikken op om de vervolgkeuzelijst weer te geven 3 Selecteer het type rangschikking van uw voorkeur Uw bestanden sorteren Ga als volgt te werk om u...

Page 500: ...All Programs Alle programma s Maintenance Onderhoud Backup and Restore Back up en Herstellen 2 Klik op Set up backup Back up instellen Klik op Next Volgende 3 Selecteer de bestemming van uw back up Klik op Next Volgende 4 Selecteer Let Windows choose recommended Laat Windows kiezen aanbevolen of Let me choose as your backup mode Laat mij als uw back upmodus kiezen Uw systeem herstellen De functie ...

Page 501: ... controleren en installeren om de beveiliging en prestaties van uw computer te verbeteren Windows Update lanceren Ga als volgt te werk om Windows Update te lanceren 1 Klik op de Windows takenbalk op de pictogram Start om het startmenu te lanceren 2 Selecteer All Programs Alle programma s Windows Update 3 Klik vanaf het scherm Windows Update op de taak die u wilt uitvoeren Een gebruikersaccount en ...

Page 502: ...anvallen beschermt Het wordt afzonderlijk gekocht Na activering hebt u een proefperiode van 60 dagen Ga als volgt te werk om Trend Micro Internet Security te activeren 1 Activeer de applicatie Trend Micro Internet Security 2 Lees aandachtig de licentievoorwaarden Klik op Agree Activate Akkoord Activeren 3 Voer uw e mailadres in en selecteer uw locatie Klik op Next Volgende 4 Klik op Voltooien om d...

Page 503: ...en 1 Klik op in het systeemvak van Windows op uw computer en klik vervolgens op Eject USB2 0 FlashDisk USB2 0 FlashDisk uitwerpen of Eject USB3 0 FlashDisk USB3 0 FlashDisk uitwerpen als u het USB3 0 flashstation of USB3 0 compatibele apparaten gebruikt 2 Als het bericht Safe to Remove Hardware Veilig om hardware te verwijderen verschijnt verwijdert u het USB opslagapparaat van uw computer Voorpan...

Page 504: ...ansluiten Deze desktop PC komt met poorten voor microfoon en luidsprekers op zowel het voor als achterpaneel De audio I O poorten bevinden zich op het achterpaneel en hiermee kunt u stereoluidsprekers met 2 4 6 en 8 kanalen aansluiten Koptelefoon en mic aansluiten Luidsprekers met 2 kanalen aansluiten ...

Page 505: ...Nederlands ASUS CG8580 503 Nederlands Luidsprekers met 4 kanalen aansluiten Luidsprekers met 6 kanalen aansluiten ...

Page 506: ...504 Hoofdstuk 3 Apparaten op uw computer aansluiten Nederlands Nederlands Luidsprekers met 8 kanalen aansluiten ...

Page 507: ...te vergroten Ga als volgt te werk om meerdere schermen in te stellen 1 Schakel uw computer uit 2 Verbind de twee schermen met uw computer en verbindt de stroomkabels van de schermen Raadpleeg in Hoofdstuk 1 de paragraaf Uw computer instellen voor details over op uw computer een monitor aan te sluiten Als in uw computer een grafische kaart is geïnstalleerd sluit u de schermen op de uitvoerpoorten v...

Page 508: ... scherm 2 weer te geven Dit scherm verwijderen Selecteer deze opties om het geselecteerde scherm te verwijderen 6 Klik op Apply Toepassen of op OK Klik daarna op het bevestigingsbericht op Keep Changes Wijzigingen bewaren 3 Zet uw computer aan 4 Doe één van het volgende om het instellingenscherm Screen Resolution Schermresolutie te openen Klik op Control Panel Configuratiescherm Appearance and Per...

Page 509: ...luit op de HDMI poort van uw computer een High Definition tv HDTV aan Om de HDTV op de computer aan te sluiten hebt u een HDMI kabel nodig De HDMI kabel is afzonderlijk verkrijgbaar Voor de beste weergaveprestatie mag uw HDMI kabel niet langer dan 15 meter zijn ...

Page 510: ...508 Hoofdstuk 3 Apparaten op uw computer aansluiten Nederlands ...

Page 511: ...iets hoger zijn dan uw heupen om de achterkant van uw dijen te ontspannen Indien nodig dient u een voetsteun te gebruiken om de hoogte van uw knieën te verhogen Stel de rug van uw stoel zo af dat de basis van uw ruggengraat stevig wordt ondersteund en iets naar achteren wordt gebracht Zit rechtop met uw knieën ellebogen en heupen in een hoek van ongeveer 90 terwijl u achter de computer zit Plaats ...

Page 512: ...en naar verschillende geheugenkaartstations lezen en schrijven Ga als volgt te werk om de geheugenkaart te gebruiken 1 Plaats de geheugenkaart in de kaartsleuf 2 Selecteer van het venster AutoPlay automatisch afspelen een programma voor toegang tot uw bestanden Als AutoPlay NIET op uw computer is ingeschakeld klikt u op de takenbalk op de knop Windows 7 Start en klikt u op Computer Daarna dubbelkl...

Page 513: ... programma voor toegang tot uw bestanden Een optische schijf verwijderen Ga als volgt te werk om een optische schijf te verwijderen 1 Terwijl het systeem aan is moet u één van het volgende doen om de lade uit te werpen Druk onder de stationlade op de uitwerpknop Druk met de rechtermuisknop op het pictogram van het cd dvd station op het scherm Computer en klik daarna op Eject Uitwerpen 2 Verwijder ...

Page 514: ...naar USB adapter om uw speltoetsenbord aan te sluiten op de USB 2 0 poort van uw computer 1 Lijn de polssteun uit en stop deze in de polssteunsleuven A van het gametoetsenbord Gebruik beide duimen om de polssteun omlaag te drukken tot deze op zijn plaats klikt B Raadpleeg het hoofdstuk Inhoud verpakking voor de inhoud van de verpakking van het ASUS ROG U9N gametoetsenbord Start uw computer opnieuw...

Page 515: ...zien van een linkerknop een rechterknop een scrollwiel twee zijknoppen een DPI knop en een speciaal ontworpen knop voor het schakelen van profielen Toetsen Beschrijving Toetsen Beschrijving 1 Linkerknop 7 GX900 logo 2 Rechterknop 8 Knop IE Volgende 3 Scrollwiel 9 Knop IE Vorige 4 DPI schakelaar 10 Muisvoet 5 Profielschakelknop profielindicator 11 Muisvoet en lasersensor met twee ogen 6 LED DPI ind...

Page 516: ...eer start zal het programma de muis automatisch detecteren en is deze rechtstreeks toegankelijk Anders zult u het hulpprogramma handmatig moeten installeren vanaf de bijgeleverde ondersteunings dvd Om het programma te installeren vanaf de ondersteunings dvd plaatst u de ondersteunings dvd in het optische station en volgt u de instructies op het scherm om het programma te starten Als Autorun NIET i...

Page 517: ...gen 6 Klik om de verschillende kleurindicators van het profiel en hun status weer te geven 7 Klik om het opgeslagen profiel te laden naar uw muis 8 Klik om de huidige profielinstellingen op te slaan naar uw harde schijf 9 Klik om alle muisinstellingen opnieuw in te stellen naar de standaard fabrieksinstellingen 10 Klik om de instellingen die u hebt opgegeven op te slaan 11 Klik om de instellingen ...

Page 518: ...ogram wilt gebruiken 4 Selecteer de functie voor elke knop actie in de vervolgkeuzelijst Raadpleeg de onderstaande tabel voor meer informatie Functies Beschrijving Knop L Functie linkermuisknop Knop R Functie rechtermuisknop Knop M Functie middelste muisknop IE Vorige Functie knop IE Vorige Indien dit geselecteerd is drukt u op de knop om terug te keren naar de vorige pagina IE Volgende Functie kn...

Page 519: ...n kantelwiel Snel vuren muis Druk op de knop om snel te vuren in een klik om aan te vallen game Dit is hetzelfde als drie keer klikken met de linkermuisknop Snel vuren toets Druk op de knop om snel te vuren in een game door de spatiebalk in te drukken om aan te vallen Dit is hetzelfde als drie keer drukken op de spatiebalk Webbrowser Druk op de knop om uw standaard webbrowser te starten E mail Dru...

Page 520: ...stratie van de toetsaanslagen en of muisacties te stoppen Wissen Klik om alle opgeslagen instructies te wissen Omhoog omlaag verplaatsen Klik om de geselecteerde instructie omhoog omlaag te verplaatsen Tijd instructiecyclus Wanneer Timing is uitgeschakeld zal de vertragingstijd van alle acties de waarde zijn die u kiest in de vervolgkeuzelijst Lus Stelt de macro in die moet worden uitgevoerd met é...

Page 521: ...nslagen en of muisacties te stoppen Wissen Klik om alle opgeslagen instructies te wissen Omhoog omlaag verplaatsen Klik om de geselecteerde instructie omhoog omlaag te verplaatsen Tijd instructiecyclus Wanneer Timing is uitgeschakeld zal de vertragingstijd van alle acties de waarde zijn die u kiest in de vervolgkeuzelijst Lus Stelt het script in dat moet worden uitgevoerd met één klik en die moet ...

Page 522: ...520 Hoofdstuk 4 Uw computer gebruiken Nederlands ...

Page 523: ...f een local area network LAN netwerk te verbinden 2 Verbind één uiteinde van een RJ 45 kabel met de LAN poort RJ 45 op het achterpaneel van uw computer en het andere uiteinde met een DSL kabelmodem Raadpleeg de documentatie die met uw DSL kabelmodem wordt geleverd 3 Schakel de DSL kabelmodem en uw computer in 4 Configureer de benodigde instellingen voor internetverbinding Neem contact op met uw In...

Page 524: ...erk om via LAN te verbinden 1 Verbind één uiteinde van een RJ 45 kabel met de LAN poort RJ 45 op het achterpaneel van uw computer en het andere uiteinde met uw LAN 2 Zet uw computer aan 3 Configureer de benodigde instellingen voor internetverbinding Neem contact op met uw netwerkbeheerder voor details of hulp bij het instellen van uw internetverbinding RJ 45 kabel LAN ...

Page 525: ...oze verbinding aan op het internet Om een draadloze verbinding te verkijgen moet u met een draadloos toegangspunt access point AP verbinding maken USB3 0 UASP USB KB MS USB KB MS Wireless AP Modem USB3 0 UASP USB KB MS Wireless AP Modem Gebruik een van de volgende methoden om een draadloze verbinding tot stand te brengen OF ...

Page 526: ...een draadloos netwerk 1 Klik in het systeemvak op het pictogram van het netwerk om beschikbare draadloze netwerken weer te geven 2 Selecteer het draadloze netwerk waarmee u verbinding wilt maken en klik op Connect Verbinden 3 Het kan zijn dat u voor een beveiligd draadloos netwerk de netwerk beveiligingscode moet intypen Klik daarna op OK 4 Wacht terwijl uw computer verbinding maakt met het draadl...

Page 527: ...e moederbord BIOS bij te werken om de systeeminformatie weer te geven en om de instellingen van de Al Suite II aan te passen De ondersteunings dvd en herstel dvd zijn mogelijk niet in het pakket opgenomen U kunt deze zelf branden Raadpleeg Recovering your system Uw systeem herstellen voor details Klik om sensors of CPU frequentie te controleren Klik om sensors of CPU frequentie te controleren Klik...

Page 528: ...et menuTool Extra bevat System Level Up Probe II Sensor Recorder enAi Charger Bij het instellen van de functies moet u de sneltoetsen voor de profieluitwisseling System level up Systeemniveau omhoog toewijzen U kunt de instellingen voor de sneltoetsen handmatig aanpassen Raadpleeg de onderstaande afbeelding voor details Pas System Level Up Systeemniveau omhoog aan via twee methoden BIOS Klik in he...

Page 529: ...ingen Met dit hulpprogram ma bent u verzekerd dat uw computer altijd in een gezonde bedrijfsconditie is Probe II lanceren Na van de ondersteunings dvd Al Suite II te installeren lanceert u de Probe II door op de hoofdmenubalk van de Al Suite II op Tool Extra Probe II te klikken Probe II configureren Klik op de tabbladen Voltage Temperature Fan Speed Spanning Temperatuur Ventilator snelheid om de s...

Page 530: ... op Tool Extra Sensor Recorder op de hoofdmenubalk van AI Suite II om PC Probe te lanceren Sensor Recorder configureren Klik op de tabbladen Voltage Temperature Fan Speed Spanning Temperatuur Ventila torsnelheid en selecteer de sensors die u wilt controleren Met het tabblad History Record Historie opname kunt u de wijzignigen in de sensors die u hebt ingeschakeld opnemen Klik om de Y as in uit te ...

Page 531: ...helpt u bij het opladen van de aangesloten USB apparaten zelfs wanneer uw pc in de status S3 S4 S5 is nadat het opstart in de S0 status Raadpleeg de fabrikant van uw USB apparaat als dit de BC 1 1 functie volledig ondersteunt De werkelijke oplaadsnelheid kan verschillen afhankelijk van de voorwaarden van uw USB apparaat Zorg dat u het USB apparaat loskoppelt en opnieuw aansluiten nadat u Ai Charge...

Page 532: ... temperatuur en spanningen Klik op de hoofdmenubalk van Al Suite II op Monitor Scherm Sensor om het paneel Sensor te lanceren CPU frequentie Het paneel CPU frequentie geeft de huidige CPU frequentie en CPU gebruik weer Klik op de hoofdmenubalk van Al Suite II op Monitor Scherm CPU Frequency CPU frequentie om het paneel CPU frequentie te lanceren Paneel Sensor Paneel CPU frequentie Bevindt zich in ...

Page 533: ...e die u wilt downloaden Klik op Next Volgende Als geen bijgewerkte versie wordt gedetecteerd wordt het als het scherm op de rechterzijde weergegeven Update Met de sectie Update kunt u de moederbord BIOS bijwerken evenals de BIOS startlogo met de voor ASUS ontworpen hulp programma s voor bijwerken ASUS update De ASUS Update is een hulpprogramma waarmee u de moe derbord BIOS in het Windows besturing...

Page 534: ...ik op Open en klik op Next Volgende 3 U kunt beslissen of u het startlogo van de BIOS wilt wijzigen Klik op Yes Ja als u het startlogo wilt wijzigen of op No Nee om door te gaan 4 Volg de instructies op het scherm om het updateproces te voltooien 4 U kunt beslissen of u het BIOS startlogo wat de afbeelding is die tijdens de Power On Self Tests POST op het scherm verschijnt wilt veranderen Klik op ...

Page 535: ... op het tabblad MB om de details van de fabrikant van het moederbord de naam van het product de versie en de BIOS weer te geven Klik op het tabblad CPU om de details op de processor en de Cache weer te geven Klik op het tabblad SPD en selecteer de geheugensleuf om de details op de geheugenmodule die op de overeenkomende sleuf zijn geïnstalleerd weer te geven ...

Page 536: ...te de website voor technische ondersteuning de website voor downloadondersteuning of de contactgegevens Instellingen Met de sectie Instellingen kunt u de instellingen van de hoofdmenubalk en de weergave van de interface aanpassen Met Applicatie kunt u de applicatie selecteren die u wilt inschakelen Met Balk kunt u de balkinstellingen modificeren Met Weergave kunt u het contrast de helderheid de in...

Page 537: ...de snelbalk of takenbalk te lanceren ASUS AI Manager ASUS AI Manager is een hulpprogramma waarmee u snel een eenvoudig toegang tot regelmatig gebruikte applicaties krijgt AI Manager installeren Ga als volgt te werk om Al Manager te installeren Al Manager laceren Om de AI Manager vanaf het Windows bureaublad te lanceren klikt u op Start All Programs Alle Programma s ASUS AI Manager AI Manager 1 xx ...

Page 538: ...m de AI Manager te sluiten Hoofdmenu Het Hoofdmenu bevat drie hulpprogramma s AI Disk Al schijf AI Security Al beveiliging en AI Booting Al opstarten Klik met de pijl op het pictogram van het hoofdmenu om door de hulpprogramma s in het hoofdmenu te bladeren Al schijf Met Al Disk Al schijf kunt u gemakkelijk tijdelijke IE bestanden IE cookies IE URL s IE historie of de Prullenbak wissen Klik op de ...

Page 539: ...ekens in 2 Bevestig het wachtwoord 3 Typ de hint voor het wachtwoord in aanbevolen 4 Klik op Ok wanneer u klaar bent 5 Selecteer het apparaat dat u wilt vergrendelen en klik daarna op Apply Toepassen 6 Typ het wachtwoord in dat u eerder hebt ingesteld en klik daarna op Ok Ga als volgt te werk om het apparaat te ontgrendelen 1 Deselecteer het vergrendelde apparaat en klik op Apply Toepassen 2 Typ h...

Page 540: ... favorieten kunt u applicaties toevoegen die u regelmatig gebruikt Dit spaart u tijd om in uw computer naar de applicaties te zoeken Ga als volgt te werk om een applicatie toe te voegen 1 Klik op Add Toevoegen en zoek dan de applicatie die u aan My Favorites Mijn favorieten wilt toevoegen 2 Klik op het venster voor bestanden zoeken op Open De applicatie wordt aan de lijst My Favorites Mijn favorie...

Page 541: ... naar de ASUS website website voor technische ondersteuning website voor ondersteuning bij downloaden of website met contactinformatie te gaan Informatie Klik op het venster Information Informatie op het tabblad om de gedetailleerde informatie over uw systeem moederbord CPU BIOS geïnstalleerde apparaten en het geheugen te zien ...

Page 542: ...rken Nero 9 installeren Ga als volgt te werkt om Nero 9 te installeren 1 Plaats de Nero 9 dvd in uw optische station 2 Als Autorun is ingeschakeld wordt het hoofdmenu automatisch weergegeven Als Autorun is uitgeschakeld dubbelklikt u vanuit de hoofdmap van uw Nero 9 dvd op het bestand SeupX exe 3 Klik in het hoofdmenu op Nero 9 Essentials Essentiële instellingen Nero 9 ...

Page 543: ...ecteer de taal die u voor de Installatiewizard wilt gebruiken Klik op Next Volgende 5 Klik op Next Volgende om door te gaan 6 Vink I accept the License Conditions Ik accepteer de licentievoorwaarden aan Klik op Next Volgende wanneer u klaar bent ...

Page 544: ...teer Typical Typisch en klik daarna op Next Volgende 8 Vink Yes I want to help by sending anonymous application data to Nero Ja ik wil helpen door anonieme applicatiegegevens naar Nero te sturen aan en klik daarna op Next Volgende 9 Klik op Exit Afsluiten wanneer u klaar bent ...

Page 545: ...ederlands Bestanden branden Ga als volgt te werk om bestanden te branden 1 Klik op het hoofdmenu op Data Burning Gegevens branden Add Toevoegen 2 Selecteer de bestanden die u wilt branden Klik op Add Toevoegen wanneer u klaar bent ...

Page 546: ...ruiken Nederlands Nederlands 3 Klik nadat u de bestanden hebt geselecteerd die u wilt branden op Burn Branden om de bestanden naar een schijf te branden Raadpleeg de Nero website op www nero com voor meer details over het gebruik van Nero 9 ...

Page 547: ... De Herstellingspartitie is in de fabriek gemaakt en kan niet worden hersteld als u deze verwijderd Breng uw Desktop PC naar een bevoegd ASUS servicecentrum als u problemen ondervindt met het herstellingsproces Ga als volgt te werk om de Herstellingspartitie te gebruiken 1 Druk tijdens het opstarten op F9 2 Druk op Enter om Windows instellingen EMS ingeschakeld te selecteren 3 Selecteer één van de...

Page 548: ... Uw Desktop PC moet worden IN geschakeld 2 Herstart de Desktop PC en druk tijdens het opstarten op F8 en selecteer het optische station kan als CD DVD zijn gelabeld en druk op Enter om de Herstel dvd te starten 3 Selecteer OK om te beginnen met het herstellen van de afbeelding 4 Selecteer OK om het systeemherstel te bevestigen Het herstellen zal uw vaste schijf overschrijven Zorg dat u voordat u h...

Page 549: ...op responsiviteit moet u voldoen aan de volgende vereisten 1 CPU Intel 3de 2de generatie core processor familie 2 Be sturings systeem Besturingssysteem Windows 7 3 SSD Eén specifieke SSD Solid State Disk voor het ondersteunen van de Intel Smart Response en Intel Rapid Start technologie is noodzakelijk Raadpleeg de tabel SSD capaciteitsvereisten voor informatie over de vereisten voor deSSD grootte ...

Page 550: ...nderlijke partitie 20GB en 2GB SSD grootte 22GB Afzonderlijke partitie 20GB en 4GB SSD grootte 24GB Afzonderlijke partitie 20GB en 8GB SSD grootte 28GB De SSD die wordt gebruikt voor Intel Rapid Start en Intel Smart Response is niet toegelaten voor het maken van een RAID Vanwege het gedrag van het besturingssysteem werkt de Intel Rapid Start technologie niet efficiënt met meer dan 4GB systeemgeheu...

Page 551: ...ologie installeren Plaats de ondersteunings dvd in het optische station Het tabblad Drivers installation Installatie stuurprogramma s verschijnt als de functie Autorun is ingeschakeld voor uw computer Klik op het tabblad Drivers Stuurprogramma s en klik vervolgens op de software Intel Rapid Storage Technology Driver Stuurprogramma Intel Rapid Storage technologie Volg de instructies op het scherm o...

Page 552: ...d Start Technology Met de Intel Rapid Start Technology kunt u uw computer snel opnieuw activeren uit de slaapmodus Het opslaan van het systeemgeheugen van uw computer naar de geconfigu reerde SSD biedt een snellere responstijd voor de activering maar houdt de energie in een laag profiel Voordat u de Intel Rapid Start Technology toepast gaat u naar Geavanceerde modus Geavanceerd PCH configuratie in...

Page 553: ...tappen 5 Voer de vereiste partitiegrootte in en deze moet gelijk zijn aan het DRAM geheugen van het systeem 1GB 1024MB Klik op Verkleinen Ga naar Start Configuratiescherm Systeem en beveiliging Systeem en controleer de informatie over de DRAM grootte Het niet toegewezen volume wordt toegewezen aan de geselecteerde schijf Als uw SSD kleiner is dan 64GB en is ingesteld op de cacheoptie Volledige sch...

Page 554: ...yp create partition primary en druk op Enter 10 Nadat u een primaire partitie hebt gemaakt typt u detail disk en drukt u op Enter om de details van de gepartitioneerde schijf weer te geven 10 Selecteer het RAW volume dat dezelfde grootte heeft als het verkleinde volume typ select volume x x nummer en druk op Enter om de Intel Rapid Start partitie op te slaan De waarde x verwijst naar een schijfnum...

Page 555: ...gy De Intel Rapid Start Technology in en uitschakelen onder het besturingssysteem Installeer eerst de Intel Rapid Start Technology vanaf de ondersteunings dvd om Intel Rapid Start Manager te starten Nadat u de partitie hebt gemaakt start u Intel Rapid Start Manager om de Intel Rapid Start Technology in of uit te schakelen Klik op de pijl Verborgen pictogrammen weergeven aan de rechterzijde van de ...

Page 556: ...steem automatisch naar de Intel Rapid Start modus De standaardtijd is 10 minuten Klik om de opgegeven instellingen op te slaan Klik om de opgegeven instellingen te annuleren De waarde x verwijst naar een schijfnummer waar u de opslagpartitie wilt verwijderen 4 Selecteer de schijf SSD waarop de Intel Rapid Start Technology is geïnstalleerd voor volumeherstel typ select disk x x nummer en druk op En...

Page 557: ...op Enter Het diskpart hulpprogramma verwijdert de geselecteerde partitie 7 Klik op het bureaublad op Start klik met de rechtermuisknop op Computer en klik op Beheren 8 Klik in het venster Computerbeheer op Schijfbeheer klik met de rechtermuisknop op het verkleinde nieuwe volume en selecteer Volume uitbreiden 9 Klik op Volgende wanneer de wizard Volume uitbreiden verschijnt De waarde x verwijst naa...

Page 558: ...systeem periodiek uit de slaapmodus wordt geactiveerd dat de gebruikersstatus wordt verza meld en dat opnieuw naar de slaapmodus wordt gegaan om te worden geactiveerd na een ingesteld tijdsinterval De Intel Smart Connect technologie ondersteunt Windows Live Mail Microsoft Outlook en Seesmic toepassingen U moet de items van de PCH configuratie inschakelen in de BIOS voordat u de Intel Smart Connect...

Page 559: ... Intel Smart Connect technologie inschakelt Klik op Start All Programs Alle programma s Intel Intel Smart Connect Technology Klik op het tabblad Basic Basis op Enable Updating Bijwerken inschakelen Wanneer deze optie is ingeschakeld is het tabblad Advanced Geavanceerd beschik baar voor geavanceerde functie instellingen 1 Klik om de functie in of uit te schakelen Wanneer de schuifbalk is geactiveer...

Page 560: ...n opnieuw in te stellen klikt u op Reset All to Defaults Alles resetten naar standaardwaarden 4 Stel op het tabblad Advanced Geavanceerd de planning in tijdens de periode van laag energieverbruik voor energiebesparing Deze instelling is alleen van toepassing op de toegewezen tijdperiode 5 Klik op het tabblad Help op About Info om de versie van de functie weer te geven Klik op Topics Onderwerpen vo...

Page 561: ...ageert en klik daarna op End Task Taak beëindigen Als het toetsenbord niet reageert Houd de aan uit knop bovenop uw chassis ingedrukt totdat de computer uitschakelt Druk daarna op de aan uit knop om het in te schakelen Ik kan niet via de ASUS WLAN kaart alleen op geselecteerde modellen verbinding maken met een draadloos netwerk Zorg dat u voor het draadloze netwerk waarmee u verbinding wilt maken ...

Page 562: ...dows Als in uw computer een grafische kaart is geïnstalleerd dien u te verzekeren dat de schermen op de uitvoerpoorten van de grafische kaart zijn aangesloten Controleer of de instellingen voor meervoudige weergave juist zijn Raadpleeg de sectie Meerdere externe schermen aansluiten in Hoofdstuk 3 voor details Mijn computer kan mijn USB opslagapparaat niet te vinden De eerste keer dat u uw USB opsl...

Page 563: ... Keep Changes Wijzigingen bewaren Mijn luidsprekers produceren geen geluid Zorg dat u uw luidsprekers op de Poort lijn Uit limoen op het voor of achterpaneel aansluit Controleer of uw luidspreker op een elektrische bron is aangesloten en is ingeschakeld Stel het volume van uw luidsprekers bij Zorg dat het geluid van uw computersysteem niet is gedempt Als het is gedempt wordt het volumepictogram al...

Page 564: ...r is ingeschakeld De stroomkabel van uw computer is niet goed aangesloten Zorg dat de stroomkabel goed is aangesloten Gebruik een andere compatibele stroomkabel Problemen met PSU Power supply unit voedingseenheid Bel ons callcenter voor reparaties Scherm Probleem Mogelijke oorzaak Actie Na het inschakelen van de computer is geen beelduitvoer zwart scherm De signaalkabel is niet op de juiste VGA po...

Page 565: ...instellingen Problemen door de antivirus software veroorzaakt Sluit de antivirus software Problemen stuurprogramma s Installeer het LAN stuurprogramma opnieuw Audio Probleem Mogelijke oorzaak Actie Geen audio Luidspreker of koptelefoon is op de verkeerde poort aangesloten Raadpleeg de gebruikershandleiding van uw computer betreffende de juiste poort Verwijder en sluit de luidspreker opnieuw op uw ...

Page 566: ... hangen of bevriest Storing station vaste schijf Stuur het beschadigde station van de vaste schijf naar het ASUS servicecentrum voor service Vervang met een nieuw station voor vaste schrijf Problemen geheugenmodule Vervang met compatibele geheugenmodules Verwijder de extra geheugenmodules die u hebt geïnstalleerd en probeer opnieuw Er is niet genoeg luchtventilatie voor uw computer Verplaats uw co...

Page 567: ...t asus com om de nieuwste BIOS versies te downloaden Computer is te luidruchtig tijdens het gebruik De CPU ventilator is vervangen Zorg dat u een compatibele of door ASUS aangeraden CPU ventilator gebruikt Er is niet genoeg luchtventilatie voor de computer Verplaats uw computer naar een plek met betere luchtstroom De systeemtemperatuur is te hoog Werk de BIOS bij Als u weet hoe het moederbord opni...

Page 568: ...rsteuning Telefoon 1 886 678 3688 Fax ondersteuning 1 812 284 0883 Online support support asus com ASUS COMPUTER GmbH Germany and Austria Adres Harkort Str 21 23 D 40880 Ratingen Germany Fax 49 2102 959911 Web site www asus de Online contact www asus de sales Technisch Ondersteuning Telefoon 49 1805 010923 Fax ondersteuning 49 2102 9599 11 Online ondersteuning support asus com EUR 0 14 minuut vana...

Page 569: ...PC de Secretária ASUS Essentio CG8580 Manual do Utilizador ...

Page 570: ...UMA PODE A ASUS SEUS DIRECTORES OFICIAIS EMPREGADOS OU AGENTES SER RESPONSABILIZADA POR QUAISQUER DANOS INDIRECTOS ESPECIAIS ACIDENTAIS OU CONSEQUENTES INCLUINDO DANOS PELA PERDA DE LUCROS PERDA DE NEGÓCIO PERDA DE UTILIZAÇÃO OU DE DADOS INTERRUPÇÃO DA ACTIVIDADE ETC MESMO QUE A ASUS TENHA SIDO ALERTADA PARA A POSSIBILIDADE DE OCORRÊNCIA DE TAIS DANOS RESULTANTES DE QUALQUER DEFEITO OU ERRO NESTE ...

Page 571: ...pastas 590 Restaurar o seu sistema 592 Proteger o seu computador 593 Obter Ajuda e Suporte do Windows 594 Capítulo 3 Ligar dispositivos ao computador Ligar um dispositivo de armazenamento USB 595 Ligar um microfone e altifalantes 596 Ligar vários monitores externos 599 Ligar uma TV HD 601 Capítulo 4 Utilizar o computador Postura adequada ao utilizar o seu PC de Secretária 603 Utilizar o leitor de ...

Page 572: ...r os utilitários ASUS AI Suite II 619 ASUS AI Manager 629 Nero 9 634 Recuperar o seu sistema 639 Introdução às tecnologias de resposta Intel 2012 Desktop 641 Capítulo 7 Resolução de problemas Resolução de problemas 653 Informação sobre o software 660 ...

Page 573: ...equipamento gera usa e pode irradiar energia de radiofrequência e se não instalado e usado de acordo com as instruções do fabricante pode causar interferências prejudiciais às comunicações de rádio No entanto não existe qualquer garantia de que as interferências não ocorram numa determinada instalação Caso este equipamento cause interferências prejudiciais à recepção de rádio ou televisão o que po...

Page 574: ...ireitos de autor ao abrigo de patentes dos E U A e outros direitos de propriedade intelectual detidos pela Macrovision Corporation e outros detentores de direitos A utilização desta tecnologia protegida por direitos de autor deverá ser autorizada pela Macrovision Corporation e destina se apenas a utilização doméstica e outras utilizações limitadas de visualização com excepção de outras disposições...

Page 575: ...e NÃO utilize o modem durante tempestades eléctricas Aviso de segurança para a bateria NÃO atire a bateria para o fogo NÃO provoque curto circuito nos contactos NÃO desmonte a bateria Utilize este equipamento em ambientes com temperaturas entre 0 C 32 F e 35 C 95 F NÃO tape os orifícios de ventilação do PC de Secretária para evitar o sobreaquecimento do sistema NÃO utilize cabos de alimentação ace...

Page 576: ...adicionais que ajudam a realizar uma tarefa IMPORTANTE Instruções que DEVE seguir para realizar uma tarefa Onde encontrar mais informações Consulte as seguintes fontes para obter informações adicionais e actualizações do produto e do software Web site da ASUS O Web site da ASUS oferece informações actualizadas acerca dos produtos de hardware e software da ASUS Consulte o Web site da ASUS www asus ...

Page 577: ...alhes acerca da utilização do teclado e do rato para jogos incluídos consulte as secções Utilizar o Teclado para Jogos ASUS ROG e Utilizar o Rato para Jogos ASUS GX900 PC de Secretária ASUS Essentio Teclado para Jogos ASUS ROG U9N x1 Rato laser para jogos ASUS GX900 x1 Installation Guide Cabo de alimentação x1 DVD de software de gravação Nero 9 x1 Guia de instalação x1 Certificado de garantia x1 D...

Page 578: ...576 Português ...

Page 579: ...m os diferentes modelos Bem vindo Obrigado por ter adquirido o PC de Secretária ASUS Essentio CG8580 O PC de Secretária ASUS Essentio CG8580 oferece desempenho de última geração extrema fiabilidade e utilitários centrados no utilizador Todos estes valores estão condensados numa caixa atraente e futurista Leia o Certificado de Garantia da ASUS antes de utilizar o seu PC de Secretária da ASUS 1 2 3 ...

Page 580: ...tema do seu computador 9 Portas USB 3 0 Estas portas de Barramento de Série Universal 3 0 USB 3 0 ligam a dispositivos USB 3 0 como ratos impressoras scanners câmaras PDA e outros NÃO ligue um teclado rato a qualquer porta USB 3 0 quando instalar um sistema operativo Windows Devido às limitações do controlador USB 3 0 os dispositivos USB 3 0 apenas podem ser utilizados no SO Windows OS após a inst...

Page 581: ...ÃO ligue um teclado rato a qualquer porta USB 3 0 quando instalar um sistema operativo Windows Devido às limitações do controlador USB 3 0 os dispositivos USB 3 0 apenas podem ser utilizados no SO Windows OS após a instalação do controlador USB 3 0 Os dispositivos USB 3 0 apenas podem ser utilizados para armazenamento de dados Recomendamos que ligue dispositivos USB 3 0 às portas USB 3 0 para obte...

Page 582: ...al subwoofer 10 Porta de microfone rosa Esta porta liga a um microfone 11 Porta saída de linha verde lima Esta porta liga a auscultadores ou altifalantes Numa configuração de áudio de 4 6 ou 8 canais esta porta actua como Saída de Altifalantes Frontais 12 Porta entrada de linha azul claro Esta porta liga a um leitor de cassetes CD DVD ou a outras fontes de áudio 3 Placa ASUS Wi Fi GO Wi Fi 802 11 ...

Page 583: ...r 16 Porta Combo para Teclado Rato PS 2 Esta porta destina se a um teclado ou rato PS 2 17 Porta de saída óptica S PDIF Esta porta liga a um dispositivo de saída de áudio externo através de um cabo S PDIF 18 Porta HDMI Esta porta destina se à ligação de um conector de Interface Multimédia de Alta Definição HDMI e está em conformidade com o protocolo HDCP permitindo reprodução de DVD HD Blu ray e o...

Page 584: ...externo Utilizando a Placa Gráfica ASUS apenas em alguns modelos Ligue o seu monitor à porta de saída de monitor na Placa Gráfica ASUS dedicada Para ligar um monitor externo utilizando a Placa Gráfica ASUS 1 Ligue um monitor à porta de saída de monitor na Placa Gráfica ASUS 2 Ligue o monitor a uma fonte de alimentação As portas de saída de monitor da Placa Gráfica ASUS poderão variar de acordo com...

Page 585: ...nitor HDMI à porta HDMI no painel traseiro do computador 2 Ligue o monitor a uma fonte de alimentação Se o seu computador estiver equipado com uma Placa Gráfica ASUS essa placa gráfica estará definida como o dispositivo de visualização principal no BIOS Por conseguinte ligue o seu monitor à porta de saída de monitor da placa gráfica Para ligar vários monitores externos ao seu computador consulte a...

Page 586: ... traseiro do computador e a outra extremidade a uma fonte de alimentação USB3 0 UASP USB KB MS USB3 0 UASP USB KB MS USB3 0 UASP USB KB MS O utilitário de configuração do rato para jogos ASUS GX900 apenas poderá ser acedido quando ligar o rato ao seu computador antes de iniciar o Windows 7 pela primeira vez Caso contrário será necessário instalar o utilitário de configuração a partir do DVD de Sup...

Page 587: ...uptor de alimentação 2 Ligue o interruptor de alimentação e de seguida prima o botão de alimentação do seu computador Desligar o computador Para desligar o computador 1 Feche todas as aplicações em execução 2 Clique em no ambiente de trabalho do Windows 3 Clique em para encerrar o sistema operativo 3 Aguarde que o sistema operativo carregue automaticamente Botão de alimentação USB3 0 UASP USB KB M...

Page 588: ...586 Capítulo 1 Começar a utilizar Português ...

Page 589: ...m Seguinte 5 Introduza as informações necessárias para definir a sua palavra passe e depois clique em Seguinte Poderá também clicar em Seguinte para ignorar este passo sem introduzir quaisquer informações 6 Leia atentamente os termos de licenciamento Marque a opção Aceito os termos de licenciamento e clique em Seguinte 7 Seleccione Utilizar definições recomendadas ou Instalar apenas actualizações ...

Page 590: ... item Introdução O item Introdução no menu Iniciar contém informações acerca de algumas tarefas básicas como personalizar o Windows adicionar novos utilizadores e transferir ficheiros para o ajudar a familiarizar se com o Windows 7 Para utilizar o item Introdução 1 Na barra de tarefas do Windows clique no ícone Iniciar para aceder ao menu Iniciar 2 Seleccione Introdução Será apresentada a lista de...

Page 591: ...leccione Remover desta lista Afixar programas no menu Iniciar ou na barra de tarefas Para afixar programas no menu Iniciar ou na barra de tarefas 1 Na barra de tarefas do Windows clique no ícone Iniciar para aceder ao menu Iniciar 2 Clique com o botão direito no item que deseja afixar no menu Iniciar ou na barra de tarefas 3 Seleccione Afixar na Barra de Tarefas ou Afixar no Menu Iniciar Poderá ta...

Page 592: ...ir Para mais detalhes consulte a secção Utilizar o Centro de Acção do Windows neste capítulo Personalizar ícones e notificações Pode optar por mostrar ou ocultar os ícones e notificações na barra de tarefas ou na área de notificação Para personalizar ícones e notificações 1 Na área de notificação clique no ícone da seta 2 Clique em Personalizar 3 Na lista pendente seleccione os comportamentos para...

Page 593: ...Poderá também clicar com o botão direito do rato no painel de Vista clicar em Ver e seleccionar o tipo de vista que deseja Dispor os seus ficheiros Para dispor os seus ficheiros 1 Abra o Explorador do Windows 2 Clique no campo Dispor por para exibir a lista pendente 3 Seleccione o tipo de disposição preferida Ordenar os seus ficheiros Para ordenar os seus ficheiros 1 Abra o Explorador do Windows 2...

Page 594: ...idir recomendado ou Deixar me escolher como o seu modo de cópia de segurança Restaurar o seu sistema A funcionalidade de Restauro do Sistema do Windows cria um ponto de restauro onde as definições do sistema do computador são armazenadas numa determinada data e hora Permite lhe restaurar ou anular alterações efectuadas às definições do sistema do computador sem afectar os seus dados pessoais Para ...

Page 595: ...dows Update permite lhe procurar e instalar as actualizações mais recentes para melhorar a segurança e o desempenho do seu computador Abrir o Windows Update Para abrir o Windows Update 1 Na barra de tarefas do Windows clique no ícone Iniciar para aceder ao menu Iniciar 2 Seleccione Todos os Programas Windows Update 3 No ecrã do Windows Update clique na tarefa que deseja executar Configurar uma con...

Page 596: ...ra ataques de vírus informáticos É adquirido separadamente Após a activação o programa oferece um período de avaliação de 60 dias Para activar o Trend Micro Internet Security 1 Execute a aplicação Trend Micro Internet Security 2 Leia atentamente os termos de licenciamento Clique em Concordar e Activar 3 Introduza o seu endereço de e mail e seleccione a sua localização Clique em Seguinte 4 Clique e...

Page 597: ...seu computador NÃO remova um dispositivo de armazenamento USB durante a transferência de dados Se o fizer poderá causar perda de dados ou danos no dispositivo de armazenamento USB Capítulo 3 Ligar dispositivos ao computador Ligar um dispositivo de armazenamento USB Este PC de secretária possui portas USB 2 0 1 1 e USB 3 0 nos painéis frontal e traseiro e portas USB 3 0 no painel traseiro As portas...

Page 598: ...antes Este PC de secretária está equipado com portas de microfone e portas de altifalantes nos painéis frontal e traseiro As portas de E S de áudio localizadas no painel traseiro permitem ligar altifalantes estéreo de 2 4 6 e 8 canais Ligar auscultadores e microfone Ligar altifalantes de 2 canais ...

Page 599: ...80 597 Português Ligar altifalantes de 4 canais Ligar altifalantes de 6 canais ENTRADAS DE ÁUDIO ENTRADAS DE ÁUDIO Traseiro Frontal ENTRADAS DE ÁUDIO ENTRADAS DE ÁUDIO ENTRADAS DE ÁUDIO Traseiro Frontal Central Subwoofer ...

Page 600: ...598 Capítulo 3 Ligar dispositivos ao computador Português Português Ligar altifalantes de 8 canais Traseiro Frontal ENTRADAS DE ÁUDIO ENTRADAS DE ÁUDIO Lateral Central Subwoofer ...

Page 601: ...aumentar o ambiente de trabalho do Windows Para configurar vários monitores 1 Desligue o seu computador 2 Ligue os dois monitores ao computador e ligue os cabos de alimentação aos monitores Consulte a secção Instalar o computador no Capítulo 1 para obter detalhes acerca da ligação de um monitor ao seu computador Quando estiver instalada uma placa gráfica no computador ligue os monitores às portas ...

Page 602: ...mentará o espaço do seu ambiente de trabalho Mostrar ambiente de trabalho apenas em 1 2 Seleccione esta opção para mostrar o ambiente de trabalho apenas no monitor 1 ou no monitor 2 Remover este ecrã Seleccione esta opção para remover o monitor seleccionado 3 Ligue o seu computador 4 Execute uma das seguintes acções para abrir o ecrã de definição da Resolução de ecrã Clique em Painel de controlo A...

Page 603: ...ma TV de Alta Definição TV HD à porta HDMI do seu computador Precisará de um cabo HDMI para ligar a TV HD ao computador O cabo HDMI é adquirido separadamente Para obter o melhor desempenho do monitor utilize um cabo HDMI com um comprimento inferior a 15 metros ...

Page 604: ...602 Capítulo 3 Ligar dispositivos ao computador Português ...

Page 605: ...geiramente superior à anca para relaxar a parte posterior das coxas Se necessário utilize um apoio para os pés para elevar o nível dos joelhos Ajuste as costas da cadeira de forma a que a base da sua coluna esteja firmemente apoiada e ligeiramente inclinada para trás Quando utilizar o PC sente se correctamente com os joelhos cotovelos e anca num ângulo aproximado de 90º Coloque o monitor directame...

Page 606: ...do seu sistema permite lhe ler e escrever em diferentes cartões de memória Para utilizar o cartão de memória 1 Insira o cartão de memória na ranhura para cartões de memória 2 Seleccione um programa a partir da janela de Reprodução Automática para aceder aos seus ficheiros Se a Reprodução Automática NÃO estiver activada no seu computador clique no botão Iniciar do Windows 7 na barra de tarefas cliq...

Page 607: ...rodução Automática para aceder aos seus ficheiros Remover um disco óptico Para remover um disco óptico 1 Com o sistema ligado execute uma das seguintes acções para ejectar o tabuleiro Prima o botão de ejecção abaixo da tampa do compartimento da unidade Clique com o botão direito no ícone da unidade de CD DVD no ecrã Computador e depois clique em Ejectar 2 Remova o disco do tabuleiro da unidade Se ...

Page 608: ...a USB incluído para ligar o seu teclado para jogos à porta USB 2 0 do seu computador 1 Alinhe e insira o apoio de pulso nas ranhuras para o apoio de pulso do teclado para jogos A Utilizando ambos os polegares exerça pressão no apoio de pulso até este encaixar na sua posição B Consulte a secção Conteúdo da embalagem para saber qual o conteúdo da embalagem do Teclado para Jogos ASUS ROG U9N Reinicie...

Page 609: ...ui um botão esquerdo um botão direito uma roda de deslocamento dois botões laterais Interruptor de mudança de perfil e um Interruptor de mudança de perfil Itens Descrição Itens Descrição 1 Botão esquerdo 7 Logótipo GX900 2 Botão direito 8 Botão Avançar do IE 3 Roda de deslocamento 9 Botão Anterior do IE 4 Interruptor PPP 10 Pés do rato 5 Interruptor de mudança de perfil Indicador de perfil 11 Pés ...

Page 610: ...ama irá detectar automaticamente o rato e poderá aceder directamente ao programa Caso contrário será necessário instalar o utilitário de configuração a partir do DVD de Suporte fornecido Para instalar o programa a partir do DVD de Suporte coloque o DVD de Suporte na unidade óptica e siga as instruções no ecrã para executar o programa Se a Execução automática NÃO estiver activa no seu computador pr...

Page 611: ...ardadas dos botões 6 Clique para exibir as indicações das diferentes cores do indicador de Perfil 7 Clique para carregar um perfil guardado no rato 8 Clique para guardar as actuais definições do perfil no disco rígido 9 Clique para repor todas as predefinições do rato 10 Clique para guardar as alterações efectuadas 11 Clique para guardar as alterações efectuadas e sair do programa Cada perfil ofer...

Page 612: ... acção na lista pendente Para mais detalhes consulte a tabela seguinte Itens Descrição Botão E Faz com que o botão funcione como botão esquerdo do rato Botão D Faz com que o botão funcione como botão direito do rato Botão M Faz com que o botão funcione como botão meio do rato IE Anterior Faz com que o botão funcione como botão IE Anterior do rato Quando seleccionado prima o botão para voltar à pág...

Page 613: ...rizontal Esta função apenas funciona nas aplicações Microsoft Office nos sistemas operativos Windows 7 Vista Disparo rápido rato Quando seleccionado prima o botão para disparar rapidamente num jogo de disparos funcionando como um clique triplo no botão esquerdo do rato Disparo rápido tecla Quando seleccionado prima o botão para disparar rapidamente num jogo de disparos funcionando como se pression...

Page 614: ...es das teclas e ou do rato Limpar Clique para limpar todas as instruções guardadas Mover para cima baixo Clique para mover a instrução seleccionada para cima baixo Tempo de ciclo de instrução Quando o item Temporização não estiver marcado todos os tempos de atraso das acções terão o valor escolhido a partir da lista pendente Repetir Define a macro a executar ao efectuar um clique e pára quando cli...

Page 615: ...as e ou do rato Limpar Clique para limpar todas as instruções guardadas Mover para cima baixo Clique para mover a instrução seleccionada para cima baixo Tempo de ciclo de instrução Quando o item Temporização não estiver marcado todos os tempos de atraso das acções terão o valor escolhido a partir da lista pendente Repetir Define a script a executar ao efectuar um clique e pára quando clicar novame...

Page 616: ...614 Capítulo 4 Utilizar o computador Português ...

Page 617: ... LAN 2 Ligue uma extremidade de um cabo RJ 45 à porta LAN RJ 45 no painel traseiro do seu computador e a outra extremidade a um modem por cabo DSL Consulte a documentação fornecida com o modem por cabo DSL 3 Ligue o modem por cabo DSL e o computador 4 Configure as definições necessárias de ligação à Internet Contacte o seu Fornecedor de Serviços de Internet ISP para obter detalhes ou ajuda para a ...

Page 618: ... um cabo RJ 45 à porta LAN RJ 45 no painel traseiro do seu computador e a outra extremidade à sua LAN 2 Ligue o seu computador 3 Configure as definições necessárias de ligação à Internet Contacte o seu administrador de rede para obter detalhes ou ajuda para a configuração da sua ligação à Internet USB3 0 UASP USB KB MS RJ 45 cable LAN ...

Page 619: ...ess AP Modem Para estabelecer uma ligação sem fios utilize um dos seguintes métodos OU Ligação sem fios apenas em alguns modelos Ligue o computador à Internet através de uma ligação sem fios Para estabelecer uma ligação sem fios é necessário ligar a um ponto de acesso sem fios AP AP sem fios AP sem fios ...

Page 620: ...cionais Para ligar a uma rede sem fios 1 Clique no ícone de rede na área de notificação para exibir as redes sem fios disponíveis 2 Seleccione a rede sem fios à qual pretende ligar e depois clique em Ligar 3 Poderá ser necessário introduzir a chave de segurança da rede para redes sem fios protegidas depois clique em OK 4 Aguarde enquanto o computador liga à rede sem fios 5 A ligação sem fios será ...

Page 621: ...leccionar e iniciar um utilitário para monitorizar o sistema actualizar o BIOS da placa principal exibir informações do sistema e personalizar as definições da interface do AI Suite II O DVD de Suporte e DVD de Recuperação poderão não estar incluídos na embalagem Pode utilizar a Partição de Recuperação para criar o DVD de Suporte e o DVD de Recuperação Para mais detalhes consulte a secção Recupera...

Page 622: ...e Sistema clique em Tool Ferramentas System Level Up Level Up de Sistema na barra de menus da AI Suite II Ao definir a função atribua as teclas de atalho para a alteração de perfil de level up de sistema Pode ajustar as definições das teclas de atalho manualmente Consulte a figura abaixo para obter mais informações Ajuste o Level Up de Sistema através de dois métodos BIOS No programa de Configuraç...

Page 623: ... funcionamento Iniciar o Probe II Depois de instalar o AI Suite II a partir do DVD de suporte inicie o Probe II clicando em Ferramentas Probe II na barra de menu principal do AI Suite II Configurar o Probe II Clique nos separadores Tensão Temperatura Velocidade da ventoinha para activar os sensores ou para ajustar os valores limite do sensor O separador Preferências permite lhe personalizar o inte...

Page 624: ...sor na barra de menu principal do AI Suite II para iniciar o PC Probe Configurar o Registo do sensor Clique nos separadores Tensão Temperatura Velocidade da ventoinha e seleccione os sensores que pretende monitorizar O separador Registo do histórico permite lhe registar as alterações nos sensores activados Seleccione os sensores que pretende monitorizar Clique para aumentar diminuir o zoom no eixo...

Page 625: ...r ajuda a carregar os dispositivos USB ligados quando o PC se encontra nos Estados S3 S4 S5 depois de iniciar no Estado S0 Consulte o fabricante do seu dispositivo USB para saber se o seu dispositivo suporta a função BC 1 1 A velocidade real de carregamento poderá variar dependendo das condições do seu dispositivo USB Certifique se de que remove e volta a ligar o seu dispositivo USB depois de acti...

Page 626: ...eratura da CPU e tensões Clique em Monitorizar Sensor na barra de menu principal do AI Suite II para iniciar o painel Sensor Frequência da CPU O painel Frequência da CPU exibe a frequência da CPU e utilização da CPU actuais Clique em Monitorizar Frequência da CPU na barra de menu principal do AI Suite II para abrir o painel Frequência da CPU Painel Sensor Painel Frequência da CPU Residente no pain...

Page 627: ... pretende transferir Clique em Seguinte Se não for detectada nenhuma versão actualizada será exibido o ecrã na imagem à direita Actualizar A secção Actualizar permite lhe actualizar o BIOS da placa principal e o logótipo de arranque do BIOS através dos utilitários de actualização da ASUS ASUS Update O ASUS Update é um utilitário que lhe permite gerir guardar e actualizar o Bios da placa principal ...

Page 628: ...em Abrir e em seguida clique em Seguinte 3 Pode decidir se deseja alterar o logótipo de arranque do BIOS Clique em Sim se desejar alterar o logótipo de arranque ou em Não para continuar 4 Siga as instruções no ecrã para concluir o processo de actualização 4 Pode decidir se deseja alterar o logótipo de arranque do BIOS que é a imagem exibida no ecrã durante o Auto Teste de Arranque POST Clique em S...

Page 629: ...de memória Clique no separador MB para ver os detalhes acerca do fabricante nome do produto versão e BIOS da placa principal Clique no separador CPU para ver os detalhes acerca do processador e da Cache Clique no separador SPD e depois seleccione a ranhura de memória para ver os detalhes acerca do módulo de memória instalado na ranhura correspondente ...

Page 630: ...activar O separador Barra permite lhe modificar as definições da barra O separador Máscara permite lhe personalizar o contraste brilho saturação tonalidade e valor de gama da interface Clique no separador Disk Disco e seleccione cada disco para visualizar os detalhes dos mesmos O ecrã de Suporte O ecrã de Suporte exibe informações acerca do Web site da ASUS do Web site de apoio técnico do Web site...

Page 631: ...ciar o AI Manager a partir da barra de acesso rápido ou da barra de tarefas ASUS AI Manager O ASUS AI Manager é um utilitário que lhe permite aceder de maneira fácil e rápida a aplicações utilizadas frequentemente Iniciar o ASUS AI Manager Para iniciar o AI Manager a partir do ambiente de trabalho do Windows clique em Iniciar Todos os Programas ASUS AI Manager AI Manager 1 xx xx A barra de acesso ...

Page 632: ...r para manter o AI Manager na barra de tarefas Clique no botão Fechar para sair do AI Manager Principal O menu Principal contém três utilitários AI Disk AI Security e AI Booting Clique na seta no ícone do menu Principal para percorrer os utilitários no menu principal Principal Os meus favoritos Suporte Informações Botão Sair Mudar para a janela principal Adicionar à Barra de ferramentas Clique par...

Page 633: ...imo de 20 caracteres alfanuméricos 2 Confirme a palavra passe 3 Introduza uma sugestão para a palavra passe recomendado 4 Quando terminar clique em Ok 5 Seleccione o dispositivo que pretende bloquear e clique em Aplicar 6 Introduza a palavra passe que definiu previamente e clique em Ok Para desbloquear o dispositivo 1 Remova a selecção do dispositivo bloqueado e clique em Aplicar 2 Introduza a pal...

Page 634: ... permite lhe adicionar aplicações que usa com frequência evitando lhe o trabalho de ter de as procurar no seu computador Para adicionar uma aplicação 1 Clique em Adicionar e procure a aplicação que pretende adicionar a Os meus favoritos 2 Clique em Abrir na janela de localização do ficheiro A aplicação é adicionada à lista Os meus favoritos Clique com o botão direito do rato no ícone da aplicação ...

Page 635: ...eb site da ASUS o Web site de apoio técnico o Web site de apoio a transferências ou as informações de contacto Informações Clique no separador na janela Informações para ver informações detalhadas acerca do seu sistema placa principal CPU BIOS dispositivo s instalado s e memória ...

Page 636: ...ro 9 1 Insira o DVD do Nero 9 na sua unidade óptica 2 Se a função de Execução automática estiver activada o menu principal será exibido automaticamente Se a função de Execução automática estiver desactivada clique duas vezes no ficheiro SeupX exe que se encontra no directório principal do seu DVD do Nero 9 3 No menu principal clique em Nero 9 Essentials ...

Page 637: ... 4 Seleccione o idioma que pretende utilizar durante o Assistente de instalação Clique em Seguinte 5 Clique em Seguinte para continuar 6 Marque a caixa Aceito as condições da licença Quando terminar clique em Seguinte ...

Page 638: ...ASUS CG8580 636 7 Seleccione Típica e clique em Seguinte 8 Marque a caixa Sim pretendo ajudar enviando dados da aplicação anonimamente para a Nero e clique em Seguinte 9 Quando terminar clique em Sair ...

Page 639: ...ASUS CG8580 637 Gravar ficheiros Para gravar ficheiros 1 No menu principal clique em Gravar dados Adicionar 2 Seleccione os ficheiros que pretende gravar Quando terminar clique em Adicionar ...

Page 640: ...580 638 3 Depois de seleccionar os ficheiros que pretende gravar clique em Gravar para gravar os ficheiros num disco Para mais detalhes acerca da utilização do Nero 9 consulte o Web site da Nero em www nero com ...

Page 641: ...ada na fábrica e não pode ser restaurada se for eliminada Leve o seu PC de Secretária a um centro de assistência autorizado da ASUS caso tenha problemas com o processo de recuperação Utilizar a Partição de Recuperação 1 Prima F9 durante o arranque 2 Prima Enter para seleccionar Configuração do Windows EMS Activado 3 Escolha uma das seguintes opções de recuperação Recuperação do sistema Esta função...

Page 642: ...a F8 durante o arranque para seleccionar a unidade óptica esta poderá ter o nome de CD DVD e prima Enter para arrancar a partir do DVD de Recuperação 3 Seleccione OK para começar a restaurar a imagem 4 Seleccione OK para confirmar a recuperação do sistema O restauro irá apagar e substituir os dados do seu disco rígido Faça cópias de segurança de todos os seus dados importantes antes de efectuar a ...

Page 643: ...el 2012 Desktop deverá cumprir os seguintes requisitos 1 CPU Processador da família Intel Core 3ª 2ª geração 2 OS Sistema operativo Windows 7 3 SSD É necessário um SSD Disco de Estado Sólido para suportar a tecno logia Intel Smart Response e Intel Rapid Start Consulte a tabela de Requisitos de Capacidade de SSD para obter informações sobre os requisitos de tamanho capacidade de partição do SSD e m...

Page 644: ...el Smart Connect Partições inde pendentes 20GB e 2GB Tamanho de SSD 22GB Partições independentes 20GB e 4GB Tamanho de SSD 24GB Partições independentes 20GB e 8GB Tamanho de SSD 28GB O SSD utilizado para Intel Rapid Start e Intel Smart Response não pode ser utilizado para criação de RAID Devido ao comportamento do SO a tecnologia Intel Rapid Start funciona de forma ineficiente com mais de 4GB de m...

Page 645: ...o BIOS Instalar a tecnologia Intel Smart Response Coloque o DVD de suporte na unidade óptica O ecrã de instalação será apresentado se a função de Execução Automática estiver activada no computador Clique no separador Drivers Controladores e depois clique em Intel Rapid Storage Technology Driver Controlador da Tecnologia Intel Rapid Storage Siga as instruções apresentadas no ecrã para concluir a in...

Page 646: ...Tecnologia Intel Rapid Start A Tecnologia Intel Rapid Start permite retomar o funcionamento normal do compu tador a partir do modo de suspensão O armazenamento da memória do sistema do computador no SSD configurado permite um tempo de reactivação mais rápido mas mantém um baixo consumo de energia Antes de aplicar a Tecnologia Intel Rapid Start aceda a Modo Avançado Avançado Configuração PCH no BIO...

Page 647: ...assos 5 Introduza o tamanho da partição que deverá ser igual à memória DRAM do sistema 1GB 1024MB Clique em Reduzir Aceda a Iniciar Painel de controlo Sistema e segurança Sistema e verifique a informação do tamanho da memória DRAM Se o tamanho do SSD for inferior a 64GB e estiver definido para a opção de cache Capacidade total do disco para Intel Smart Response não será possível ver nenhum volume ...

Page 648: ...ate partition primary e prima Enter 10 Após a criação de uma partição principal digite detail disk e prima Enter para ver os detalhes do disco particionado 11 Seleccione o volume RAW com o mesmo tamanho do volume reduzido digite select volume x x número e prima Enter para armazenar a partição Intel Rapid Start O valor x refere se ao número do disco onde deseja criar a partição O valor x refere se ...

Page 649: ...ada Activar e desactivar a Tecnologia Intel Rapid Start no Sistema Operativo Instale primeiro a Tecnologia Intel Rapid Start a partir do DVD de suporte para executar o Gestor Intel Rapid Start Após a criação da partição inicie o Gestor Intel Rapid Start para activar ou desac tivar a Tecnologia Intel Rapid Start Clique na seta Mostrar ícones ocultos no lado direito da barra de tarefas e clique no í...

Page 650: ...que para activar ou desactivar a função Clique para activar ou desactivar o temporiza dor Quando activado desloque a barra para o tempo desejado Quando o sistema estiver inactivo durante um período superior ao tem po definido o sistema entrará automatica mente no modo Intel Rapid Start O tempo predefinido é 10 minutos Clique para guardar as alterações Clique para cance lar as alterações 1 Execute ...

Page 651: ...rima Enter 6 Digite delete partition override e prima Enter O utilitário diskpart eliminará a partição seleccionada 7 No ambiente de trabalho clique em Iniciar clique com o botão direito em Computador e clique em Gerir 8 Na janela Gestão de computadores clique em Gestão de discos clique com o botão direito no novo volume reduzido e seleccione Expandir volume 9 Quando for apresentado o Assistente d...

Page 652: ...Configuration Configuração PCH e active a tecnologia Intel Smart Connect Instalar a tecnologia Intel Smart Connect Coloque o DVD de suporte na unidade óptica Aceda a Utilities Utilitários e clique em Intel Smart Connect Technology Tecnologia Intel Smart Connect Quando for apresentado o assistente de instalação clique em Next Seguinte para iniciar a instalação Marque a opção I accept the terms in t...

Page 653: ...nect Clique em Start Iniciar All Programs Todos os programas Intel Intel Smart Connect Technology Tecnologia Intel Smart Connect No separador Basic Básico clique em Enable Updating Activar actu alização Quando activado o separador Advanced Avançado permite ajustar as definições das funções avançadas 1 Clique para activar ou desactivar a função Quando a barra de deslocamento estiver activada ajuste...

Page 654: ...s clique em Reset All to Defaults Repor todas as predefinições 4 No separador Advanced Avançado configure o horário durante o período de utilização baixa utilização de energia para poupar energia Esta configuração aplica se apenas ao período de tempo definido 5 No separador Help Ajuda clique em About Sobre para ver a versão da função Clique em Topics Tópicos para saber mais sobre a tecnologia Inte...

Page 655: ...efa Se o teclado não estiver a responder Mantenha premido o botão de energia na parte superior do chassis até que o computador desligue Em seguida prima o botão de energia para ligar o computador Não consigo ligar a uma rede sem fios utilizando a Placa WLAN da ASUS apenas em alguns modelos Certifique se de que introduziu a chave de rede correcta para a rede sem fios à qual deseja ligar Ligue as an...

Page 656: ... apenas no Windows Quando estiver instalada uma placa gráfica no computador certifique se de que liga os monitores à porta de saída da placa gráfica Verifique se as definições dos vários monitores estão correctas Consulte a secção Ligar vários monitores externos no Capítulo 3 para obter mais detalhes O meu computador não detecta o meu dispositivo de armazenamento USB Na primeira vez que ligar o se...

Page 657: ...ltifalantes estão ligados à porta de saída de Linha verde lima no painel frontal ou no painel traseiro Verifique se os altifalantes estão ligados a uma fonte de alimentação Ajuste o volume dos altifalantes Certifique se de que os sons do computador não se encontram desactivados Se os sons estiverem desactivados o ícone de volume será apresentado como Para activar os sons do sistema clique em na ár...

Page 658: ...or está ligado O cabo de alimentação do seu computador não está correctamente ligado Certifique se de que o cabo de alimentação está correctamente ligado Utilize outro cabo de alimentação compatível Problemas com a PSU Fonte de alimentação Contacte o seu Centro de Apoio para obter reparação Visualização Problema Causa possível Acção Nenhuma imagem exibida após ligar o computador ecrã vazio O cabo ...

Page 659: ... Serviços de Internet ISP para saber as definições de LAN correctas Problemas causados pelo software antivírus Feche o software antivírus Problemas com o controlador Reinstale o controlador de LAN Áudio Problema Causa possível Acção Sem áudio Os altifalantes ou auscultadores estão ligados à porta incorrecta Consulte o manual do utilizador do computador para saber qual a porta correcta Desligue e v...

Page 660: ...ativo O sistema pára ou bloqueia frequentemente Falha na unidade de disco rígido Envie o disco rígido para o Centro de Assistência da ASUS para que seja reparado Substitua por uma nova unidade de disco rígido Problemas com os módulos de memória Substitua por módulos de memória compatíveis Remova os módulos de memória adicionais que tenha instalado e tente novamente Não existe ventilação suficiente...

Page 661: ...locidade depois de entrar no SO As definições do BIOS foram alteradas Restaure os valores predefinidos das definições do BIOS Versão do BIOS antiga Actualize o BIOS para a versão mais recente Visite o site de Suporte da ASUS em http support asus com para transferir a versão do BIOS mais recente O computador é demasiado ruidoso durante a utilização O dissipador da CPU foi substituído Certifique se ...

Page 662: ...cia técnica Telefone 1 888 6783688 Fax da assistência 1 812 284 0883 Assistência online support asus com ASUS COMPUTER GmbH Alemanha Áustria Endereço Harkort Str 21 23 D 40880 Ratingen Germany Fax 49 2102 959911 Web site www asus de Fax da assistênciat www asus de sales Assistência técnica Telefone Component 49 1805 010923 Fax da assistência 49 2102 9599 11 Assistência online support asus com 0 14...

Reviews: