

To obtain warranty service for your Audibox, call, write, or Email to
ARX or the dealer you purchased it from. They will give you the
correct address to send your unit to. Have your sales receipt show-
ing date of purchase handy, and include a copy of it with your
Audibox. Please pack the unit well - we are not responsible for
any damage caused by unsuitable packing during shipment. Send
the unit to us pre-paid, by a delivery service like FedEx, UPS, or
any other service that can track the shipment. We will return it to
you freight paid. If you have any questions, or any part of this is
unclear, please write to ARX Systems in the country of purchase,
or to the address below.
PO Box 15,Moorabbin, Victoria 3189, Australia. Phone: +61 (0)3
9555 7859 Fax: +61 (0)3 9555 6747
You can also Email the factory at:
Page 7
Page 6
Page 4
Page 5
ARX Systems (ARX) warrants to the first purchaser of this Audibox
product that it is free from defects in materials and workmanship
under normal use and service. ARX’s sole obligation under this war-
ranty shall be to provide, without charge, parts and labour neces-
sary to remedy defects, if any, which appear within twelve (12)
months from date of purchase; and to supply parts only (where pos-
sible) for the life of the product to the original purchaser.
This is our sole warranty. It does not cover finish or appearance
items, nor does it apply if the Audibox has been, in ARX’s sole judge-
ment:
• Subjected to misuse, abuse, negligence or accident;
• Repaired, worked on, or altered by persons not authorized by ARX,
• Connected, installed, adjusted or used otherwise than in accord-
ance with the instructions supplied by ARX.
This warranty gives you and us specific legal rights, and you may also
have other rights which can vary from state to state.
INTERNATIONAL LIFETIME WARRANTY
As well as the
USB-DI
, ARX manufac-
ture other products in the unique Audi-
box range:
The
ISO-Balancer
for balancing unbal-
anced signals, and also the
ISO De-
Balancer
, which will de-balance a sig-
nal when required to connect to an un-
balanced input.
The
ISO-Later
is a Dual channel Un-
balanced to Balanced Low Impedance
transformer isolated converter, and the
ISO Splitter
is a transformer isolated 1
input to 2 outputs splitter for splitting 1
input 2 ways in applications where com-
plete Galvanic isolation is required.
Both available in Single Channel or
Double Header format.
The
Ear Driver
is a Headphone Ampli-
fier with 2 pairs of Stereo inputs each
feeding two channels of headphone
level outputs. It has individual Level
controls plus a 12 - 15VDC power con-
nector. A compact, flexible unit
The
Pro-D
I is an ultra compact Active
Direct box, with normal High Imped-
ance input as well as a separate speak-
er level input for connection to instru-
ment amplifiers.
Other features include –20dB Pad and
Audio Ground Lift switches, plus Phan-
tom or DC power options.
Available in Single Channel or Double
Header format
Did you know...
The
DI-Pre
is an Ultra compact Micro-
phone Pre amp with XLR input, balanced
jack output and 10 to 60dB Gain control.
Other features include –20dB Pad switch,
Clip LED and Phantom Power switch,
plus DC power connector.
Available in Single Channel or Double
Header format
For the latest information on the complete
Audibox range, visit our website:
www.arx.com.au/audibox.htm
Using your Audibox
The
USB-DI
VC
is a Direct Injection, or
Direct, box. It is a self contained, stand
alone stereo unit designed to interface
stereo digital audio with professional
balanced low impedance inputs. It will
convert computer audio signals into
ones that are happy to travel down a
long line into a mixing console at the
other end. It has many applications for
Live Sound, Studio or Broadcast use.
Plug and Play
If you are running Win XP or Vista, as
soon as you plug the
USB-DI
VC
into a
spare USB port on the computer it will
be recognised as a
USB Audio De-
vice
, and will be ready straight away.
With Win 98SE, as soon as you plug
the
USB-DI
VC
into a spare USB port
on the computer it will be recognised as a
USB Composite Device
, and the Add
New Hardware Wizard screen will pop
up. Click NEXT on the first 2 screens,
put in the 98SE CD Rom, then select
CD Rom drive on the search screen and
click NEXT. Click Next on the following
pop up screen, then FINISH on the fi-
nal screen.
It will then install the USB Device driv-
ers, and repeat the install process for a
USB Audio Device.
A complete set of pop up installation
screens can be found on the ARX
website at:
www.arx.com/audibox_usb_di.htm
IMPORTANT #1
Operating instructions
Input Connections
Connect the USB connector to the
USB-
DI
VC
and to the USB port on the compu-
ter. On XP and Vista it will be available
immediately and the LED on the front of the
USB-DI will start to flash. On 98SE follow
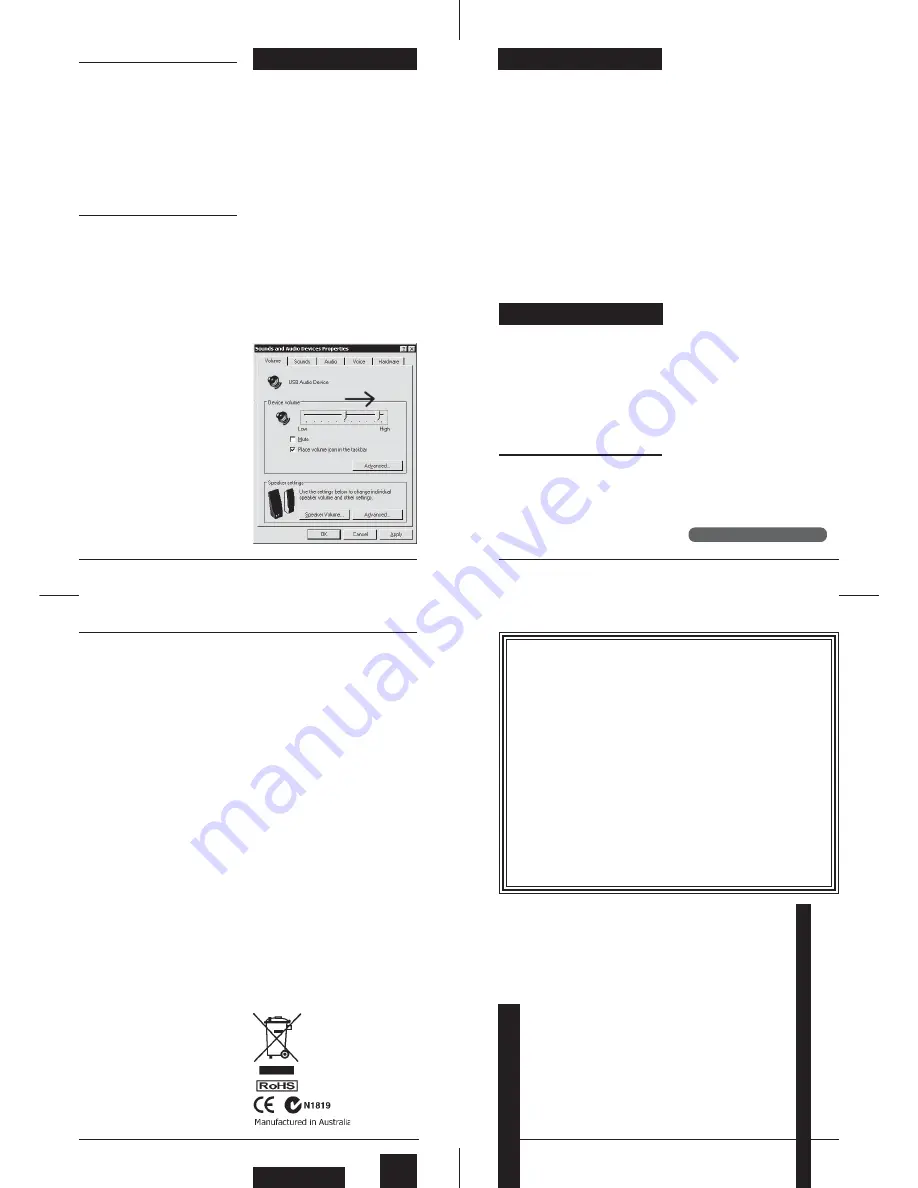
The Windows default volume setting for
USB Audio Devices is 50% of maximum.
In many cases this will be too low, induc-
ing noise and hum as excessive gain may
need to be applied to deliver the level
required. We suggest increasing this vol-
ume setting to 100%.
No matter which operating system you
are using, once the
USB-DI
is installed,
go to Control Panel, then Sounds and
Audio Devices, then USB Audio Device,
then the Volume tab, and move the slid-
er to the right, reading 100%. This will give
you the optimum signal to noise ratio.
Please Note:
Even if you reduce the
overall output with the Volume control
next to the XLR connectors,
you still
need to do this step!
IMPORTANT #2
Computers are very electrically noisy
environments, and USB is a very popu-
lar Plug and Play protocol for lots of Win-
dows devices.
For fastest and quietest audio operation you
must
plug the
USB-DI
VC
into its own
USB port. Experiment on your computer
to find the quietest USB port, and keep it
only for the
USB-DI
VC
I
- don't have any-
thing else on the same buss.
Otherwise you may get a hissing and click-
ing noise every time you move the mouse,
touch the keyboard, or click on the screen.
IMPORTANT #3
Keep mobile/cellular phones well away
(at least 2 metres/8 feet) from the com-
puter and the USB-DI. The "Dut dut-dah-
dut dut-dah-dut dut-dah-dut" sound of a
mobile phone connecting is not one that
audiences care to hear!
the previous instructions. You
will
need
the 98 SE install CD Rom.
Adjust the Audio Level as described in the
Important #1 note on the previous page.
Output Connections
Connect a balanced microphone lead from
each 3 pin XLR connector on the
USB-DI
VC
to a pair of input channels on the mix-
ing console. Set the Output volume con-
trol on the
USB-DI
VC
to 0db (hard right)
at first - you can reduce it later if neces-
sary. Set the Input Gains on the chan-
nels, and Pan the channels Left or Right
as required.
To check that the
USB-DI
VC
is set up
correctly, open your audio software, en-
sure that USB Audio Device is selected
as the default audio device, open a mu-
sic file and play.
If the output level is causing the input
channels to clip even when the input
gain is reduced, you can use the Vol-
ume control on the
USB-DI
VC
to re-
duce the output level
That's all there is to it.
Put simply, the
USB-DI
VC
is the USB
pro audio interface that Audio Profes-
sionals have been waiting for!
©2008 ARX Systems Pty.Ltd. ACN 006 471
825. All rights reserved. ARX Systems®
is a Registered Trade Mark.
www.arx.com.au
Latest information updates are always
available on the comprehensive ARX
website: