136
| Captive Portal for Guest Access
Aruba Instant 6.5.0.0-4.3.0.0 | User Guide
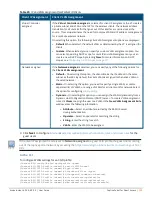
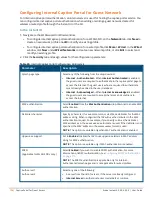
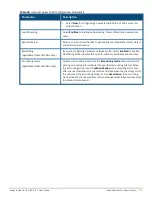
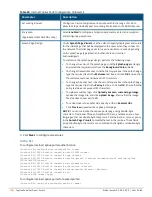
(Instant AP)(SSID Profile <name>)# captive-portal {<type>[exclude-uplink <types>]|external
[exclude-uplink <types>|profile <name>[exclude-uplink <types>]]}
(Instant AP)(SSID Profile <name>)# end
(Instant AP)# commit apply
Example
The following example configures a Facebook account for captive portal authentication:
(Instant AP)(config)# wlan ssid-profile guestNetwork
(Instant AP)(SSID Profile "guestNetwork")# captive-portal facebook
(Instant AP)(SSID Profile "guestNetwork")# end
(Instant AP)# commit apply
Configuring the Facebook Portal Page
To bind the VC with the Facebook portal:
1. Open the SSID with the Facebook option enabled, navigate to the
Security
tab and click the
configuration
link. The Facebook page is displayed.
The
Facebook configuration
link is displayed only if the IAP is successfully registered with Facebook.
2. Log in with your Facebook credentials. The
Facebook Wi-Fi Configuration
page is displayed.
3. Select the Facebook page.
4. Under
Bypass Mode
, select any of the following options:
l
Skip Check-in link
—When selected, the users are not presented with your business Facebook page, but
are allowed to access the Internet by clicking the
Skip Check-in
link.
l
Require Wi-Fi code
—When selected, the users are assigned a Wi-Fi code to gain access to the Facebook
page.
5. Customize the session length and terms of service if required.
6. Click
Save Settings
.
Accessing the Portal Page
To access the portal page:
1. Connect to the SSID with the Facebook option enabled.
2. Launch a web browser. The browser opens the Facebook Wi-Fi page. If the Wi-Fi-code based login is
enabled, the users are prompted to enter the Wi-FI code. If the
Skip Check-in
link is displayed, click the link
to skip checking in to the Facebook business page and proceed to access the Internet.
3. If you want to check in the business page, click
Check In
and provide your credentials. After checking in,
click
Continue Browsing
to access the web page that was originally requested.
Configuring Guest Logon Role and Access Rules for Guest Users
For captive portal profile, you can create any the following types of roles:
l
A pre-authenticated role—This role is assigned before the captive portal authentication. The user can only
access certain destinations with this role.
l
A guest role—This role is assigned after user authentication.
l
A captive-portal role—This role can be assigned to any network such as Empolyee, Voice, or Guest. When
the user is assigned with this role, a splash page is displayed after opening a browser and the users may
need to authenticate.


