Page 1 of 2
1
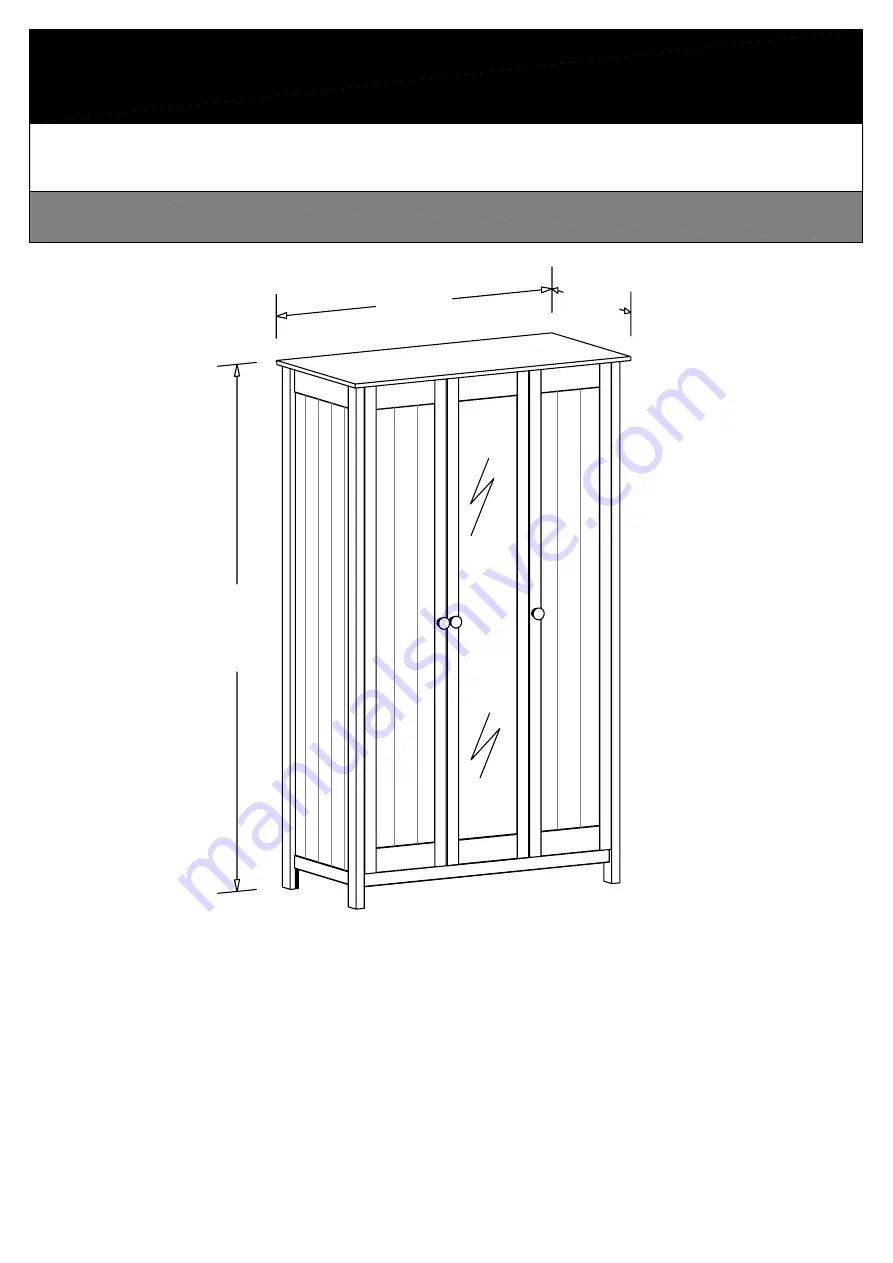
Scandinavia
3 door robe w. mirror
Scandinavia 3 door robe w. mirror
1799mm
1070mm
530mm
Page 1: ...Page 1 of 21 Scandinavia 3 door robe w mirror Scandinavia 3 door robe w mirror 1799mm 1070mm 530mm...
Page 2: ...0 10 20 30 40 50 60 70 80 90 100 110 120 130 140 150 160 170 180 190 200 210 220 230 240 250 260 270 MM G 30 pcs Nail 1 2 x 20mm L 4 pcs Hanging rail cup Knob 40 x 30mm F 3 pcs Screw 3 5 x 35mm J 3 pc...
Page 3: ...s Support Rail 8 1 pcs Door right 11 2 pcs Back 2 2 pcs Plinth Page 3 of 21 Scandinavia 3 door robe w mirror 7 1 pcs Divider 10 1 pcs Door w mirror 9 1 pcs Door left 1070 x 530mm 960 x 480mm 960 x 45m...
Page 4: ...g below the ceramic tile to avoid splitting or cracking 5 Ensure wall plugs are well fitted and are a tight fit in the drilled hole Types Of Walls You can use one of the following types of wall plug i...
Page 5: ...unction of cam bolt Step 2 Push the wooden Panel with the attached Bolt onto the other wooden Panel Step 4 Tighten Turn the Cam to the Right Step 1 Fix the Bolt to the wooden Panel Step 3 Place the Ca...
Page 6: ...t Fix the cross plates P to the sides 5 and 6 using screws E into the holes indicated It is important that the cross plates is placed exactly as shown The short end of the cross plates must point towa...
Page 7: ...4 1 Screw the bolts B into the holes indicated on the sides 5 and 6 6 Side right 5 Side left Fix the cross plates P to the divider 7 using screws D It is important that the cross plates is placed exac...
Page 8: ...the bolt to the divider B 1 Pcs Fix the hanging rail cup L onto the left hand side of the divider 7 using screws D into the pre drilled holes See fig 5a 1 Fix the hanging rail cup L onto the right ha...
Page 9: ...w mirror 10 Mounting the bolts to the top B 6 Pcs 1 Top B B B B B 4 Support Rail 2 2 Pcs Plinth 2 Plinth 2 Plinth 3 Bottom Knock the dowels C into the holes indicated on the support rail 4 Knock the...
Page 10: ...ing screws D into the pre drilled holes It is important that the magnetic part points towards the front edge of the top See fig 11 1 Fix the divider 7 to the bottom 3 using screws J Make sure to turn...
Page 11: ...he support rail 4 See page 4 Function of the cam bolt Place the cams A into the holes indicated arrows pointing towards the side bolt Tighten Turn the cams to the right Press the side 6 onto the plint...
Page 12: ...2 of 21 Scandinavia 3 door robe w mirror 6 Side right 5 Side left Lower the top 1 onto the sides 5 and 6 and the divider 7 See page 4 Function of the cam bolt Place the cams A into the holes indicated...
Page 13: ...there is NO GAP between the side and the back NOR between the top and the back Fasten the back with nails G along the top Use the nail guide M see fig 17 4 The angle between the top and the side must...
Page 14: ...18 1 Place the back into the rabbet of the top 1 and the side 5 Ensure there is NO GAP between the side and the back NOR between the top and the back Fasten the back along the top Use the nail guide s...
Page 15: ...18 Pcs N 9 Pcs N D N D N D N D N D N D N D N D D N Page 15 of 21 Scandinavia 3 door robe w mirror Lower the cup hinges N into the holes indicated on the doors 8 9 and 10 Fix the hinges using screws D...
Page 16: ...e at the level of the fixing screw Push the cup hinge towards the cross plate placing the fixing screw in the wider part of the adjustment hole It is very IMPORTANT to catch ALL of the fixing screws S...
Page 17: ...ing rails K 3 Pcs F 3 Pcs F F K K Page 17 of 21 Scandinavia 3 door robe w mirror K F Fig 21 1 Fig 21 2 Lower the hanging rails O and R into the hanging rail cups L Fix the knobs K to the doors using s...
Page 18: ...ng screw Step 2 To adjust the door away from the side towards the other door the centre turn the adjusting screw to the right Step 3 To adjust the door towards the side away from the other door the ce...
Page 19: ...ia 3 door robe w mirror Step 1 Loosen the fixing screw Step 2 Push the cup hinges the door back OR forth to adjust The doors should level with the front edge of the sides Step 3 Tighten the fixing scr...
Page 20: ...inavia 3 door robe w mirror Step 1 Loosen the two screws E D of each cross plate BUT ONLY as much as it will allow the cross plate to move up and down Step 2 Adjust the cross plate the door Step 3 Tig...
Page 21: ...es scratch glass 4 Do not sit or stand upon horizontal glass surfaces 5 If you are not sure the furniture is put together right please get professional help as wrong assembled furniture can cause dama...
Page 22: ...ease read these instructions fully before starting assembly If you need help or have damaged or missing parts call the Customer Helpline 08456 400800 642 3801 Scandinavia 3 Door Robe w Mirror Assembly...
Page 23: ...ease read these instructions fully before starting assembly Care and maintenance This product should not be discarded with household waste Take to your local authority waste disposal centre From time...
Page 24: ...call the Customer Helpline 08456 400800 Top 107 x 53cm 1 Plinth x 2 96 x 4 5cm 2 Bottom 96 x 48cm 3 Support rail 64 x 9cm 4 Left side 178 5 x 49 8cm 5 Right side 178 5 x 49 8cm 6 Divider 165 6 x 48cm...
Page 25: ...50 60 70 80 90 100 110 120 130 140 150 3 170 160 150 140 130 120 110 100 90 80 70 60 50 40 30 20 10 0 5 15 25 35 45 55 65 75 85 95 105 115 125 135 145 155 165 Ruler Use this ruler to help correctly id...
Page 26: ...den panel with the attached locking pin onto the other wooden panel Step 3 Place the cam into the hole arrow pointing towards the locking pin Step 4 Tighten Turn the cam to the right 4 Function of Cam...
Page 27: ...sides Long end Front Short end Front Front Step 2 Mounting the hanging rail cups to the sides Fix the hanging rail cups J onto the sides 5 and 6 using screws D into the pre drilled holes Step 3 Mount...
Page 28: ...linths 2 to the bottom 3 using the screws in the miniblocks O Note the chamfer Step 6 Mounting the cross plates to the divider Fix the cross plates L to the divider 7 using the screws D into the holes...
Page 29: ...tep 8 Mounting the hanging rail cups to the divider Fix the hanging rail cup J onto the right hand side of the divider 7 using screws D into the pre drilled holes Step 9 Mounting the locking pin to th...
Page 30: ...king pins to the top Screw the locking pins B into the holes indicated on the top 1 Note Insert locking pins B as far as shown Do not over tighten B B Step 12 Mounting the magnets to the top Fix the m...
Page 31: ...the cam A into the hole indicated arrow pointing towards the divider locking pin To tighten cam Turn to the right using a screwdriver Step 15 Adding the side to the plinths and the support rail Fit t...
Page 32: ...ghten cams Turn to the right using a screwdriver 10 Step 17 Assembling the top to the sides Attach the top 1 onto the sides 5 and 6 and the divider 7 See page 4 Function of cam and locking pin Place t...
Page 33: ...d the back Fasten the back with nails G along the sides and the bottom o 90 Rabbet Back 1 6 11 G Rabbet Back Top 1 G G G G G Back 11 Side right 6 5 3 G G G G G G G 4 Step 19 Adding the back and the jo...
Page 34: ...ons Mounting the cup hinges to the doors Fix the cup hinges K into the holes indicated on the doors 8 and 9 and 10 Attach the hinges using screws D Door right 8 Door left 9 Door w mirror 10 D D D D D...
Page 35: ...rs a Place the adjustment hole of the cup hinge at the level of the fixing screw Push the cup hinge towards the cross place placing the fixing screw in the wider part of the adjustment hole Important...
Page 36: ...Mounting the knobs and adding the hanging rails Lower the hanging rails M and N into the hanging rail cups J Fasten the knobs I to the doors 8 and 9 and 10 using screws F M N F F F I I I Door left 9 D...
Page 37: ...the cross plates Push the cup hinges the door back or forth to adjust The door should level with the front edge of the sides Loosen the fixing screw 1 1 Continue adjustment see 2 or tighten the fixin...
Page 38: ...00800 S Q D R Step 24 T T Fixing to wall It is recommended that the wardrobe is fixed to a wall Fix wall straps R to top of wardrobe using screws D With help move wardrobe into position Warning The wa...
Page 39: ...ll plugs are well fitted and are a tight fit in the drilled hole You can use one of the following types of wall plug if your walls are made of brick breeze block concrete stone or wood No 1 General Pu...
Page 40: ...rought and time In cold and dry periods the wood contracts which may lead to small cracks in the piece of furniture The reverse happens in warm and humid periods where the wood expands and this may re...