Araani 8000003 Installation Manual Download Page 22

Version: 20220329 


 22 

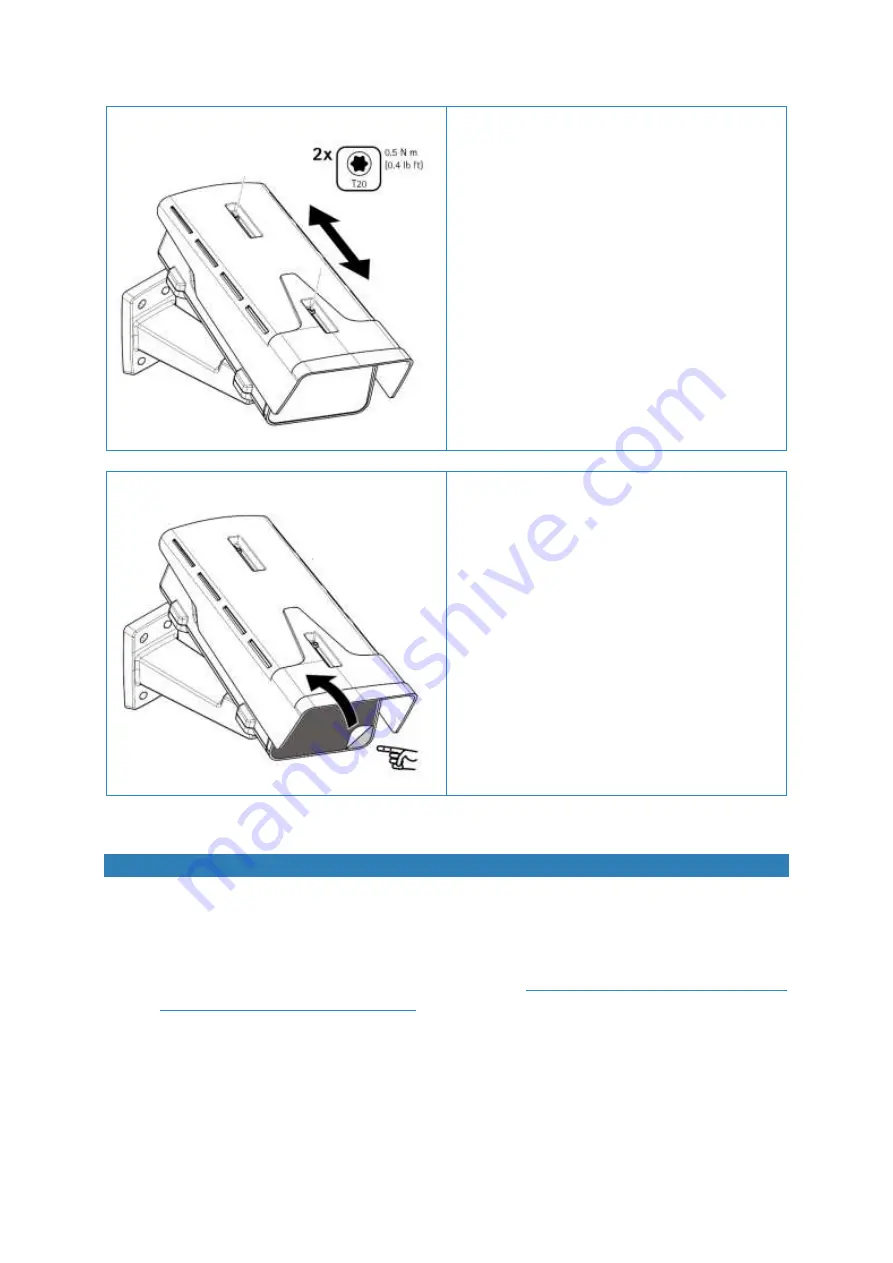
9 Adjust the weather shield 


Adjust the weather shield: extend to the maximum 
without entering the field of view. This will protect the 
camera window from dirt and sideways disturbances 
by light sources to the maximum. 


10 Remove protective film 


Remove the adhesive protective film from the camera 
window. 


Assigning an IP address with Axis device manager 

By default, the FireCatcher Camera is configured to use DHCP. Axis Device Manager can be used to assign an IP 
address to the camera or to find out the IP address that was dynamically received by the camera on your network if 
a DHCP server is active. If you want to change the IP address to a fixed value, follow the steps below. Verify with your 
IT department what IP addresses are allowed to use. 

1.


Download the latest version of the Axis device manager from 

https://www.axis.com/support/tools/install-

and-manage-systems/axis-device-manager

.  Run  the  installation  program  and  follow  the  instructions  on 

screen. 

2.


Make sure your FireCatcher Camera is powered up and connected to the network. Start Axis Device Manager 
on a Microsoft Windows computer that is on the same physical network as the cameras. The program will 
start and scan the network for cameras. All FireCatcher Cameras should appear in the "Add devices" dialog 
window  in  grey  font  with  "Enter  password"  next  to  it.  If  your  camera  is  not  showing,  verify  network 
connections and power. 

Summary of Contents for 8000003

Page 1: ...FireCatcher Camera ACAP software version V3 03 01 Hardware part number 8000003 INSTALLATION MANUAL...

Page 2: ...10 Standby power battery calculation 10 Cabling 10 Camera positioning 11 Site assessment 11 Environmental requirements 11 Camera alignment field of view 12 Installation instructions 15 Bracket mounti...

Page 3: ...e device presents exterior damages do not install it and contact your supplier Notice Do not remove any label from the device Avoid exposing the FireCatcher Camera to shocks or heavy pressure Do not i...

Page 4: ...make changes to the product and manuals without prior notice Araani NV makes no warranty of any kind regarding the material contained within this document including but not limited to the implied war...

Page 5: ...be answered immediately your reseller will forward your queries through the appropriate channels to ensure a rapid response If you are a reseller please contact your direct contact person or contact...

Page 6: ...unctionality inside It will trigger an alarm if it recognizes smoke or flames The FireCatcher Camera can be connected to the fire alarm control panel to generate audible and or visual alarms if smoke...

Page 7: ...ts lamps sun etc 2 Window Transparent window in front of lens This part may require regular cleaning to guarantee proper image quality 3 Intrusion alarm magnet Works with 6 4 Interface board Interface...

Page 8: ...se or modify this connection 17 Power connector Connect external power wires from the power alarm cable to this connector Polarity is indicated on the connector 18 Network connector Connect external n...

Page 9: ...tion Green Steady green for 10 seconds for normal operation after startup completed Amber Steady during startup Flashes during firmware upgrade or reset to factory default Amber Red Flashes amber red...

Page 10: ...g use and maintenance recommends a battery standby capacity of 24 hours for continuously monitored systems and 72 hours for non continuously monitored systems BS 5839 1 2017 Fire detection and fire al...

Page 11: ...e length of copper wire at an ambient temperature of 20 C to these values Wire conductor gauge 0 75 mm 18 AWG 1 mm 17 AWG 1 5 mm 16 AWG Maximum cable length Ah 100 m 140 m 210 m Camera positioning SIT...

Page 12: ...alse triggers Avoid sources of dust damp or smoke e g from operating machines in the field of view during normal operation These could lead to recurring false detections Outdoor Outdoor conditions are...

Page 13: ...the field of view the higher the sensitivity and the further away from the camera the lower the sensitivity The minimum required coverage for smoke to be detected depends on the smoke alarm minimum co...

Page 14: ...of the space Information Axis provides a lens calculator tool on their website that assists in determining the field of view based on lens type and focal length mounting height and distance in the sce...

Page 15: ...e steps below to install the FireCatcher Camera 1 Mount the bracket Fix the wall mount bracket against the wall by means of 4 screws and wall plugs leading the power outputs cable and the Ethernet cab...

Page 16: ...ugh this box as illustrated below The FireCatcher Camera is then further mounted on top of the conduit back box as described in the case with wall feed cabling The conduit box can be purchased from yo...

Page 17: ...a body Open the FireCatcher Camera by removing 4 Torx screws 2 optional Adjust for corridor mode If the FireCatcher Camera needs to operate in corridor mode portrait mode release the camera sensor bod...

Page 18: ...ide 4 Route cable and fix camera body Lead the cables through the cable gaskets into the camera Use the RJ45 cap as indicated if you need to enter the Ethernet cable with connector pre attached Make s...

Page 19: ...Version 20220329 19 5 Connect Ethernet Insert the Ethernet cable in the corresponding RJ45 Ethernet connector 18...

Page 20: ...power alarm cable to the 8 pins mating connector of the interface board Consult the connection diagram on the left for identification Connector labels correspond to outputs as follows ALM Output 1 def...

Page 21: ...cessive force Do not use any automatic gear in order to avoid damaging it by excessive force Refer to Viewing the camera stream on how to connect to the camera and see live video Note that zoom and fo...

Page 22: ...server is active If you want to change the IP address to a fixed value follow the steps below Verify with your IT department what IP addresses are allowed to use 1 Download the latest version of the...

Page 23: ...ar that allow to enter the username and password for the FireCatcher Camera Fill in User name root Password root Click OK 4 The camera will now appear in the Add devices window with model name P 1375...

Page 24: ...ge the IP address right click the camera and select Assign IP Address 7 A dialog box appears that allows to provide a fixed IP address or use DHCP Provide IP address subnet mask and default router add...

Page 25: ...the camera stream The live camera stream can be used to verify operation and or align the camera mechanically for a proper field of view The image of the camera can be visualized in standard browser...

Page 26: ...ep the current setting To adjust the focus of the lens follow these steps 1 Open a browser and log into the camera web interface 2 Click on the play button to view live video 3 Select the Image tab 4...

Reviews: