INSTALLATION & OPERATION
MANUAL
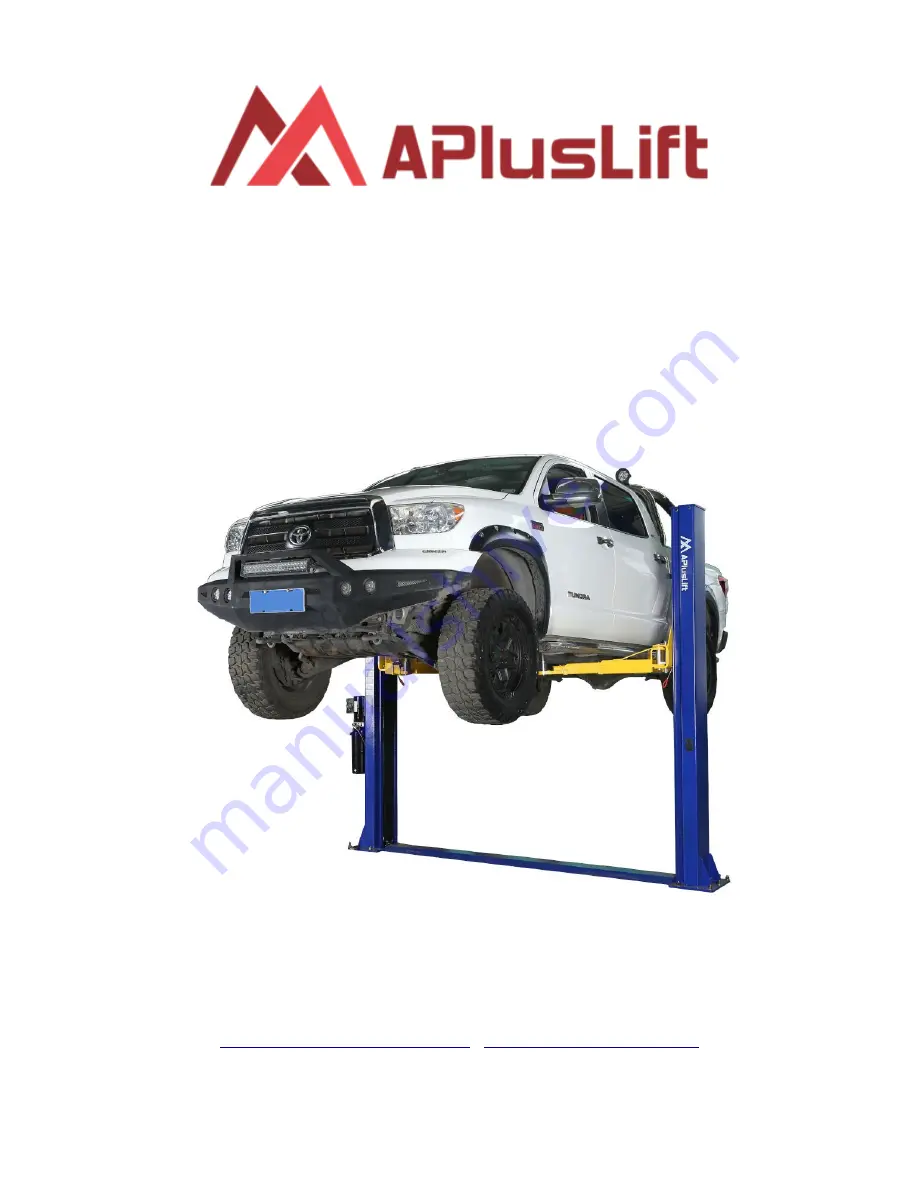
HW-10KBP 2-Post Floor Plate Car Lift
10,000LB Capacity
SONGA ENTERPRISES INC.
8512 122ND AVE NE UNIT 25, KIRKLAND, WA 98033
Phone: 800-616-9618 or 206-289-0814 (text)
http://www.apluslift.com
[email protected]
1
Page 1: ...ATION MANUAL HW 10KBP 2 Post Floor Plate Car Lift 10 000LB Capacity SONGA ENTERPRISES INC 8512 122ND AVE NE UNIT 25 KIRKLAND WA 98033 Phone 800 616 9618 or 206 289 0814 text http www apluslift com apluslift gmail com 1 ...
Page 2: ... duty 3 8 diameter cable and 5 pulley that reduce high stress on synchronization process and increase cable life Ultra high molecular self lubricating nylon slider that ensures carriage smooth moving up and down Control System Lifting operation by pressing UP button on motor Manual lowering operation by pressing lever Relief valve built in power pump to prevent overloading A 4 piece truck adapter ...
Page 3: ...k and 3 500 psi tensile strength with steel or fiber mesh reinforcement If you always lift vehicles below 9 000LB 4 thick concrete will be fine DO NOT install this lift over concrete expansion joints or cracks Check with your building architect DO NOT install this lift on an upper floor without written authorization from your building architect Should only be installed on basement floor DO NOT att...
Page 4: ...hick concrete will be fine Minimum size of a slab L100 x W216 x H6 3500 psi Alternatively columns can be installed on two concrete footings 2 ft x 2 ft with 30 deep or 3 ft x 3 ft with 12 deep and 3500 psi tensile strength with steel or fiber mesh reinforcement Maintain a 6 minimum distance from a slab edge Do not install this lift over expansion joints or cracks Check with your qualified engineer...
Page 5: ...ength of the anchor bolts Drill through the concrete is recommended when you move the lift to a new location you may hammer down the anchor bolts instead of cutting them off For better holding power blow dust from the hole Place a flat washer and hex nut over threaded end of anchor leaving approximately 1 2 of thread exposed Carefully tap anchor Do not damage threads Tap anchor into the concrete u...
Page 6: ...Asymmetrical Arm Diagram 6 ...
Page 7: ...and contact us if there are any parts missing Please read the installation requirements and anchoring tips in previous pages for concrete requirement layout and drill holes for anchor bolts The area where the lift will be installed should be free of overhead obstructions such as heater building support or electrical lines Once a location is determined use a carpenter s chalk line to layout a grid ...
Page 8: ...ng between columns Using a tape measure measure from back corner to back corner of the base plate to assure columns are square to each other Adjust the columns as needed to obtain the best fit Drill anchor holes with 3 4 inch drill bit into concrete following Anchoring Tips on page 4 Assemble washers and nuts on the anchors and then tap into each hole with a rubber hammer until washers rest agains...
Page 9: ...n the threads Stand in front of each carriage and find two holes on the top of the carriage Take the threaded end the end without nut and run it up inside the carriage through the front hole on the right side of the carriage See figures below for cable routing Do not tighten cables at this time Just start them on the treads 9 ...
Page 10: ...hex bolts Connect 4 inches fitting to the cylinder in main side column Connect short hydraulic hose to the fitting Connect short hydraulic hose to the power unit Connect long hydraulic hose between the cylinders and let it lay inside the floor plate See figures below for hose layout and routing to the power unit 10 ...
Page 11: ... code Find a certified electrician to connect the power unit to a power outlet Protect each circuit with a time delay fuse or circuit breaker The car lift uses a 220V single phase power unit The running amperage is 10A Recommend a 30A breaker and a 10 gauge wire Yellow Green is ground wire For 220V single split phase with two hot wires wire blue to Hot 1 and wire brown to Hot 2 For 220V power from...
Page 12: ...s Pull down on the lowering valve handle lever on the power unit and lower the lift all the way to floor Raise the lift again and listen for the clicking of the safety locks in each column Determine which side is slower and tighten the adjusting bolt on the opposite side carriage Remember to only tighten a few turns at a time until the both locks click at the same time when raising the lift Cycle ...
Page 13: ...Push Button on the side of the Motor to raise the Carriages off the locks Release the Push Button and then pull the Lock Release Cable under each carriage to release the locks Run the lift all the way up and down two more times to bleed all the air from the system While running the lift listen to safeties clicking Each side should click simultaneously or with in a 1 2 second of each other If they ...
Page 14: ... sure the pads are in proper and safe positions to support the vehicle Use caution before lifting pickup trucks SUV s and other framed vehicles Use truck adapters as needed Never exceed 9 of pad height Raising Lift Push Up switch to raise lift make sure arm restraints engage or stop and slightly move arm to allow gear to mesh until tires clear floor Stop and check for secure contact on adapters an...
Page 15: ...r Bolts Check anchor bolts daily in the first week of use DO NOT use an impact wrench After the first week check them monthly for the first six months Tighten the anchor bolts if necessary Concrete Check concrete for stress cracks daily in the first two weeks of use After the first two weeks check it monthly Bolts and Nuts Check all bolts and nuts every six months Hydraulic Oil The hydraulic oil s...
Page 16: ...NY INDICATIONS OF IMPENDING LIFT FAILURE CEASE OPERATION IMMEDIATELY INPECT CORRECT AND OR REPLACE PARTS AS NEEDED Daily Pre Operation Check 8 Hours 1 Check safety lock audibly and visually while in operation 2 Check safety latches for free movement and full engagement with rack 3 Check hydraulic connections and hoses for leakage 4 Check chain connections bends cracks and loose links 5 Check cable...
Page 17: ...ses Replacement of chains and rollers Replacement of cables and sheaves Replacement or rebuilding air and hydraulic cylinders as required Replacement or rebuilding pumps motors as required Checking of hydraulic cylinder rod and rod end threads for deformation or damage CAUTION Relocate or change components may cause problems Each component in the system must be compatible An undersized or restrict...
Page 18: ... on the racks 2 9 Power unit 220V single phase with manual release handle 1 10 M8 20 bolts washers nuts mount power unit on the column 4 11 Hydraulic long hose 9 1 2 feet connect cylinders 1 12 Hydraulic short hose 3 1 2 feet connect cylinder to power unit 1 13 Extended fitting 4 1 4 inches connect short hose to cylinder 1 14 Short fitting to cylinders pre installed already 2 15 Truck adapters 4 1...
Page 19: ...st be noted for any potential recovery with the shipping company The customer is required to notify APlusLift of any missing parts within 30 days Missing power units and or motors must be reportedat time of delivery APlusLift will replace any defective part under warranty at no charge as soon as such parts become available Anything reported after three days of receipt will be replaced or returned ...