Anritsu MT8870A Quick Start Manual Download Page 13

13 


3.


Checking Operation


The MT8870A can be operated only by the remote commands described in the operation manual. 
Remote commands related to analysis are described in each operation manual.


This section explains how to perform a simple operation check using the MT8870A control software 
(CombiView) on the attached DVD.


3.1.


Installing MT8870A Measurement Control Software (CombiView)


Run the installers in the folder MT8870A/Installer/CombiView/ on the accessory DVD. See Chapter 2 
in the PDF document mx880052a_opm_e_xxx.pdf in the folder /MT8870A/Manual/English for the 
installation instructions. 


Install using this manual as a guide.


3.2.


Checking Operation


Check the RF input and output by: 


a)


Outputting a CW signal using the Vector Signal Generator function.


b)


Receiving the signal using the spectrum monitor function. 


Connect an RF cable with N-type connector to Port3 and Port4 of the module.
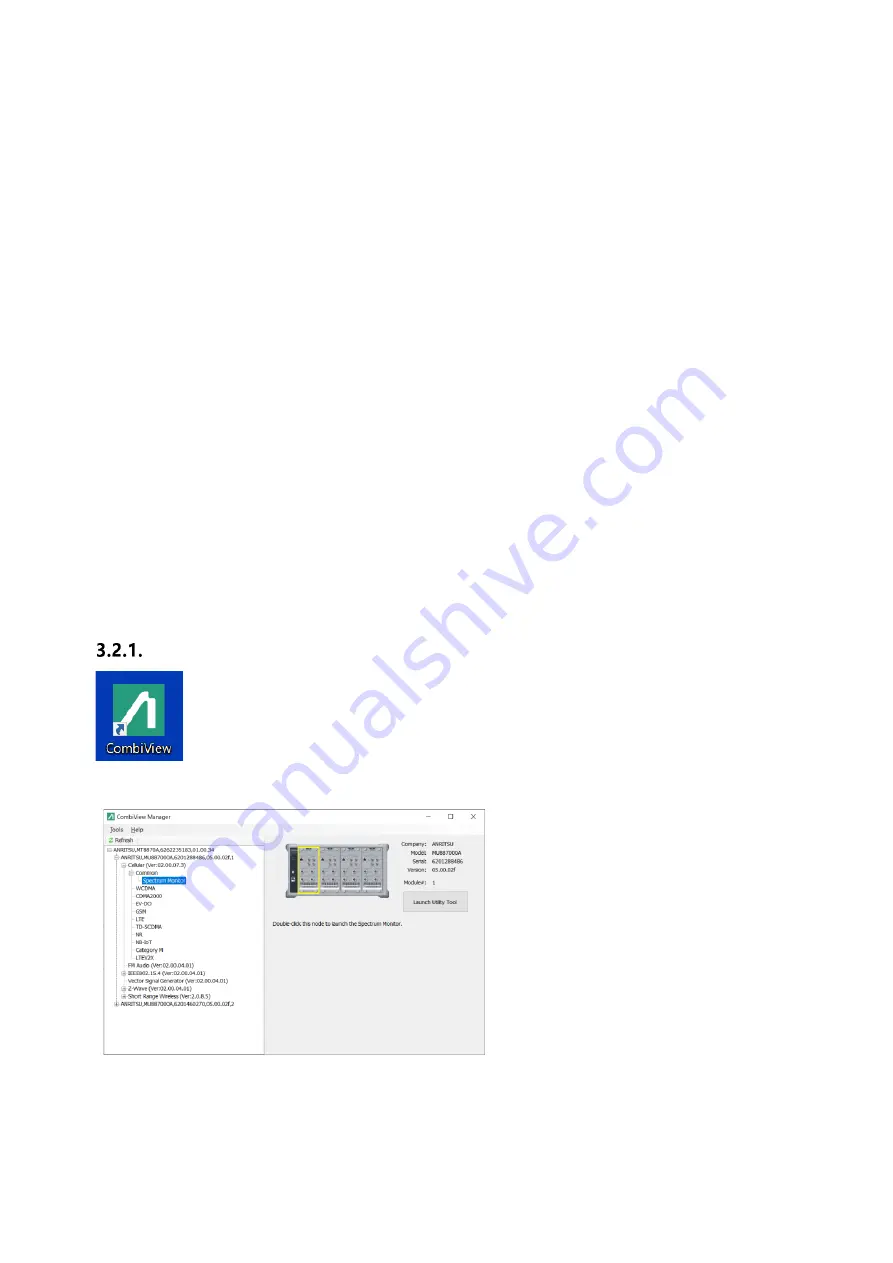


Starting CombiView


Double-click the 

CombiView

 icon on the PC desktop to start CombiView.


Summary of Contents for MT8870A

Page 1: ...Quick Start Guide Universal Wireless Test Set MT8870A...

Page 2: ...Utility Tool 7 2 7 Changing Network Settings 8 2 8 Changing GPIB settings 9 2 9 Upgrading Firmware 10 2 10 Installing Waveform File 12 2 11 Restoring PC Network Configuration 12 3 Checking Operation 1...

Page 3: ...cables supported DVD MT8870A Universal Wireless Test Set Supplied accessory Useful if you have RF Cable RF cable with N type connector both ends Used in Chapter 3 Checking Operations 1 3 Terms The ter...

Page 4: ...to read DVD R Memory 1 GB or more HDD Free Space 200 MB or more Display resolution of 1024 768 pixels or better PDF Viewer Interface 1 Ethernet or GPIB 1 An Ethernet connection is recommended for ini...

Page 5: ...test Utility Tool from the Anritsu Web site as described in Chapter 4 2 4 Changing PC Network Configuration The Utility Tool can control the MT8870A via both GPIB and Ethernet but functions requiring...

Page 6: ...2 168 1 x where x is 1 to 4 change the IP address to 192 168 1 100 to match the network configuration Note In this description the PC IP address is set to 192 168 1 100 but any IP address in the range...

Page 7: ...cable The MT8870A has Ethernet connectors at front and back Use either one 2 6 Starting Utility Tool Double click the Utility Tool icon on the PC desktop Click IPv4 to display the Network interface s...

Page 8: ...as described below Click Configure Network at the Select Interface Function Tree 1 Change the settings to match the network environment 2 Click Apply to set the new network settings at the MT8870A an...

Page 9: ...to control the MT8870A over GPIB 1 Select the chassis from the Select Interface Function Tree and click Maintenance Settings 2 Set the GPIB address and Delimiter Terminator for each module 3 Click Ap...

Page 10: ...directory containing the new firmware 3 Select the firmware file 4 Click Upgrade 5 The Progress screen displays the upgrade execution status MU887000A status indicator lamps 1 to 6 blink during the up...

Page 11: ...cific modules 1 Select the chassis and click Upgrade Firmware 2 Click Browse to select the directory containing the new firmware 3 Select the firmware file 4 Check un check the module s for firmware u...

Page 12: ...Files 2 Click Browse to select the directory containing the waveform file 3 Select the waveform file 4 Select the destination module 5 Click Transfer Note The waveform file installed at factory shipm...

Page 13: ...installers in the folder MT8870A Installer CombiView on the accessory DVD See Chapter 2 in the PDF document mx880052a_opm_e_xxx pdf in the folder MT8870A Manual English for the installation instructio...

Page 14: ...are is described below 1 At the software selection screen double click Cellular Common Spectrum Monitor to display the Spectrum Monitor screen 2 Set the parameters shown below Next configure the Vecto...

Page 15: ...rm does not have a peak check the following RF cables connected to correct port set at Input Port Output Port at Spectrum Monitor screen Level and Frequency settings of Spectrum Monitor match settings...

Page 16: ...en double click Short Range Wireless Bluetooth WLAN to start the SRW Applet screen 2 Select Configure VSG from the menu bar to display the Configure VSG screen 3 Set the parameters as shown below If t...

Page 17: ...ement If the waveform does not have a peak check the following RF cables connected to correct port set at VSA VSG Port in SRW Applet screen Power and Frequency settings of CW Analysis match VSG settin...

Page 18: ...manuals by registering the user and product at the Anritsu Web site A notification email is sent when software and operation manuals are updated 4 1 If You Do Not Have Anritsu ID First register the u...

Page 19: ...19 3 Input the required information and click NEXT...

Page 20: ...20 4 Input the 6 digit confirmation code sent to your email address and click Submit...

Page 21: ...21...

Page 22: ...ribed in section 4 1 Go to http www anritsu com and follow the steps listed below to register the purchased MT8870A Log in to My Anritsu and Select Register My Product Input the Model Number and Seria...

Page 23: ...23 5 Enter the serial number of the MT8870A you purchased and click ADD Once the serial number is confirmed click Submit to complete registration 2 1 3...

Page 24: ...te Navigate to the software download page shown below 1 Visit http www anritsu com 2 Log in to My Anritsu 3 Select MY PRODUCTS 4 Select MT8870A as the filter condition and click Update 5 Click MT8870A...

Page 25: ...ration for details Product registration may take a few days to confirm the details Trademarks and Registered Trademarks Microsoft and Windows are registered trademarks of Microsoft Corporation in the...

Page 26: ...hone 43 0 1 717 28 710 United Arab Emirates Anritsu EMEA Ltd Anritsu A S 2106 Singapore Anritsu Pte Ltd 11 Chang Charn Road 04 01 Shriro House Singapore 159640 Phone 65 6282 2400 Fax 65 6282 2533 Viet...

Reviews: