AMULET
HOTKEY
solutions you can bank on
®
®
www.amulethotkey.com
K4u
Overview
The K4u is a multi-platform keyboard, mouse and audio switch. It allows up to
four
computers to be controlled from a single keyboard and mouse. It will mix or switch
four sources of audio to one pair of powered speakers. Any combination of USB, Sun
TM
or PS/2
TM
compatible keyboard and mouse.
The K4u also supports PC Sharing (when connected to a second K4u) and USB hot-plug
device switching.
TO PREVENT ELECTRIC SHOCK, DO NOT EXPOSE THIS
DEVICE TO RAIN OR HUMIDITY.
In the Box
Unless ordered in bulk, the K4u will be supplied complete with an external power supply
and cables for connecting up to 4 USB computers. Cables for PS/2 or legacy Sun
computers must be ordered separately.
Manuals and updates
Full operating instructions in a portable document format and the latest firmware for
the K4u can be found on the appropriate page of the Amulet Hotkey website.
Preparation
Before starting, take time to read through this quick start guide even if you have seen
it before. There may be some important changes documented.
The K4u is a robust device and the order of connection is not critical. If USB connections
are being used, there is no need to power down the computers that will be connected
to the K4u.
Whilst the K4u can be powered from any one or more of the attached computers, we
recommend that the supplied PSU is used. This is designed to provide enough power
for a wide variety USB peripherals. The supply provided by a computer may be limited.
During configuration you may need to access the DIP switches located on the base of
the K4u. It is therefore advisable to do configure the K4u before it is mounted in any
kind of bracket or inaccessible location.
Configuration
Out of the box, the simplest way to configure the K4u ready for use is to set the DIP
switches located on the underside of the unit. A comprehensive guide to the function
of the DIP switches and the default settings can also be found on the base of the unit
and will provide a useful reference in the event that this document is misplaced. A chart
detailing the function of the DIP switches and options available is included on page two
of this quick start guide.
Indicators
The K4u is fitted with front panel status indicators which are used to show which channel
is currently selected and to provide information about each of the attached computers.
The indicators use colour codes to communicate this information. The codes used are
as follows:
LED Colour
Description
Blue
USB computer on indicated channel
Green
PS/2 computer on indicated channel
Red
Legacy Sun computer on indicated channel
Pink
Unknown or powered down system on indicated channel
Flashing
Audio muted on indicated channel
●
Connect computers (up to a total of four) to the rear panel ports of the
K4u connect only the PS/2, legacy Sun or USB ports for each, not both
●
Optionally, connect audio cables from the computers to the K4u rear
panel audio ports
●
Connect monitors directly to the computers in the usual way (the K4u
does not support video switching)
●
Attach a keyboard, mouse and (optionally) speakers to the K4u front
panel
●
Power up the system
Operation
The K4u will direct the output from an attached keyboard and mouse to one
AND ONLY ONE of the connected computers. The K4u front panel indicators
show which computer (channel) is currently the focus of keyboard and mouse
data. To select a different computer (channel) as the focus:
●
Use the keyboard hot-keys. For example, Hold down Alt + Space then
press:
!
Quick Start Guide
/
*
*Or legacy Sun computer.
●
Use the mouse (eg. Hold down the centre button then press one of the
other buttons)
●
Quickly press the ‘Scroll Lock’ key twice
●
Attach and operate a K4 Controller to the rear panel expansion port
Connections
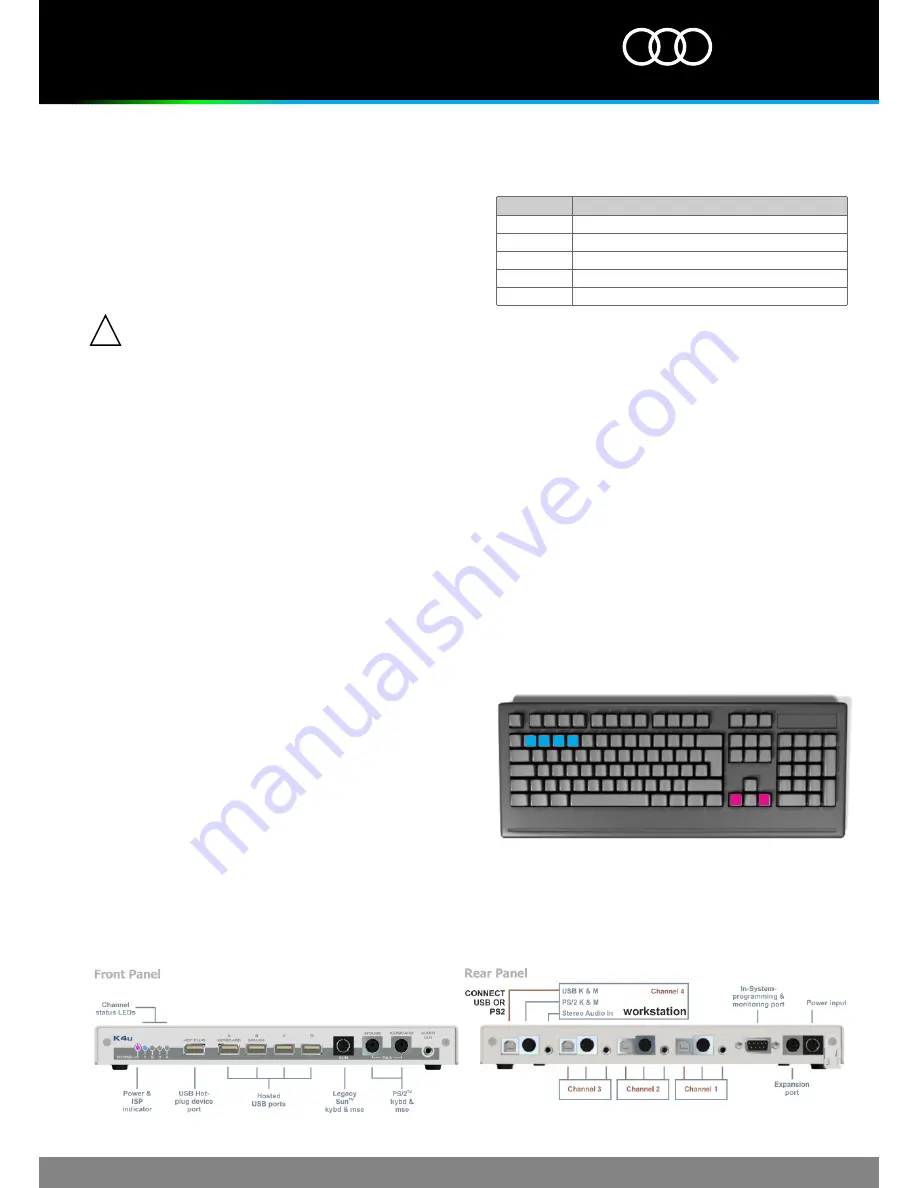
Connection of the K4u to a group of computers is very straightforward: connect
the power supply and computers to the K4u rear panel and the keyboard,
mouse and speakers (if used) to the front panel. Using the illustration on this
page as a guide:


